“When you first take on industrial equipment, the three letters CANopen feel like a threshold.”“In fact, it’s not that mysterious; it just needs someone to guide you in.”—— From the blood and tears of a bald engineer
🟧 1. Why Learn CANopen?
If you are working on:
-
AGVs, small vehicles, AMRs
-
Robotic arms
-
Motor drivers
-
Sensor networks
-
PLC peripheral expansion
-
Industrial robots…you can hardly escape CANopen.
Why is it so popular? In one sentence:
Because the most important thing in an industrial site is: stability.
The biggest features of CANopen are:
-
Strong anti-interference capability
-
High bus reliability
-
Easy expansion with multiple nodes
-
Stable real-time performance
-
Independent of operating systems
No complex TCP handshakes, no chaotic address conflicts like RS-485. As long as you do the wiring and terminal resistors correctly, it can run stably for many years.
This is why:AGV motion control almost exclusively uses CANopen.
🟧 2. What is the Relationship Between CAN and CANopen?
One of the most confusing points for beginners:
CANopen is not CAN! CAN is the physical layer & data link layer CANopen is a protocol family built on top of CAN
It can be understood this way:
| Level | Meaning |
|---|---|
| CAN (Lower Layer) | Responsible for sending 8-byte data. Similar to “the courier is only responsible for delivering the package.” |
| CANopen (Upper Layer) | Specifies what data to include, how to interpret it, and when to send it. Similar to “the recipient address and item list on the delivery note.” |
So:
-
CAN is the pipeline
-
CANopen is the specification
To make the driver “move,” it is not enough to just send raw data via CAN; you need CANopen to tell it whether this 8-byte data is a “speed command” or a “control word.”
🟧 3. What Components Make Up CANopen?
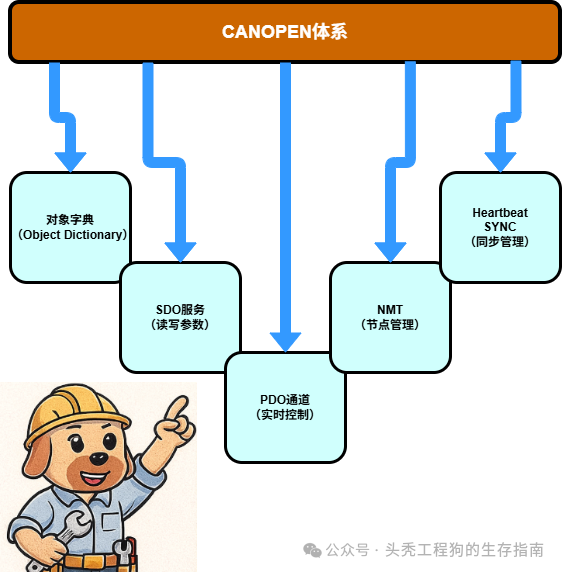
The CANopen system actually consists of 6 main components:
-
Object Dictionary
-
SDO Service (Read/Write Parameters)
-
PDO Channels (Real-time Control)
-
NMT (Node Management)
-
Heartbeat
-
SYNC (Synchronization)
To summarize in one sentence:
SDO is used to read and write parameters, PDO is used for real-time control. NMT manages states, SYNC manages rhythm, and Heartbeat manages disconnections.
As long as you remember this sentence, you have already mastered 50% of the basics.
🟧 4. What is CANopen Suitable For (and Not Suitable For)?
✔ Very Suitable For:
-
Motor control (CiA402)
-
Multi-driver synchronized motion
-
Sensor networks
-
AGV / AMR chassis
-
Actuators & industrial subsystems
✘ Not Suitable For:
-
Large data volume transmission (e.g., images)
-
High-speed motion control (>10kHz synchronization, EtherCAT is recommended)
-
Complex network topologies (not as good as Ethernet protocols)
In one sentence—CANopen is positioned as a “reliable medium-speed industrial control bus.”.
🟧 5. Common Roles in CANopen: What are Node ID, Index, and COB-ID?
📌 Node ID: Node Number
Values range from 1 to 127 Each driver, sensor, or I/O module is considered a Node.
📌 Index / Sub-index: Object Dictionary Number
For example:
-
0x6040 — Control word
-
0x6041 — Status word
-
0x6060 — Mode
-
0x607A — Target position
-
0x60FF — Target speed
These are like “parameter addresses.”
📌 COB-ID: ID of CAN Message
CANopen messages are defined based on COB-ID:
-
SDO: 0x600 + NodeID / 0x580 + NodeID
-
PDO: 0x180, 0x200, 0x280, 0x300 …
Knowing this allows you to analyze packet captures.
🟧 6. What Does a Minimal Running CANopen System Look Like?
A minimal demo includes:
-
1 CAN cable (CANH, CANL)
-
2 120Ω terminal resistors
-
1 PC (your development machine)
-
1 CAN to USB converter (e.g., PEAK-CAN)
-
1 driver (supports CANopen)
Once you connect the wires properly, insert the terminal resistors, and ensure the baud rate is consistent— you can run SDO and PDO.
🟩 7. Practical: Get Your First CANopen Communication Running in 5 Minutes
Here is the initial “Hello world.”
📌 Step 1: Install python-canopen
pip install canopenpip install python-can📌 Step 2: Connect Your CAN Device
Using PEAK-CAN as an example:
import canopennetwork = canopen.Network()network.connect(bustype='pcan', channel='PCAN_USBBUS1', bitrate=500000)📌 Step 3: Add a Node (Assuming Node ID=8)
node = network.add_node(8, "device.eds")📌 Step 4: Read Device Information
manufacturer = node.sdo[0x1008].rawrevision = node.sdo[0x100A].rawprint("Device Name:", manufacturer)print("Version:", revision)Output similar to:Device Name: XYZ Servo DriveVersion: V1.23This is your first CANopen SDO!🟧 8. Next Article Preview
“The 8 Core Concepts of CANopen: Explained with Comics for Engineers”