When it comes to GPS tracking, many people’s first reaction is that it is complicated: collecting latitude and longitude, setting up servers, databases, and drawing trajectories on a webpage. For an engineer looking to quickly validate an idea, these “infrastructures” can be more troublesome than the hardware itself.
This project offers a refreshing approach:
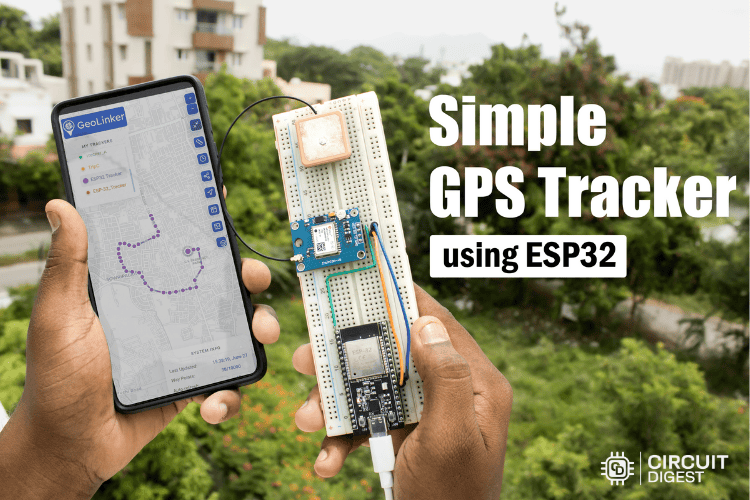
Using ESP32 + Neo-6M GPS module, let the GeoLinker API handle data collection, cloud uploading, and trajectory visualization, while you focus solely on the front-end hardware and device-side logic.
1
Project Overview: Drawing Trajectories on a Cloud Map with ESP32
This project is a trajectory recorder based on the ESP32 + Neo-6M GPS module: The ESP32 collects NMEA data from the GPS module and uploads the coordinates to the cloud GeoLinker service via Wi-Fi, allowing the route with timestamps to be viewed in a browser.
The parameters provided by the author are approximately:
-
Setup time: 3–5 hours
-
Cost: $20–30 (ESP32 + Neo-6M + miscellaneous components)
-
Difficulty: Beginner – Intermediate
-
Applicable scenarios:
-
Vehicle/electric bike positioning
-
Personal/asset tracking
-
Simple motion trajectory recording
-
Outdoor experimental equipment location recording
2
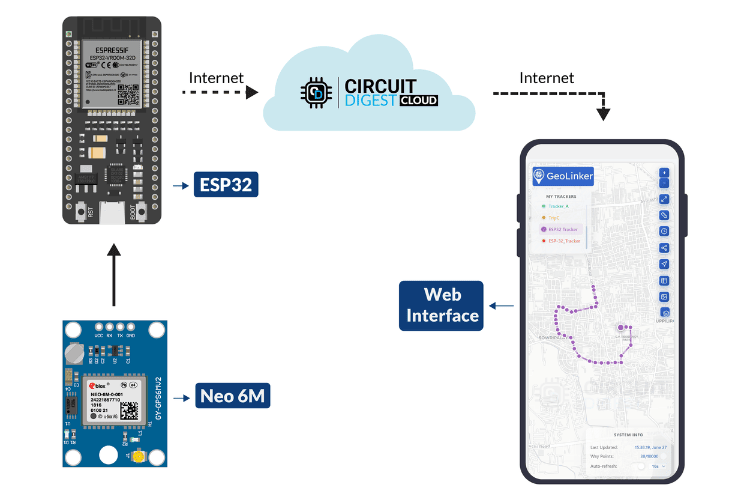
Working Principle: ESP32 + GeoLinker Cloud Visualization
The system is divided into three parts:
-
Front-end Hardware: ESP32 + Neo-6M GPS
-
Neo-6M continuously outputs NMEA sentences (latitude, longitude, time, satellite status, etc.);
-
ESP32 reads this data using UART1.
ESP32 Logic:
-
Parse NMEA → Extract latitude, longitude, time, etc.;
-
Package data points based on update intervals;
-
Report location information via HTTP calls to the GeoLinker API;
-
If the network is interrupted, cache the data in memory buffer first.
Cloud GeoLinker Service:
-
Store each point by device ID;
-
Draw the trajectory as a polyline on the web page, allowing timestamps and paths to be viewed;
-
Provide a simple routing and visualization interface.
The project also implements a very useful feature:
Cache data when offline, and after the network is restored, upload the offline data first before continuing real-time uploads.
This is very practical for devices that often run in unstable network environments (such as outdoor electric bikes or field experimental boxes).
3
Hardware List and Circuit Connections
Hardware List
-
ESP32 Development Board × 1
-
Neo-6M GPS Module × 1
-
LED × 2 (used for network/GPS status indication)
-
1 kΩ Resistor × 2 (current limiting)
-
Breadboard × 1
-
Several Dupont Wires
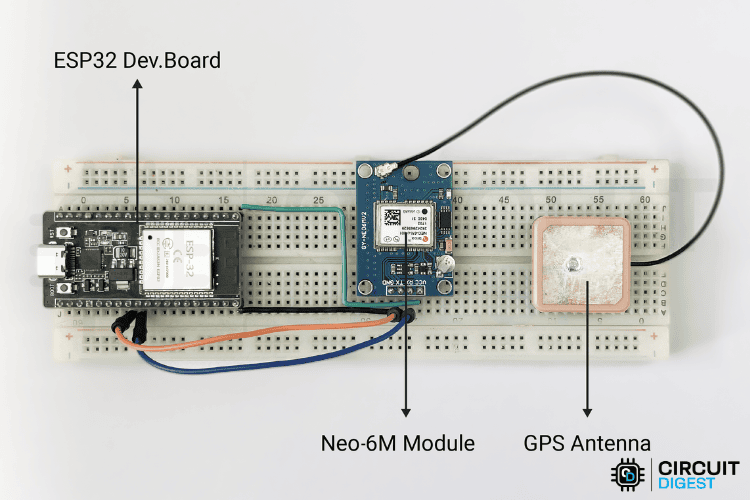
Power Supply and Communication:
-
ESP32 is powered via USB;
-
Neo-6M is powered by the ESP32 with 3.3 V;
-
Communication is through UART1:
-
GPS TX → ESP32 RX (GPIO16)
-
GPS RX → ESP32 TX (GPIO17)
-
Baud rate 9600 bps, which is a common rate for most NMEA GPS modules.
The author used HardwareSerial(1) instead of software serial: continuous streaming GPS data requires high reliability, and hardware serial can reduce packet loss.
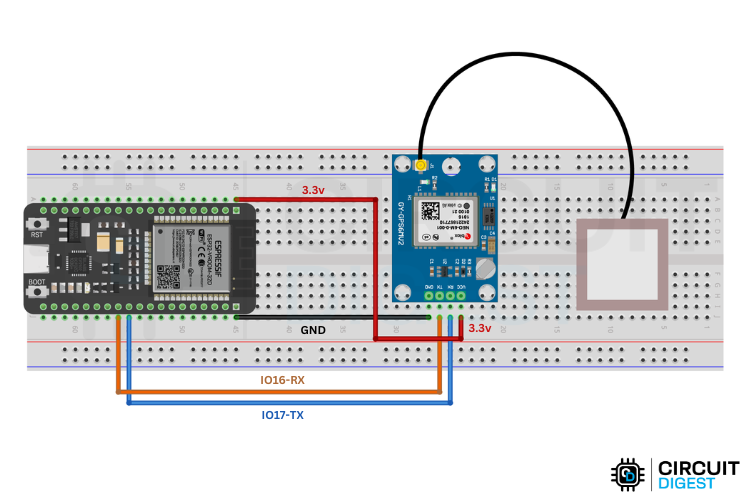
In the project diagram, two LEDs are connected to the ESP32’s IO for network/GPS status indication. The overall layout is ESP32 + Neo-6M + antenna arranged in a row on the breadboard, making it easy to hold and measure while walking.
4
GeoLinker Cloud Configuration: Obtain API Key First
Before writing code, you need to prepare your GeoLinker account and API Key. The general steps are:
-
Register and log in to CircuitDigest Cloud;
-
Go to the “My Account” page;
-
After completing the captcha, click “Generate API Key”;
-
The page will provide a line with an expiration date and usage count for the API Key, which can be copied directly.
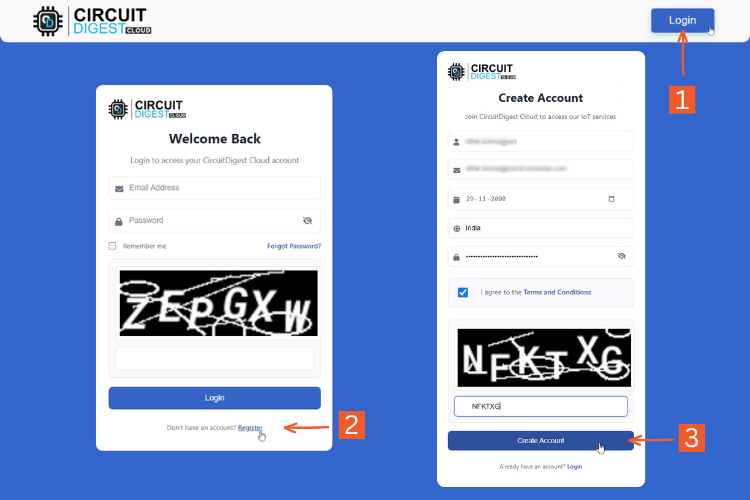
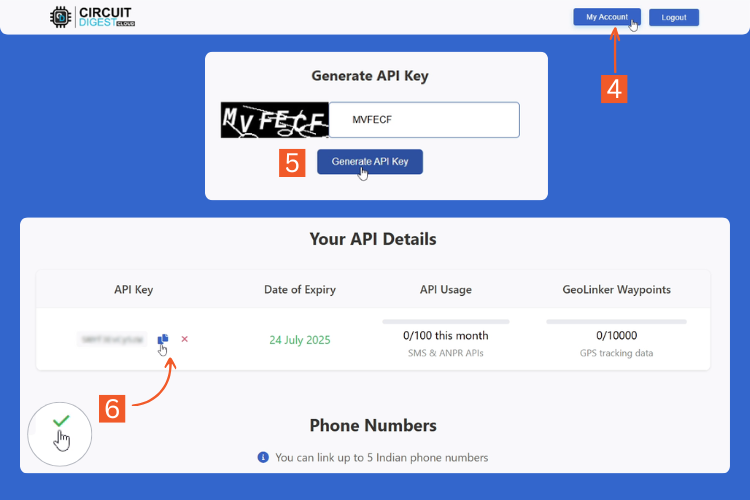
The current official limits are:
-
Each Key can upload 10,000 GPS data points;
-
Once used up, a new Key can be generated to avoid overloading the server with a single Key.
When writing code, simply replace:
const char* ssid = "yourSSID"; const char* password = "yourPASSWORD"; with your own Key and device name. The deviceID is used to distinguish different devices, such as multiple vehicles in a fleet.
5
Arduino Code Structure Breakdown
The project directly uses the Arduino framework to write ESP32 code and comes with a GeoLinker official library that encapsulates GPS parsing, HTTP uploading, caching, and reconnection.
1. Library Inclusion and Hardware Configuration
#include <GeoLinker.h> HardwareSerial gpsSerial(1);#define GPS_RX 16 #define GPS_TX 17 #define GPS_BAUD 9600 This segment accomplishes two things:
-
Import the GeoLinker library, which includes NMEA parsing, network management, cloud service integration, etc.;
-
Define the UART1 used for GPS and the RX/TX pins.
2. Wi-Fi and GeoLinker Parameters
const char* ssid = "yourSSID"; const char* password = "yourPASSWORD"; const char* apiKey = "xxxxxxxxxxxx"; const char* deviceID = "ESP-32_Tracker"; const uint16_t updateInterval = 5; const bool enableOfflineStorage = true; const uint8_t offlineBufferLimit = 20; const bool enableAutoReconnect = true; const int8_t timeOffsetHours = 5; const int8_t timeOffsetMinutes = 30; Key points:
-
<span><span>updateInterval</span></span>: Upload interval (5 seconds in this example; the code has also been tested with 2 seconds); -
<span><span>enableOfflineStorage</span></span>: Whether to enable offline caching; -
<span><span>offlineBufferLimit</span></span>: Maximum number of cached entries; when full, new data overwrites the oldest data, adapting to the MCU’s memory limitations; -
<span><span>enableAutoReconnect</span></span>: Automatically reconnect to Wi-Fi when disconnected; -
<span><span>timeOffsetHours/Minutes</span></span>: Convert UTC to local time (this example uses UTC+5:30).
3. Initialization: Serial + GeoLinker + Network
In <span><span>setup()</span></span>:
-
Initialize the serial port
Serial.begin(115200);delay(1000);gpsSerial.begin(GPS_BAUD, SERIAL_8N1, GPS_RX, GPS_TX);-
Initialize GeoLinker
geo.begin(gpsSerial); geo.setApiKey(apiKey); geo.setDeviceID(deviceID); geo.setUpdateInterval_seconds(updateInterval);geo.setDebugLevel(DEBUG_BASIC); geo.enableOfflineStorage(enableOfflineStorage); geo.enableAutoReconnect(enableAutoReconnect); geo.setOfflineBufferLimit(offlineBufferLimit); geo.setTimeOffset(timeOffsetHours, timeOffsetMinutes);-
Set the network mode to Wi-Fi and connect
geo.setNetworkMode(GEOLINKER_WIFI); geo.setWiFiCredentials(ssid, password); if (!geo.connectToWiFi()) { Serial.println("WiFi connection failed!");}If Wi-Fi disconnects later, the library will automatically attempt to reconnect based on <span><span>enableAutoReconnect</span></span>.
4. loop(): One Line to Handle the Main Loop
uint8_t status = geo.loop();All logic is encapsulated in <span><span>geo.loop()</span></span><code><span><span>:</span></span>
-
Continuously read NMEA data from the GPS serial port;
-
Parse latitude, longitude, time, satellite information;
-
Check GPS positioning quality;
-
Determine if Wi-Fi is online;
-
If online: immediately send HTTP requests to upload to the cloud;
-
If offline: store in the local buffer, waiting for later upload;
-
Return a status code indicating the current operation result.
The author wrote a <span><span>switch(status)</span></span><span><span> to print prompts:</span></span>
if (status > 0) { Serial.print("[STATUS] GeoLinker Operation: "); // Interpret status codes and provide user feedback switch(status) { case STATUS_SENT: Serial.println("✓ Data transmitted successfully to cloud!"); break; case STATUS_GPS_ERROR: Serial.println("✗ GPS module connection error - Check wiring!"); break; case STATUS_NETWORK_ERROR: Serial.println("⚠ Network connectivity issue - Data buffered offline"); break; case STATUS_BAD_REQUEST_ERROR: Serial.println("✗ Server rejected request - Check API key and data format"); break;-
<span><span>STATUS_SENT</span></span>: Data successfully uploaded to the cloud; -
<span><span>STATUS_GPS_ERROR</span></span>: GPS communication error (check wiring); -
<span><span>STATUS_NETWORK_ERROR</span></span>: Network issue, buffered offline; -
<span><span>STATUS_BAD_REQUEST_ERROR</span></span>: Request rejected by the server (API Key or data format issue); -
<span><span>STATUS_PARSE_ERROR</span></span>: GPS data parsing failed; -
<span><span>STATUS_INTERNAL_SERVER_ERROR</span></span>: Cloud service error.
This set of status codes is very friendly for debugging, allowing quick identification of whether the problem lies in hardware, network, or cloud.
6
Testing Process: Online Trajectory + Offline Cache Verification
The author’s testing steps are also quite practical:
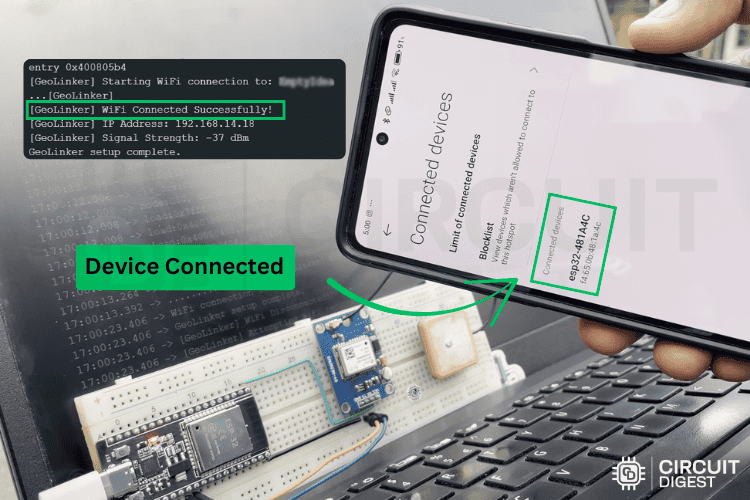
1. Power Supply and Networking
-
Power the ESP32 via USB from a computer;
-
Use a mobile phone as a Wi-Fi hotspot as the router;
-
ESP32 automatically connects to the hotspot.
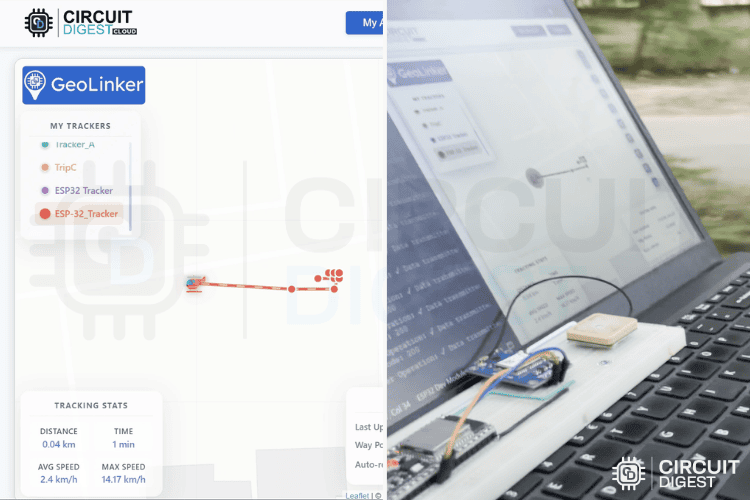
2. Walk Around to Draw the Trajectory
-
Set the upload interval to 2 seconds;
-
Depart from the office and walk a short distance;
-
On the GeoLinker map interface, the route can be seen slowly extending.
3. Test Offline Caching
-
Turn off the mobile hotspot for about 1 minute;
-
During this time, the device continues to collect GPS data, but stores the points in local cache;
-
After turning the hotspot back on, the cached data will be uploaded sequentially, and the system will return to real-time online mode.
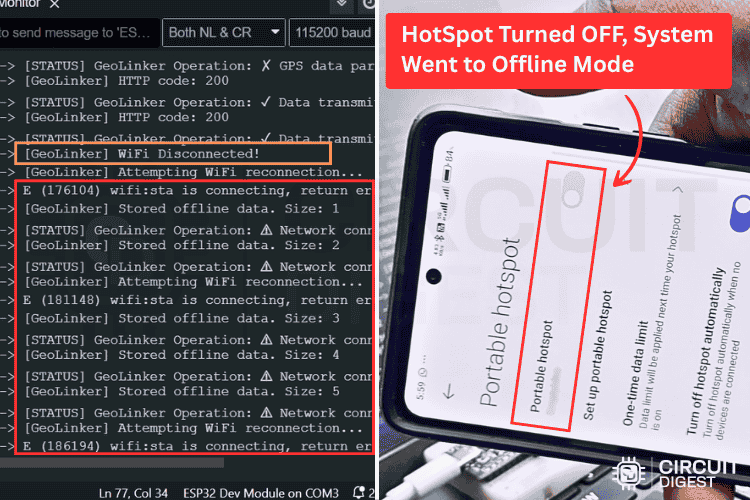
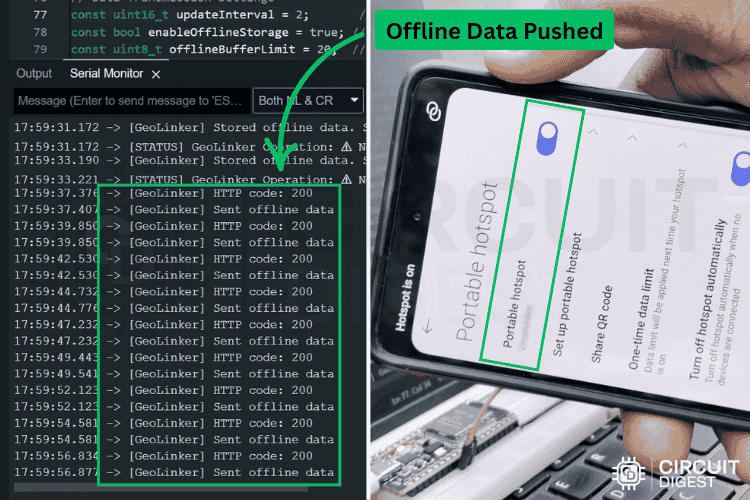
4. Final Result
-
Walked for about 20 minutes;
-
In the end, a complete round-trip path can be seen on the map, with no “broken lines”, proving that the offline upload indeed works.
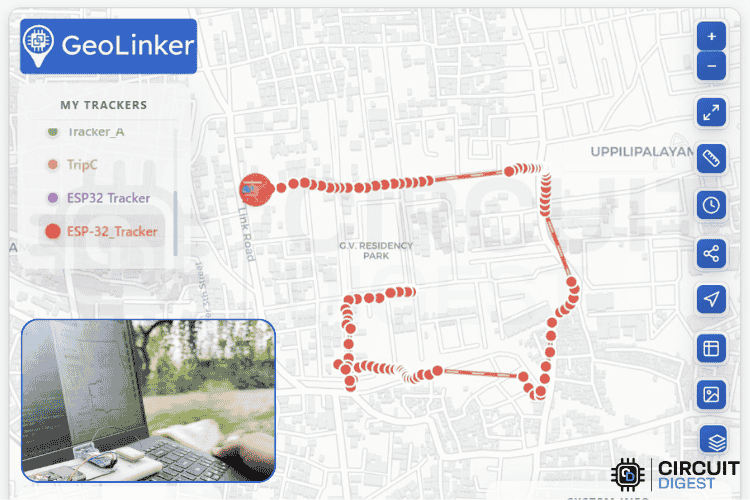
Code is open-sourced on GitHub:https://github.com/Circuit-Digest/Simple-GPS-Tracker-using-ESP32—Visualize-Data-on-Map/tree/main/GPS_Tracker_Code_V2
7
How Can It Be Extended?
If you plan to transform this project into your own product/topic, consider:
-
Using GeoLinker as a backend, binding device IDs and user accounts for unified management of multiple devices;
-
Add a 4G/NB-IoT module for fleet or outdoor asset tracking;
-
Make the upload interval configurable, supporting an adaptive strategy of “low frequency when stationary, high frequency when moving”;
-
Add IMU and accelerometer to create a motion trajectory recorder with posture awareness;
-
Change the breadboard solution to a small PCB + battery + casing, making it a truly portable GPS tag.
8
Conclusion
This project demonstrates a very practical combination approach:
Using a general-purpose MCU (ESP32) + inexpensive GPS module + dedicated cloud API, a complete GPS tracking system with “online visualization + offline caching” can be created in a short time.
For those looking to get started with GPS/IoT, this is a very suitable starting point; for engineers already working on projects, it provides a set of directly applicable cloud architecture + offline strategy.
If you happen to have an ESP32 and Neo-6M on hand, why not replicate it over the weekend, draw your commuting route on the map, and then consider how to productize it.
Note: The above content has been summarized and generated by AI. Feel free to click “Read the original” to replicate it yourself.

Click to read the original for more