Scan to follow Chip Dynamics , say goodbye to “chip” blockage!

 Search WeChat
 Chip Dynamics
 How to Create a New Project
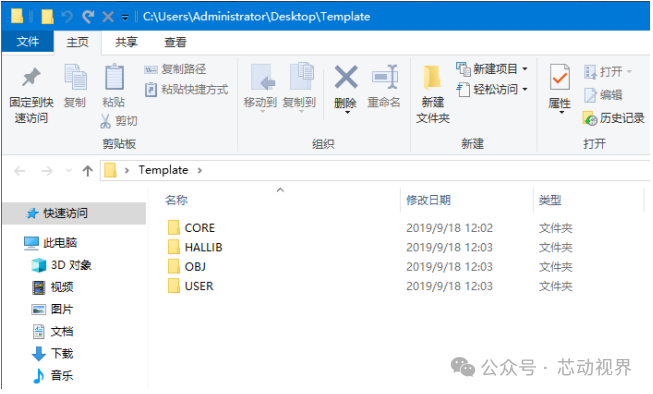
Today we will learn how to create an STM32 project using Keli. Before creating the project, we need to create a folder in a directory on the computer where we can place all the projects we create later. For example, we can create a folder named Template. This will be the root directory for our projects. To facilitate the storage of other files needed for the project, we will also create four subfolders: CORE, HALLIB, OBJ, and USER. The names of these folders can actually be anything; these names are just for easy identification.
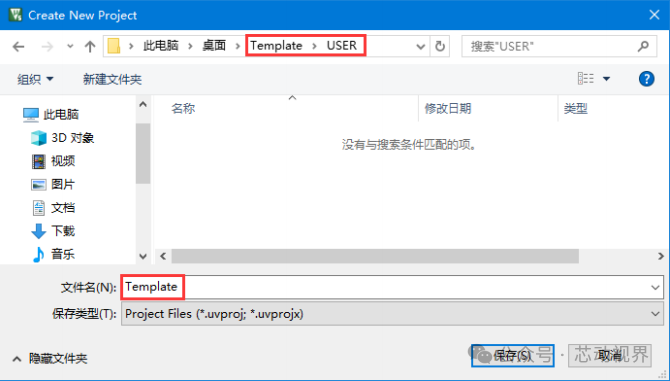
Next, open MDK, click on the menu Project –> New Uvision Project, then navigate to the USER subdirectory under the Template folder we just created, name the project Template, and click save. The project files will be saved in the USER folder.
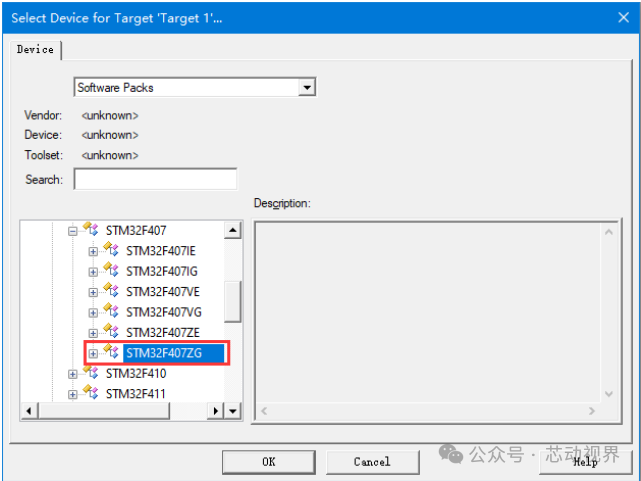
Next, a Device selection interface will appear, where we select our chip model. Here we locate to STMicroelectronics under STM32F407ZGT6, and select STMicroelectronics→STM32F4 Series→STM32F407→STM32F07ZG (if you are using a different series of chips, just select the corresponding model). Make sure to install the corresponding device pack for these options to be displayed.
Click OK, and MDK will pop up the Manage Run-Time Environment dialog.
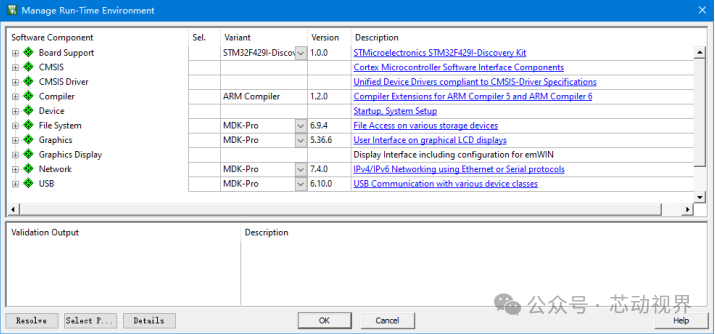
This is a new feature in MDK5, where we can add the components we need to facilitate building the development environment. Just click Cancel to proceed, and you will see the interface as shown in the figure:
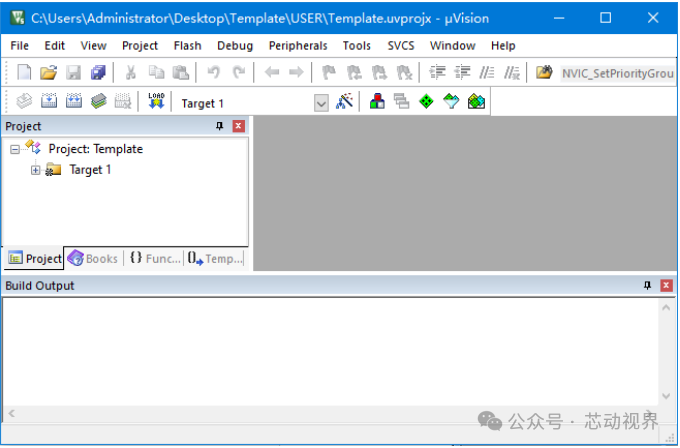
At this point, the contents of the USER directory are as shown in the figure:
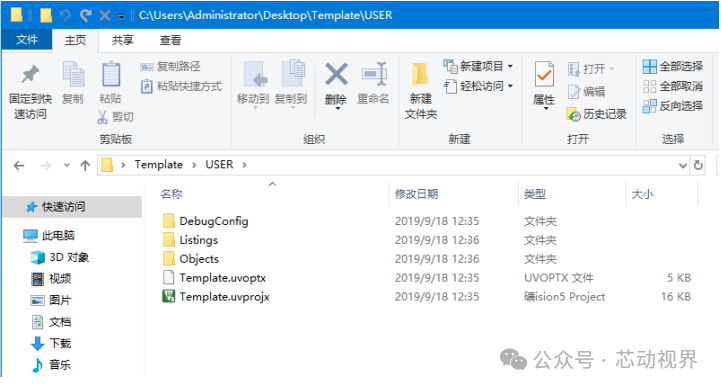
Template.uvprojx is the project file, which is very important and should not be deleted easily. The project files generated by MDK5.20 have a .uvprojx suffix. The DebugConfig, Listings, and Objects folders are automatically generated by MDK. The DebugConfig folder is used to store some debugging configuration files, while the Listings and Objects folders are used to store some intermediate files generated during the MDK compilation process.
How to Add Project Files
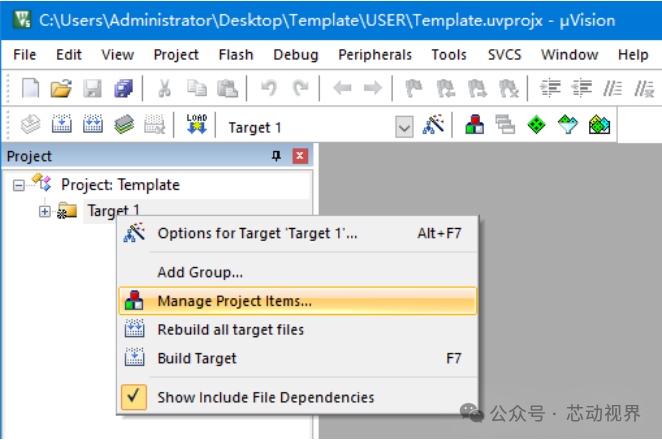
Right-click on Target1 and select Manage Project Items, as shown in the figure below:
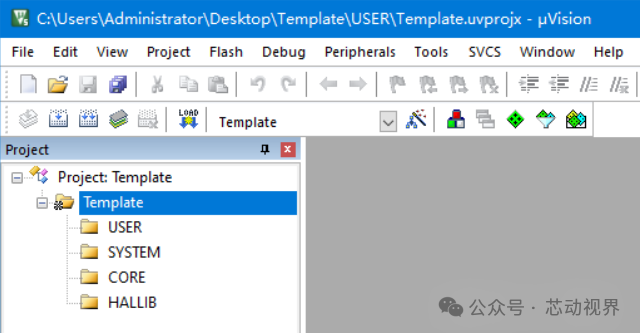
In the Project Targets section, we will change the Target name to Template, then in the Groups section, delete one Source Group1, and create four Groups: USER, SYSTEM, CORE, and HALLIB. Then click OK, and we can see our Target name and Groups as shown below:
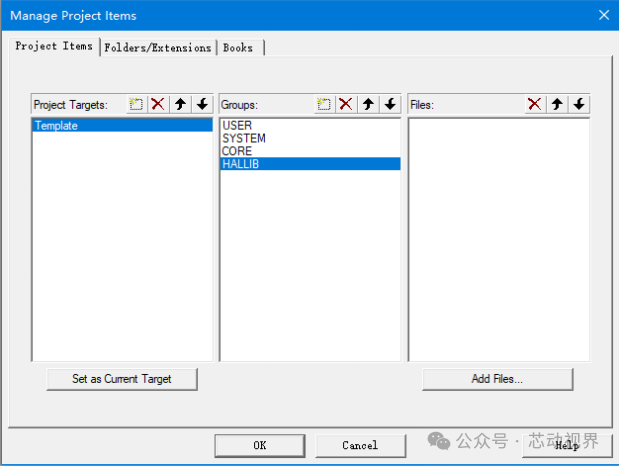
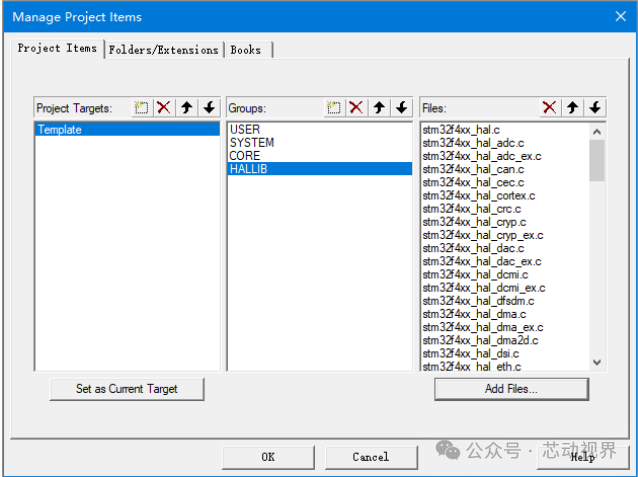
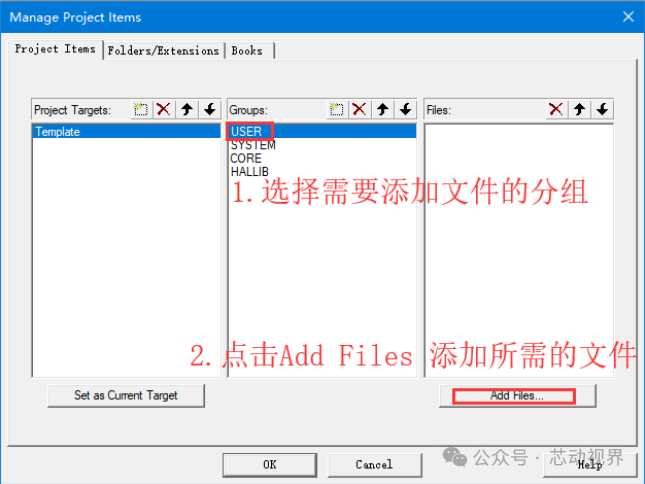
Next, we will add the files we need to the Group. Right-click on Template, select Manage Project Items, then select the Group where we want to add files. Here, we first select HALLIB, then click Add Files on the right, navigate to the directory \HALLIB\Src we just created, select all the files inside (Ctrl+A), then click Add, and then Close. We can see that the Files list now includes the files we added.
 Setting Header File Paths
Next, we need to set the header file storage paths in MDK. This means telling MDK where to look for the included header files. This step is very important. If the header file paths are not set, the project will report errors indicating that the header files cannot be found.
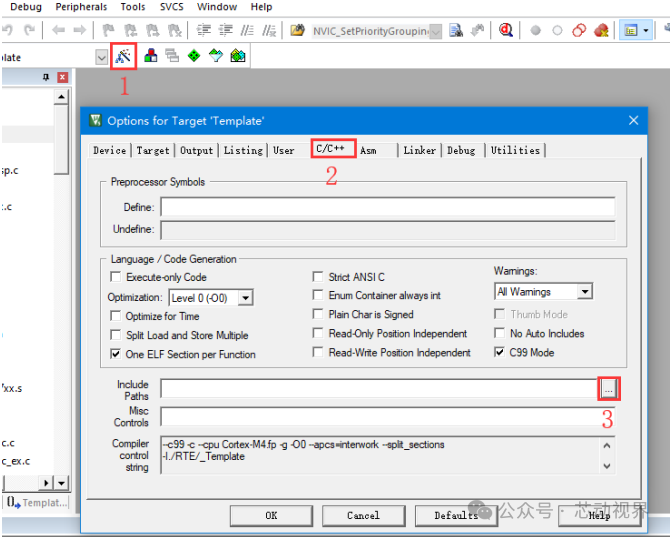
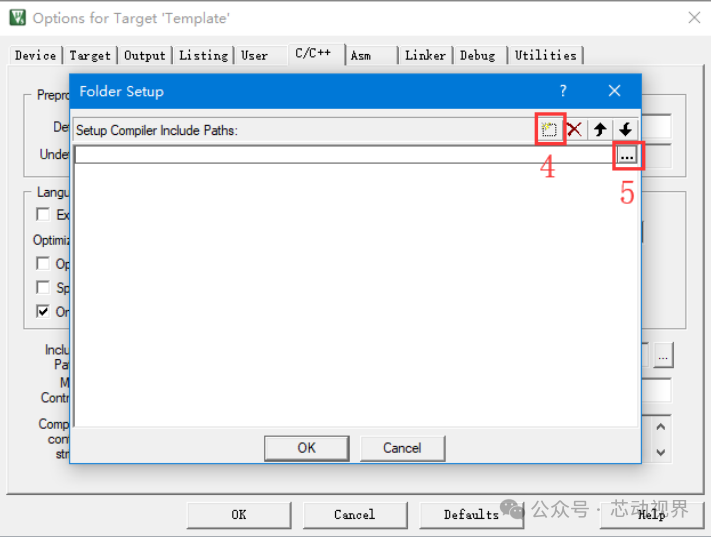
The paths added here must be the last level of the directories where the header files are located. For example, if there are three subfolders under the SYSTEM folder, each containing .h header files that need to be used in the project, we must include all three subdirectories. The header file paths we need to add include: \CORE, \USER\, \SYSTEM\delay, \SYSTEM\usart, \SYSTEM\sys, and \HALLIB\Inc.
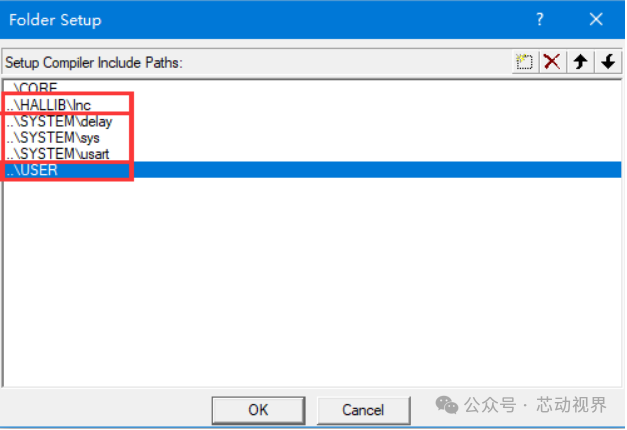 Adding Global Macro Definitions
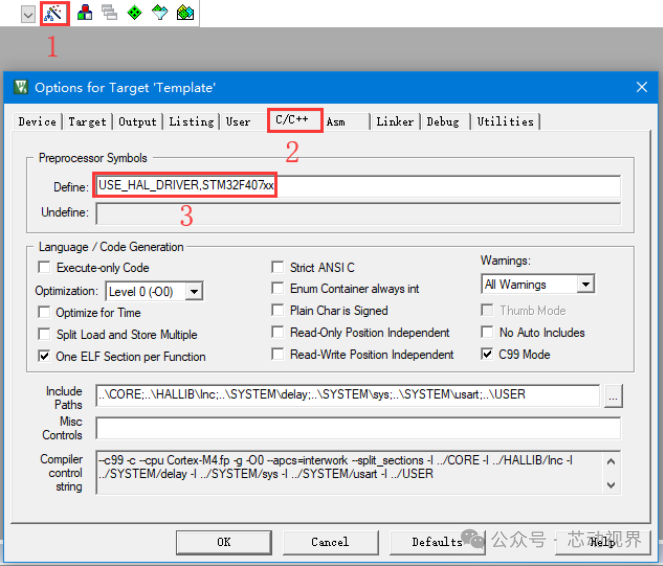
Next, for the STM32F407 series project, we also need to add global macro definition identifiers, which are visible anywhere in the project. The method to add them is to click on the magic wand, then go to the C/C++ tab, and in the Define input box, enter: USE_HAL_DRIVER,STM32F407xx. Note that there are two identifiers USE_HAL_DRIVER and STM32F407xx, separated by a comma.
 Selecting the Directory for Compiled Intermediate Files
Next, we need to compile the project. Before compiling, we first need to select the directory where the compiled intermediate files will be stored. As mentioned earlier, the default directory for MDK to store compiled intermediate files is the Listings and Objects subdirectories under the USER directory. We can choose to store them in the OBJ directory instead. The method is to click on the magic wand, then select the “Output” option and then “Select folder for objects…”, and choose the OBJ directory we created earlier, then click OK. The operation process is shown in the figure below:
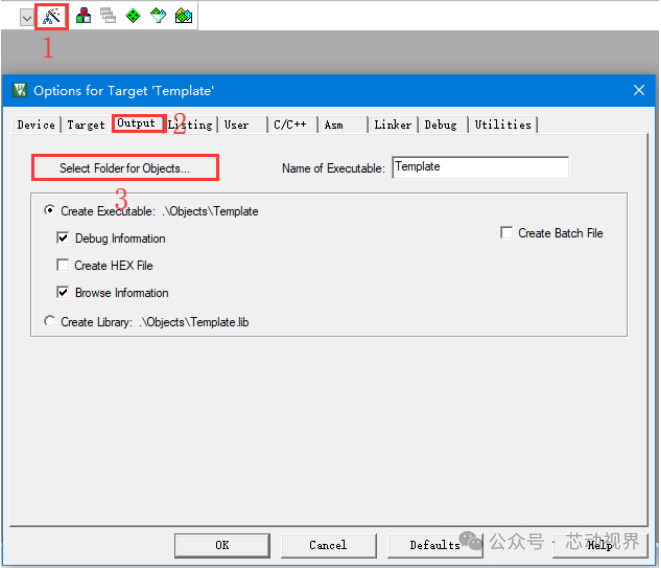
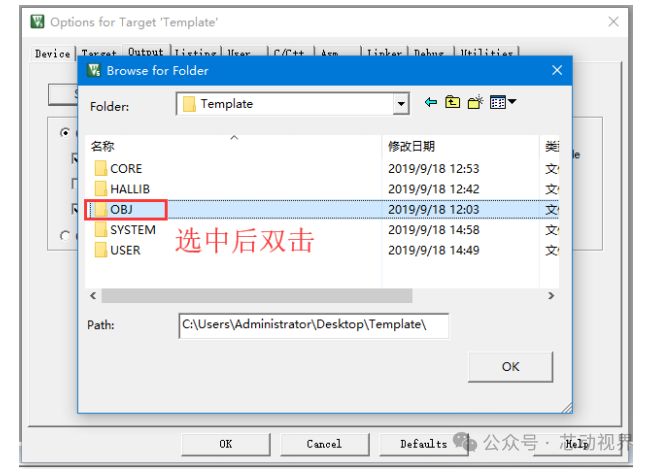
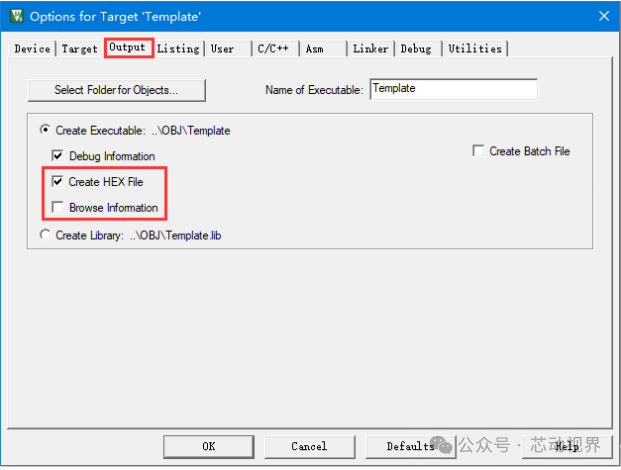
After selecting the OBJ directory as the storage location for compiled intermediate files, click OK to return to the Output tab. Here we also need to check the “Create HEX File” option. Checking the Create HEX File option requires generating a HEX file after compilation. The Browse Information option is checked to facilitate viewing some function variable definitions in the project. However, checking this option with the HAL library can significantly slow down compilation speed, so to speed up development, we can leave it unchecked. The specific operation method is shown in the figure below:
 Compiling the Program
Now we click the compile button to compile the project files.
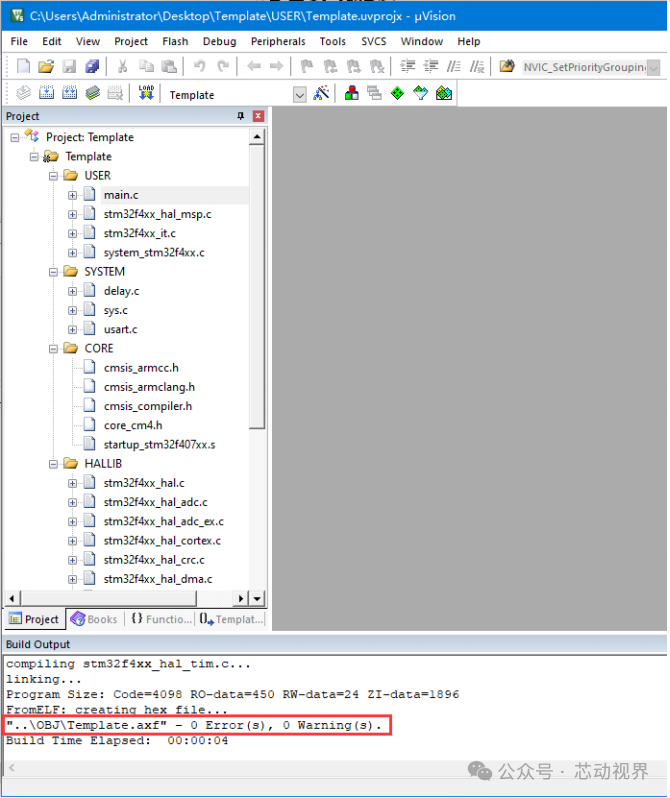
After compilation, there will be a warning: “warning: #1-D: last line of file ends without a newline”. We just need to add a newline at the end of the main.c function to resolve this. At this point, a project template based on the HAL library has been successfully created, and a corresponding hex file has been generated in the OBJ directory of the project.


● The Difference Between typedef and #define
● Enumeration Types: The “Human Language Translator” of C Language, Turning Code from “Heavenly Book” to “Chat”
● A Complete Guide to C Language Unions: Memory Reuse, Bit Manipulation, Type Puns, All in One!
● C Language Struct Arrays: A Guide to Managing Data in Batches
If you find this article helpful, please click“Like“, “Share“, and “Recommend“!