This article uses the Simatic S7-1500 and TIA Portal software to control a Siemens three-phase asynchronous motor. In our example, a drive unit needs to be assembled for the motor. The drive unit requires the following components:Simatic S7-15001. G120 Control Unit (CU250S-2PN)2. Power Module (PM240-2)3. Three-phase asynchronous motor with order number 1LE14. Power supplyBefore starting, the following prerequisites must be met:1. The motor should be connected to the control unit and power module as shown in Figure a.2. The control unit should be connected to the S7-1500 via Profinet.3. The S7-1500 should be connected to a computer with TIA Portal Startdrive software.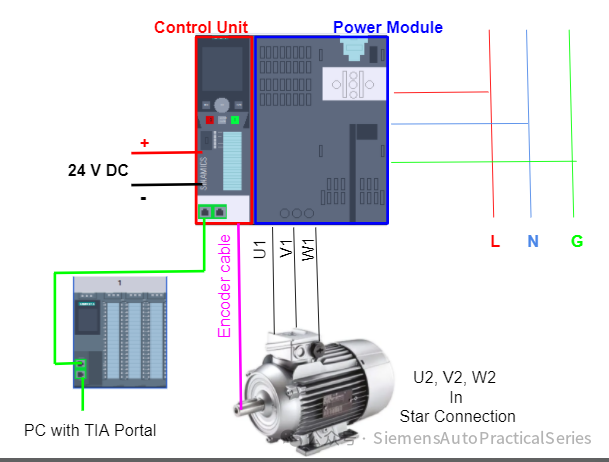 Figure a
Creating a Project in TIA Portal
To create a project in TIA Portal, follow these steps:
Step 1: Create a Project
Open TIA Portal V17, create a new project by specifying a name, and then click “Create” as shown in Figure 1.
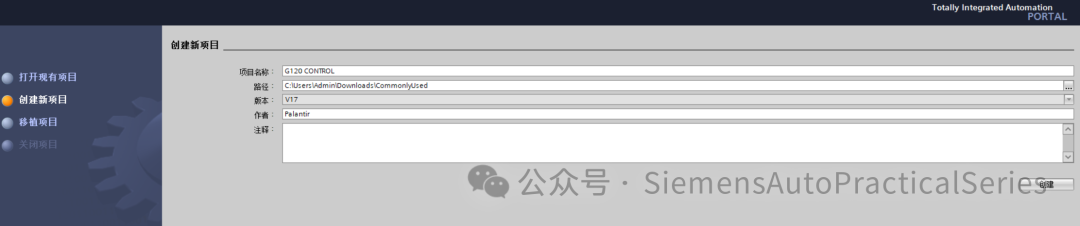 Figure 1
Next, click on “Project View” at the bottom of the window.
Step 2: Add Devices to the Project
Add the control unit and S7-1500 to the project. To do this, go to “Online”, select “Accessible Devices”, as shown in Figure 2.
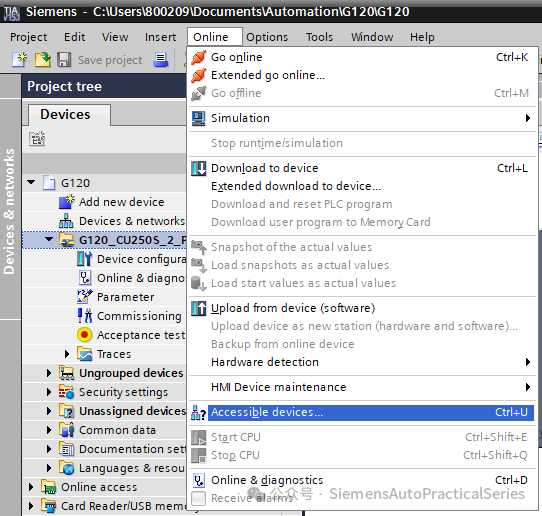 Figure 2Once the software finds the accessible devices, they should be added to the project tree, as shown in Figure 3.
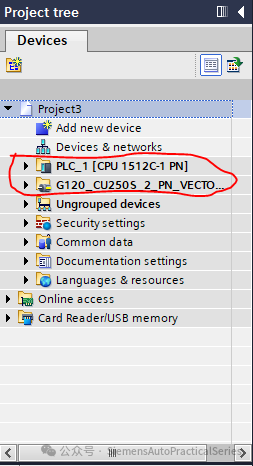 Figure 3
Step 3: Configure the Control Unit
The control unit needs to be configured according to the type of motor connected. To do this, expand “G120_CU250S_2_PN_VECTOR” and select “Debug”, as shown in Figure 4.
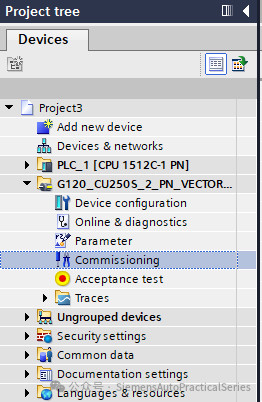 Figure 4Next, follow the steps described in this (not yet updated)
Using Sinamics G120 Control Unit to Control Siemens Three-Phase Asynchronous Motor
to configure the control unit.
Note:We want to control the motor with S7-1500, so do not start the main control, just follow the steps up to Step 4
Step 4: S7-1500 Programming
In this example, we use the “SINA_SPEED” block (see Figure 5). SINA_SPEED is a communication block used to read and write drive data in TIA Portal.
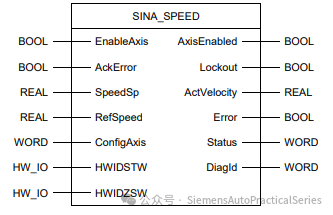 Figure 5
Block Parameters
Input Parameters
- EnableAxis – Start/stop of the drive.
- AcKError – Acknowledge error in the device.
- SpeedSp – Setpoint for speed.
- RefSpeed – Reference speed of the drive.
- ConfigAxis – Allocation of drive control word.
- HWIDSTW – Hardware ID set value.
- HWIDZSW – Actual value of hardware ID.
Output Parameters
- AxisEnabled – Drive is enabled.
- LockOut – Drive’s enable suppression function is activated.
- ActVelocity – Actual running speed.
- Error – Drive fault activated.
- Status – Displays status value.
- DiagId – Extended communication fault.
The SINA_SPEED block can be found in the “Library” section on the right side. As shown in Figure 6, select Drive_Lib_S7_1200_1500 > Main Copy > Sinamics > SINA_SPEED.If not, download the drive library from the official website.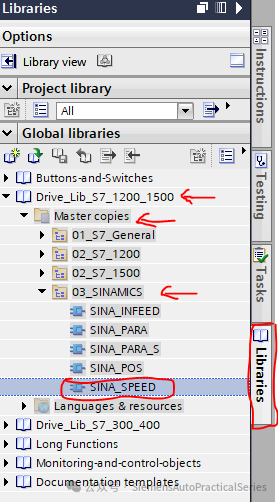 Figure 6Add this block to “Main[OB1]”, located below PLC_1 > Program Blocks as shown in Figure 7.
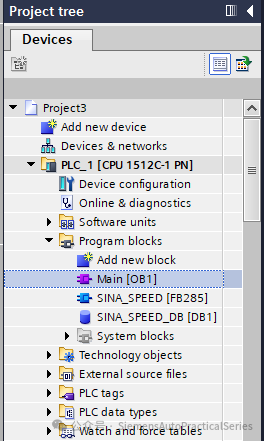 Figure 7We will use the following input fields of the SINA_SPEED block:
- EnableAxis
- SpeedSp
- RefSpeed
- HWDSTW
- HWDZSW
- Create a boolean type tag “start” and assign it to “EnableAxis”, as shown in Figure 8.
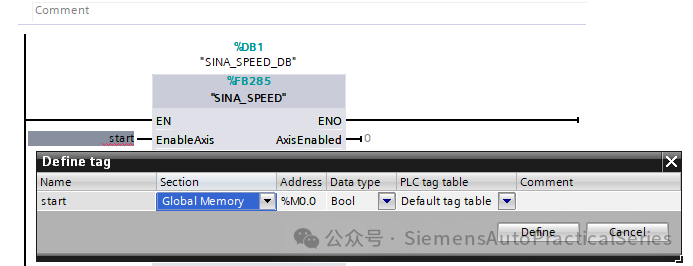 Figure 8
- Create a Real type tag “speed” and assign it to “SpeedSp”, as shown in Figure 9.
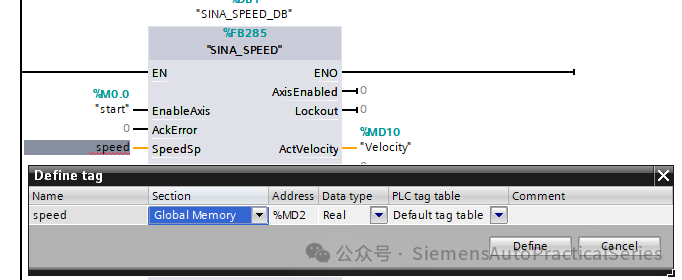 Figure 9
- Input the “RefSpeed” value as 1500. (RefSpeed depends on the motor, check the nameplate of the motor you are using).
- To communicate with the S7-1500, the control unit requires a channel. We have configured Telegram 1 for the communication channel to be used. So assign Telegram 1 as the input for “HWDSTW”. To do this, find the ID of the telegram, which can be found under the “System Constants” in the control unit properties field, as shown in Figure 10.
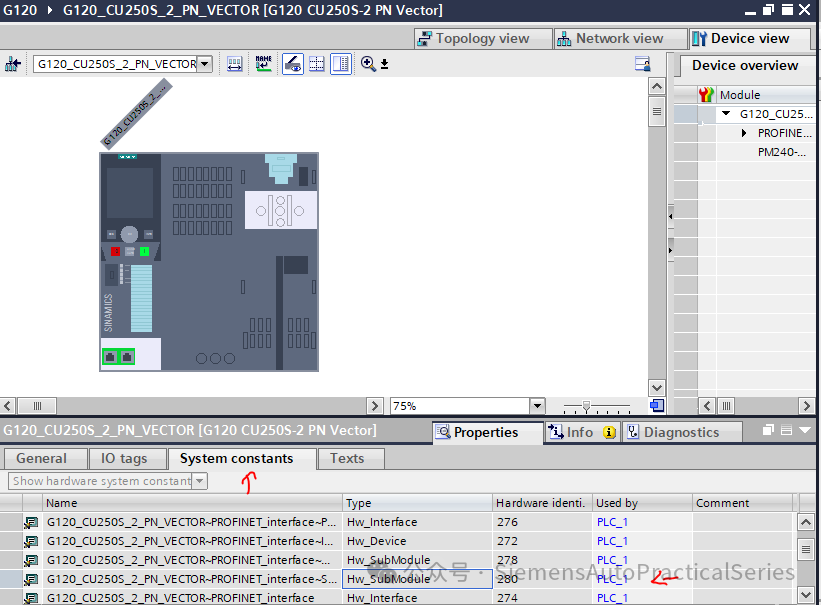 Figure 10
Assign the same Telegram 1 as the input for “HWDZSW”.
After assigning the tags to the SINA_SPEED block, it should look similar to the block shown in Figure 11.
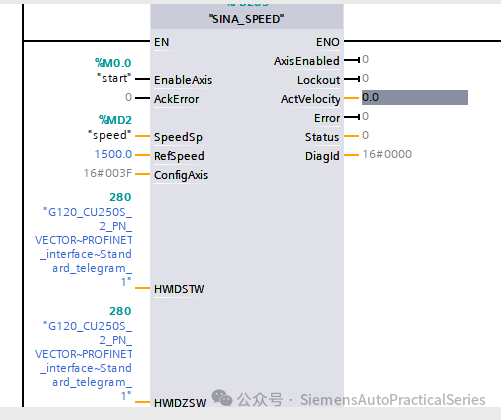 Figure 11
Step 5: Connect the Control Unit to S7-1500
Create a Profinet connection between the control unit and S7-1500 in the “Network View” and “Topology View”, as shown in Figures 12 and 13.
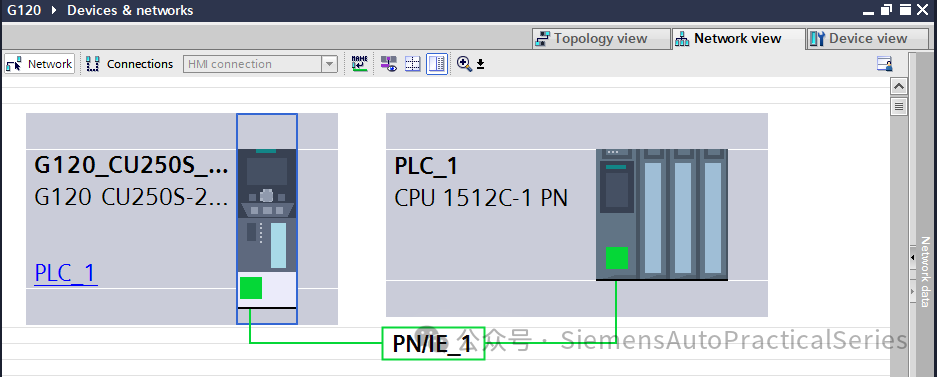 Figure 12
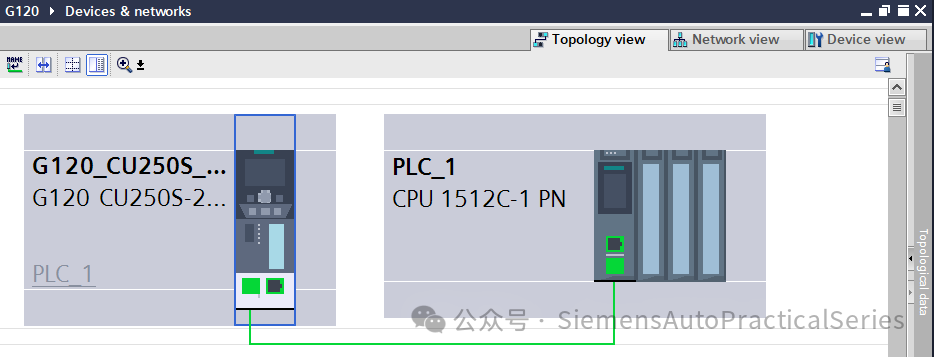 Figure 13
Step 6: Save and Download
Save the project and download it to the control unit and S7-1500.
Step 7: Online
Start your motor online. Right-click the tag “start” and select modify to 1, as shown in Figure 14.
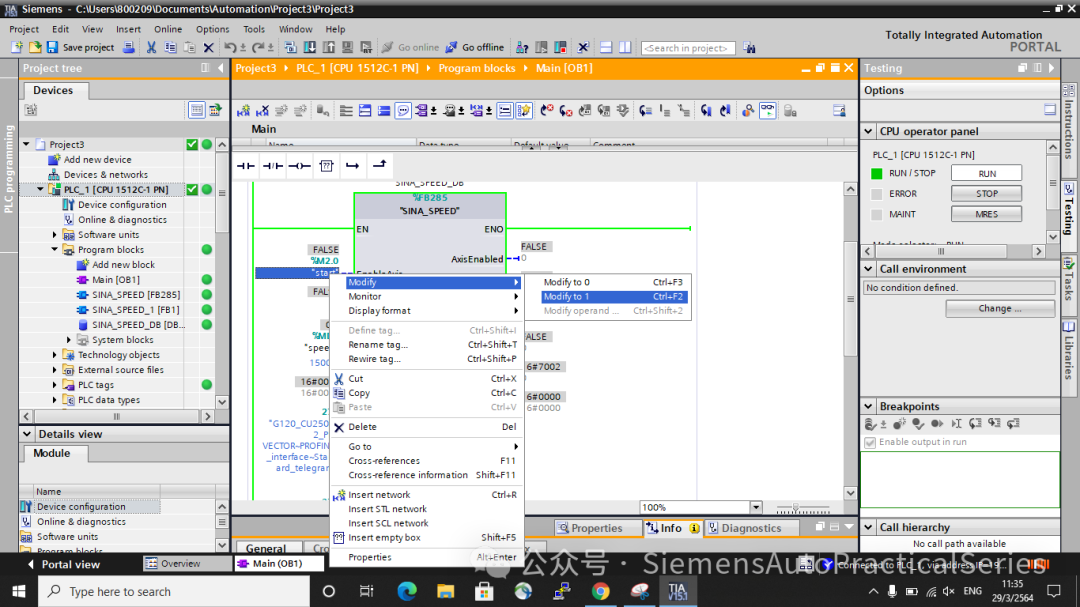 Figure 14Then, right-click the tag “speed” and select modify to set the value. A new window will appear, input the desired speed, and click “OK”, as shown in Figures 15 and 16.
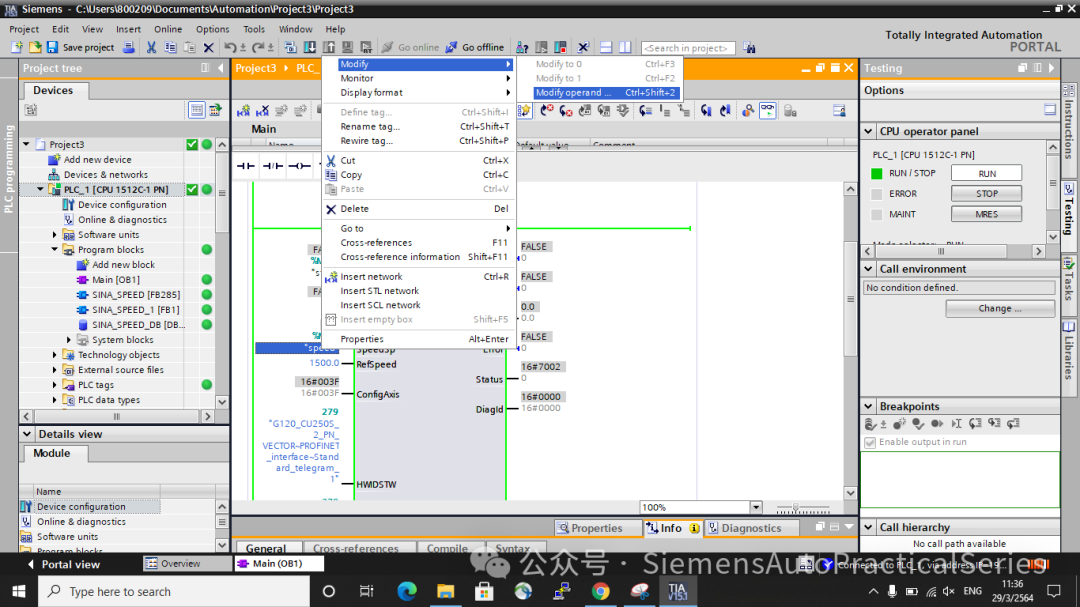 Figure 15
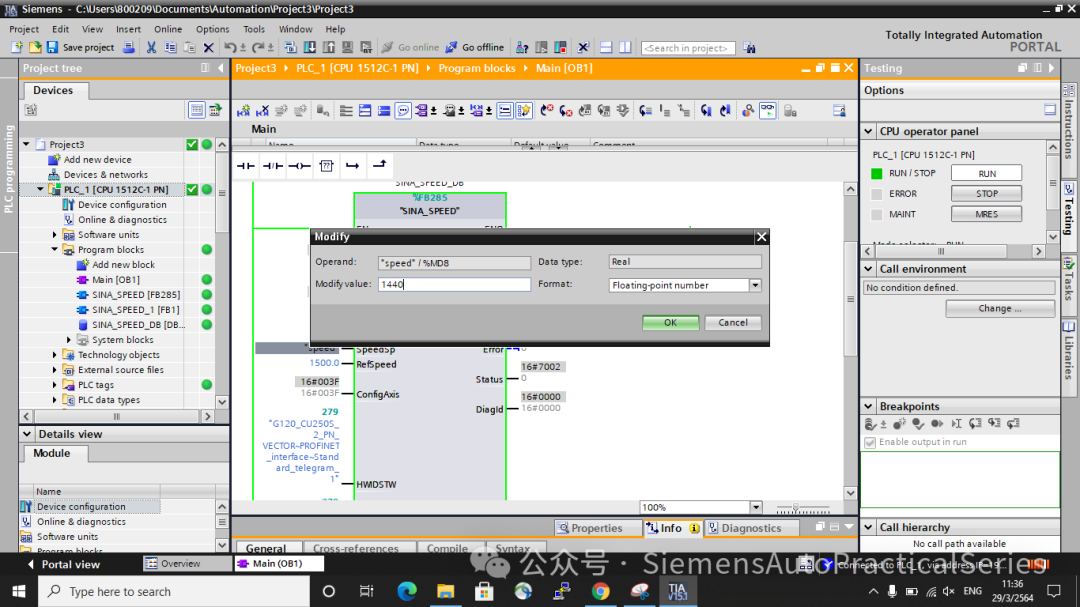 Figure 16 Now your motor starts running!The automatic reply cannot be used, so I will just share the link here.S120 Program
-
File shared via cloud: Sinamics-S120-Motion-Control-with-S7-1500-and-TIA-PortalV17.7z link: https://pan.baidu.com/s/1Lfyi7eJ6kjI62DR-6xV8Ig?pwd=2p5k Extraction code: 2p5k — shared by Baidu Cloud Super Member v7
-
G120 Program
File shared via cloud: 1500ControlG120_V17.7z link: https://pan.baidu.com/s/1vsHQQQAFk_yyoNND57D7YQ?pwd=87k4 Extraction code: 87k4 — shared by Baidu Cloud Super Member v7
The programs are for learning purposes only!