This article mainly introduces methods for outputting logs in embedded development.
The most common method is to output UART logs through the serial port. This method is simple to implement, and most embedded chips have serial port functionality. Related articles: Learning STM32 Microcontroller, Serial Port is Inevitable. However, such a simple function can sometimes be difficult to use, for example:
-
How to print logs when a newly acquired chip does not have a serial port driver?
-
In some applications where timing requirements are high, what to do if serial port log output takes too long? For example, USB enumeration.
-
What to do if certain bugs occur during normal operation but do not reproduce when the serial port log is enabled?
-
How to output logs when some packages do not have a serial port, or the serial port has been used for other purposes?
The following discusses these issues.
1 Output Log Information to SRAM
To be precise, this is not outputting logs, but a way to view logs without using the serial port. During the chip development phase, a debugger can be connected for debugging, and breakpoints can be used for debugging. However, some operations cannot be interrupted, making breakpoint debugging impossible. At this point, consider printing logs to SRAM. After the entire operation is completed, the log buffer in SRAM can be viewed through the debugger, achieving indirect log output. The test platform used in this article is the STM32F407 discovery, based on USB host experimental code, and the principles are also applicable to other embedded platforms. First, define a structure for printing logs as follows: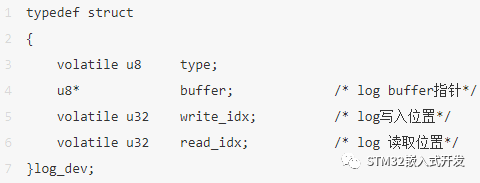
Define a segment of SRAM space as a log buffer:
static u8 log_buffer[LOG_MAX_LEN];
The log buffer is a circular buffer, allowing for infinite log printing with a small buffer. The downside is obvious; if logs are not output in time, they will be overwritten by new ones. The buffer size is allocated based on the SRAM size, here using 1kB. To facilitate output parameters, the printf function is used for formatted output, requiring the following configuration (Keil):
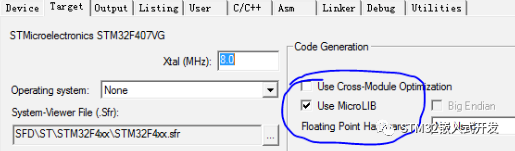
And include the header file #include <stdio.h>, implement the function fputc() in the code:
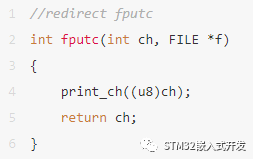
Write data to SRAM:
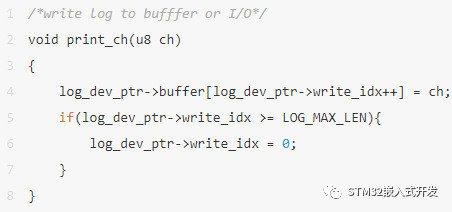 To facilitate control of log printing format, add a custom print function in the header file.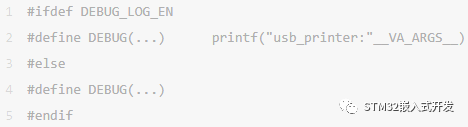
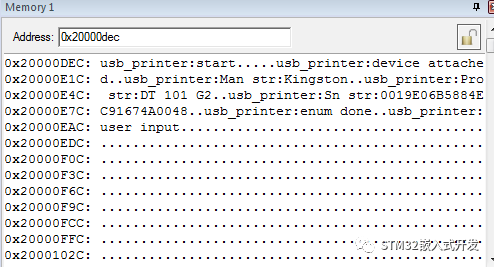
Call DEBUG() directly where logs need to be printed, and the final effect is as follows, with printed logs visible from the Memory window:
2 Output Log via SWO
By printing logs to SRAM, logs can be viewed, but when the data volume is large, it may be overwritten before it can be checked. To solve this problem, SWO output log via St-link can be used, eliminating concerns about log overwriting. Check the schematic; the SWO of the F407 discovery is already connected; otherwise, you need to connect it yourself: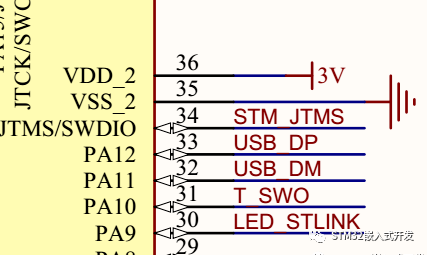 Add SWO operation function set in the log structure:
typedef struct {
    u8 (*init)(void* arg);
    u8 (*print)(u8 ch);
    u8 (*print_dma)(u8* buffer, u32 len);
} log_func;
typedef struct {
    volatile u8 type;
    u8* buffer;
    volatile u32 write_idx;
    volatile u32 read_idx;
    //SWO
    log_func* swo_log_func;
} log_dev;
SWO only requires the print operation function, implemented as follows:
u8 swo_print_ch(u8 ch) {
    ITM_SendChar(ch);
    return 0;
}
Using SWO to output logs also first outputs to the log buffer, and then outputs during system idle time, of course, it can also be output directly. Delayed log output affects the real-time nature of logs, while direct output affects the execution of time-sensitive code, so the choice depends on the situation of log output.
Call output_ch() function in the while loop to output logs during system idle time.
/*output log buffer to I/O*/
void output_ch(void) {
    u8 ch;
    volatile u32 tmp_write, tmp_read;
    tmp_write = log_dev_ptr->write_idx;
    tmp_read = log_dev_ptr->read_idx;
    if (tmp_write != tmp_read) {
        ch = log_dev_ptr->buffer[tmp_read++];
        //swo
        if (log_dev_ptr->swo_log_func)
            log_dev_ptr->swo_log_func->print(ch);
        if (tmp_read >= LOG_MAX_LEN) {
            log_dev_ptr->read_idx = 0;
        } else {
            log_dev_ptr->read_idx = tmp_read;
        }
    }
}
2.1 Output via IDE
Using the SWO output function in the IDE requires the following configuration (Keil):
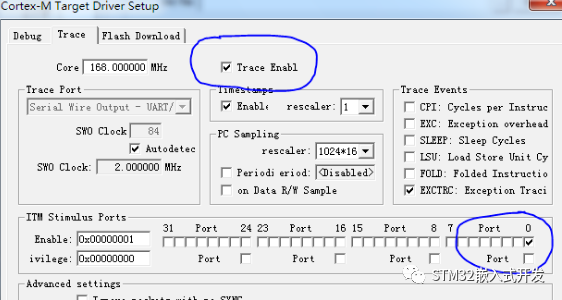
The output logs can be seen in the window:
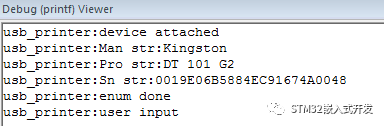
2.2 Output via STM32 ST-LINK Utility
Using STM32 ST-LINK Utility does not require special settings; just open the Printf via SWO viewer under the ST-LINK menu and press start:
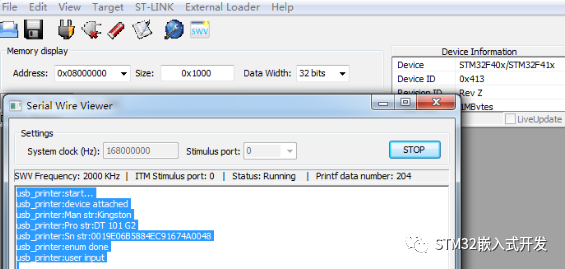
3 Output Log via Serial Port
The above methods are for situations where serial port logs are temporarily unavailable or only used temporarily, while for long-term use, outputting logs via the serial port is still necessary, as most of the time it is not possible to connect a debugger. Adding serial port log output only requires adding the operation function set for the serial port:
typedef struct {
    volatile u8 type;
    u8* buffer;
    volatile u32 write_idx;
    volatile u32 read_idx;
    volatile u32 dma_read_idx;
    //uart
    log_func* uart_log_func;
    //SWO
    log_func* swo_log_func;
} log_dev;
Implement the serial port driver function:
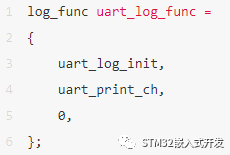
Adding serial port log output is similar to the process of using SWO, and will not be elaborated further. The issue to discuss next is that the serial port has a low baud rate, and outputting data takes a long time, severely affecting system operation.
Although the method of first printing to SRAM and then delaying output can mitigate the impact, if the system interrupts frequently or requires time-consuming calculations, logs may be lost. To solve this problem, it is necessary to address the issue of the CPU outputting data to the serial port simultaneously, and embedded engineers can immediately think of DMA as a good solution.
Using DMA to transfer log data to the serial port output while not affecting CPU operation can solve the problem of time-consuming serial port log output affecting the system. The serial port and DMA initialization functions are as follows:
u8 uart_log_init(void* arg) {
    DMA_InitTypeDef DMA_InitStructure;
    u32* bound = (u32*)arg;
    //GPIO port settings
    GPIO_InitTypeDef GPIO_InitStructure;
    USART_InitTypeDef USART_InitStructure;
    RCC_AHB1PeriphClockCmd(RCC_AHB1Periph_GPIOA, ENABLE); //Enable GPIOA clock
    RCC_APB1PeriphClockCmd(RCC_APB1Periph_USART2, ENABLE); //Enable USART2 clock
    //USART2 corresponding pin multiplexing mapping
    GPIO_PinAFConfig(GPIOA, GPIO_PinSource2, GPIO_AF_USART2); //USART2 port configuration
    GPIO_InitStructure.GPIO_Pin = GPIO_Pin_2;
    GPIO_InitStructure.GPIO_Mode = GPIO_Mode_AF; //Multiplex function
    GPIO_InitStructure.GPIO_Speed = GPIO_Speed_50MHz; //Speed 50MHz
    GPIO_InitStructure.GPIO_OType = GPIO_OType_PP; //Push-pull multiplex output
    GPIO_InitStructure.GPIO_PuPd = GPIO_PuPd_UP; //Pull-up
    GPIO_Init(GPIOA, &GPIO_InitStructure); //USART2 initialization settings
    USART_InitStructure.USART_BaudRate = *bound; //Baud rate settings
    USART_InitStructure.USART_WordLength = USART_WordLength_8b; //Data format 8-bit
    USART_InitStructure.USART_StopBits = USART_StopBits_1; //One stop bit
    USART_InitStructure.USART_Parity = USART_Parity_No; //No parity bit
    USART_InitStructure.USART_HardwareFlowControl = USART_HardwareFlowControl_None; //No hardware flow control
    USART_InitStructure.USART_Mode = USART_Mode_Tx; //Transceiving mode
    USART_Init(USART2, &USART_InitStructure); //Initialize serial port 1
#ifdef LOG_UART_DMA_EN
    USART_DMACmd(USART2, USART_DMAReq_Tx, ENABLE);
#endif
    USART_Cmd(USART2, ENABLE); //Enable serial port 1
    USART_ClearFlag(USART2, USART_FLAG_TC);
    while (USART_GetFlagStatus(USART2, USART_FLAG_TC) == RESET);
#ifdef LOG_UART_DMA_EN
    RCC_AHB1PeriphClockCmd(RCC_AHB1Periph_DMA1, ENABLE); //Config DMA channel, uart2 TX usb DMA1 Stream6 Channel
    DMA_DeInit(DMA1_Stream6);
    DMA_InitStructure.DMA_Channel = DMA_Channel_4;
    DMA_InitStructure.DMA_PeripheralBaseAddr = (uint32_t)(&USART2->DR);
    DMA_InitStructure.DMA_DIR = DMA_DIR_MemoryToPeripheral;
    DMA_InitStructure.DMA_PeripheralInc = DMA_PeripheralInc_Disable;
    DMA_InitStructure.DMA_MemoryInc = DMA_MemoryInc_Enable;
    DMA_InitStructure.DMA_PeripheralDataSize = DMA_PeripheralDataSize_Byte;
    DMA_InitStructure.DMA_MemoryDataSize = DMA_PeripheralDataSize_Byte;
    DMA_InitStructure.DMA_Mode = DMA_Mode_Normal;
    DMA_InitStructure.DMA_Priority = DMA_Priority_High;
    DMA_InitStructure.DMA_FIFOMode = DMA_FIFOMode_Disable;
    DMA_InitStructure.DMA_MemoryBurst = DMA_MemoryBurst_Single;
    DMA_InitStructure.DMA_PeripheralBurst = DMA_PeripheralBurst_Single;
    DMA_Init(DMA1_Stream6, &DMA_InitStructure);
    RCC_AHB1PeriphClockCmd(RCC_AHB1Periph_DMA1, ENABLE);
#endif
    return 0;
}
The function for DMA output to the serial port is as follows:
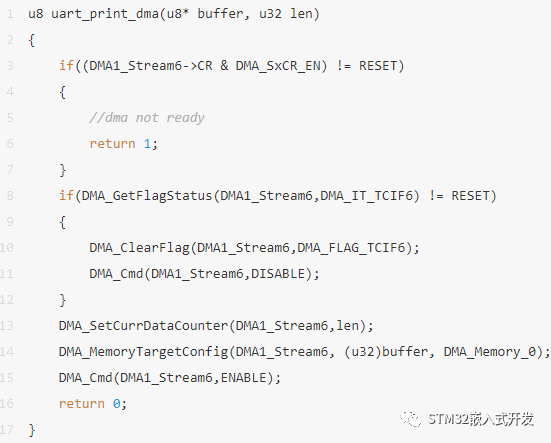
Here, for convenience, the DMA status register is directly queried; if needed, it can be modified to DMA interrupt mode. The datasheet can find that serial port 2 uses DMA1 channel 4 stream 6:
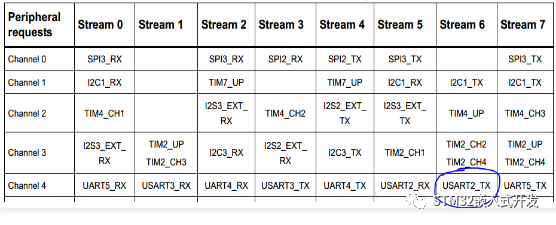
Finally, the log output can be seen on the PC terminal:
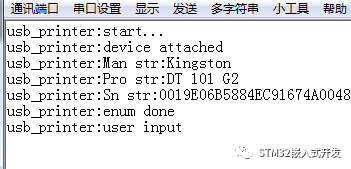
Using DMA to transfer data from the log buffer to the serial port allows the CPU to handle other tasks, minimizing the impact on the system, and timely log output is the most commonly used method in practical applications. Moreover, this method can be used not only with serial ports but also with other interfaces that can use DMA (such as SPI, USB) to print logs.
4 Simulate Serial Port Output Log Using IO Ports
Finally, we need to discuss how to output logs when there is no serial port in some packages, or the serial port has been used for other purposes. In this case, an idle general IO can be found to simulate UART protocol to output logs to the host computer’s serial port tool. The commonly used UART protocol is as follows:
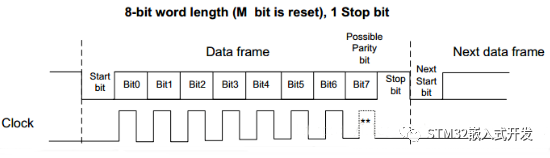
As long as the high and low levels are output on the IO at a determined time, the waveform can be simulated, and this determined time is the serial port baud rate. To achieve precise delays, the TIM4 timer is used to generate a 1us delay. Note: The timer cannot be reused; in the test project, TIM2 and TIM3 have been used. If reused, it will cause confusion. The initialization function is as follows:
u8 simu_log_init(void* arg) {
    TIM_TimeBaseInitTypeDef TIM_InitStructure;
    u32* bound = (u32*)arg;
    //GPIO port settings
    GPIO_InitTypeDef GPIO_InitStructure;
    RCC_AHB1PeriphClockCmd(RCC_AHB1Periph_GPIOA, ENABLE); //Enable GPIOA clock
    GPIO_InitStructure.GPIO_Pin = GPIO_Pin_2;
    GPIO_InitStructure.GPIO_Mode = GPIO_Mode_OUT;
    GPIO_InitStructure.GPIO_Speed = GPIO_Speed_50MHz; //Speed 50MHz
    GPIO_InitStructure.GPIO_OType = GPIO_OType_PP; //Push-pull multiplex output
    GPIO_InitStructure.GPIO_PuPd = GPIO_PuPd_UP; //Pull-up
    GPIO_Init(GPIOA, &GPIO_InitStructure);
    GPIO_SetBits(GPIOA, GPIO_Pin_2); //Config TIM
    RCC_APB1PeriphClockCmd(RCC_APB1Periph_TIM4, ENABLE); //Enable TIM4 clock
    TIM_DeInit(TIM4);
    TIM_InitStructure.TIM_Prescaler = 1; //2 prescaler
    TIM_InitStructure.TIM_CounterMode = TIM_CounterMode_Up;
    TIM_InitStructure.TIM_Period = 41; //1us timer
    TIM_InitStructure.TIM_ClockDivision = TIM_CKD_DIV1;
    TIM_TimeBaseInit(TIM4, &TIM_InitStructure);
    TIM_ClearFlag(TIM4, TIM_FLAG_Update);
    baud_delay = 1000000 / (*bound); //Calculate bit delay based on baud rate
    return 0;
}
The delay function using the timer is as follows:
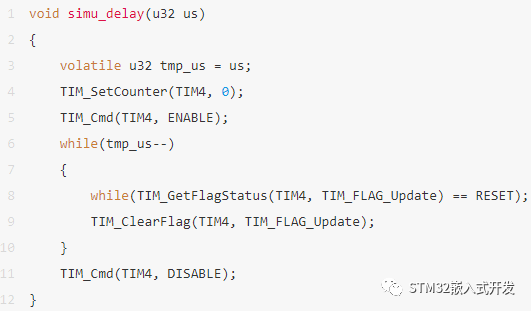
Finally, the simulation output function, note: interrupts must be disabled before outputting, and re-enabled after one byte output is complete; otherwise, garbled characters may occur:
u8 simu_print_ch(u8 ch) {
    volatile u8 i = 8;
    __asm("cpsid i"); //start bit
    GPIO_ResetBits(GPIOA, GPIO_Pin_2);
    simu_delay(baud_delay);
    while (i--) {
        if (ch & 0x01)
            GPIO_SetBits(GPIOA, GPIO_Pin_2);
        else
            GPIO_ResetBits(GPIOA, GPIO_Pin_2);
        ch >>= 1;
        simu_delay(baud_delay);
    }
    //stop bit
    GPIO_SetBits(GPIOA, GPIO_Pin_2);
    simu_delay(baud_delay);
    simu_delay(baud_delay);
    __asm("cpsie i");
    return 0;
}
Using IO simulation can achieve effects similar to a real serial port, and only requires a general IO, making it suitable for small package chips.