Introduction to TuoZhu Cyberbrick and the Motivation for This Project
First of all, TuoZhu is a consumer-grade 3D printer manufacturer, and its various 3D printers have received high praise, especially the A1 series, which is priced as low as around 1000 yuan.
At the same time, the MakerWorld community operated by TuoZhu is a large platform for sharing 3D works, allowing novice users (with no modeling experience) to download models from this community and perform 3D printing.
However, the vast majority of 3D printed works can only be displayed statically or manually pushed and pulled. To make a 3D printed car move, certain skills and knowledge in electronic circuits are required. In light of this, TuoZhu officially launched the CyberBrick kit, which allows novice users to create a remote-controlled 3D printed car through simple block assembly, providing more fun.
Official introduction of CyberBrick: CyberBrick is a modular smart toy ecosystem that integrates programmable hardware, 3D printed structures, and a dual-layer coding environment. It combines 3D printing with electronics and programming through Lego-like simplicity. CyberBrick enables anyone to build and enjoy various 3D printing projects, from remote-controlled toys to productivity tools.
However, the price of the CyberBrick kit is not cheap; a beginner’s kit costs 199 yuan, and each kit can only be used for one toy car. Therefore, I created this project to replicate the “TuoZhu Cyberbrick” using inexpensive components, which not only reduces costs but also provides more possibilities for play.
I named this project “OpenCyberbrick”; let’s get started.
Disassembly and Replication Ideas
The Core Logic of Cyberbrick
During the crowdfunding phase of CyberBrick, I gained a rough understanding of its composition and operational logic through introductions and demonstration videos. On the first day of the CyberBrick kit’s release, I purchased the beginner’s kit and printed the official truck model for testing.
CyberBrick is divided into a remote control part and a controlled part, but both parts use the same main control board, the ESP32 C3 Mini, which can be interchanged. The remote control part collects information from input devices such as joysticks, buttons, and switches through the “remote control receiving board” and sends it to the controlled part. The controlled part transmits the received signals to output devices such as motors, servos, and LEDs through the “remote control receiving board.” It seems that the remote control and receiving parts use the unique ESPNow protocol.
Replication Ideas
Understanding the core logic of Cyberbrick clarifies the replication ideas.
- 1. Main Control Board Transmission Protocol: We also use Espressif’s ESP series chips for the main control board, such as ESP8266, ESP32, and ESP32 C3, which are inexpensive and include Wi-Fi modules. The modules can communicate via ESPNow, solving the communication protocol issue.
- 2. Controlled Part: Use ESP8266 to connect to an L298N motor driver module (which provides power to the motor), a 9g servo module (for steering), and a WS2812 LED group (for driving lights, turn signals, light shows, etc.).
- 3. Remote Control Part: Use ESP32 C3 to connect two PS2 joystick modules (each with two buttons) and two additional button modules, forming a 12-channel remote control that supports many actions.
- 4. In subsequent optimization processes, I found that using a smartphone as the remote control is more suitable, supporting more actions and further saving hardware and software costs for the remote control. Therefore, the subsequent introduction will only briefly cover the replication of the remote control part.
Detailed Explanation of the Controlled Part
1. 3D Printed Jeep Car Body
First, like Cyberbrick, we need to print the parts of the Jeep car using a 3D printer and assemble them. It is important to note that because our components are not highly integrated, they occupy much more space than the original Cyberbrick parts, so we need to choose a larger model; smaller models do not have enough space to accommodate our electronic components.
Here, I chose Willy’s CyberBrick Remote-Controlled Jeep[1], which has enough space in the front trunk to accommodate electronic devices and features a typical structure: using a motor to provide forward and backward movement, a servo for steering, and reserved space for LED lights.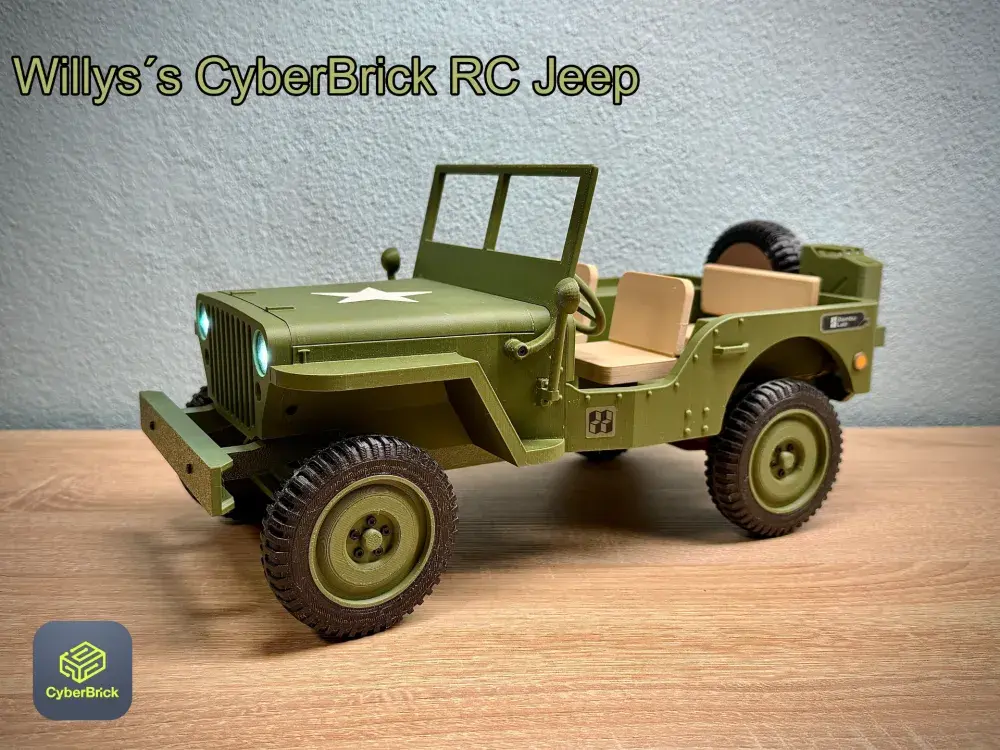
2. Electronic Circuit of the Jeep Car
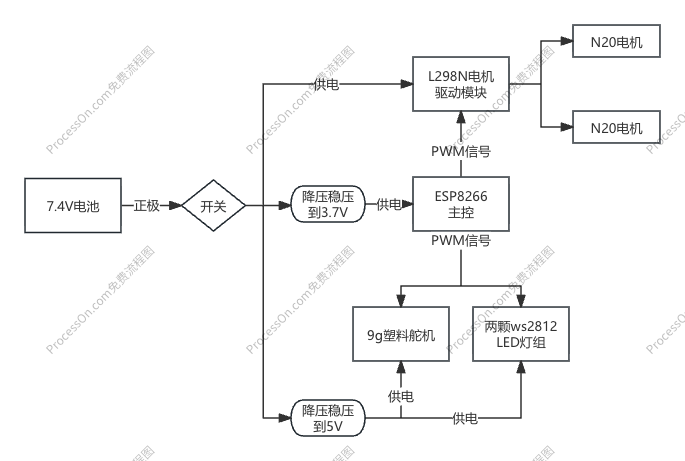
The above is a schematic diagram of the electronic circuit wiring for this Jeep car. Here are some pitfalls I encountered:
- Different device modules have different rated voltages; for example, the ESP8266 requires a stable 3.7V voltage, servos and LEDs require 5V, and the motor driver module has a range (the higher the voltage, the better the power). If you want to power the entire system with one battery, you need to add a step-down voltage regulator module before different devices.
- 7.4V batteries are relatively expensive and require matching charging equipment. However, 3.7V 18650 and 14500 batteries can be found in many discarded toys and electronic products. I made a series connection to use two 3.7V batteries as one 7.4V, but be careful to use batteries with consistent internal resistance in series.
- The GPIO interfaces of the ESP8266 connect to the signal interfaces of the motor driver, servo, and LED, and control commands are sent through PWM signals, but they also need to share a common ground with these devices.
3. Software Program
ESP devices support development using MicroPython and Arduino languages. I happen to have some Python background, so I defaulted to using MicroPython for development.
The software project code has been uploaded to GitHub, available at: OpenCyberbrick’s GitHub address[2] or OpenCyberbrick’s Gitee address[3]. Here is a brief introduction to the function of each project file:
- jeep_motor.py: The motor driver program controls the direction and speed of the motor, enabling the car to move forward and backward.
- jeep_servo.py: The servo driver program controls the rotation angle of the servo, enabling the car to steer.
- jeep_led.py: The LED driver program controls the lighting of two WS218 LEDs, enabling the car’s driving lights, reverse lights, turn signals, and light show effects.
- wifi.py: Used to connect the main control device to the network for local area network control.
- wificonfig.json: Used to store information about the network to connect to, which can be modified on the remote control web page.
- jeep_action.py: The action summary control for the Jeep car translates received remote control signals into commands for the motor, servo, and LED, and calls for execution. The GPIO pin numbers for controlling the motor, servo, and LED are also configured here.
- jeep_espnow_rec.py: The ESPNow signal listening program continuously listens for information received via ESPNow and passes it to jeep_action for execution.
- jeep_websocket_rec.py: Initiates a WebSocket server that can receive signals sent from web clients over the local area network and pass them to jeep_action for execution.
- main.py: The main entry point of the program, which controls the method of receiving remote control signals.
- jeep_remote_index.html: The remote control H5 page, which supports control via buttons and device gyroscope sensing. This file does not need to be uploaded to the ESP main control and should be saved on the smartphone used for remote control.
Detailed Explanation of the Remote Control Part
Unlike Cyberbrick, this project, while also implementing a separate remote control device, ultimately recommends using a smartphone for remote control. When using a smartphone for remote control, there are two modes: button control and motion sensing control.
1. ESPNow Remote Control
ESPNow remote control can actually be treated as a standalone project; it can be used not only for Cyberbrick but also to control other ESP devices. It includes both hardware and software components: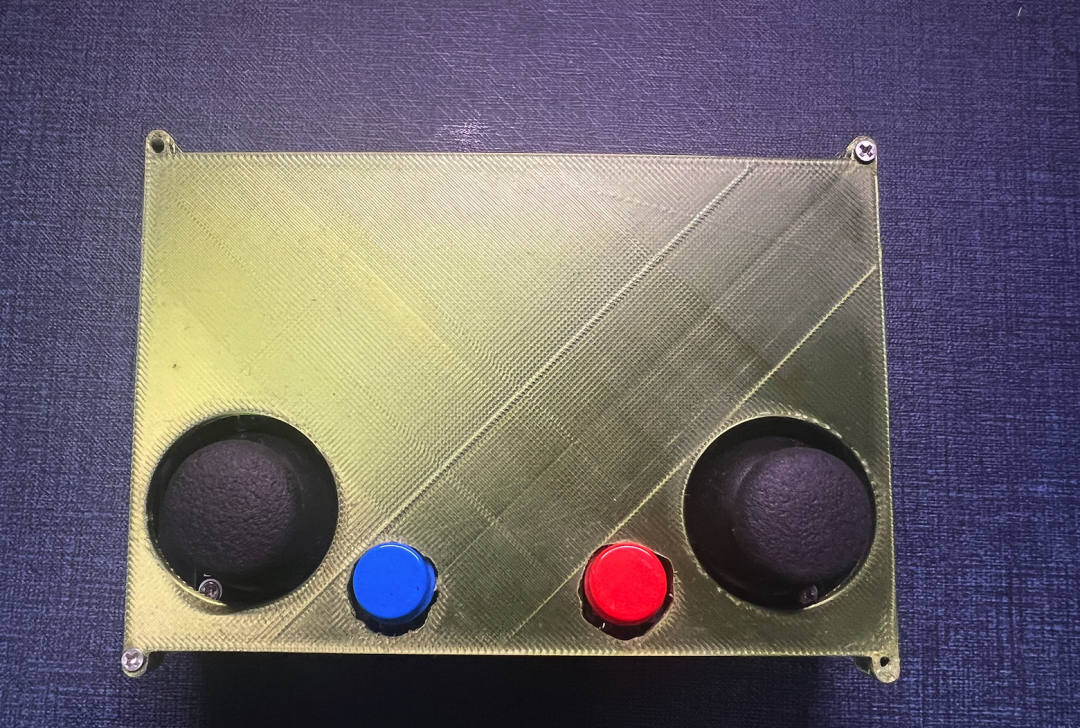
- The hardware part consists of an ESP32 connected to two PS2 joysticks and two ordinary buttons, along with power and a switch.
- The software part is also developed using MicroPython, which retrieves data from the PS2 joysticks and buttons, formats it, and forwards it to the controlled device.
- This remote control can also switch controlled settings via buttons, allowing one remote control to manage multiple devices.
This remote control project may have a separate article introduced later.
2. Smartphone Web Button Remote Control
Having one remote control device and one controlled device can still be quite costly. Can we use the smartphones that everyone has as remote terminals? The answer is, of course, yes. ESP devices have Wi-Fi capabilities, allowing them to connect to a router to access the home local area network or create a hotspot network to form a local area network.
On the ESP main control of the controlled device, a server runs to receive command requests sent from local area network devices, which are then converted into actions for the Jeep car.
On the remote control side, using a smartphone to open an HTML page allows button clicks and releases to send commands to the server for remote operation. Here are a few special points:
- Due to the very limited memory of ESP devices, the server cannot return HTML content, so the control page’s HTML file needs to be saved in advance on the remote control smartphone. iPhones can use “HTML Viewer” to open and browse local HTML files. Android devices can click the HTML file to open it in a browser.
- Since the remote control requires high real-time performance, ordinary HTTP GET or POST requests put a lot of pressure on the server, so here we use WebSocket long connections. This meets the real-time requirement while significantly reducing the server’s load.
3. Smartphone Motion Sensing Remote Control
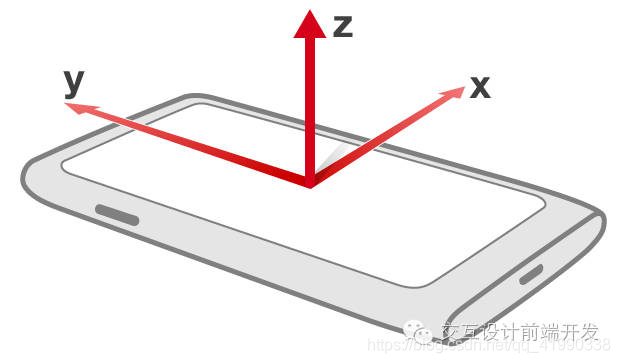 Button control is simple and straightforward, but it lacks a bit of “coolness”; motion sensing control is much “cooler.” On the HTML page, we obtain data from the smartphone’s gyroscope, converting changes in the phone’s orientation into actions for the Jeep car. For example:
- X-axis: Less than -20 degrees means moving forward, greater than 20 degrees means moving backward, and between -20 and 20 degrees means stationary.
- Y-axis: Less than -20 degrees means turning left, greater than 20 degrees means turning right, and between -20 and 20 degrees means stationary.
- Z-axis: Not used. The X-axis and Y-axis can be simultaneously detected to achieve combinations of left front, right front, left rear, and right rear movements.
Cost Calculation
If using a smartphone as the remote terminal, the entire system only incurs the cost of the Jeep car’s circuit. Let’s calculate the approximate cost:
- ESP8266 or ESP32 main control: 11.7 yuan.
- One L298N motor driver: 7.42 yuan; there should be cheaper driver boards available, but I used this one since I had it on hand.
- Two N20 motors: 6.16 yuan (30.8 yuan for 10).
- One 9g plastic servo: 4.7 yuan.
- Two WS2812 LEDs: 0.37 yuan (11 yuan for 60).
- Two DC-DC voltage regulator chips: 3.6 yuan (1.8 yuan each); if you have knowledge of capacitors, you could use a cheap capacitor instead.
- Two 3.7V 14500 batteries: 0 yuan; you can find some 14500 batteries in discarded toys.
- Electronic wires, terminals, switches: total 2 yuan. Total: 35.95 yuan; this does not include some hardware components needed for the Jeep car, such as screws and bearings.
More Functional Possibilities
Most of the above functions are aimed at replicating Cyberbrick, with some differences in the remote control side. However, we can explore more possibilities, such as adding a screen to the ESPNow remote control, adding a screen to the Jeep car, adding sound effects to the Jeep car, and incorporating obstacle avoidance radar, etc. This is where the OpenCyberbrick project can offer more possibilities and fun.
Conclusion
This article only introduces the general logic of this project; there are many details in both hardware and software that I have not explained due to space limitations. If you are interested in this project, feel free to leave me a message for further discussion.
If you are skilled in PCB design and are interested in my projects, I would be very welcome to contact me to create some interesting projects together.
References
[1]
Willy’s CyberBrick Remote-Controlled Jeep: https://makerworld.com.cn/zh/models/1217847-wei-li-de-cyberbrickyao-kong-ji-pu-che#profileId-1295819
[2]
OpenCyberbrick’s GitHub address: https://github.com/Ya-chunJen/OpenCyberbrick
[3]
OpenCyberbrick’s Gitee address: https://gitee.com/renyajun1990/OpenCyberbrick