
 Arduino Sensor: HS-S01A Infrared SensorArduino Sensor: HS-S02P Infrared Sensor (Obstacle Avoidance)Arduino Sensor: HS-S03P Ultraviolet SensorArduino Sensor: HS-S05P Sound SensorArduino Sensor: HS-F07P Active BuzzerArduino Sensor: HS-S08P Flame SensorArduino Sensor: HS-S09LB Raindrop SensorArduino Sensor: HS-S09PC Soil Moisture Sensor
Arduino Sensor: HS-S10P Mist Sensor
Arduino Sensor: HS-S11-L Gas Sensor
Arduino Sensor: HS-S20P Ambient Light Sensor
Arduino Sensor: HS-S21P Tilt SensorArduino Sensor: HS-S22P Grayscale SensorArduino Sensor: HS-S24P Digital Temperature SensorArduino Sensor: HS-S26A Temperature and Humidity SensorArduino Sensor: HS-S28P Rotary Potentiometer
Arduino Sensor: HS-S31P Touch Sensor
Arduino Sensor: HS-S37PS Water Level Sensor
Arduino Sensor: HS-S38P Human Sensor
Arduino Sensor: HS-S40P Hall Magnetic Sensor
Arduino Sensor: HS-S45P Barometric Sensor
Arduino Sensor: HS-S46P Weighing Sensor
Arduino Sensor: HS-S59P Slot Photoelectric Sensor
Arduino Sensor: HS-S70P Heart Rate and Blood Oxygen Sensor
Arduino Sensor: Photoresistor Sensor
Arduino Sensor: Infrared Receiver Module
Arduino Sensor: Infrared Transmitter Module
Arduino Sensor: Clock Module
Arduino Sensor: Rotary Encoder Module
Arduino Sensor: Dual-axis Joystick Module
Arduino Sensor: Gyroscope Module
Arduino Sensor: Voice Broadcast Module
Arduino Sensor: Voice Recognition Control Module
Arduino Communication Module: Bluetooth Module
Arduino Power Module: Motor Driver Module
Arduino Control Module: Self-locking Button ModuleArduino Storage Module: SD Card Module
Arduino Control Module: Conductive Switch Module
Arduino Execution Module: Electromagnet Module
Arduino Detection Module: Ultrasonic ModuleArduino Interaction Module: Button Switch ModuleArduino Display Module: One-digit Seven-segment DisplayArduino Display Module: Four-digit Seven-segment DisplayArduino Display Module: 8*8 Dot Matrix DisplayArduino Display Module: Electronic Ink ScreenArduino Display Module: OLED ScreenArduino Display Module: LCD DisplayArduino Execution Control: Micro Servo— Previous Recommendations —


01Basic Understanding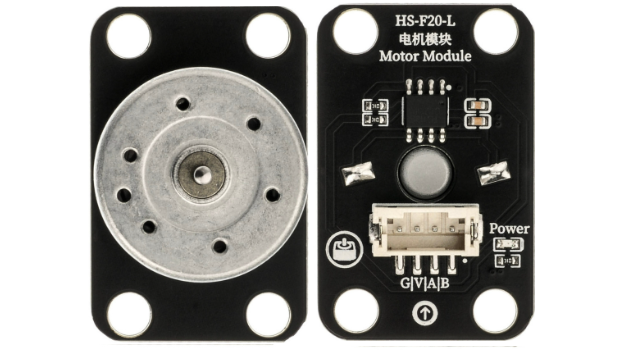 Model:HS-F20-LName:DC Motor Fan ModuleSeries:Execution Power ControlDescription:This is a fan drive module integrated with RF300 DC motor, with the core advantage of no additional motor driver board required. It can be directly controlled by Arduino: the motor start/stop and forward/reverse rotation can be achieved through the high and low level combination of two IO ports, and the motor speed can be precisely adjusted with PWM (Pulse Width Modulation) signals. The module is suitable for light load scenarios, meeting the needs of DIY small projects and light applications. It should be noted that the RF300 motor has a minimum current requirement, and when the supply voltage is below the threshold, the motor cannot rotate normally. It features simple control, high integration, and low cost, making it a commonly used execution module for achieving “ventilation and transmission” functions in Arduino creative projects.Usage Scenarios:DIY desktop small fan (controlled by button or knob for start/stop and wind speed), ventilation and heat dissipation for small devices (such as Arduino motherboard cooling, mini case ventilation), electronic experiments in primary and secondary schools (exploring the principles of DC motor control, PWM speed regulation logic, in line with the “General Education Guidelines for Artificial Intelligence in Primary and Secondary Schools (2025 Edition)” practice requirements), children’s programming creative works (such as a mini car that can “walk”, automatically opening and closing ventilation windows), lightweight transmission devices (such as small conveyor belts, simple lifting mechanisms).Disciplinary Integration:Physics,MathematicsElectronic Engineering, Mechanical EngineeringInformation TechnologyEthical Education:Module applications need to consider noise control during motor operation (such as avoiding high-frequency operation noise interference in home scenarios), balancing functionality and environmental comfort; electronic waste disposal should focus on the classification and recycling of metal coils and plastic shells inside the motor, promoting resource recycling; when designing loads, the rated power of the motor should be matched to avoid overload operation that could burn out the motor, reflecting technical rigor; in DIY projects, protective structures should be added to rotating parts (such as fan blades) to prevent injury to the human body, ensuring safety; when not in use for a long time, the power supply should be cut off to reduce standby power consumption, practicing energy-saving concepts.Note: Images are sourced from the internet, and products are based on actual purchases.
02Technical Parameters
Working Principle::
The core of the module consists of an RF300 DC motor and an integrated driving circuit, requiring no additional driver board: control is achieved through two control IO ports (A, B) for direction and start/stop control — when A is high and B is low, the motor rotates forward; when A is low and B is high, the motor rotates in reverse; when both IO ports are low, the motor stops; if speed adjustment is needed, one of the control IO ports (or a separate PWM pin) can be connected to the PWM output pin of Arduino, adjusting the average voltage across the motor by changing the duty cycle of the PWM signal (0%-100%), thereby controlling the speed (the higher the duty cycle, the faster the speed); the RF300 motor has a minimum starting current and voltage threshold, and when the supply voltage/current is below the threshold, the motor cannot overcome internal resistance to rotate.
Parameter Analysis:
G (GND): Power input negative
V (VCC): Power input positive
A:Motor forward/reverse control pin
B:Motor forward/reverse control pin
Motor Model: RF300 DC Motor (Micro DC Motor, suitable for light load scenarios)Control Method: IO port high/low level control for start/stop / forward/reverse, PWM signal (duty cycle 0%-100%) for speed controlSpeed Range: 1500-3000rpm (at 5V supply, speed adjusts linearly with PWM duty cycle, reaching maximum speed at 100% duty cycle)Minimum Starting Voltage: ≥3.3V (below this voltage, the motor current is insufficient to overcome internal resistance)Rated Working Current: 100-200mA (at 5V supply, no load), current increases synchronously with load, not exceeding 300mARated Torque: 0.5kg・cm (at 5V supply, can drive an object weighing 0.5kg at a 1cm lever arm)Load Type: Suitable for light loads (such as plastic fan blades, small drive wheels), prohibited from heavy load operation (such as driving metal gear sets)03Code Example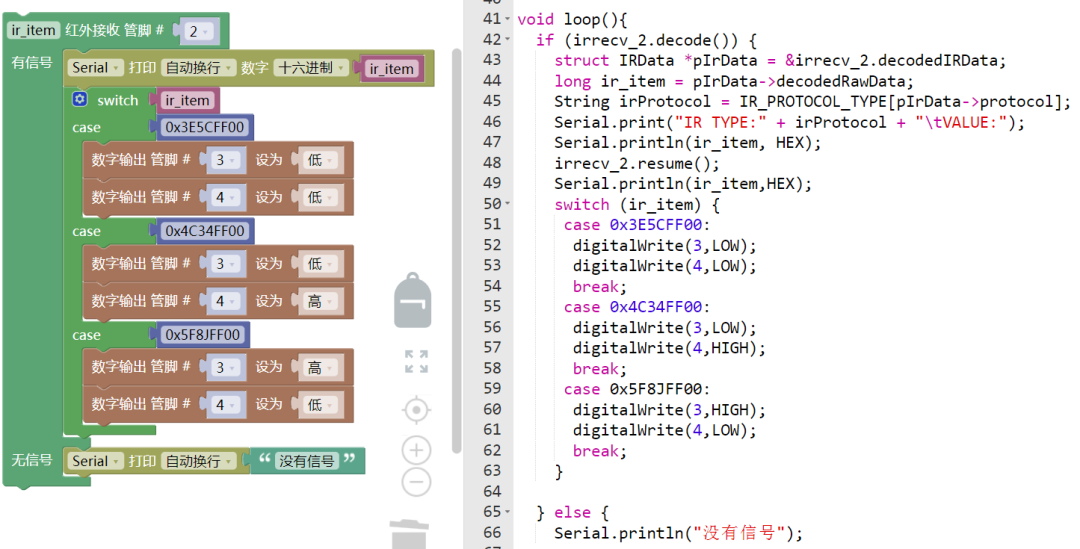
Connect pins A\D3; B\D4.
04Safety Measures
1. Power Safety: Power must be turned off before wiring, confirm VCC voltage is 3.3V~5V, do not connect to power above 5V (will burn out the motor coil and integrated driving circuit); if using battery power, ensure battery output current ≥300mA (to avoid insufficient current causing motor stalling);
2. Wiring Specifications: Strictly distinguish pin functions, do not reverse VCC and GND (reverse connection will instantly burn out the module); IO1 and IO2 must not be simultaneously connected to high level to prevent motor short circuit;
3. Load Limitations: Only suitable for light loads (such as plastic fan blades), prohibited from driving heavy loads (such as metal parts, jammed transmission mechanisms), heavy loads will cause motor current to surge (exceeding 300mA), burning out the driving circuit;
4. Mechanical Protection: Rotating parts of the motor (such as fan blades) must be equipped with protective nets or shells to prevent fingers or hair from being caught and causing injury; avoid collisions with hard objects during rotation to prevent motor shaft deformation;
5. Running Duration: Continuous running time is recommended to be ≤30 minutes (in light load state), long-term operation will cause the motor to heat up (temperature ≤60℃ is safe), if exceeding 60℃, stop for cooling;
6. Stalling Protection: If the motor exhibits a “buzzing sound but does not rotate” stalling phenomenon, power must be turned off immediately to check the load (such as blade jamming), stalling for more than 5 seconds will burn out the driving chip due to excessive current;
7. Debugging Safety: Keep hands away from rotating parts during debugging, initially power on to test “stop → low-speed rotation”, confirm no abnormalities before testing high speed and reverse;
8. Storage and Maintenance: When not in use for a long time, the module should be placed in a dry environment (humidity ≤60%), to avoid rusting of the motor interior; regularly (such as every 3 months) power on and run for 1 minute to prevent coil moisture.
05Expansion
Students can try the following methods:
1. Temperature-controlled automatic fan: linked with HS-S26A Temperature and Humidity Sensor, when the ambient temperature >30℃, the motor starts (speed increases with temperature, such as 40% duty cycle at 30℃, 80% duty cycle at 35℃), and stops when temperature <25℃, achieving intelligent heat dissipation;2. Infrared remote control fan: combined with HS-S01A Infrared Sensor and infrared remote control, pressing the remote control “1” key makes the motor rotate forward, “2” key reverse, “3” key stop, “+/-” key adjusts speed, achieving remote control;3. Light-controlled ventilation window: connect the motor with a small window transmission mechanism, combined with HS-S20P Ambient Light Sensor, when brightness >600lux (strong light), the motor rotates forward to open the window (ventilation and shading), when brightness <200lux (weak light), the motor reverses to close the window;4. Touch-controlled mini car: use 2 HS-F20L modules as left and right wheel drives for the car, combined with HS-S31P Touch Sensor, touching the left sensor makes the left wheel turn, the right sensor makes the right wheel turn, the middle sensor moves forward, and long-pressing the middle sensor stops, achieving simple car control;5. Water level control drainage device: connect the motor with a small water pump (light load type), combined with HS-S15A Water Level Sensor, when water level >80%, the motor starts (pump drains water), when water level <20%, the motor stops, achieving automatic drainage;6. Knob speed control fan: connect with HS-S28P Rotary Potentiometer, the potentiometer outputs a 0~5V analog signal when rotated, Arduino converts the signal to a 0%-100% PWM duty cycle, controlling the motor speed to change synchronously, achieving intuitive interaction of “manual knob → wind speed adjustment”.