Scan to FollowLearn Embedded Together, learn and grow together

When receiving a development board, the first thing to do is to understand it, find relevant materials, and familiarize oneself with its configurations. Then, set up the development environment.
Thinking back to the past (here comes the show-off), the first development board I encountered while learning embedded Linux was the OK6410 from Forlinx, with a core CPU of Samsung’s S3C6410. It was through this development board that I got started with embedded Linux.
I am very honored to have recently received an invitation from Forlinx Embedded to experience a development board, the OK3562-C. The core CPU is the domestic chip RK3562. Let’s experience this development board together.
Unboxing
When I received the Forlinx Embedded OK3562-C development board, the packaging left me with a professional and concise first impression.
The outer layer is a sturdy corrugated cardboard box, while the inner layer carefully wraps the main body of the development board in an anti-static bag, with clearly defined sections for accessories. The overall packaging ensures transportation safety while maintaining aesthetics.

Upon opening the package, the OK3562-C development board immediately came into view.
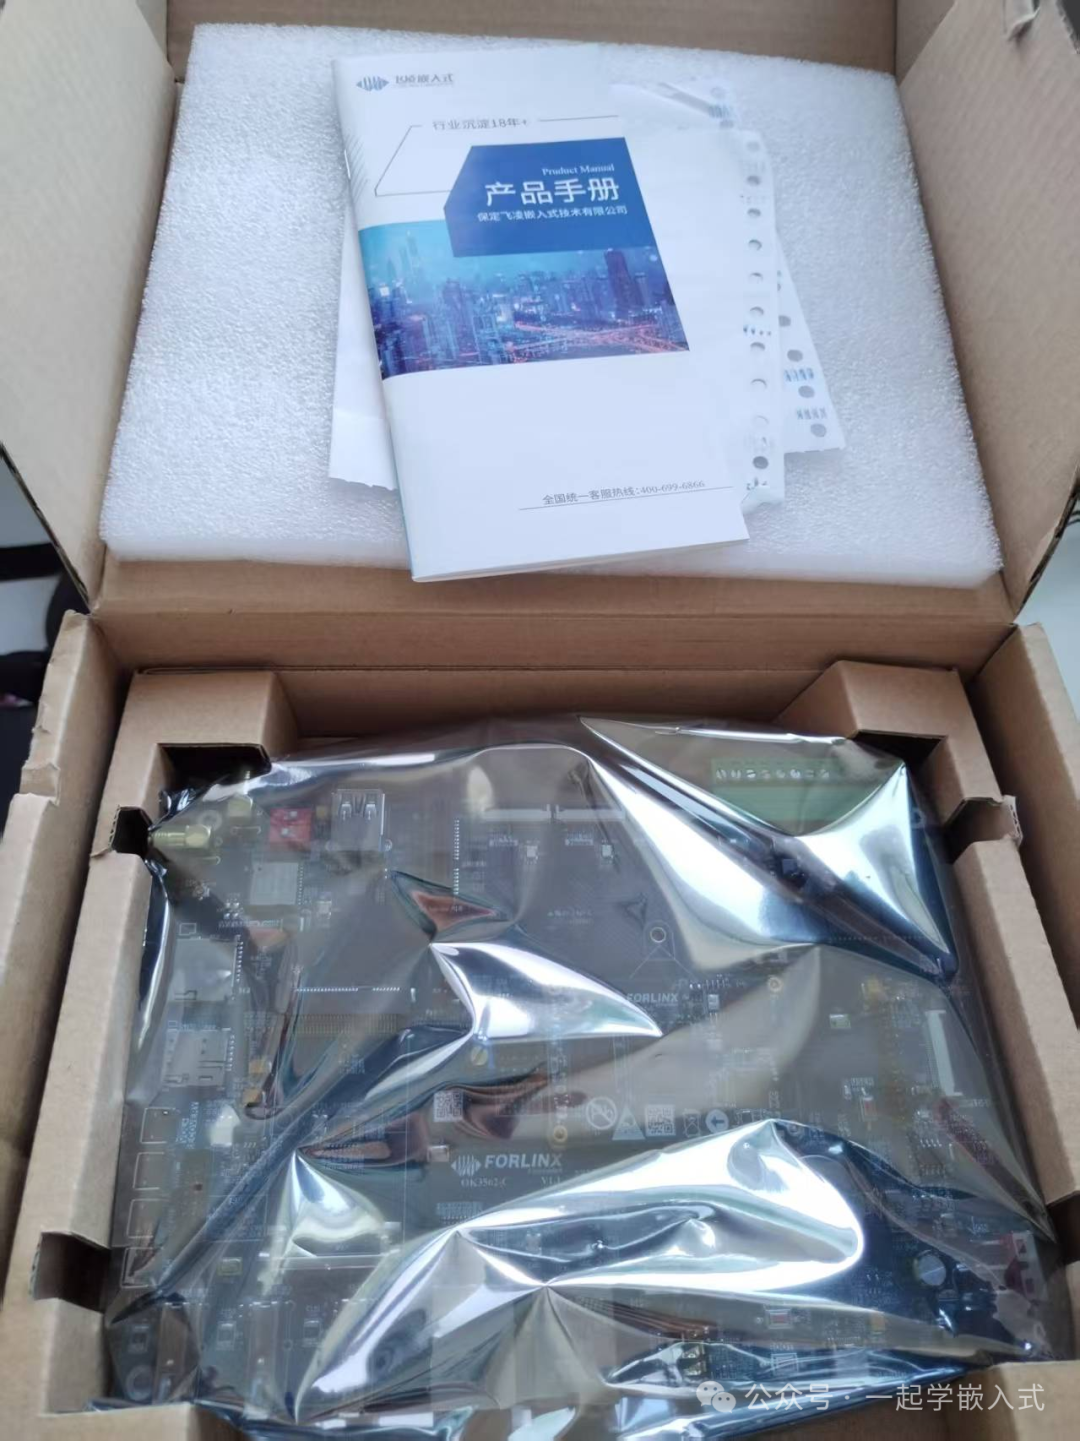
The included accessories are:
- 12V/2A power adapter
- Type-C debugging cable
- Quick start guide
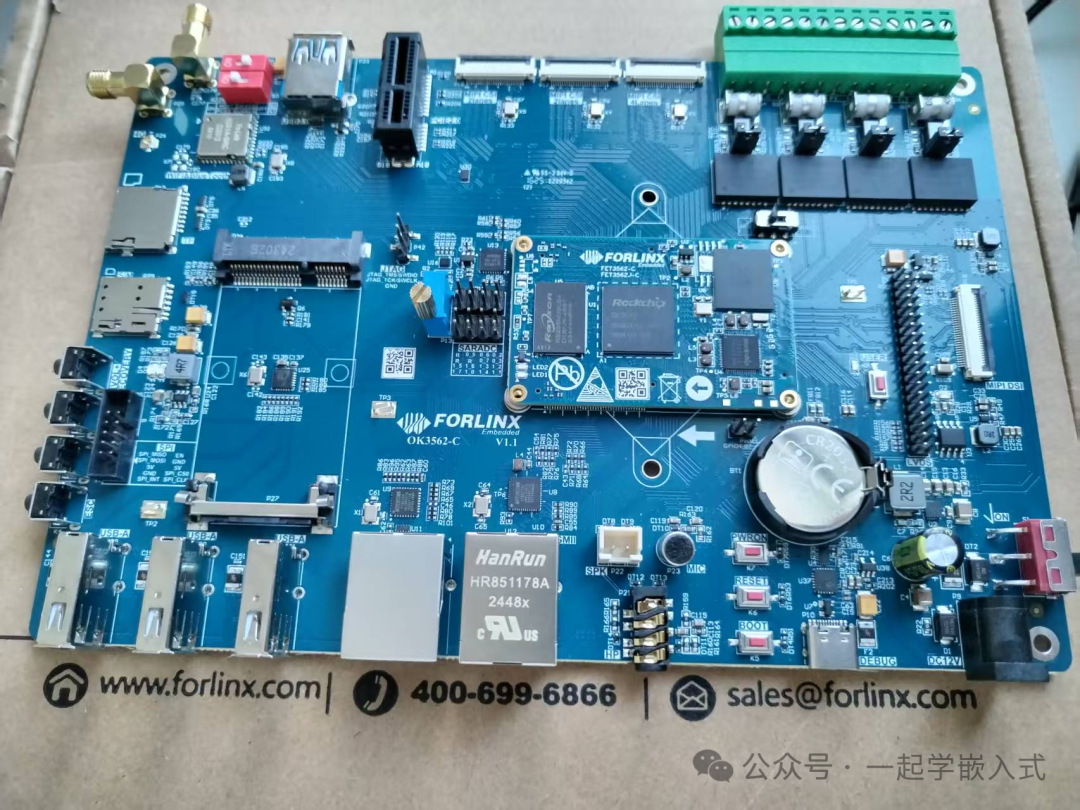
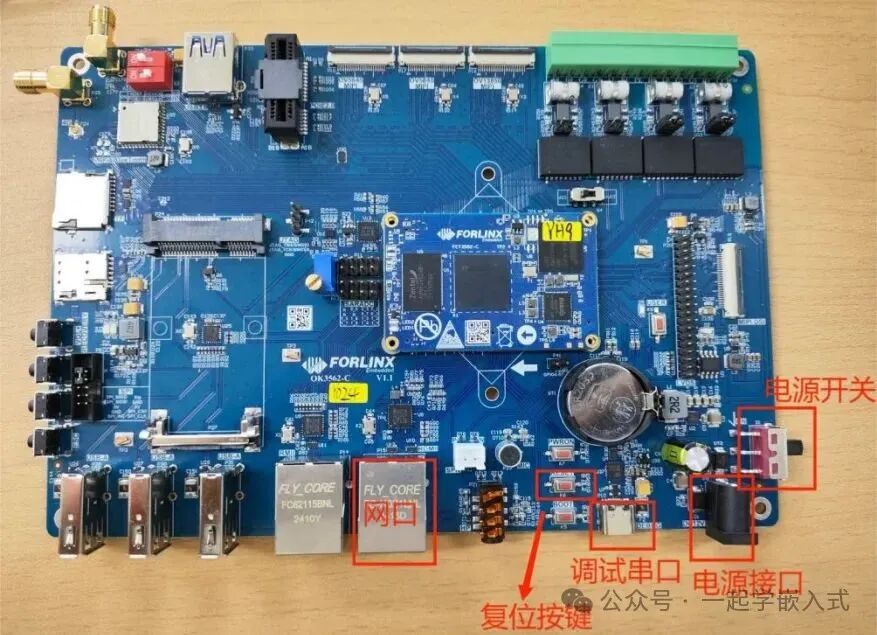
Let’s take a look at the mainboard of this single-board computer. It has a strong sense of technology, and the board is very exquisite and beautiful.
Hardware Configuration
The OK3562-C is equipped with a Rockchip RK3562 quad-core Cortex-A53 processor, with a main frequency of up to 1.8GHz. This configuration performs excellently in industrial control, smart NVR, edge computing, and other fields.
It features multiple embedded hardware engines that can optimize the performance of high-end applications. It supports nearly all formats of H.264 decoding at 1080p@60fps, H.265 decoding at 4K@30fps, and H.264 encoding at 1080p@60fps.
Additionally, it includes a high-quality JPEG encoder and decoder.
The RK3562 includes an embedded 3D GPU, ensuring full compatibility with OpenGL ES 1.1/2.0/3.2, OpenCL 2.0, and Vulkan 1.1. It also includes a special 2D hardware engine to maximize display performance and ensure smooth operation.
The RK3562 has a high-performance memory interface (LPDDR4/LPDDR4X), capable of maintaining demanding memory bandwidth.
After unpacking, I particularly noticed the following key components:
Core Processor Area: The RK3562 chip is carefully laid out in the center of the PCB, surrounded by the power supply circuit.
Storage Configuration: Onboard 8GB eMMC flash memory, with a reserved Micro SD card slot. This combination ensures the reliability of system boot and provides flexible storage expansion capabilities.
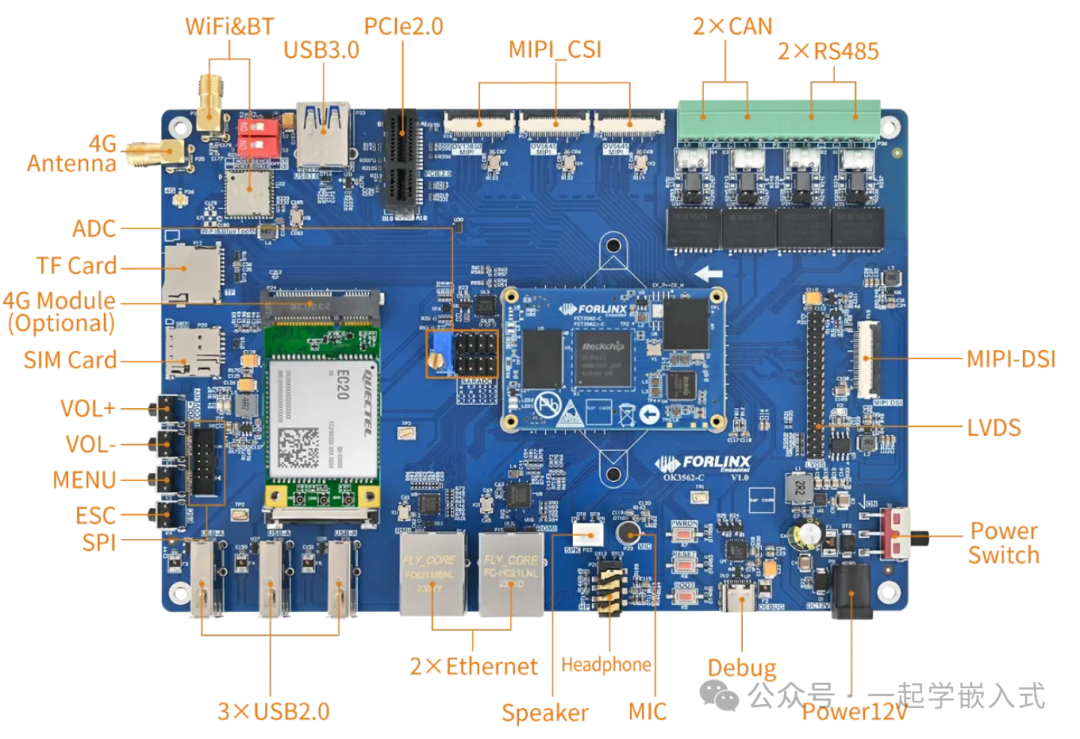
Interface Layout: The edges of the development board are densely but orderly arranged with various interfaces:
- Dual Gigabit Ethernet interfaces
- 1 USB 3.0 Host interface
- 3 USB 2.0 OTG interfaces
- PCIe 2.0 interface
- MIPI CSI/DSI interfaces
- Onboard speaker and MIC
- ….
It is particularly worth mentioning that Forlinx has adopted a gold immersion process for the PCB of the OK3562-C, with gold plating on the interfaces, which can effectively prevent oxidation during long-term use and enhance the product’s durability.
Documentation Configuration
This development board has very rich documentation (one could say that Forlinx Embedded’s documentation is very comprehensive)
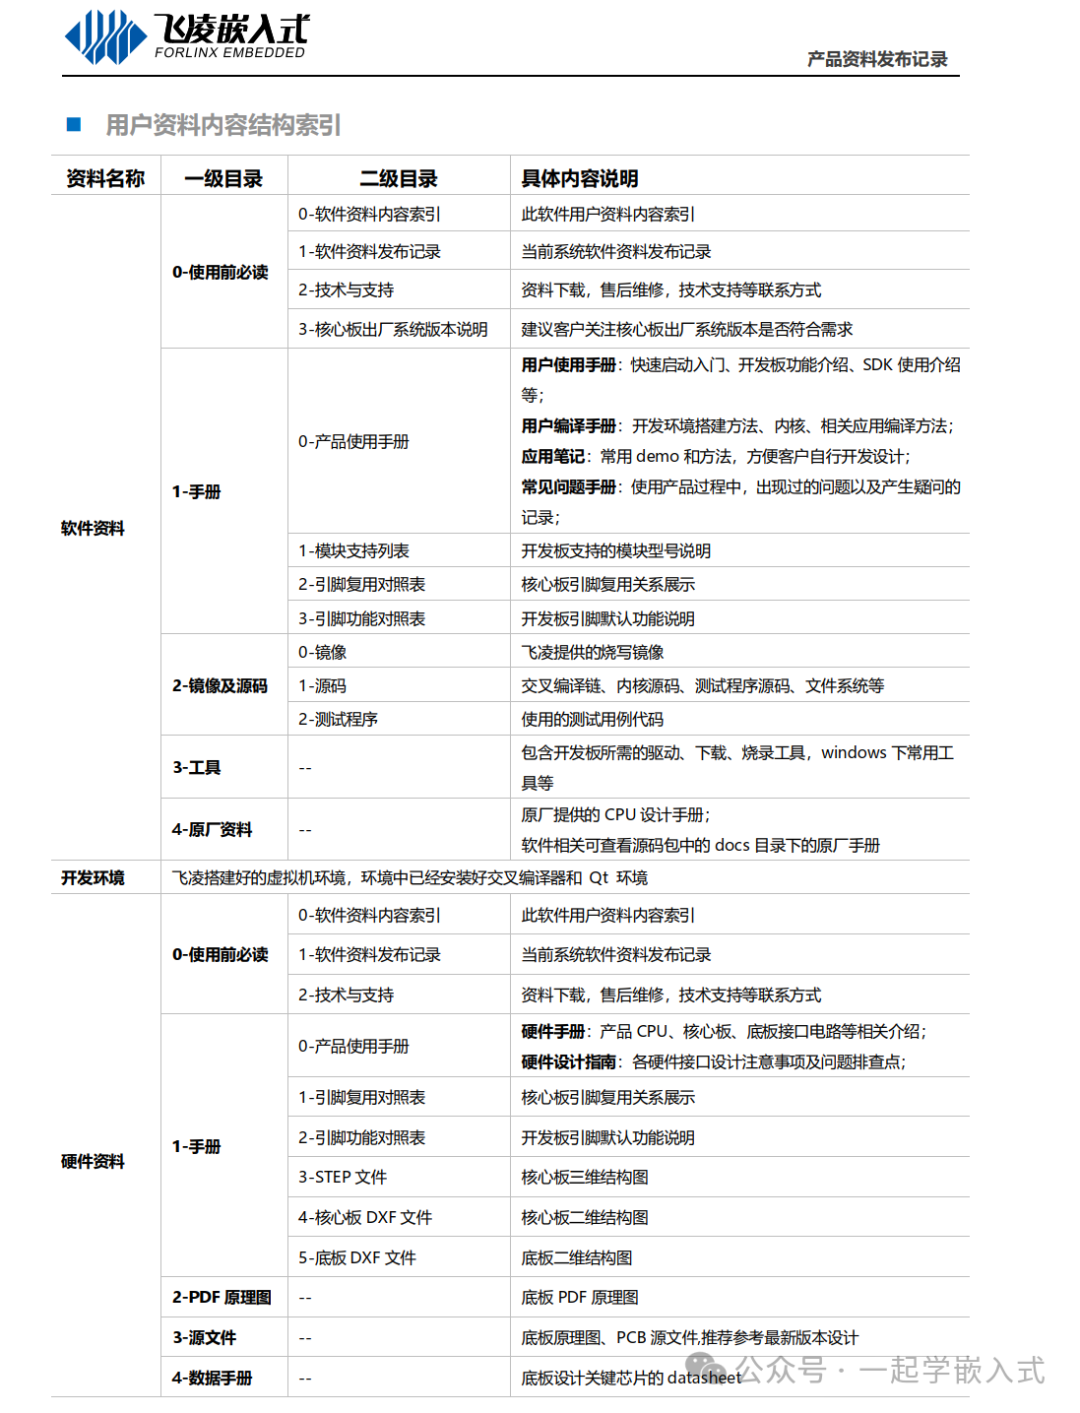
Documentation URL:https://forlinx-book.yuque.com/rh74yu/ok3562
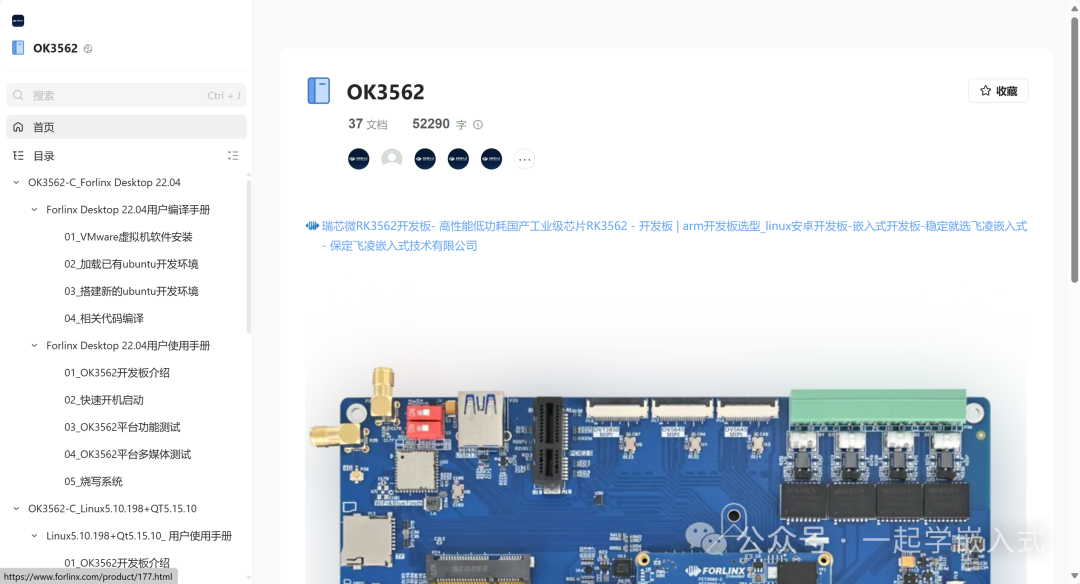
Development Manual:https://forlinx-book.yuque.com/rh74yu/rkword
Boot Experience
The OK3562 development board has two system login methods: serial port login and network login. Hardware preparation before system boot:
-
12V3A DC power supply
-
Debugging serial cable (for serial port login)
The debugging serial port on the development board is a Type-C USB port. Users can connect the development board and PC using a USB Type-A to Type-C cable to check the status of the development board.
-
Network cable (for network login)
-
Screen, connect the screen according to the development board interface (not required if no display is needed)
Connect the 12V power supply, press the power button, and the development board will start immediately. The power indicator lights up, and the system LED starts to flash regularly. The entire process is quiet and without abnormal heating.
Serial Port Login Method
The OK3562-C platform debugging serial port uses a Type-C interface, with an onboard USB to UART chip, eliminating the need for customers to purchase USB to serial debugging tools, making it extremely simple and convenient to use.
-
Serial port terminal login for forlinx user: username forlinx, password forlinx.
-
Serial port terminal login for root user: username root, password root.
-
Serial port settings: baud rate 115200, data bits 8, stop bits 1, no parity, no flow control.
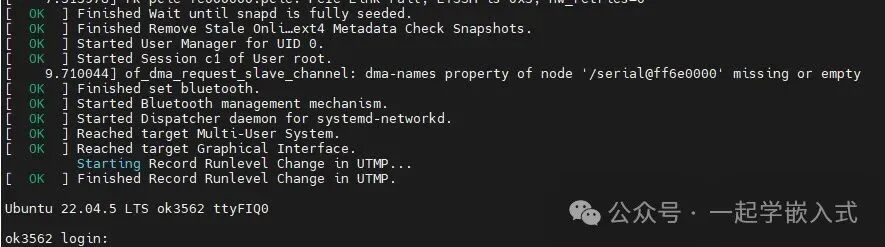
After setting up the terminal software on the PC, connect the PC and development board via the serial cable, and power on. You can see the boot information through the terminal software.
The following boot information indicates a successful boot, and you can press Enter to create a new command line:
Network Login
-
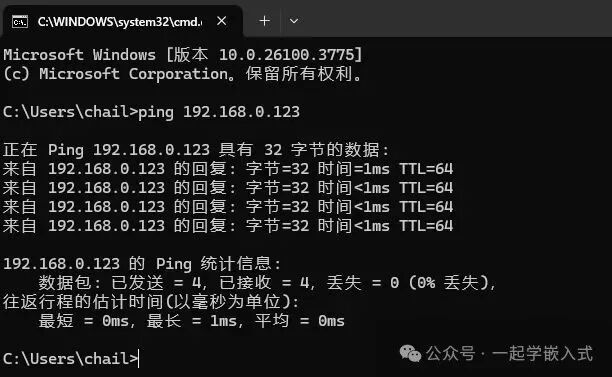
The network card is configured with a static IP by default at the factory, with the IP address 192.168.0.123
-
During testing, the computer and development board need to be on the same subnet
Before performing network login, ensure that the network connection between the computer and the development board is normal. You can test the connection status between the computer and the development board using the ping command. The specific operation method is as follows:
1. Connect the development board’s eth0 to the computer via a network cable, power on the development board, and after the kernel starts, the blue heartbeat light on the core board will flash. The network card connected to the computer will quickly flash after normal startup, at which point you can test the network connection.
2. Disable the computer firewall (no introduction to disabling the firewall here, general operation for computers), open the run command on the computer
3. Use cmd to open the computer administrator interface and use the ping command to test the network connection status between the computer and the development board.
Development Environment Setup
Forlinx provides comprehensive development support for the OK3562-C. Following the quick guide, I completed the following development environment configuration:
- Toolchain Installation: The SDK package downloaded from Forlinx’s official website includes the cross-compilation toolchain (aarch64-linux-gnu-gcc), which can be used after extraction.
- Source Code Acquisition: Synchronize the complete Linux BSP source tree using the repo tool.
- Compile Test: Run
<span>./build.sh</span>to successfully compile the kernel image and root filesystem. - Flashing Verification: Use the upgrade tool provided by Forlinx to flash the new system via the USB OTG port.
The entire setup process took about 1 hour (depending on network speed), and the steps in the documentation were clear and accurate, with no significant obstacles encountered.
Particularly commendable is the “OK3562-C Development Guide” provided by Forlinx, which not only includes basic operations but also detailed driver development examples for specific peripherals.
Of course, you can also directly load the official ubuntu development environment provided by Forlinx.
Peripheral Function Testing
To comprehensively evaluate the performance of the OK3562-C, I conducted systematic tests on its main peripherals:
Network Performance:
$ iperf3 -c 192.168.0.123
[  5]   0.00-10.00  sec  1.09 GBytes   938 Mbits/sec
The test results show that the gigabit network port can reach line speed, with excellent network performance.
USB 3.0 Interface:
Connected to an SSD external hard drive, tested using the dd command:
$ dd if=/dev/sda of=/dev/null bs=1M count=1024
1024+0 records in
1024+0 records out
1073741824 bytes (1.1 GB) copied, 2.34342 s, 458 MB/s
The transfer rate meets the USB 3.0 standard.
GPIO Control:
Control the user LED through the sysfs interface:
$ echo 1 > /sys/class/gpio/gpio38/value  # LED on
$ echo 0 > /sys/class/gpio/gpio38/value  # LED off
The response is immediate, with no delay.
USB2.0:
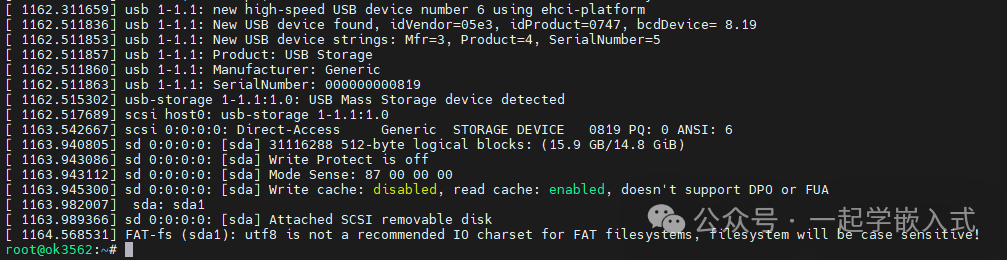
The OK3562 supports a USB2.0 interface, allowing users to connect USB mice, USB keyboards, USB flash drives, and other devices to any onboard USB HOST interface, supporting hot-swapping of these devices. Here, I will demonstrate by mounting a USB flash drive, which currently supports up to 32GB; devices over 32GB have not been tested.
The terminal will print information about the USB flash drive. Due to the variety of USB flash drives, the displayed information may vary:
After the development board starts, connect the USB flash drive to the development board’s USB host interface. The default log printing information is low, and there will be no printed information. You can use the dmesg command to view and find the USB flash drive-related information.
Button Testing:
Use the fltest_keytest command line tool for button testing. Currently, fltest_keytest supports testing the four buttons on the baseboard: VOL+, VOL-, MENU, ESC, with key codes 115, 114, 139, 158 respectively.
Execute the following command, noting that when a touchscreen is present, it is event4:
root@ok3562:~# fltest_keytest /dev/input/event3
At this point, press and release the buttons in sequence, and the terminal will output the following content:
key115 Presse                                                         // VOL+ pressed
key115 Released                                                       // VOL+ released
key114 Presse                                                         // VOL- pressed
key114 Released                                                       // VOL- released
key139 Presse                                                         // MENU pressed
key139 Released                                                       // MENU released
key158 Presse                                                         // ESC pressed
key158 Released                                                       // ESC released
Conclusion
After the experience, the Forlinx OK3562-C development board performs quite well.
It successfully strikes a good balance between performance, expandability, and price, making it suitable as a development platform for learning embedded Linux, as well as meeting the prototyping needs in professional fields such as industrial control and edge computing.
More ways to play will be introduced later.
Thank you for reading, keep it up~

Follow 【Learn Embedded Together】 to become better together。
If you find the article good, click “Share“, “Like“, or “Recommend“!