Using AI Xiao Zhi on the ESP32 development board typically involves steps such as hardware assembly, software environment setup, firmware flashing, and function configuration. Below is a detailed operational guide suitable for open-source AI Xiao Zhi robot projects based on ESP32 (such as common DIY kits):
1. Hardware Preparation and Assembly
1. Required Hardware Components
- Core Components:
- ESP32 development board (such as Espressif official board, NodeMCU-32S, Wemos D1 R32, etc.)
- Microphone module (such as electret microphone + amplifier circuit, or dedicated voice module ISD1820)
- Speaker (8Ω/0.5W or higher, for voice output)
- Display (optional, such as OLED screen SSD1306, TFT screen, etc., for displaying interaction information)
- Auxiliary Components:
- Button/Switch (for waking up or resetting AI Xiao Zhi)
- Power supply (5V lithium battery or USB power supply)
- Dupont wires, breadboard, or PCB board (for circuit connections)
- Enclosure/Bracket (optional, for securing components)
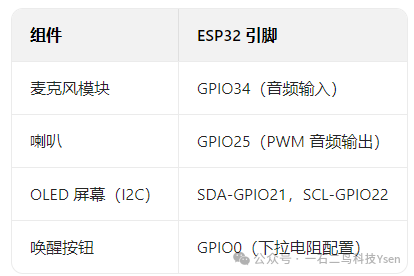
2. Hardware Connection Scheme
Taking the common ESP32 + Microphone + Speaker + OLED as an example, the connection method is as follows:
⚠️ Note:
- The microphone module may require an additional amplifier circuit to ensure clear input signals;
- The speaker connection requires a series capacitor (10μF or higher) to prevent DC damage to the speaker;
- The power supply must be stable (recommended 5V/2A) to avoid restarts due to insufficient current.
2. Software Environment Setup
1. Install Arduino IDE (Recommended Solution)
- Step 1: Download and install Arduino IDE.
- Step 2: Add ESP32 support:
- Open the IDE, go to “File > Preferences”, and enter the following in “Additional Board Manager URLs”:
<span>https://dl.espressif.com/dl/package_esp32_index.json</span> - Go to “Tools > Board > Board Manager”, search for “ESP32” and install the Espressif official board package.
- Step 3: Install dependent libraries (search and install in the IDE via “Tools > Manage Libraries”):
- ESP32 Arduino Core
- Arduino UPnP Library (if network functionality is needed)
- Arduino JSON (data parsing)
- OLED driver library (such as Adafruit SSD1306)
2. Download AI Xiao Zhi Firmware or Code
- Obtain from Open Source Projects: Common ESP32 AI Xiao Zhi projects can be searched on GitHub (such as “ESP32 AI Voice Assistant”), recommended projects:
- ESP32-AI-Kit (Espressif official AI development kit)
- VoiceControl_ESP32 (basic voice control example)
- Code Structure Description: The firmware typically includes the following functional modules:
- Voice capture (microphone input processing)
- Keyword wake-up (local wake word detection, such as “Xiao Zhi, hello”)
- Voice recognition and response (local TTS or network API calls)
- Interaction logic (dialogue state management)
3. Firmware Configuration and Flashing
1. Configure Code Parameters
- Open the downloaded firmware code and modify the following key parameters:

- Local Voice Model (Optional): If using offline voice recognition, it is necessary to train or import the wake word model in advance (such as through ESP32’s neural network library TensorFlow Lite for Microcontrollers).
2. Flash Firmware to ESP32
- Connect the ESP32 to the computer, ensuring the driver is properly installed (Windows may require CH340/CP2102 driver installation).
- Select the correct board in Arduino IDE (such as “ESP32 Dev Module”) and port (“Tools > Port”).
- Click the “Upload” button and wait for the code to be flashed (about 1-2 minutes).
4. Function Testing and Debugging
1. Basic Function Testing
- Power On Startup: After connecting the power supply, the ESP32 will automatically run the firmware, and the display may show initialization information (such as “AI Xiao Zhi is starting”).
- Wake-up Test: Say the wake word (such as “Xiao Zhi, hello”) to the microphone and observe if there is a response (the speaker plays a prompt sound, and the display shows “I am here”).
- Voice Interaction: Try asking questions (such as “How’s the weather today”), if the network API is configured, AI Xiao Zhi will fetch information online and respond vocally.
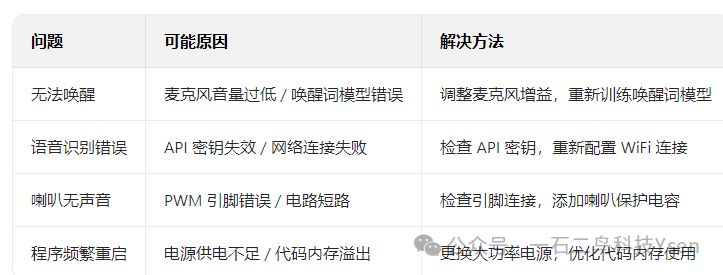
2. Common Issues and Solutions
5. Advanced Function Extensions
1. Custom Wake Words and Responses
- Modify the wake word model and dialogue logic in the code, by adding new keywords and response functions, to achieve personalized interaction (such as controlling smart home devices).
2. Integrate Cloud Services
- Connect to third-party AI platforms (such as Alibaba Cloud IoT, Tencent Cloud Smart Voice) to obtain more powerful natural language processing capabilities, but be aware of data consumption and API costs.
3. Hardware Expansion
- Add sensors (such as DHT11 temperature and humidity sensor, infrared sensor) to enable AI Xiao Zhi to have environmental monitoring or device control functions.
6. Reference Resources
- Open Source Projects: Search “ESP32 voice assistant” on GitHub for more example codes.
- Tutorial Videos: Search “ESP32 AI Xiao Zhi production” on Bilibili for hardware assembly and code debugging demonstrations.
- Official Documentation: The Espressif ESP32 documentation center (https://docs.espressif.com) provides guides for AI development kits.