

Repairing the “core board” of a drone is the most advanced, complex, and high-risk task in the entire field of drone maintenance, often referred to as the “Mount Everest” of repairs.
The primary and strongest recommendation: For the vast majority of users, especially consumer drone users (such as DJI), once you suspect a core board failure, the only safe and economical choice is to return it to the manufacturer or replace the entire core module. The success rate of self-repair is extremely low and can easily lead to permanent damage.
The following content will detail every aspect of core board repair, primarily aimed at providing you with in-depth diagnostic knowledge and decision-making basis, rather than encouraging self-repair.
—
1. What is a core board? How does it differ from a flight controller?
First, we must clarify the concepts:
· Flight Controller (FC): Primarily responsible for stabilizing the drone’s flight attitude. It processes data from the IMU (Inertial Measurement Unit), compass, barometer, etc., and controls the motors through PID algorithms to achieve hovering and stable flight. It acts as the “pilot”.
· Core Board (Main Board): The “brain” and “central nervous system” of the drone. It typically integrates or connects:
· Main Processor (SoC): Runs the operating system (such as Linux), processes intelligent flight modes, image encoding, computer vision algorithms, etc.
· Image Signal Processor (ISP): Processes raw image data from the camera.
· Memory (RAM) and Storage (eMMC): Stores the operating system, programs, and data.
· Multiple Power Management ICs (PMIC): Provide different voltages to various chips on the board.
· Various Interface Controllers: Used to connect flight controllers, visual sensors, obstacle avoidance modules, gimbals, GPS modules, video transmission modules, remote controllers, etc.
· In highly integrated drones (like DJI), flight control functions are often integrated into the core board as part of it.
A simple analogy: the flight controller is the spinal cord, responsible for reflexes and balance; the core board is the entire brain, responsible for thinking, decision-making, and coordinating the whole body.


2. Symptoms of Core Board Failure and Initial Diagnosis
The symptoms of core board failure are usually very severe and complex, and can easily be confused with failures of the flight controller or other modules.
Failure Phenomenon Possible Core Board Related Causes
Completely bricked: No response when pressing the power button, indicator light not on, unable to charge.
1. Severe damage to the core board power management circuit (PMIC)
2. Short circuit on the core board, triggering protection
3. Severe damage to the bootloader
Stuck during startup: The indicator light gets stuck at a certain state during startup, or the device keeps rebooting.
1. Operating system crash, eMMC storage chip damage
2. A core chip (such as CPU, memory) is poorly soldered or damaged
3. Unstable power supply
Unable to connect to computer or app: USB does not recognize the device, or the app cannot discover the drone.
1. USB interface chip or circuit damage
2. Fault in the main processor related module
Video transmission related issues: No video transmission signal, video lag, screen artifacts, green screen.
1. Image processing unit (ISP) failure
2. Video transmission chip poorly soldered or damaged (although video transmission may be independent, it is closely connected to the core board)
Specific functions permanently disabled: Obstacle avoidance, visual positioning, intelligent follow, etc., cannot be enabled at all. The computing unit or interface responsible for that function on the core board is damaged.
Camera/gimbal issues: Gimbal cannot self-check, camera cannot take photos or videos (after excluding issues with the gimbal and camera themselves). The gimbal control chip or camera interface circuit on the core board is faulty.


3. Systematic Diagnostic Process: How to Determine if the Core Board is Faulty?
Before deciding on any repair plan, a rigorous investigation must be conducted.
1. Basic Checks (Essential Steps):
· Battery: Ensure the battery voltage is normal, measure with a multimeter. A bad battery is the primary culprit for “bricking”.
· Power Lines: Check for any breaks or burn marks in the power lines from the battery connector to the core board.
· External Connections: Ensure all cables connected to the core board (especially power cables) are securely plugged in and that there are no bent pins.
2. Cross-Isolation Testing (if possible):
· If the drone has other separable modules (such as visual modules, GPS modules), try disconnecting them and powering on. Sometimes these peripheral modules can short circuit and prevent the core board from starting.
· If the core board itself is modular, you can try installing it in another confirmed working drone of the same model for testing. This is the most accurate method of diagnosis (but very costly).
3. Observation and Smell:
· Carefully visually inspect both sides of the core board, looking for:
· Burn marks: Any black spots, cracks, or bulges on any chip.
· Corrosion marks: Water stains, mold, green rust.
· Physical damage: Bent board, capacitors falling off.
· Smell: Is there a noticeable burnt electronic component smell?
4. Multimeter Measurements (Advanced):
· Measure ground resistance:
· In a powered-off state, use the diode or resistance setting on the multimeter.
· Measure the resistance from the positive terminal of the battery connector to ground (GND).
· Normal: Should have a resistance of several hundred ohms or more (should not be close to 0).
· Abnormal: If the resistance is close to zero ohms, it indicates a serious short circuit on the main board. This is likely strong evidence of core board failure.
· Measure key voltages:
· Locate the power management chip (PMIC) on the core board. Refer to its datasheet to find the pins for various output voltages (such as 1.8V, 3.3V, 5V, etc.).
· Power on and measure these pins with the voltage setting on the multimeter.
· If a certain voltage is completely absent or far below the nominal value while the input voltage is normal, it may indicate that the PMIC is damaged or its load (subsequent chips) is shorted.


4. Repair Methods: The Abyss of Chip-Level Repair
If it is determined that there is a hardware failure in the core board, the repair will enter the realm of chip-level work.
Required Equipment (extremely specialized):
· High-precision constant temperature soldering station + hot air gun
· Optical microscope
· BGA rework station (ball placement station)
· Precision multimeter, DC power supply
· Abundant spare parts (for chip removal)
Common repair operations (high risk!):
1. Replacing discrete components: If only a capacitor, resistor, inductor, or MOSFET is damaged, it is relatively easy. Just replace it with a soldering iron.
2. Replacing interface chips: Such as USB control chips, power management chips (PMIC). These chips are usually in QFN or LGA packages and require a hot air gun for removal and soldering. The success rate is relatively high.
3. Reflowing BGA chips: For main processors (SoC), memory, eMMC storage, and other BGA packaged chips, poor soldering is a common issue. Use a BGA rework station to heat the chip, allowing the solder balls to remelt and reconnect. This requires precise temperature curve control.
4. Replacing BGA chips: This is the most difficult operation.
· Removal: Use a BGA rework station to remove the damaged chip.
· Underfill removal and ball placement: BGA chips usually have underfill adhesive underneath, which needs to be carefully removed. Then, re-ball the chip with solder balls.
· Soldering: Align the new chip with the pads and solder it using the BGA rework station according to the precise temperature curve.
Why is it strongly discouraged to attempt this yourself?
· Extremely low success rate: Without experience and skills, 99% will fail.
· High costs: Professional equipment is expensive, and good spare parts are hard to find.
· Risk of secondary damage: Improper heating can burn chips, char circuit boards, and cause pads to fall off, rendering a potentially repairable board completely unusable.
· Software barriers: Even if hardware repair is successful, some highly integrated core boards (like DJI) require official software for firmware updates or serial number matching, which individuals cannot complete.


5. Data Recovery (An Important Consideration)
If there is important data on the drone that has not been backed up (such as photos, videos), and the failure point is only a part of the core board (such as power), sometimes professional repair personnel can use special methods (such as removing the eMMC storage chip and reading it with a programmer) to recover data. This is also a complex operation.
6. Final Recommendations and Decision Tree
When faced with core board failure, your choices are very clear:
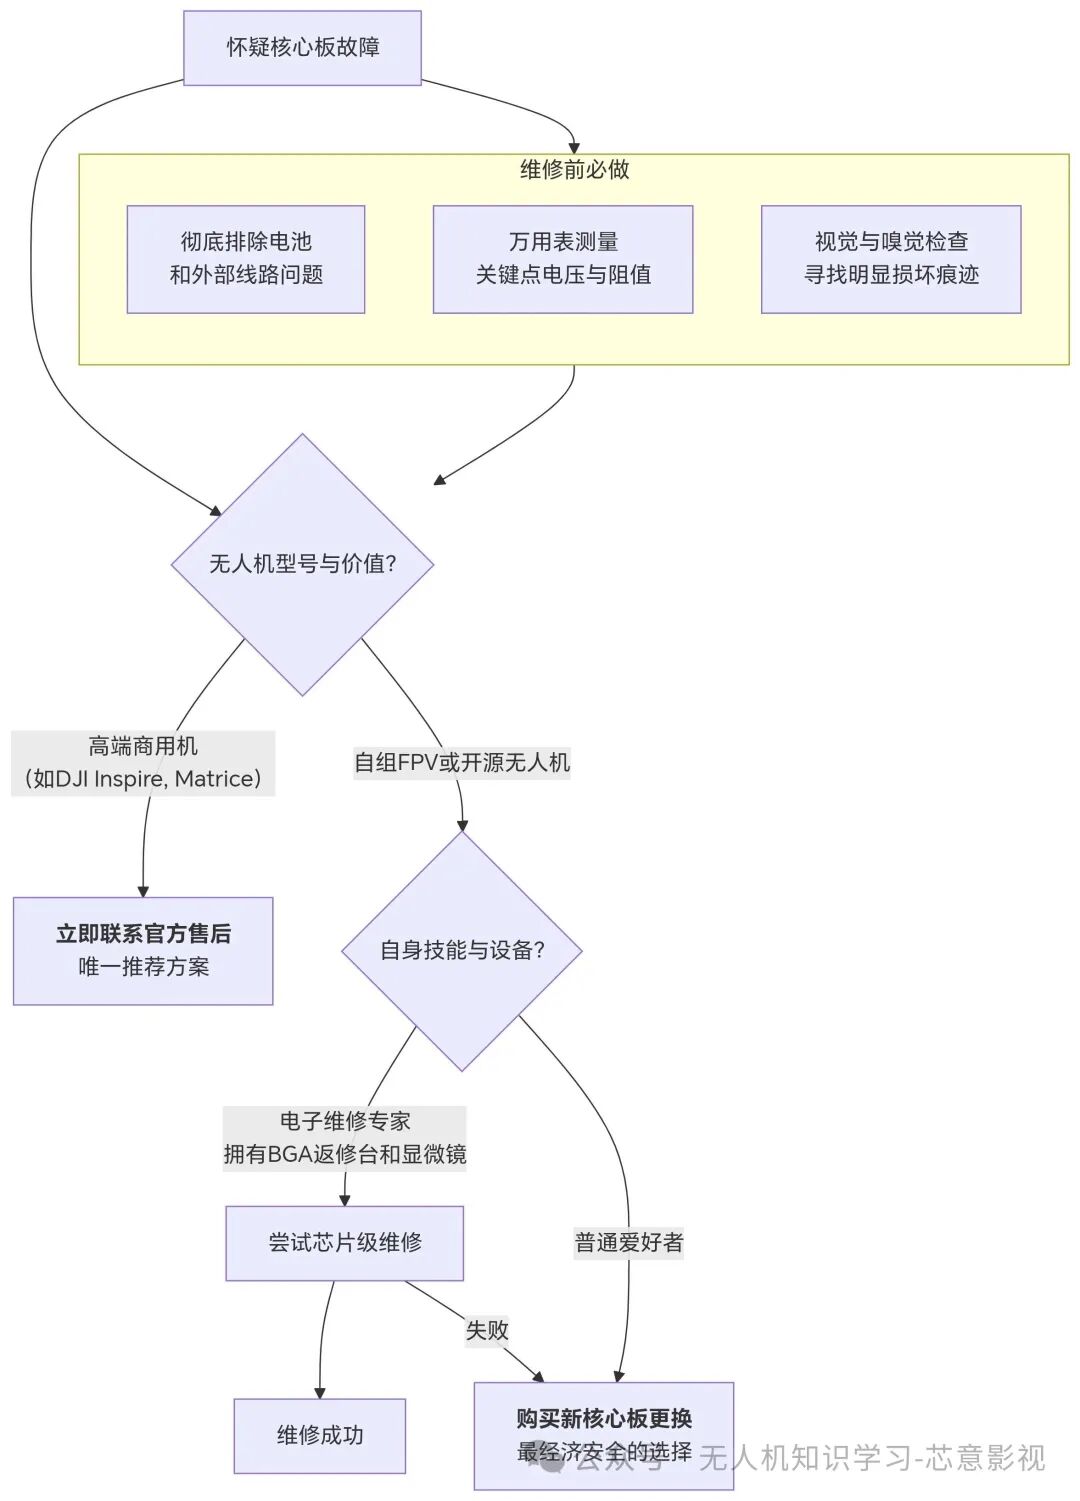
Summary:
· For 99.9% of users: Core board failure ≈ need to replace the entire main board. Contacting official after-sales service for a quote is the only wise choice.
· For a very small number of experts: Core board repair is a technically challenging task, and the value of the process may exceed the repair itself.
We hope this extremely detailed guide provides you with a comprehensive understanding of the complexities of drone core board repair and helps you make the most reasonable decision.


 Like
Like Share
Share Like
Like