Click the blue text to follow us

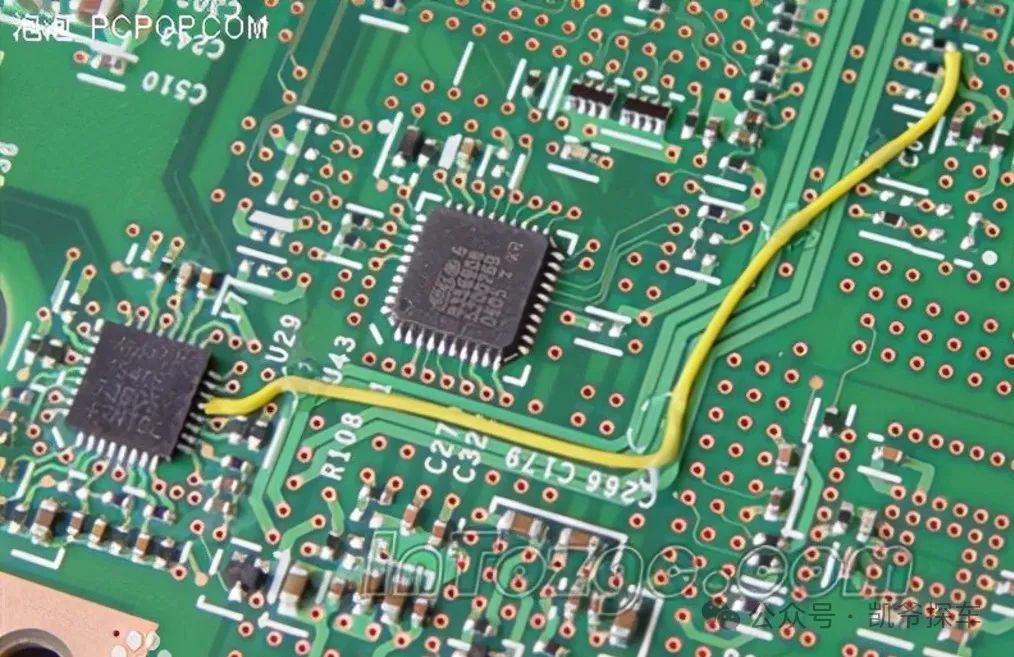
Recently, I took on an urgent repair task; a control board had multiple broken fly wires, and the client requested a repair within 24 hours. This posed a challenge for me, as 0.1mm enameled wire is difficult to handle under a microscope, not to mention ensuring reliability. However, after 15 years of experience, I still have some tricks up my sleeve. Today, I will share the ins and outs of fly-wiring on circuit boards.
The Essence of Fly-Wiring: A “Circuit Band-Aid” for Emergency Repairs
In simple terms, fly-wiring involves using fine wires to bridge connections on a circuit board, reconnecting lines that are broken or have design flaws. Just like applying a band-aid to a cut on human skin, fly-wiring serves as a “band-aid” for the circuit board.
However, don’t underestimate this “band-aid”; without proper techniques, it can easily cause greater damage:
-
Wires that are too thick can cause short circuits.
-
Excessive soldering temperature can damage surrounding components.
-
Poor wiring can introduce interference noise.
So the key is: how to complete the fly-wiring quickly and effectively?
To Do a Good Job, One Must First Prepare the Tools
First, you need the right tools:
-
Microscope: 40-100x magnification, an essential weapon.
-
Fine-tip soldering iron: tip diameter < 0.5mm.
-
0.1-0.3mm enameled wire: the main actor in fly-wiring.
-
Flux: enhances soldering performance.
-
Tweezers: essential for precise positioning.
Note: Cheap USB microscopes may have delays that affect operations. It’s recommended to invest in an optical microscope.
Three Steps for Practical Fly-Wiring
1. Carefully Plan the Wiring Path
First, use a pencil to draw the wiring path on the PCB, noting:
-
Avoid high-frequency signal lines.
-
Try to keep it straight, minimizing bends.
-
Leave some length to prevent stress.
2. Prepare the Ends of the Enameled Wire
This is an easily overlooked detail. We need to clean the insulation paint off both ends of the enameled wire:
-
Gently burn the ends with a match head.
-
Lightly sand the ends.
-
Dab some rosin flux on the ends.
Never use your teeth to bite! A friend did this and ended up staining his teeth…
3. Precise Soldering
-
First, tin the PCB pad.
-
Use tweezers to hold the enameled wire and align it with the position.
-
Dab a small amount of solder on the soldering iron tip.
-
Lightly touch the pad for 3-5 seconds to complete the soldering.
The key is: control the temperature between 300-320℃, and do not exceed 5 seconds.
The Art of Fly-Wiring: Tips from Experienced Technicians
-
Use component pins as relays: Chip pins and resistor pins can serve as “landing points” to reduce fly-wire length.
-
Route along the “edges”: Follow the edges of the PCB or chip for a neat appearance and to prevent accidental removal.
-
“Snake-like routing”: Long-distance fly-wires can be shaped into an S-curve, leaving slack to prevent breakage.
-
Multiple point fixations: Use glue to fix every 1-2cm for enhanced reliability.
-
Batch fly-wire knotting: For multiple parallel fly-wires, tie them at intervals to prevent tangling.
Testing and Validation After Fly-Wiring
After completing the fly-wiring, be sure to perform the following tests:
-
Use a multimeter to measure continuity.
-
Power on for functional testing.
-
Inspect solder joints under a high-magnification microscope.
-
Gently tug on the fly-wires to ensure they are secure.
Remember: Take precautions during testing to avoid short circuits!
Practical Exercise Recommendations
Want to get hands-on quickly? Try practicing on a scrap circuit board:
-
Start with 0.3mm wire, and transition to 0.1mm once you’re familiar.
-
Challenge yourself with different lengths and paths of fly-wires.
-
Attempt to complete multiple fly-wires in a confined space.
Remember: Patience and attention to detail are key. Rome wasn’t built in a day; practice makes perfect, so take your time.