In simple terms, configuring a static IP on Linux means manually assigning a fixed IP address to the Linux system, rather than obtaining it automatically through a DHCP server.
Core Features
- The IP address remains fixed and does not change with network environment or system reboots.
- Requires manual configuration of subnet mask, gateway, DNS, and other network parameters to ensure network connectivity.
Applicable Scenarios
- Server deployment, such as web servers or database servers, which require a fixed address for external access.
- Interconnection of devices within a local area network, requiring stable IP addresses for communication or management.
Preparation Before Configuration
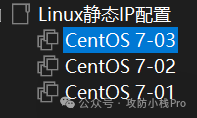
Prepare three Linux systems; I am using CentOS 7.
Check Current Network Information
- Use the command
<span><span>ip addr</span></span>or<span><span>ifconfig</span></span>to check the status of network interfaces and current IP addresses. - Use
<span><span>ip route</span></span>or<span><span>route -n</span></span>to check the default gateway and routing table. - Determine the network interface name (e.g., ens33, eth0, etc.), which may vary across different systems.
Collect Necessary Information
- IP Address Choose an unused address (e.g., 192.168.1.100).
- Subnet Mask Typically 255.255.255.0 (or /24).
- Gateway Address Check using
<span><span>ip route | grep default</span></span>. - DNS Server You can use public DNS such as 8.8.8.8 (Google) or 114.114.114.114 (domestic).
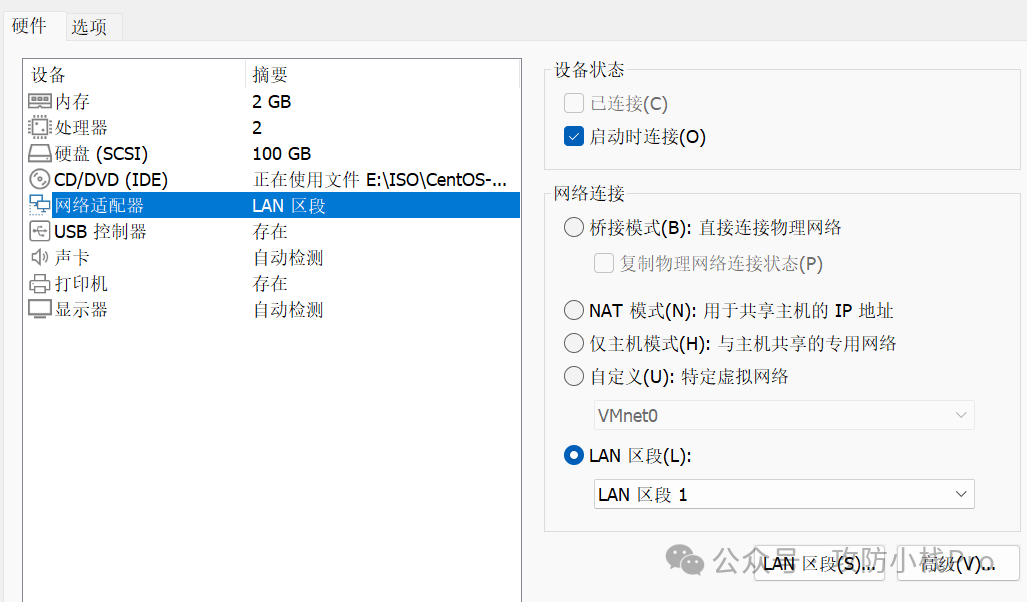
Formal Configuration First, we will configure the network card information for the three virtual machines.
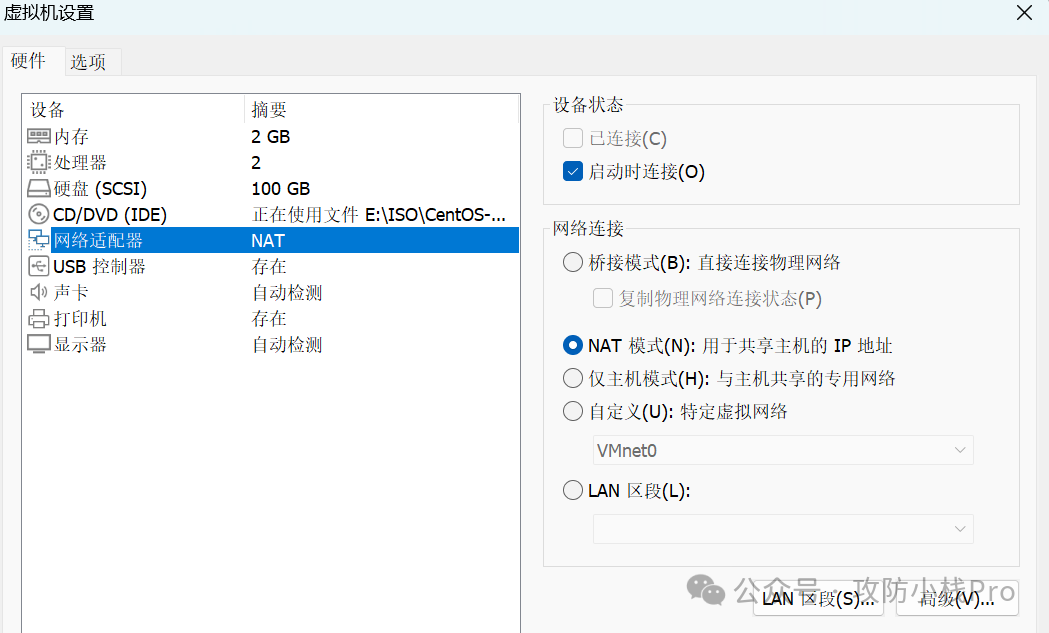
- CentOS 7-01 — Network card configured in NAT mode.
- CentOS 7-02 configuration Two network cards — configured as NAT mode and LAN segment respectively.
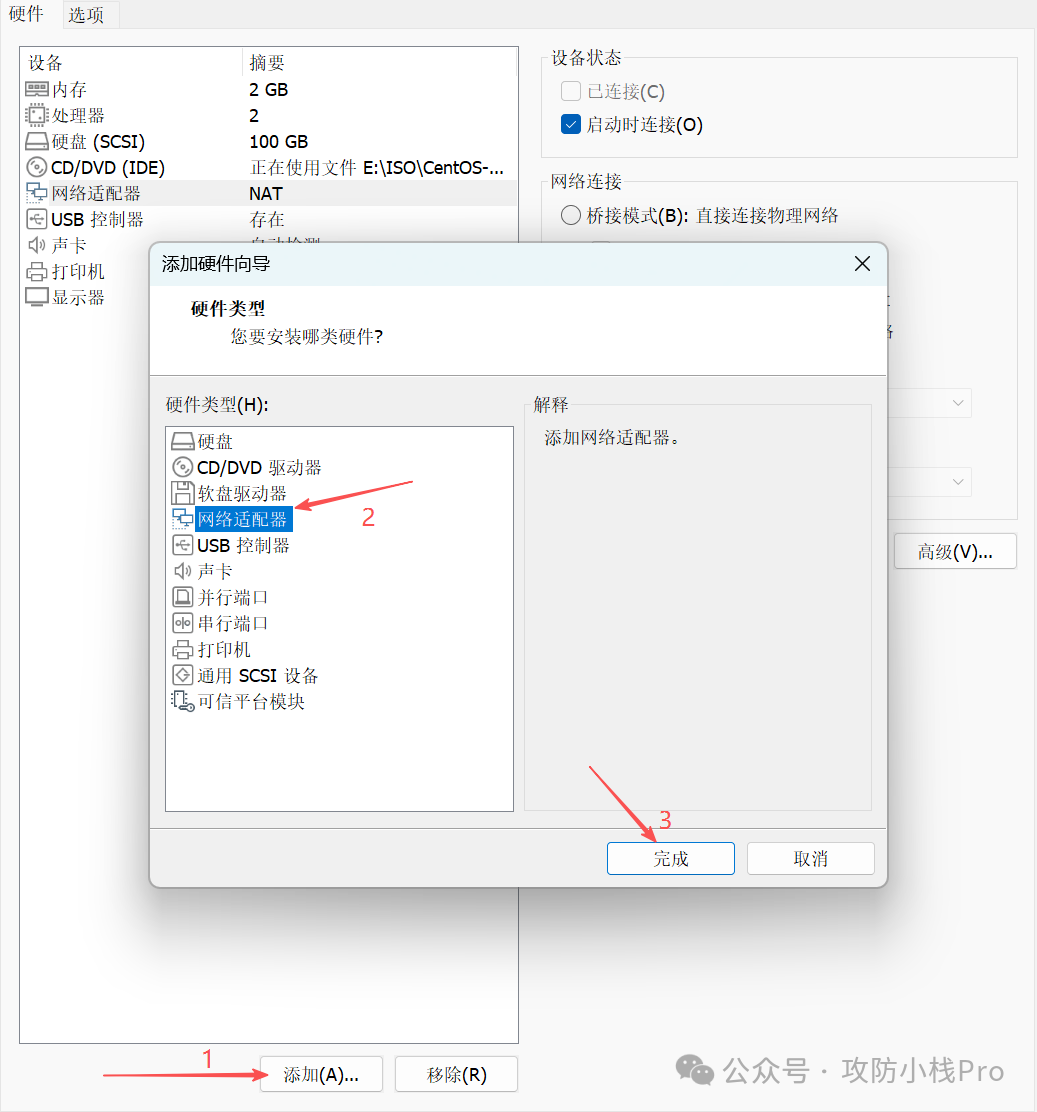
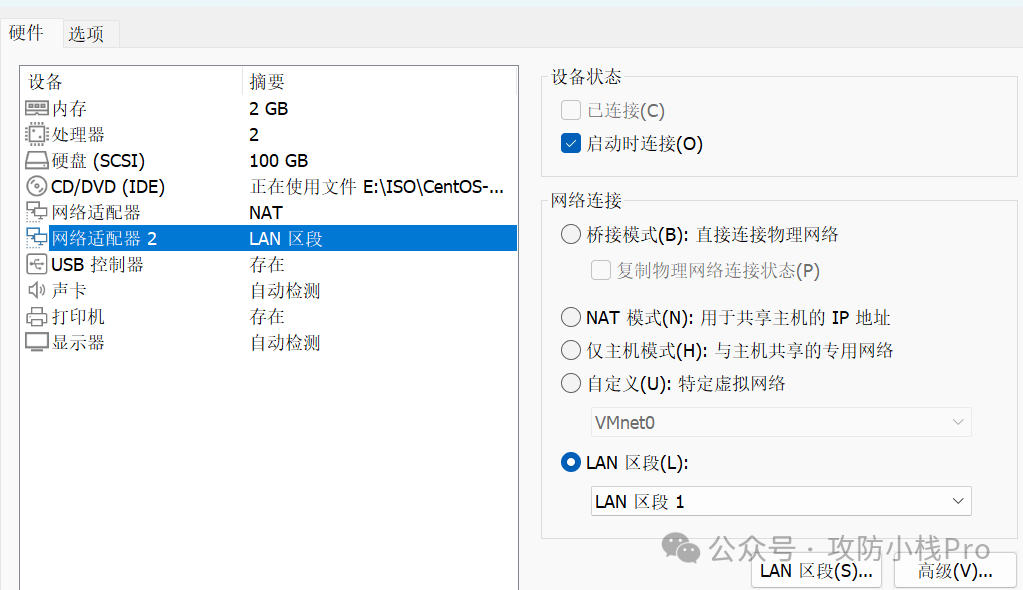 Just create a LAN segment.
 - CentOS 7-03 — Configured as LAN segment.
 Now the network card configuration for the three virtual machines is complete.Next, we will enter the three virtual machines to configure fixed IP addresses.I will first configure the network card settings for CentOS 7-02.After entering, check our IP address.
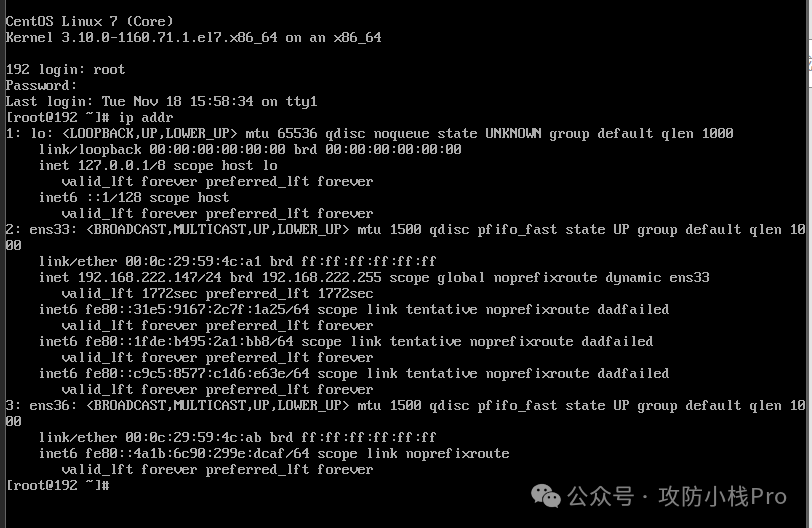 We can see that we have two network cards – ens33 and ens36, indicating that our configuration is correct.I connect using Xshell for a more comfortable experience.First, locate our network card configuration file, which is in the /etc/sysconfig/network-scripts directory.
 This file is our configuration file.We can open the file using
 <span><span>vim ifcfg-ens33</span></span>to see the following parameters:
Parameter Meaning <span><span>TYPE="Ethernet"</span></span>The network card type is Ethernet (wired network type). <span><span>PROXY_METHOD="none"</span></span>The network proxy method is “none”, no proxy service is used. <span><span>BROWSER_ONLY="no"</span></span>This network is not only for browsers, supporting full system network communication. <span><span>BOOTPROTO="dhcp"</span></span>Automatically obtain an IP address via DHCP at startup (rather than a static IP). <span><span>DEFROUTE="yes"</span></span>This network card is the default routing interface, the system defaults to routing through it (i.e., the interface where the default gateway is located). <span><span>IPV4_FAILURE_FATAL="no"</span></span>If IPv4 configuration fails, it is not considered a “fatal error”, and the system can continue to run. <span><span>IPV6INIT="yes"</span></span>Enable IPv6 initialization, the system will attempt to configure an IPv6 address. <span><span>IPV6_AUTOCONF="yes"</span></span>Enable IPv6 auto-configuration (obtain IPv6 address via SLAAC stateless method). <span><span>IPV6_DEFROUTE="yes"</span></span>This network card is the IPv6 default routing interface, used for IPv6 default gateway communication. <span><span>IPV6_FAILURE_FATAL="no"</span></span>If IPv6 configuration fails, it is not considered a “fatal error”. <span><span>IPV6_ADDR_GEN_MODE="stable-privacy"</span></span>IPv6 address generation mode is “stable privacy”, balancing address stability and privacy. <span><span>NAME="ens33"</span></span>The network card’s logical name, used to identify this network connection. <span><span>UUID="f6589e27-5e3f-43e9-8e2d-a5b0fe12ade6"</span></span>The unique identifier for this network connection (used to distinguish different network connections within the system). <span><span>DEVICE="ens33"</span></span>The network card’s physical device name (corresponding to the actual hardware network card, such as ens33 is a common Ethernet device naming). <span><span>ONBOOT="yes"</span></span>Automatically activate this network card at system startup, ensuring that the network interface is enabled after booting. We can delete many unnecessary items above; I will remove the unneeded ones below.The ens33 network card is using NAT mode, and to set a static IP, we need to specify a fixed IP and subnet mask. Let’s take a look. I am using VMware, and I will open the virtual network editor in the edit menu.
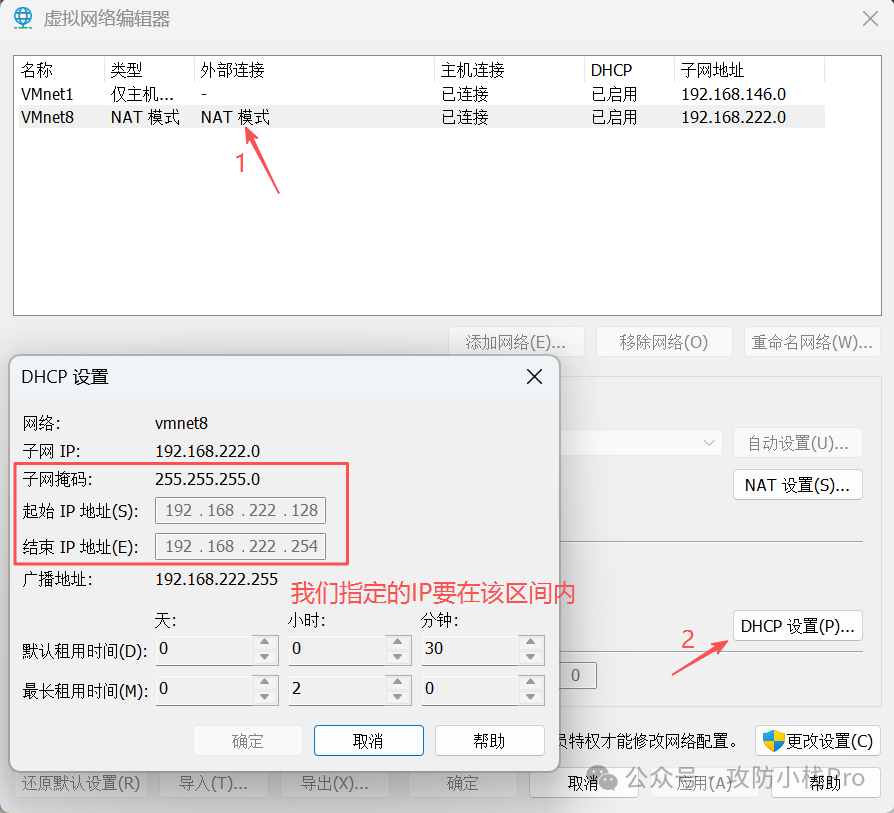 Refer to the above image to specify the IP and subnet mask.
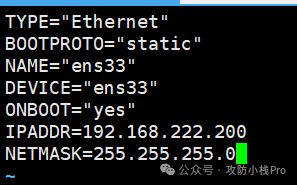 This is what our configuration looks like after setup; “static” means changing our DHCP dynamically assigned IP address to static. Now we have configured the first network card information.Next, we will configure the second network card using
 <span><span>cp ifcfg-ens33 ifcfg-ens36</span></span>to copy the configuration file for ens36.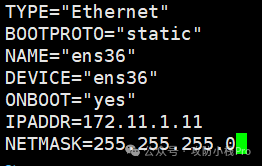 Change the network card information to ens36 and set an IP address.Now this is set up; use
 <span><span>systemctl restart network</span></span>to restart the network card.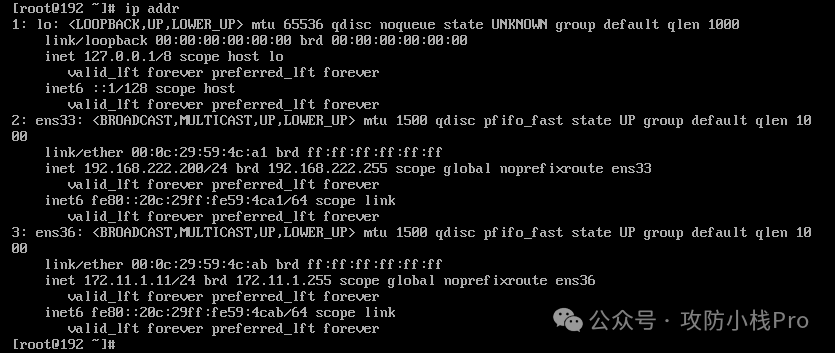 Check our network card information; it should be the same as the configured IP address, indicating that we have configured it correctly.
Next, we will configure CentOS 7-03.The configuration method is the same, so I won’t elaborate further. The network card for this virtual machine is using LAN segment mode, and the IP address set should be in the same subnet as the ens36 network card of CentOS 7-02. The configuration is as follows: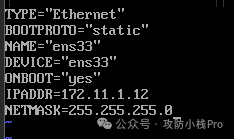 Now, our virtual machine network card configuration is complete. The network cards of CentOS 7-01 and the ens33 network card of CentOS 7-02 are both in NAT mode and can communicate with each other within the same subnet.Check the IP address of CentOS 7-01.
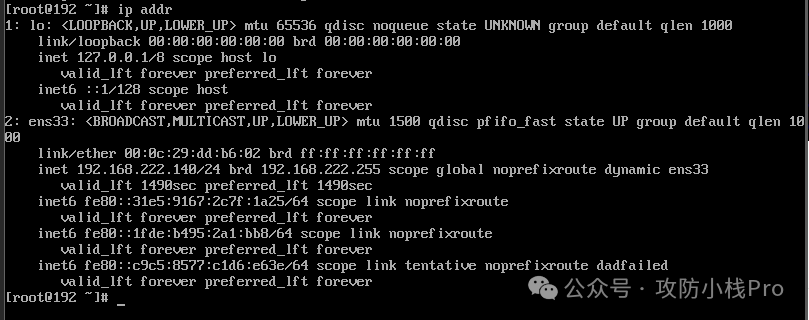 Next, let’s test the connectivity between the three virtual machines.First, from CentOS 7-02, ping CentOS 7-01.
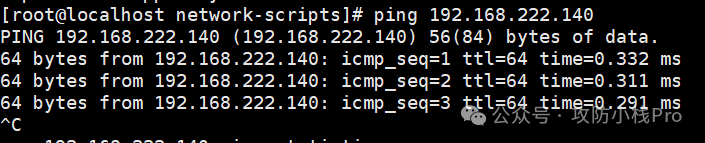 It shows that the ping is successful.Then, from CentOS 7-02, ping CentOS 7-03.
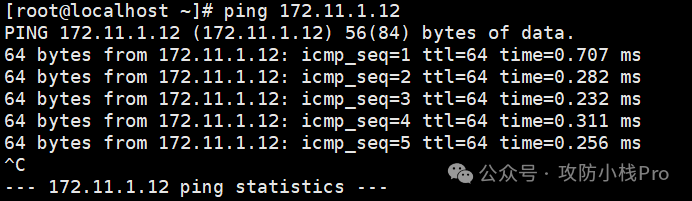 It shows that the ping is successful, no issues.Finally, let’s test from CentOS 7-01 to ping CentOS 7-03.
 It gets stuck here, indicating that these two networks are not connected. This situation occurs because the two IP addresses are not in the same subnet. We can use
 <span><span>tcpdump -i ens36 -nn icmp</span></span> to check the network card while using the 01 host to ping the 03 host. From the above image, we can see that our CentOS 7-03 host did not receive the data packets. To resolve this, we can set a static routing rule.Static Routing Rule ConfigurationFirst, enable the forwarding feature on the 02 host.
vim /etc/sysctl.conf # Insert net.ipv4.ip_forward = 1sysctl -p # Restart to apply the configuration.Add a static routing rule on the 01 host.
route add -net 172.11.1.0/24 gw 192.168.222.200Add a static routing rule on the 03 host.
route add -net 192.168.22.0/24 gw 172.11.1.11This completes the configuration.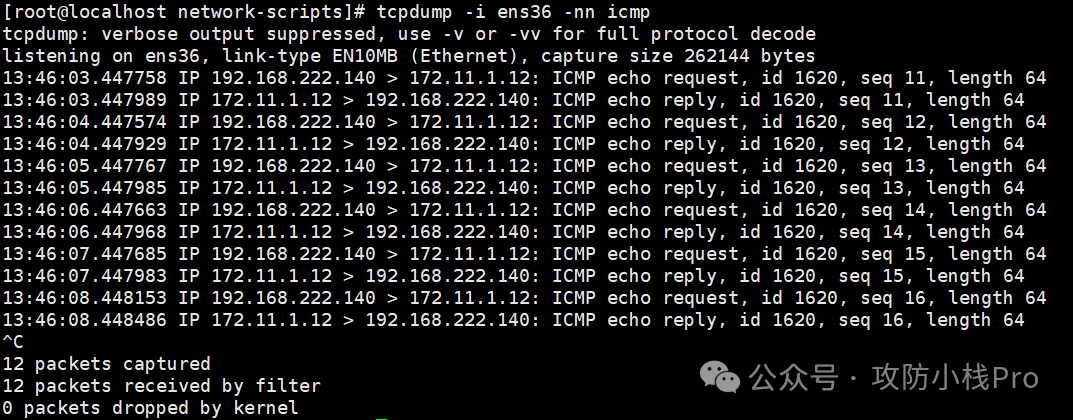 As shown, it was successful.Common Mistakes
In Linux static IP configuration, the following are the most common mistakes that lead to network connectivity issues or configuration failures. Special attention is required:
1. Incorrect Interface Name
- Problem Directly copying the interface name from the tutorial (e.g.,
<span><span>ens33</span></span>), but the actual system’s interface name may differ (e.g.,<span><span>eth0</span></span>,<span><span>enp0s3</span></span>,<span><span>wlp3s0</span></span>, etc.). - Consequence The configuration file takes effect for the wrong interface, and the actual interface that needs configuration still uses default settings (e.g., DHCP).
- Solution First, confirm the actual interface name using
<span><span>ip addr</span></span>or<span><span>nmcli device status</span></span>, then write it into the configuration file.
2. Incorrect Configuration File Path/Name
- Problem Different distributions have different configuration file locations, such as:
- Ubuntu (netplan):
<span><span>/etc/netplan/*.yaml</span></span>(the filename may be<span><span>00-installer-config.yaml</span></span>instead of others); - CentOS 7:
<span><span>/etc/sysconfig/network-scripts/ifcfg-<interface_name></span></span>(must strictly match the interface name). - Consequence Editing the wrong file, the configuration is not read by the system, and the old configuration remains effective.
- Solution Confirm the correct configuration file path based on the distribution to avoid blind modifications.
3. Format Errors (YAML/Configuration File Syntax)
- Problem
- Ubuntu’s netplan uses YAML format, sensitive to indentation (must use spaces, not tabs), spaces after colons (e.g.,
<span><span>ens33: </span></span>rather than<span><span>ens33:</span></span>), and list formats (e.g.,<span><span>addresses: [IP]</span></span>); - In CentOS’s ifcfg file, parameter name/value spelling errors (e.g.,
<span><span>IPADRR</span></span>instead of<span><span>IPADDR</span></span>), or missing necessary parameters (e.g.,<span><span>ONBOOT=yes</span></span>). - Consequence Configuration file parsing fails, executing
<span><span>netplan apply</span></span>will report an error, or the network service fails to start. - Solution Use
<span><span>sudo netplan try</span></span>to verify YAML format; check parameter spelling and required items in ifcfg files.
4. IP/Subnet Mask/Gateway Mismatch
- Problem
- Static IP does not match the subnet mask (e.g., IP is
<span><span>192.168.1.100</span></span>, but the subnet mask is set to<span><span>255.255.0.0</span></span>, leading to a network segment error); - The gateway IP is not within the current subnet (e.g., IP is
<span><span>192.168.1.100</span></span>, but the gateway is set to<span><span>192.168.2.1</span></span>). - Static routing rules are not configured correctly.
- Consequence Unable to access the gateway, thus unable to connect to the local area network or the internet.
- Solution Ensure that the IP, subnet mask, and gateway belong to the same subnet (can be inferred from the gateway IP: if the gateway is
<span><span>192.168.1.1</span></span>, then the IP should be set to<span><span>192.168.1.x</span></span>, and the subnet mask should be<span><span>255.255.255.0</span></span>).
5. Missing or Incorrect DNS Configuration
- Problem Only configured IP and gateway, forgetting to fill in DNS; or incorrect DNS server address (e.g., filling in an invalid IP).
- Consequence Can ping the gateway and IP (e.g.,
<span><span>ping 114.114.114.114</span></span>), but cannot resolve domain names (e.g.,<span><span>ping baidu.com</span></span>fails). - Solution Must configure at least one usable DNS (e.g., public DNS:
<span><span>8.8.8.8</span></span>,<span><span>114.114.114.114</span></span>).
6. DHCP Not Disabled
- Problem
- In Ubuntu’s netplan,
<span><span>dhcp4: yes</span></span>not changed to<span><span>no</span></span>; - In CentOS 7,
<span><span>BOOTPROTO</span></span>still set to<span><span>dhcp</span></span>instead of<span><span>static</span></span>; - In CentOS 8,
<span><span>ipv4.method</span></span>not set to<span><span>manual</span></span>. - Consequence The system still obtains an IP from the DHCP server, overriding the manually configured static IP.
- Solution Ensure that the DHCP function is disabled for the corresponding interface, forcing the use of static configuration.
7. Incorrect Method to Restart Network Services
- Problem Different distributions have different commands to restart the network, such as:
- CentOS 7 uses
<span><span>systemctl restart network</span></span>, rather than<span><span>service network restart</span></span>(though it may work, it is recommended to use systemctl); - CentOS 8 requires
<span><span>nmcli connection down/up <interface_name></span></span>, rather than<span><span>systemctl restart network</span></span>(this service has been deprecated). - Consequence Configuration changes do not take effect, still using old parameters.
- Solution Use the correct restart command based on the distribution.
8. Firewall/SELinux Interference
- Problem Configuration is correct, but the firewall (e.g.,
<span><span>firewalld</span></span>,<span><span>ufw</span></span>) or SELinux blocks network communication (e.g., ping, port access). - Consequence Misunderstanding that the IP configuration is incorrect, while it is actually a security policy interception.
- Solution Temporarily disable the firewall (
<span><span>sudo systemctl stop firewalld</span></span>or<span><span>sudo ufw disable</span></span>) and SELinux (<span><span>setenforce 0</span></span>) for testing to confirm if it is a policy issue.
9. IPv6 Configuration Conflicts
- Problem IPv6 is not needed but not disabled, or incorrect IPv6 configuration (e.g., gateway, DNS filled incorrectly), leading to conflicts with IPv4.
- Consequence Unstable network connection, or prioritizing IPv6 causing access failures.
- Solution If IPv6 is not needed, disable it in the configuration (e.g., Ubuntu’s
<span><span>dhcp6: no</span></span>, CentOS’s<span><span>IPV6INIT=no</span></span>).
Summary
When configuring a static IP, the key is to “match the actual environment”: the interface name, subnet, gateway, and DNS must be consistent with the local area network, while strictly adhering to the configuration file format and the characteristics of the distribution tools. After configuration, be sure to verify using <span><span>ip addr</span></span>, <span><span>ping</span></span>, and other commands to troubleshoot the common mistakes mentioned above, which can significantly reduce issues.