1. Introduction: System vulnerabilities, the “invisible gaps” hidden in the software layer
In the previous article, we established a “bottom-level defense barrier” for firmware, akin to laying a solid foundation for a house. However, even with a stable foundation, if there are unpatched cracks in the walls (corresponding to system vulnerabilities), rainwater can seep in, causing mold, and intruders may enter through these cracks. Vulnerabilities in the software layer of Linux systems are such “invisible gaps”—they may exist in kernel components, applications, or system configurations. Attackers can bypass defenses and gain access, even taking control of the entire system, simply by sending malicious packets or invoking vulnerable interfaces without damaging the hardware.
In daily life, if an old version of a mobile app has vulnerabilities, hackers may steal account passwords through phishing links; if the default password of a router is not changed (configuration vulnerabilities), strangers can easily log in and alter network settings. Similarly, in Linux systems, unpatched “Heartbleed” vulnerabilities (OpenSSL vulnerabilities) can lead to the leakage of encrypted data, and kernel vulnerabilities may be exploited to gain root privileges. These vulnerabilities pose threats comparable to those at the hardware level and are even easier to exploit remotely.
Vulnerability detection tools are the “professional inspection instruments” for system security: they can accurately locate vulnerabilities in the system like detecting cracks in walls; they can differentiate between “urgent patches” and “routine concerns” like marking risk levels; and they can guide the deployment of security patches like providing repair solutions. This article will connect the firmware security system, focusing on the “precise detection – risk grading – patch deployment” of system layer vulnerabilities, detailing the practical applications of mainstream tools such as Nessus and OpenVAS, helping operations personnel proactively discover and close security gaps in the software layer.
2. Tool Matrix: A Vulnerability Scanning System Combining Open Source Mainstays and Commercial-Level Support
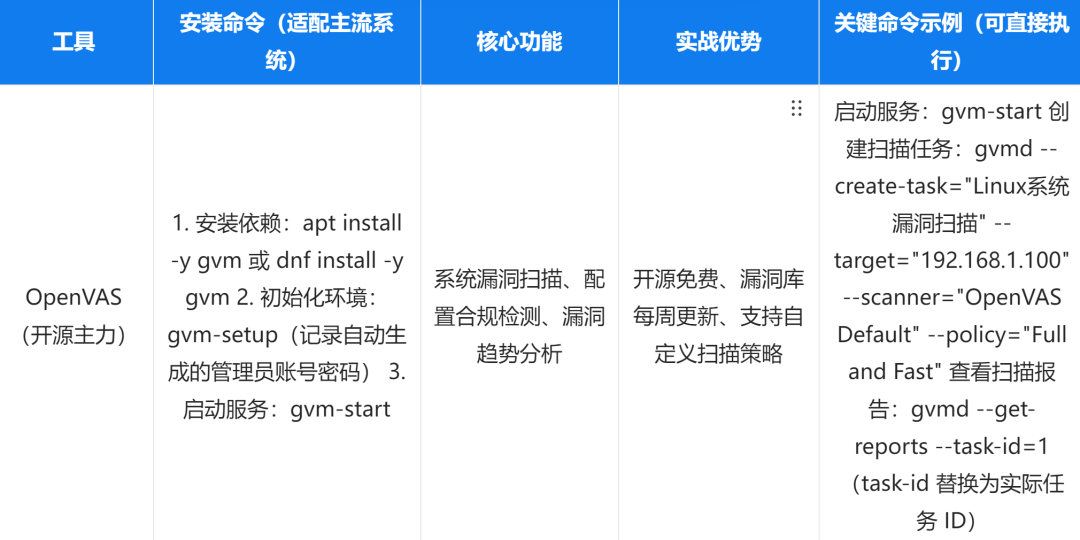
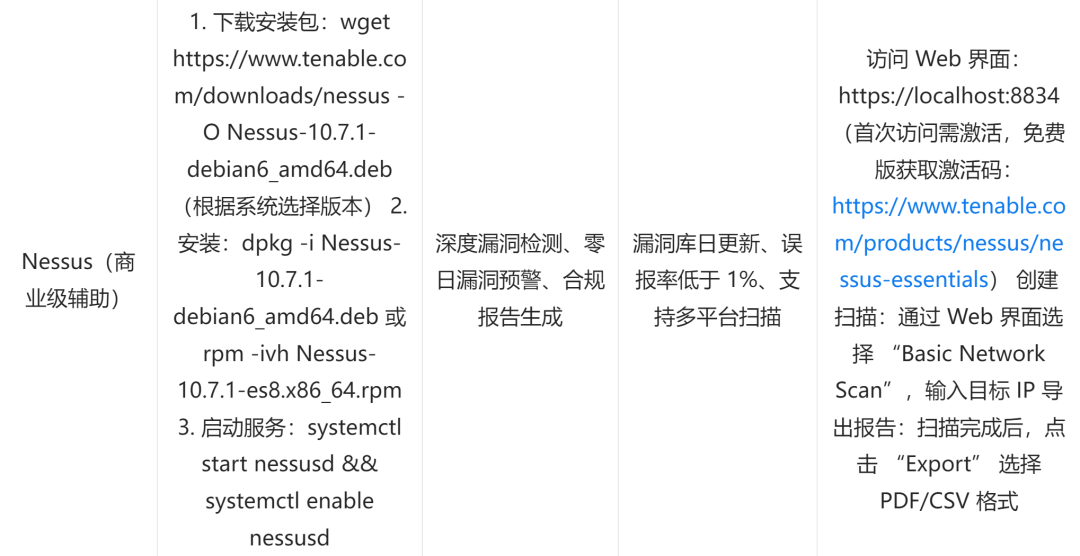
System vulnerability detection must balance “comprehensiveness” and “precision”—OpenVAS is free and fully functional, suitable for daily scanning; commercial-grade tool Nessus has a rapidly updated vulnerability database and low false positive rates, making it suitable for high-security demand scenarios. All tools are industry mainstream and continuously updated, with commands that can be executed directly based on practical tests, and key operations accompanied by configuration instructions.
1. Core Tool Details (including precise installation and configuration)
Tool Coordination Example (Emergency Vulnerability Scanning):
Quick scan with OpenVAS: After starting the service with gvm-start, create a task through the web interface (https://localhost:9392) to scan the target server 192.168.1.100, discovering the “OpenSSL 1.1.1f vulnerability (CVE-2022-2068)”;
Deep verification with Nessus: Log in to the Nessus web interface, create an “Advanced Scan”, enable the “CVE-2022-2068” specific detection, and confirm the vulnerability exists with a risk level of “high”;
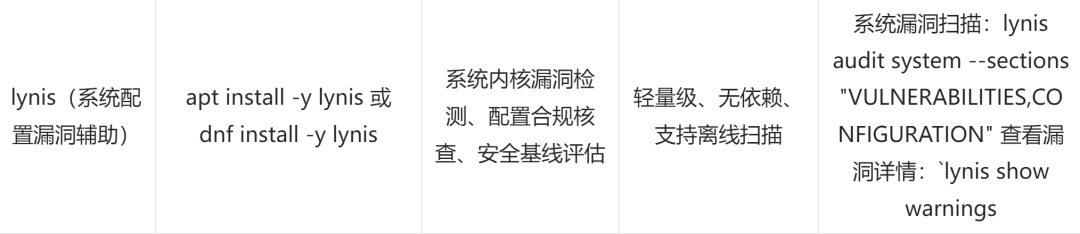
Check configuration vulnerabilities with lynis: lynis audit system –sections “VULNERABILITIES”, discovering “kernel version too old (CVE-2023-XXXXX)”;
Summarize vulnerability information: Export Nessus reports and lynis logs, form a vulnerability list, and develop a patching plan.
2. Tool Selection Logic
Small to medium teams / Daily inspections: Prioritize OpenVAS + lynis, with OpenVAS responsible for comprehensive vulnerability scanning and lynis assisting in configuration vulnerability checks, with no cost pressure and meeting basic needs;
Enterprise-level / High-security needs: Choose Nessus + OpenVAS, with Nessus used for deep detection and zero-day vulnerability alerts, and OpenVAS as a supplementary scan to reduce false positive rates;
Offline environment scanning: Use lynis alone, which can complete system kernel and configuration vulnerability detection without needing to connect to the internet, suitable for isolated zone servers.
3. Scenario-based Practical Application: From Scanning to Repair in Vulnerability Closed-loop Management
The core of vulnerability management is “discover and repair”, covering the entire process of “tool deployment – scan configuration – risk grading – patch deployment – verification loop”. The following three major scenarios combine actual operational needs, providing actionable steps, with key links accompanied by risk control suggestions.
1. Scenario One: Tool Deployment and Scan Configuration—Building a Vulnerability “Detection Platform”
The prerequisite for vulnerability scanning is the correct deployment of tools and reasonable configuration of strategies to avoid missing scans or affecting business operations due to improper scanning parameters.
(1) Core operational steps (using OpenVAS as an example)
Tool deployment and initialization:
Complete installation and environment configuration step by step, ensuring the service runs normally:
# Install OpenVAS (gvm is the new version suite of OpenVAS)apt install -y gvm # or dnf install -y gvm# Initialize environment (automatically configure database, update vulnerability database, takes about 10-30 minutes)gvm-setup# Record the administrator account password generated during initialization (key information, recommended to change immediately)# Example output: Admin user password: XXXXXXXX# Start service (including gvmd, openvas-scanner, etc.)gvm-start# Verify service status (all components showing running is normal)gvm-check-setupScan strategy configuration:
Select a scan strategy based on business scenarios, balancing scan depth and resource usage:
# View available scan strategies (understand strategy differences)gvmd --get-policies# Common strategy descriptions:# - Full and Fast: Quick full scan (suitable for daily inspections, short duration)# - Full and Fast Ultimate: Deep full scan (suitable for key servers, long duration)# - Host Discovery: Only host discovery (suitable for unknown networks)# Create target (specify the IP or subnet of the server to be scanned)gvmd --create-target="Production Server Group" --hostname="192.168.1.100,192.168.1.101" --comment="Web and Database Servers"# Get target ID (needed for subsequent task creation)gvmd --get-targets# Create scan task (replace target-id with actual target ID, policy-id with strategy ID)gvmd --create-task="Production Server Vulnerability Scan" --target-id=1 --scanner="OpenVAS Default" --policy-id=6# Start scan task (replace task-id with actual task ID)gvmd --start-task=1Monitor scan progress:
View the scan status in real-time to avoid missing detections due to interruptions:
# View task status (Running means in progress, Done means completed)gvmd --get-tasks# View scan progress (get completed percentage)gvmd --get-task-progress --task-id=1# If the scan is interrupted, restart the taskgvmd --resume-task=1Analogy:
This is like installing a “smart detection system” in a house—deploying OpenVAS is akin to installing detection devices, initializing the environment is debugging device parameters, configuring scan strategies is setting the “detection range” (e.g., only detecting the bedroom or the entire house), and starting the scan is when the device begins working. The entire process must ensure the device runs normally and that the detection range covers key areas.
2. Scenario Two: Vulnerability Risk Grading Assessment—Labeling Vulnerabilities with “Priority Tags”
After scanning, a large number of vulnerabilities will be discovered, which need to be graded according to “severity – exploitability – impact scope”, prioritizing the repair of high-risk vulnerabilities to avoid wasting resources on low-risk issues.
(1) Core operational steps
Vulnerability grading standards:
Refer to industry-standard guidelines (such as CVSS scores) and develop grading rules based on actual business conditions:

Extracting vulnerability information:
Extract key information from the scan report and categorize it according to grading standards:
# Export vulnerability report from OpenVAS (CSV format for easier analysis)gvmd --get-report=1 --format=csv --output=/var/log/gvm/vulnerability_report.csv# Extract high-risk vulnerabilities (filter entries with CVSS score ≥ 9.0)awk -F ',' '$6 >= 9.0 {print $1,$3,$6,$8}' /var/log/gvm/vulnerability_report.csv > /var/log/gvm/high_risk_vulns.csv# Field descriptions: $1=vulnerability ID, $3=vulnerability name, $6=CVSS score, $8=affected IP# Export report from Nessus Web interface (recommended PDF format, includes remediation suggestions)# Steps: After scanning is complete → Click task name → Export → Select PDF → Check "Include Remediation"Grading processing plan formulation:
Formulate a repair plan based on priority, clarifying responsible persons and timelines:
High-risk vulnerabilities: Immediately suspend non-essential operations, organize urgent repairs, and retest within 1 hour after repairs;
Medium-risk vulnerabilities: Repair during low business hours (e.g., early morning) and retest within 24 hours after repairs;
Low-risk vulnerabilities: Summarize and batch repair, with regular retests every month.
Analogy:
This is like a hospital’s “triage system”—high-risk vulnerabilities are like emergency patients (requiring immediate rescue), medium-risk vulnerabilities are like regular outpatient patients (treated in order), and low-risk vulnerabilities are like minor issues found during physical exams (requiring regular follow-ups). By grading, limited operational resources can be prioritized to address the most urgent risks.
3. Scenario Three: Security Patch Deployment and Verification—Closing the “gaps” of vulnerabilities
The core of vulnerability repair is deploying security patches, but care must be taken to avoid compatibility issues that could disrupt business operations, following the secure process of “backup – testing – deployment – verification”.
(1) Core operational steps
Patch acquisition and testing:
Obtain patches from official channels and first verify compatibility in a testing environment:
# 1. Check for patches that need to be updated in the system (using Debian/Ubuntu as an example)apt update && apt list --upgradable# For fixing the OpenSSL vulnerability, check the relevant package versionapt show openssl# 2. Deploy patches in the testing environmentapt install -y openssl # or dnf update -y openssl# 3. Verify if the patch is successfully installed (check if the version meets repair requirements)openssl version# 4. Test business compatibility (e.g., restart web service, confirm service is normal)systemctl restart nginxcurl -I http://localhost # Confirm service is accessibleProduction environment patch deployment:
Deploy in batches based on priority, with key steps backing up the system:
# 1. Backup the production system (key data or entire machine snapshot, to prevent patch failure)# Example: Backup /etc directory (centralized configuration files)tar -czf /backup/etc_backup_$(date +%Y%m%d).tar.gz /etc# 2. Deploy high-risk vulnerability patches (using OpenSSL as an example)apt install -y openssl # or dnf update -y openssl# 3. Deploy kernel vulnerability patches (requires system reboot, plan downtime window in advance)apt install -y linux-image-$(uname -r | sed 's/-generic//')-security# or dnf update -y kernel# 4. Reboot the system (kernel patches require a reboot to take effect, choose low business hours)rebootVerification of repair effects:
Rescan to confirm vulnerabilities have been closed, forming a closed loop:
# 1. Rescan the target server with OpenVASgvmd --start-task=1 (original scan task ID)# 2. Check repair results (confirm high-risk vulnerability status changes to "Fixed")gvmd --get-report=2 (new report ID) --format=csv | grep -i "fixed"# 3. Use `lynis` for auxiliary verificationlynis audit system --sections "VULNERABILITIES" | grep -i "vulnerability"# 4. Record repair logs (including vulnerability ID, patch version, repair time, verification results)echo "$(date) - Fixed CVE-2022-2068 (OpenSSL vulnerability), patch version: 1.1.1n-0ubuntu0.22.04.1, verification result: closed" >> /var/log/vulnerability_fix.logAnalogy:
This is like repairing the “cracks in the walls” of a house—obtaining patches is like buying repair materials, testing patches is like trying materials on a sample wall (confirming they do not peel or fade), production deployment is the formal repair of cracks, and repair verification is checking whether it still leaks after the repair. The entire process must ensure the repair effect without damaging the original wall structure.
Conclusion: Vulnerability scanning is the “proactive defense line” of system security, linking vulnerability assessment and risk analysis
The value of vulnerability scanning tools lies in “proactively discovering risks”—they fill the “software layer gap” between firmware security and system operational security: firmware security defends against hardware-level threats, while vulnerability scanning prevents software layer exploitations, together forming a “hardware – software” dual protection. Through practical applications of tools like OpenVAS and Nessus, precise vulnerability localization can be achieved; risk grading can optimize operational resource allocation; and patch deployment and verification can form a closed loop in vulnerability management.
However, vulnerability scanning only completes the first step of “discovering vulnerabilities”; subsequent steps must involve in-depth analysis of the actual impact scope of vulnerabilities (e.g., whether it affects core business), potential exploitation paths (e.g., whether attackers can horizontally penetrate through this vulnerability), repair costs and risks (e.g., whether patches affect critical services)—all of which require professional vulnerability assessment and risk analysis to support. The next article, “Linux System Vulnerability Assessment and Risk Analysis”, will focus on “defining impact scope – analyzing exploitation paths – optimizing repair strategies”, detailing the application of risk assessment models, calculating business impact weights, and formulating emergency plans, helping operations personnel shift from “merely repairing vulnerabilities” to “systematic risk management”, building a more complete system security framework.