This article is authored by Jiu Xin, originally published at: Jiu Xin Says.
Introduction
Recently, I helped the testing team with some signature-related requirements, and today I would like to briefly discuss the topic of signatures with everyone.
If you ask why Android needs signatures, everyone might think of the official explanation:
❝
The Android system requires that all APKs must be digitally signed with a certificate before they can be installed on a device or updated.
❞
This is a rather vague explanation. Simply put, with a signature, an app can be bound to its developer.
After all, there are so many applications, and other developers might steal your code. In this case, how can you distinguish your app from others if they have the same package name and code?
This is where digital signatures come into play.
Signature Basics
To fully understand signature knowledge, we need to learn the following:
-
Message Digest -
Digital Signature -
Encryption -
Digital Certificate
You may have encountered these concepts while studying networking.
Let’s briefly learn about these concepts:
1. Message Digest
A message digest is often referred to as a digital digest or digital fingerprint, defined as follows:
❝
Based on the original data, a one-way hash computation is performed to obtain a fixed hash value, which is the message digest.
❞
Common digest algorithms include MD5, SHA-1, and SHA-256, with the following characteristics:
Based on this, message digests are often used to check the integrity of content.
For example, when downloading from Qidian Reading, the use of message digests is as follows:
Of course, the above only covers the digest part; we will analyze other processes later.
2. Encryption Algorithms
What is encryption?
The encyclopedia explains it as follows:
❝
The process of converting plaintext information into ciphertext that is difficult to read, making it unreadable. Only those with the decryption method can restore the ciphertext to a readable form through the decryption process.
❞
Therefore, the ciphertext obtained through encryption methods can be transformed back into plaintext, while results from message digest algorithms like MD5 are irreversible, so when interviewers ask what an encryption algorithm is, you should not include MD5!
Encryption algorithms are divided into two categories: Symmetric Encryption and Asymmetric Encryption.
2.1 Symmetric Encryption
Symmetric encryption uses the same key for both encryption and decryption:
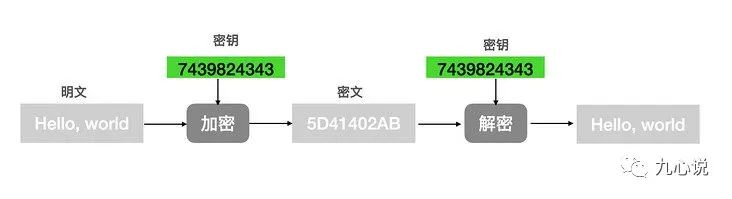
Image sourced from “A Comprehensive Guide to Understanding Encryption, Digital Signatures, and Digital Certificates!”
2.2 Asymmetric Encryption
Asymmetric encryption uses the public key from a public/private key pair to encrypt plaintext, then the corresponding private key is used to decrypt the ciphertext:
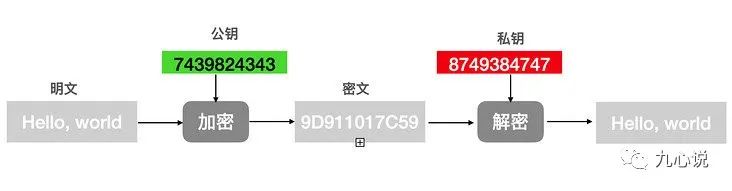 Image sourced from “A Comprehensive Guide to Understanding Encryption, Digital Signatures, and Digital Certificates!”
Let’s briefly compare symmetric and asymmetric encryption:
| Asymmetric Encryption | Symmetric Encryption | |
|---|---|---|
| Speed | Slow | Fast |
| Efficiency | Low | High |
| Security | High | Low |
| Common Algorithms | RSA, DH | AES, DES, IDEA |
2.3 Use Cases
Students who have studied networking should know that during HTTPS transmission, the client and server use asymmetric encryption to generate a symmetric encryption key, then use symmetric encryption to transmit data over the network.
For example, back in college, my conversations with my mom at the end of each month were like this:
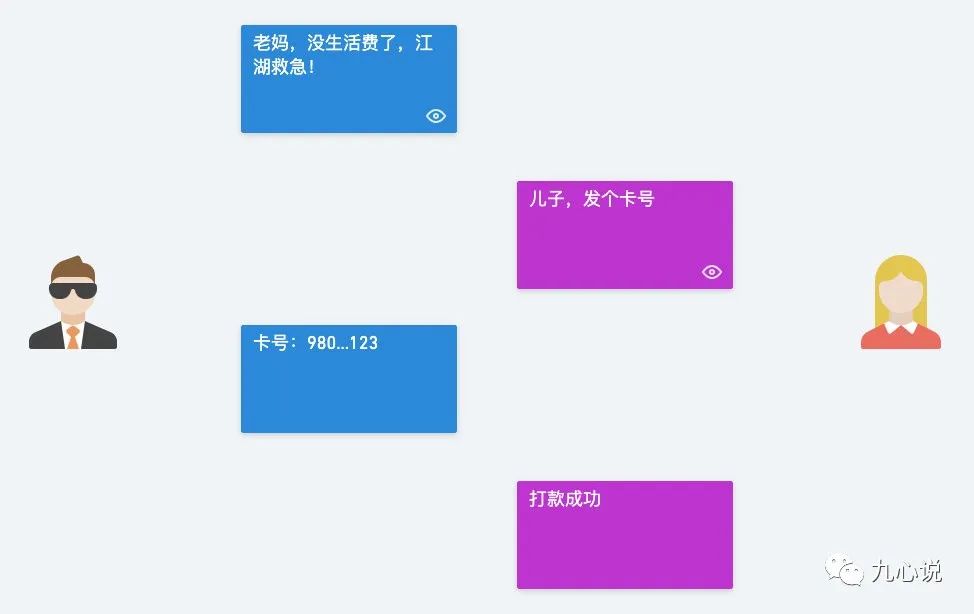
The network environment is open, and if a hacker listens in on my conversation with my mom, the process would look like this:
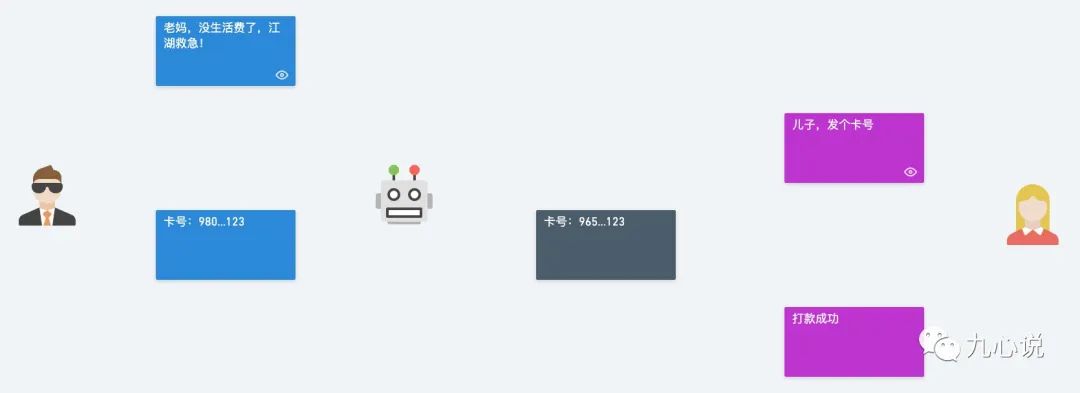
When I was sending my card number, the hacker changed it to his own, thus my living expenses became his.
To avoid this situation, my mom and I agreed to use symmetric encryption to encrypt messages before sending, and use the key to decrypt upon receiving, changing the process to this:
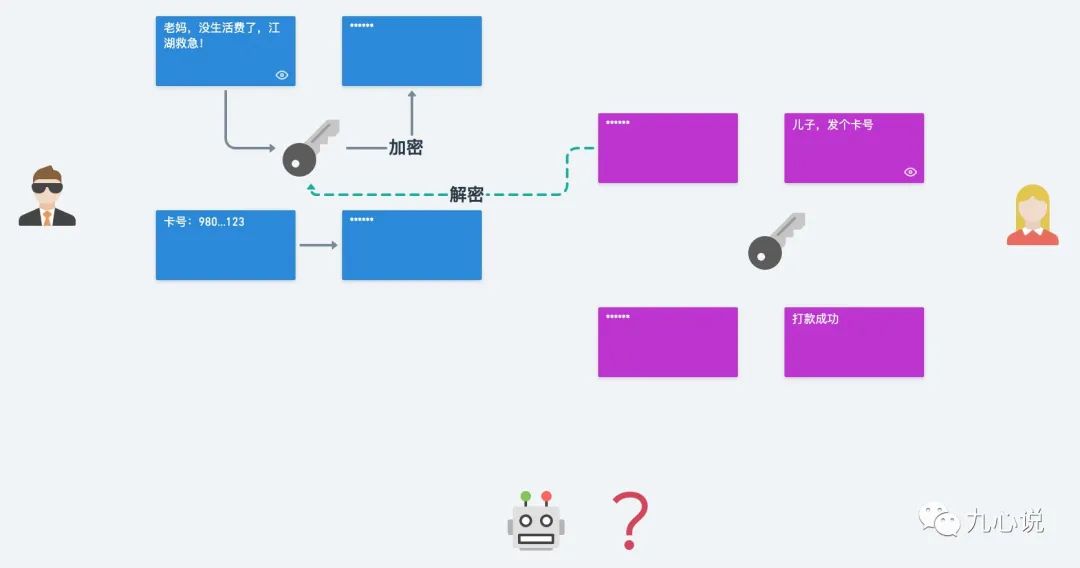
The man-in-the-middle can no longer access the messages, and while it seems like there are no issues, how do my mom and I confirm the key?
The key must be transmitted over the internet, and with transmission comes the risk of interception. If intercepted, the money is gone!
To solve the problem of transmitting symmetric encryption keys, my mom and I used asymmetric encryption, like this:

Even so, there are still issues:
Solving these two problems is simple: one is through digital signatures, and the other is through digital certificates.
3. Digital Signature
The purpose of a digital signature is to ensure the integrity of the message.
In the asymmetric encryption framework, the process of sending a message is as follows, still using the previous example:
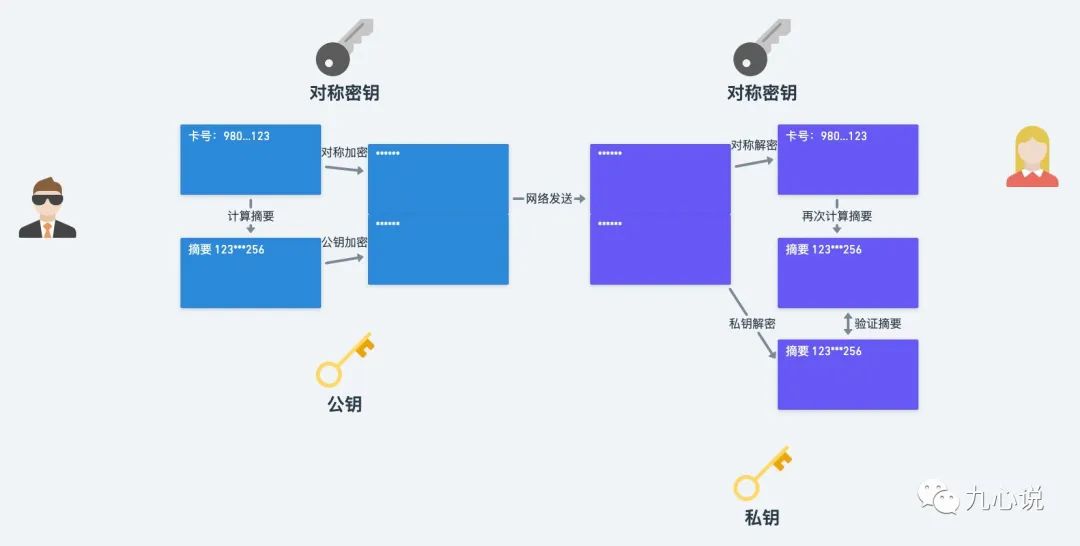
The process of digital signatures is as follows:
This scenario is somewhat inappropriate; digital signatures are generally used on certificates, and once the symmetric key is negotiated, message integrity checks are usually not performed. However, everyone should understand that digital signatures are used to verify message integrity.
As of now, there’s one last issue: I cannot confirm that the public key I received truly belongs to my mom.
4. Digital Certificate
The function of a certificate is simple: to prove the identity of the public key.
Just like in reality, how does everyone prove their identity?
That’s right, with an ID card. Have you noticed that every ID card contains three types of information:
Correspondingly, digital certificates also contain a lot of information:
The CA signs this information using its private key, and users verify it using the CA’s public key to prove the identity of the public key.
Common certificates are divided into two types:
Returning to the previous example, my mom just needs to send me her signed certificate, and I can obtain her public key, allowing us to communicate normally.
Android Signature Mechanism
In Android, digital certificates are also required for digital signatures. The private key corresponding to the public key in the digital certificate is held by the developer.
For information on generating private keys and certificates, see:
❝
Android Official Documentation
❞
In Android Studio, a .jks file is ultimately generated. In earlier versions, Eclipse used .keystore; both are binary files used for certificates and private keys.
If an app uses one private key for signing, another private key’s signed file cannot be installed or overwrite the old version. This is to prevent already installed apps from being overwritten by malicious third parties.
1. Similarities and Differences in Android Signature Mechanism
The generation of digital signatures in Android is not significantly different from that of regular digital signatures.
However, the certificates used for digital signatures can use self-signed certificates, meaning they do not require endorsement from a Certificate Authority (CA), as their purpose is to identify the developer of the application. Users downloading do not need this certificate to download the app.
2. Debug and Release Signatures
When we run or debug a project in the IDE, AS automatically uses a debug certificate generated by the Android SDK tools for our application, located at $HOME/.android/debug.keystore, but applications signed with a debug certificate cannot be published in the app store.
When packaging a release, we generally configure it in the build.gradle of the app module:
android {
    ...
    signingConfigs {
        release {
            storeFile file("release.keystore")
            storePassword "******"
            keyAlias "******"
            keyPassword "******"
        }
    }
}
These are the parameters needed to generate the .jks or .keystore files.
Signature Schemes
Currently, Android supports the following four application signature schemes:
1. v1 Scheme
v1 is a well-known signing method, and the signing process is quite simple.
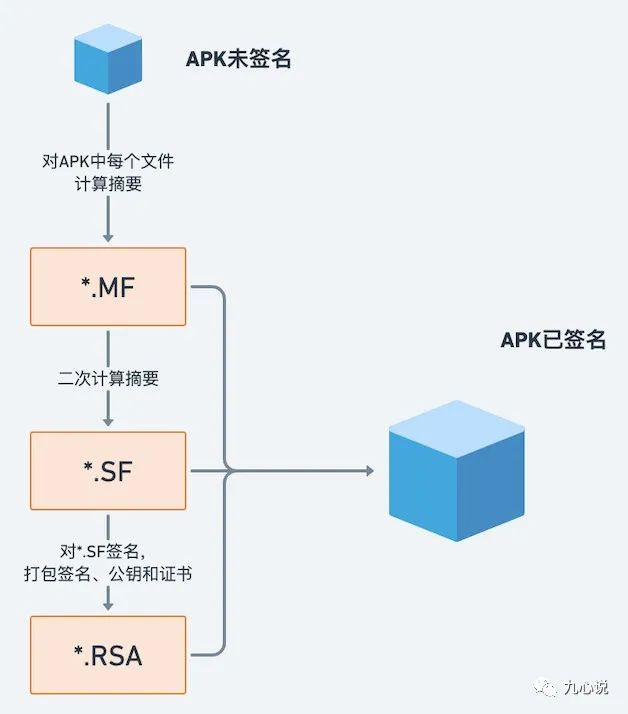
If we select any signed APK and decompress it, we will find a META-INF folder, which usually contains files ending with MF, SF, and RSA, as shown in the image:
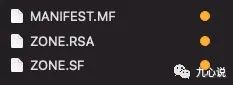
The files in the v1 signing process are as follows:
The verification process occurs during APK installation:
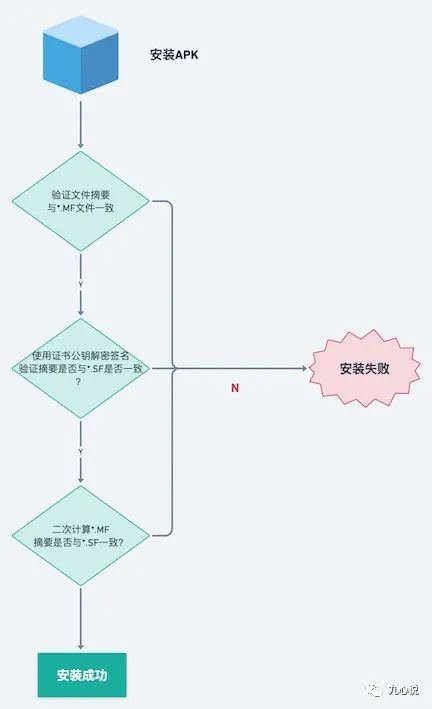
The entire process is clear, but v1 has two issues:
The first issue is that signature verification is slow, as it checks all files in the APK, which can slow down installation times on older devices.
The second issue is that it only checks ZIP entries; the META-INF file is not included in the verification process. This means that even if my APK is signed, an engineer can rearrange the entry order and recompress it, or modify the contents under the META-INF folder, leading to security vulnerabilities. Early multi-channel packaging exploited this.
2. v2 Scheme
v2 is a significant advancement in the Android signing scheme, addressing the slow signature verification and integrity issues left by v1.
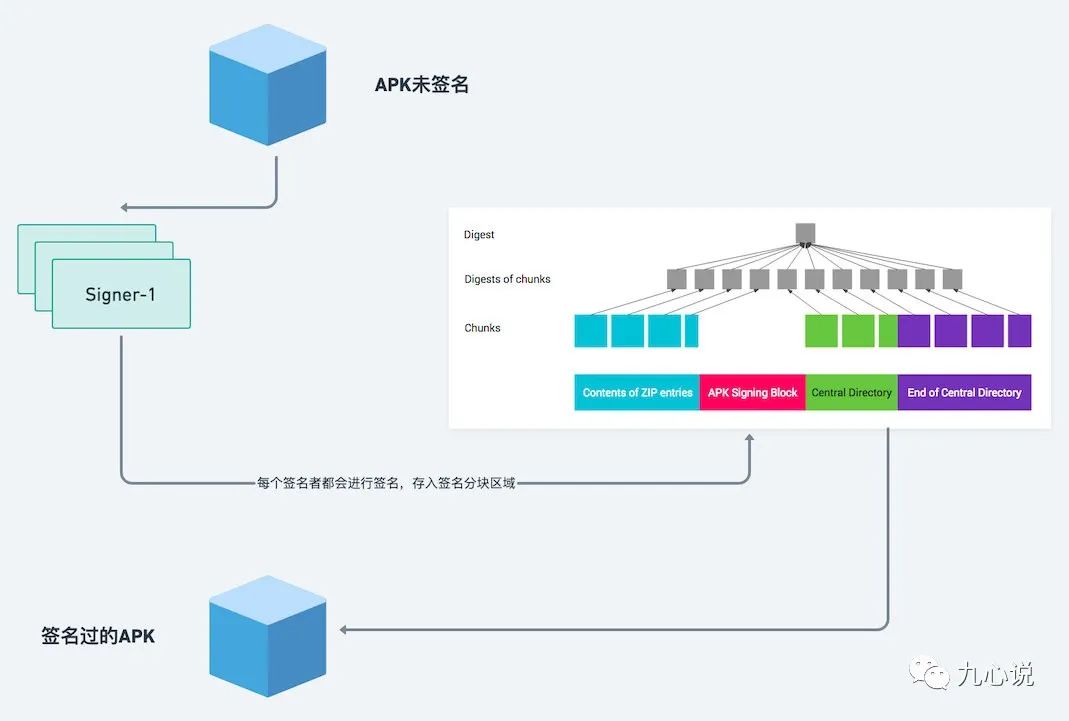
Let’s first look at the components of v2:

The components of v1 are essentially the same as the Before signing section, but v2 includes the red area, which we call the APK signing block.

In terms of protected content, v1 only protects content 1, while v2 protects regions 1, 3, 4, and the signed data area of 2, where signed data includes the digest and other information derived from 1, 3, and 4.
Signing Process
For an app, it may have one or more signers, and each signer undergoes the signing process.
v2 does not calculate for every file but instead for all bytes. It splits regions 1, 3, and 4 into contiguous blocks of 1MB and calculates as follows:
Finally, the digests, certificates, and other information of one or more signers are packaged into the APK.
Verification Process
The APK verification process for the v2 scheme is as follows:
3. v3 Scheme
The v3 scheme builds on v2, aiming to solve the issue of changing signature keys during updates.
Therefore, two parts were added to the APK signing block:
The signing and verification processes for v3 are almost identical to those of v2, so I won’t elaborate further.
4. v4 Scheme
If you often play console games, you may have noticed that on the PS5 or Switch, some games allow you to access basic functions even before installation is complete, like the NBA 2K series I used to play.
In Android 11, Google introduced the “ADB Incremental APK Installation” feature, allowing you to use some basic functions after downloading 50 MB of a 2GB APK, with the remaining files streamed in the background. However, this feature in Android 11 is aimed at ADB.
While this feature is great, it poses some challenges to the signing scheme, as previous schemes were based on verifying all files. Thus, the fourth generation signing scheme, v4, was introduced.
v4 calculates the Merkle Hash tree based on all bytes of the APK and uses the root hash of the Merkle tree along with a salt value as signature data for package integrity verification. The v4 signature must exist in a separate .idsig file and will not be present in the APK file, meaning the APK file still requires v2 or v3 signatures.
5. Backward Compatible Signature Schemes
The signature schemes in Android are compatible from top to bottom, as shown in the image:

For Android 11, the verification process is as follows:
For Android 9, verification starts from the v3 scheme.
Conclusion
After reading this article, I believe you have a basic understanding of the Android signature schemes.
If there are any inaccuracies in the article, see you in the comments!
References:
“Detailed Explanation of Android v1, v2, v3 Signatures”
https://zhuanlan.zhihu.com/p/89126018
“Introduction to Incremental Installation and Android V4 Signatures”
http://cn-sec.com/archives/224626.html
“Official Documentation”
https://source.android.google.cn/security/apksigning?hl=zh-cn
Lastly, I recommend my website, WanAndroid: wanandroid.com, which includes a comprehensive knowledge system, useful tools, and a collection of articles from this public account. Feel free to explore and bookmark!
Recommended Reading:
Follow the latest Android architecture to create a perfect WanAndroid App.
Excellent package size optimization tutorial, it’s not just about optimization!
Black technology! Prevent Native Crashes and ANR from occurring!
Click to follow my public account.
If you want to share your articles with everyone, feel free to submit!
┏(^0^)┛See you tomorrow!