Case Introduction
In today’s digital and intelligent era, the application of large language models (LLMs) is transforming the way work is done and user experiences across various fields at an unprecedented speed. Dify, as an open-source large language model application development platform, provides developers with convenient and powerful tools to build various large language model applications, from basic intelligent agents to complex AI workflows. Its core advantage lies in the integration of a Retrieval-Augmented Generation (RAG) engine, which intelligently retrieves and analyzes massive amounts of data to provide relevant information to the large language model, significantly enhancing the accuracy and relevance of model outputs. This case focuses on how to deploy Dify on the Orange Pi Kunpeng Pro development board and use the openGauss DataVec vector database as the corpus for the RAG engine, thereby building an efficient intelligent assistant platform.
Case Environment Introduction
This case is based on the Kunpeng processor on the Orange Pi Kunpeng Pro development board and the openGauss database.
openGauss is a relational database that adopts a client/server, single-process multi-threaded architecture, supporting both standalone and one master with multiple backups deployment modes, with read capabilities on backup machines, and supports dual-machine high availability and read scaling.
For detailed information and resources about openGauss, please refer to the following URLs:
openGauss Portal
https://opengauss.org/
openGauss Code Repository
https://gitee.com/opengauss
Case Device Introduction
The key configurations are shown in the table below:
| Device | Configuration |
|---|---|
| Development Board | 4-core Kunpeng CPU, 16 GB RAM |
| Terminal PC | Can connect directly to the development board via network |
| Default IP | 192.168.10.8 |
| User / Password | root / (openEuler login password) |
Case Software Tools Introduction
In terms of software, this case requires a terminal computer to connect to the Orange Pi Kunpeng Pro development board to input operational commands. For Windows 10 / macOS / Linux, we can use the command line tool ssh to complete this process. If the ssh tool cannot run on some Windows systems, you can also use tools like Putty or MobaXterm.
Case Environment Setup
Connect and Log in to the Orange Pi Kunpeng Pro Development Board
Directly Connect the Development Board with Ethernet Cable
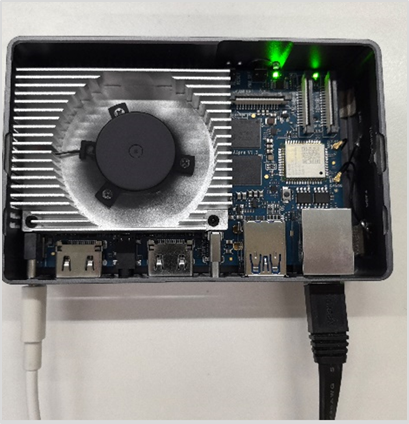
The hardware connection is shown below:
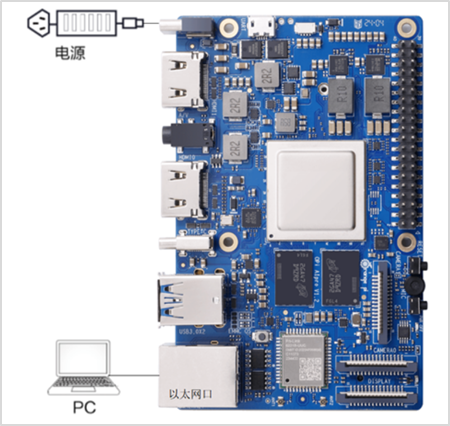
Connect the development board and PC using an Ethernet cable.
Insert one end of the Ethernet cable into the development board and connect the other end to the PC, then power on.
Configure Personal PC Network Settings
After connecting the development board to the personal PC via Ethernet, the IP address of the development board (192.168.10.8) and the Ethernet of the personal PC need to be in the same subnet to achieve network interconnection.
The specific steps are as follows:
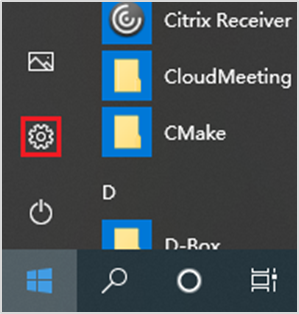
- Step 1: Open Windows Settings.On the PC, open “Start”, click the “Settings” button to enter the “Windows Settings” interface:
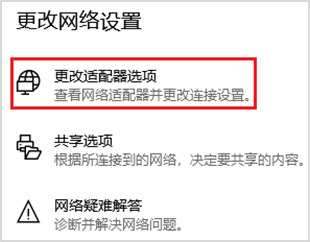
- Step 2: Open Change Adapter Options.Select “Network and Internet”, click “Change Adapter Options”:
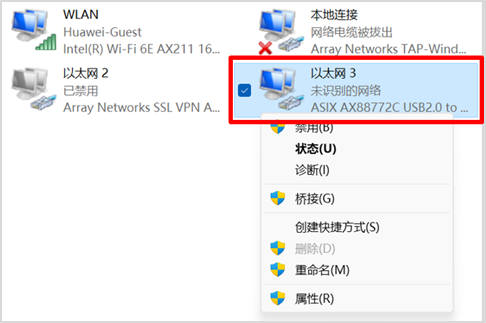
- Step 3: Open the Ethernet Properties corresponding to the connected cable.The connected “Ethernet x” is the interface for the development board’s Ethernet connection, as shown in the image below, select it and right-click to open, then click on the properties of “Ethernet x”:
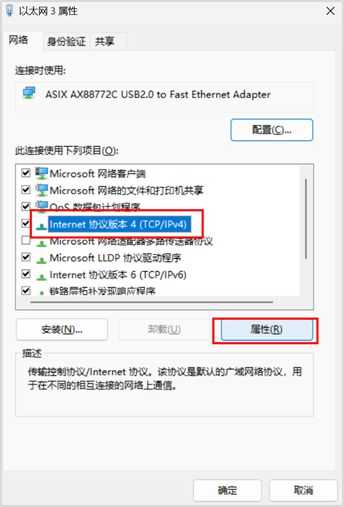
- Step 4: Modify IPV4 Properties.Modify the properties of “Internet Protocol Version 4 (TCP/IPv4)” as shown in the image:
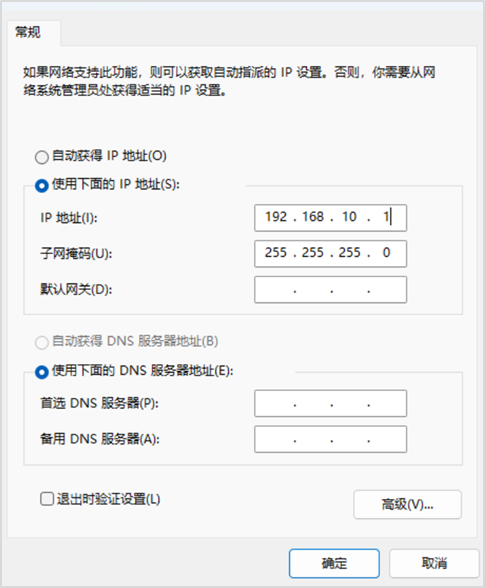
- Step 5: Set IP and Subnet Mask.Check the option “Use the following IP address”, fill in the IP address (set to 192.168.10.1 here) and subnet mask, leave the default gateway and DNS server address empty, then click “OK” to save:
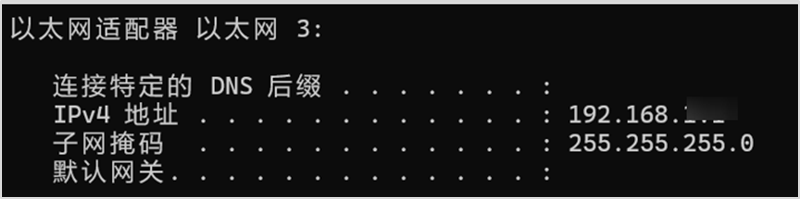
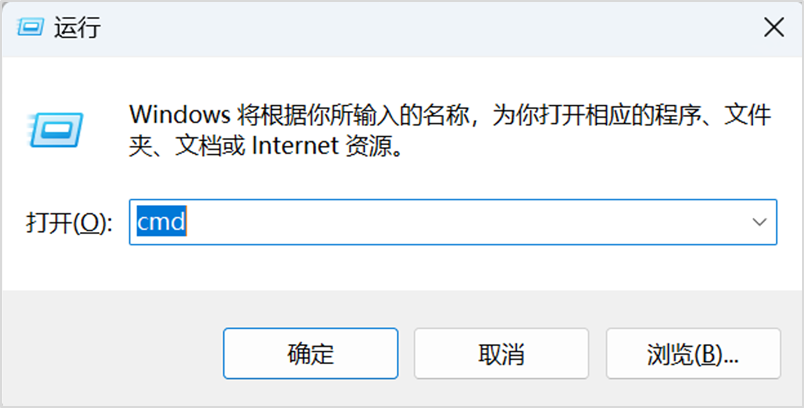
- Step 6: Verification.Use the shortcut key “Win+R” on the keyboard, enter cmd in the run window to access the command line window. Enter the ipconfig command to check if the PC’s network interface IP address has been modified successfully:C:\Users\User Information>ipconfig
Log in to the Development Board
Log in to the Development Board via cmd (Method 1)
Use the shortcut key “Win+R” on the keyboard, enter cmd in the run window to access the command line window.
Then run the following ssh login command:
ssh [email protected]
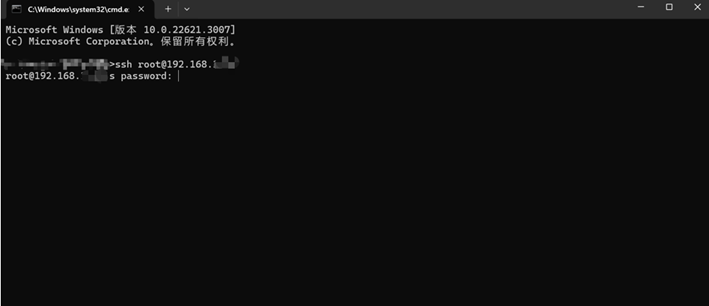
Enter the password and press the “Enter” key, the default password for the root user on the development board is openEuler.
The interface after successful login is shown below:

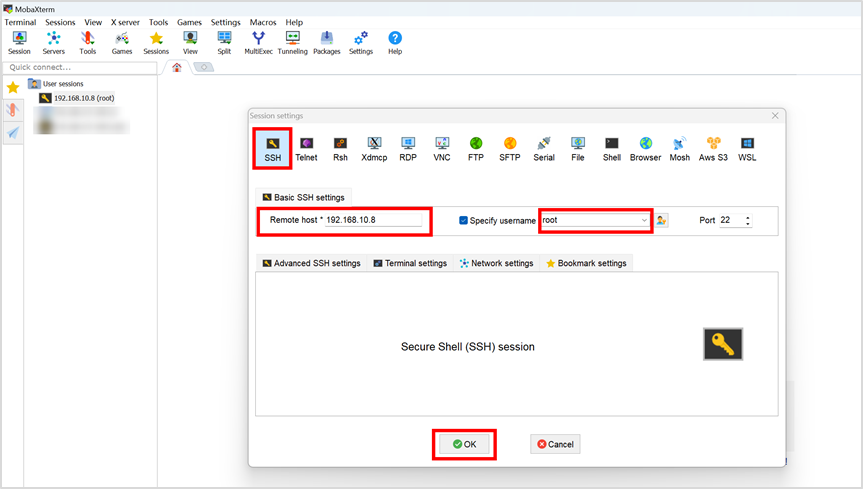
Log in to the Development Board using ssh Tool (Method 2)
You can also log in to the development board using other ssh tools such as MobaXtrem, xshell, putty, etc. Here, MobaXtrem is used as an example.Connect to the Orange Pi Kunpeng Pro development board from the local computer by configuring the IP address of the development board (e.g., 192.168.10.8) and using the root user and corresponding password (openEuler) to log in.
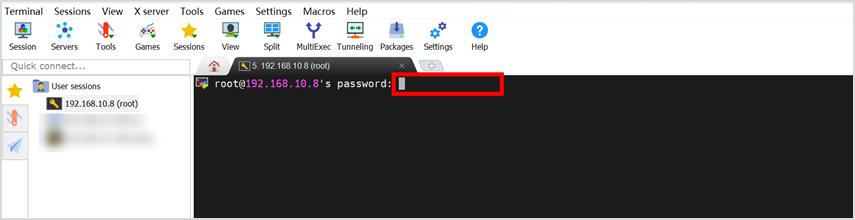
Enter the root user and corresponding password (openEuler), then press the “Enter” key to log in.
Development Board Network Connection (Recommended)
WIFI Connection
- Step 1: Preparation before connection: Connect and log in to the Orange Pi Kunpeng Pro development board first.
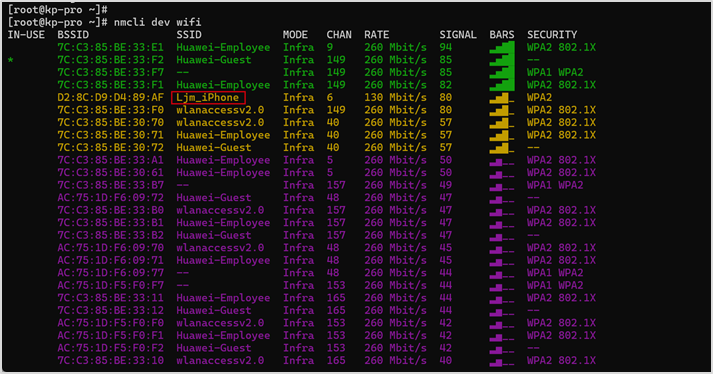
- Step 2: Scan WIFI hotspots: Execute the nmcli dev wifi command on the development board to scan for nearby WIFI hotspots:
[root@openEuler ~]# nmcli dev wifi
- Step 3: Connect to the specified WIFI.
Then use the nmcli command to connect to the scanned WIFI hotspot, where:a. wifi_name needs to be replaced with the name of the WIFI hotspot you want to connect to.b. wifi_passwd needs to be replaced with the password of the WIFI hotspot you want to connect to.
[root@openEuler ~]# nmcli dev wifi connect wifi_name password wifi_passwd
Enter the command, taking Ljm_iPhone as an example,
After successful connection, the output will be: Successfully activated the device with “wlan0ab877337-e465-440a-852d-c95ee6b5f4b0”.

- Step 4: Test if WIFI is connected.
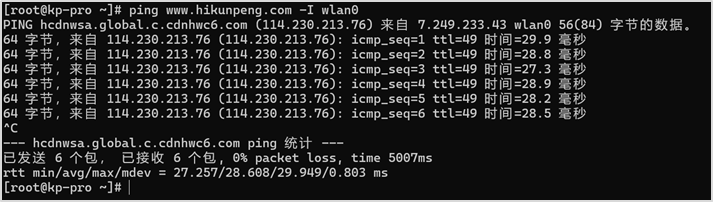
You can use the ping command to test the connectivity of the WIFI network, the ping command can be interrupted by the Ctrl+C shortcut key.
[root@openEuler ~]# ping www.hikunpeng.com -I wlan0
The output result is shown in the image below.
Building the Intelligent Q&A Assistant
Step Introduction
Quickly build an intelligent Q&A assistant based on openGauss DataVec + Dify in four steps:
- Deploy the Dify framework on the development board.
- Install plugins to connect to cloud service large model services.
- Create a local knowledge base based on openGauss.
- Complete the Q&A assistant setup based on the local knowledge base.
Operational Content
- Step 1: Remove the firewall: After removing the firewall, please power off and restart the development board.
[root@openEuler docker]# yum remove firewalld
- Step 2: Log back into the development board
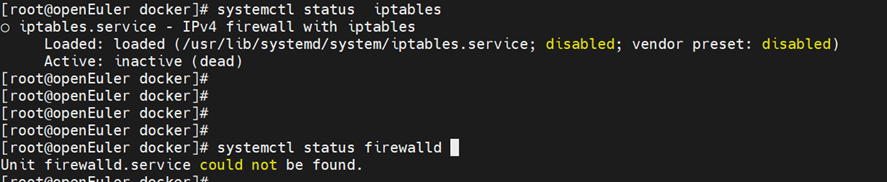
- Step 3: Check the routing status and firewall status
[root@openEuler docker]# systemctl status iptables // Check routing status
[root@openEuler docker]# systemctl status firewalld // Check firewall status
- Step 4: Download the source package of dify-1.1.3https://github.com/langgenius/dify/tree/1.1.3
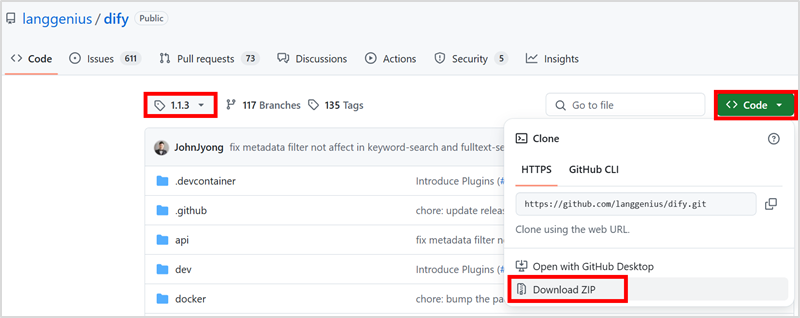 After downloading, the file name will be dify-1.1.3.zip.
- Step 5: Download docker-compose: https://github.com/docker/compose/releases
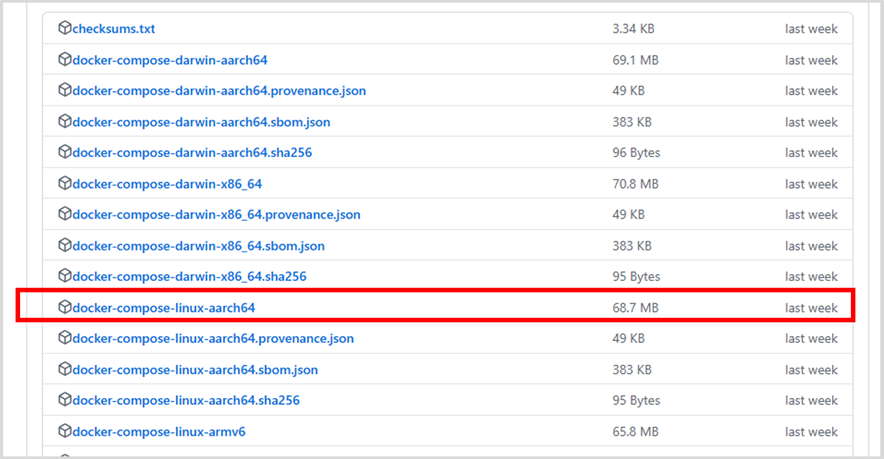
After downloading, the file name will be docker-compose-linux-aarch64.
- Step 6: Create a working directory
[root@openEuler ~]# mkdir /usr/local/dify
- Step 7: Upload files to the development boardUpload the downloaded files dify-1.1.3.zip, docker-compose-linux-aarch64 to the /usr/local/dify directory.

- Step 8: Unzip and install Dify
[root@openEuler ~]# cd /usr/local/dify
[root@openEuler dify]# unzip dify-1.1.3.zip -d /usr/local/dify/
- Step 9: Configure Dify parameters
[root@openEuler dify]# cd /usr/local/dify/dify-1.1.3/docker
[root@openEuler docker]# cp .env.example .env
Use the vim command to open and edit the .env file.
[root@openEuler docker]# vim .env
Press i to enter insert mode, modify line 387 to change the value of VECTOR_STORE to opengauss, as shown in the image below.

After modification, press the “Esc” key on the keyboard, then enter :wq to save and exit the file editing. Modify permissions, use the vim command to open and edit the docker-compose.yaml file
[root@openEuler docker]# vim /usr/local/dify/dify-1.1.3/docker/docker-compose.yaml
Press i to enter insert mode, modify lines 546 and 568 to add privileged: true, as shown in the image below:
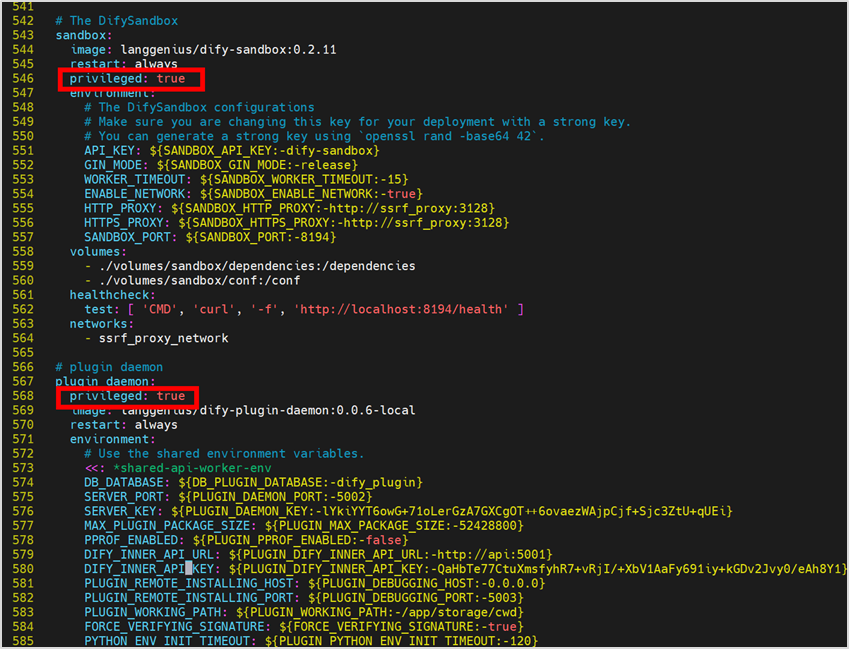
After modification, press the “Esc” key on the keyboard, then enter :wq to save and exit the file editing.
- Step 10: Install docker-compose
[root@openEuler docker]# cd /usr/local/dify
[root@openEuler dify]# mv docker-compose-linux-aarch64 /usr/bin/docker-compose
[root@openEuler dify]# chmod 777 /usr/bin/docker-compose
[root@openEuler dify]# cd /usr/local/dify/dify-1.1.3/docker
[root@openEuler docker]# yum install docker
[root@openEuler docker]# systemctl start docker
- Step 11: Pull the imageDirectly pulling may download the x86 version of nginx, you can manually pull and rename.Pull and rename (Method 1).
[root@openEuler docker]# docker pull arm64v8/nginx:latest
[root@openEuler docker]# docker tag arm64v8/nginx:latest nginx:latest
If the network is poor, pulling may report an error, in which case you can use Method 2.

Pull and rename (Method 2).
Pull (this may take about 20 minutes)
docker pull swr.cn-north-4.myhuaweicloud.com/kunpeng-ai/dify-api:1.1.3
docker pull swr.cn-north-4.myhuaweicloud.com/kunpeng-ai/dify-web:1.1.3
docker pull swr.cn-north-4.myhuaweicloud.com/kunpeng-ai/postgres:15-alpine
docker pull swr.cn-north-4.myhuaweicloud.com/kunpeng-ai/redis:6-alpine
docker pull swr.cn-north-4.myhuaweicloud.com/kunpeng-ai/dify-sandbox:0.2.11
docker pull swr.cn-north-4.myhuaweicloud.com/kunpeng-ai/dify-plugin-daemon:0.0.6-local
docker pull swr.cn-north-4.myhuaweicloud.com/kunpeng-ai/squid:latest
docker pull swr.cn-north-4.myhuaweicloud.com/kunpeng-ai/nginx:latest
docker pull swr.cn-north-4.myhuaweicloud.com/kunpeng-ai/opengauss:7.0.0-RC1
Rename
docker tag swr.cn-north-4.myhuaweicloud.com/kunpeng-ai/dify-api:1.1.3 langgenius/dify-api:1.1.3
docker tag swr.cn-north-4.myhuaweicloud.com/kunpeng-ai/dify-web:1.1.3 langgenius/dify-web:1.1.3
docker tag swr.cn-north-4.myhuaweicloud.com/kunpeng-ai/postgres:15-alpine postgres:15-alpine
docker tag swr.cn-north-4.myhuaweicloud.com/kunpeng-ai/redis:6-alpine redis:6-alpine
docker tag swr.cn-north-4.myhuaweicloud.com/kunpeng-ai/dify-sandbox:0.2.11 langgenius/dify-sandbox:0.2.11
docker tag swr.cn-north-4.myhuaweicloud.com/kunpeng-ai/dify-plugin-daemon:0.0.6-local langgenius/dify-plugin-daemon:0.0.6-local
docker tag swr.cn-north-4.myhuaweicloud.com/kunpeng-ai/squid:latest ubuntu/squid:latest
docker tag swr.cn-north-4.myhuaweicloud.com/kunpeng-ai/nginx:latest nginx:latest
docker tag swr.cn-north-4.myhuaweicloud.com/kunpeng-ai/opengauss:7.0.0-RC1 opengauss/opengauss:7.0.0-RC1
- Step 12: Start the container
[root@openEuler docker]#docker rm $(docker ps -aq)
[root@openEuler docker]#docker-compose up -d
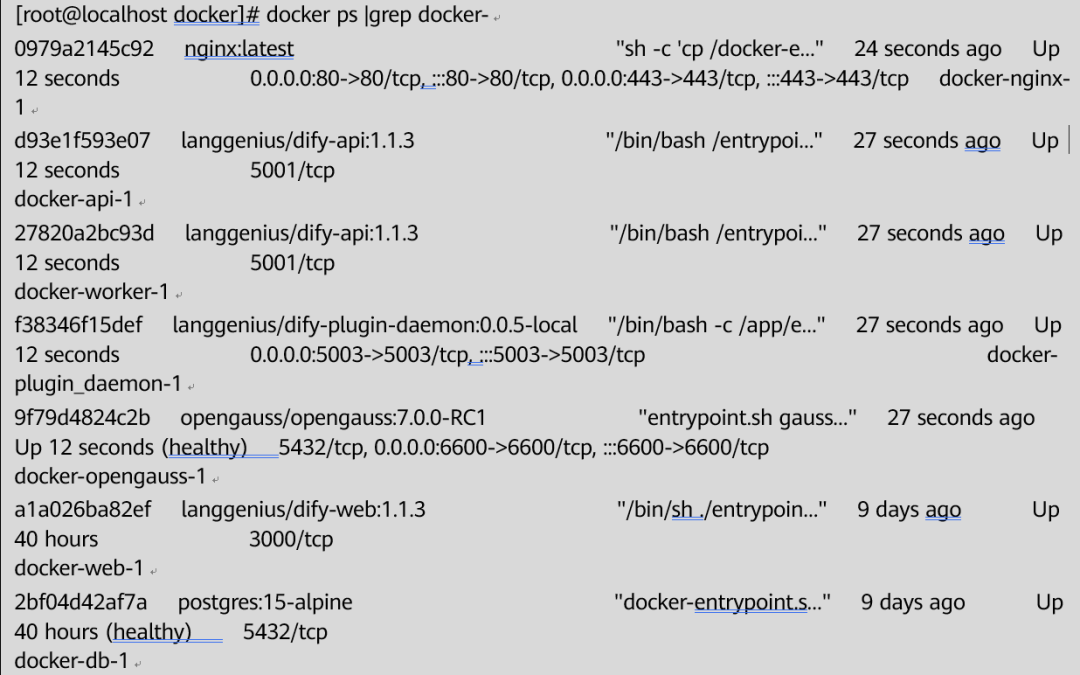
The first time the container starts, it needs to connect to the database, etc., so it will take a few minutes.Note: The command to stop the container is <span>docker-compose down</span>If everything goes smoothly, you will get a result similar to this:
[root@localhost docker]# docker ps |grep docker-
- Step 13: Log in to DifyAfter a few minutes, you can log in at http://192.168.10.8/ in your local browser.Note: Do not proxy the server IP in the browser, and ensure that the local machine can connect to the internet.
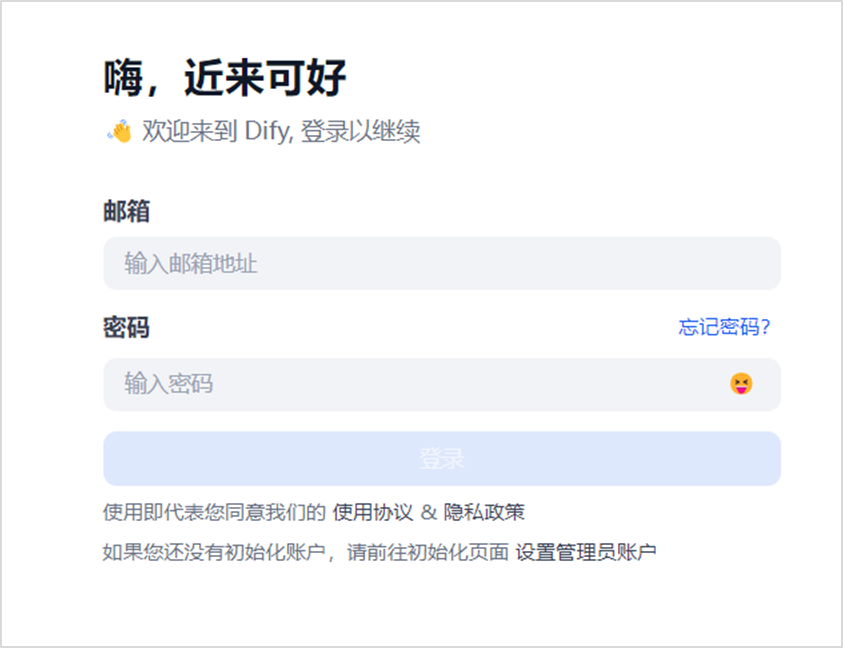
Create an account and password to log in.
- Step 14: Connect to the cloud service large modelClick on “Plugins” in the upper right corner – “Explore Marketplace” – “Models” to download and import the model plugin (taking Tongyi Qianwen as an example) – install the plugin (Tongyi Qianwen).
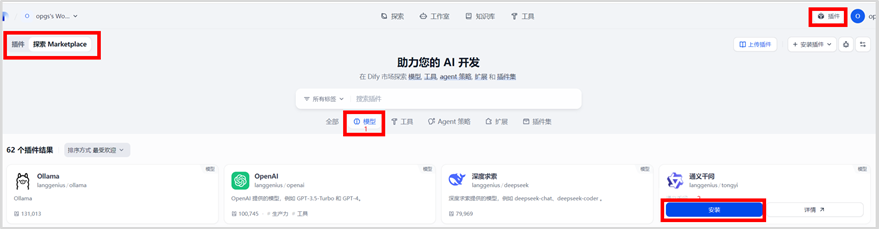
This may take a few minutes, and if it does not install successfully the first time, you can try installing it multiple times.
- Step 15: Log in to Alibaba Cloud to apply for an accountLog in to https://bailian.console.aliyun.com/?tab=model#/api-key, apply for an account, and create an API-KEY.

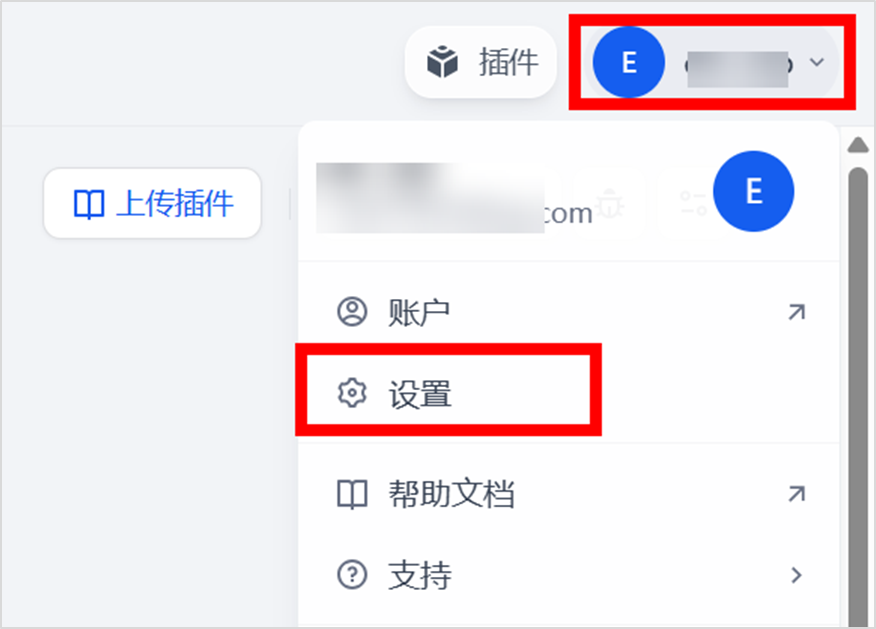
- Step 16: Configure the model API-KEY on DifyGo to the account settings page.
Configure the API-key.
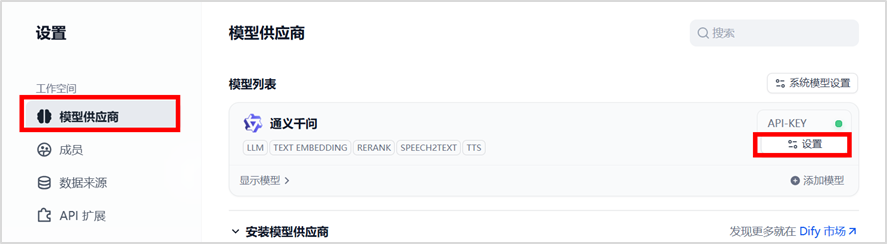
Please ensure the KEY is functional.
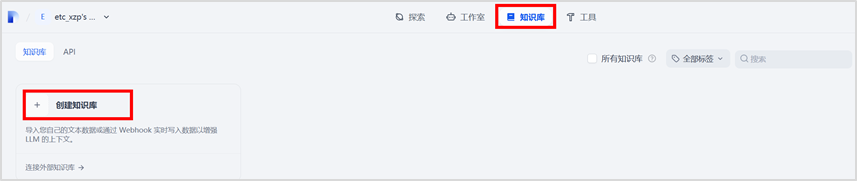
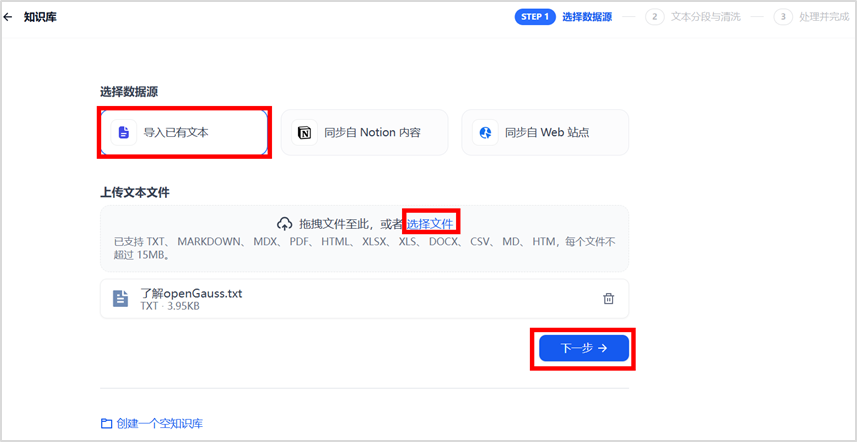
- Step 17: Create a knowledge base and import the desired text.
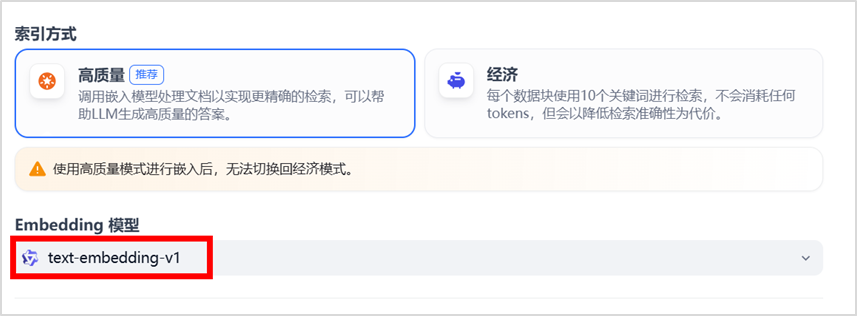
Select the Embedding model.
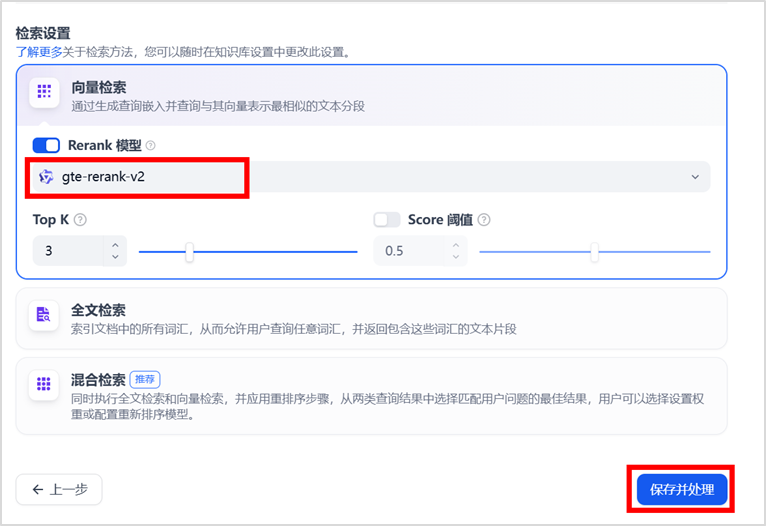
Retrieval settings.
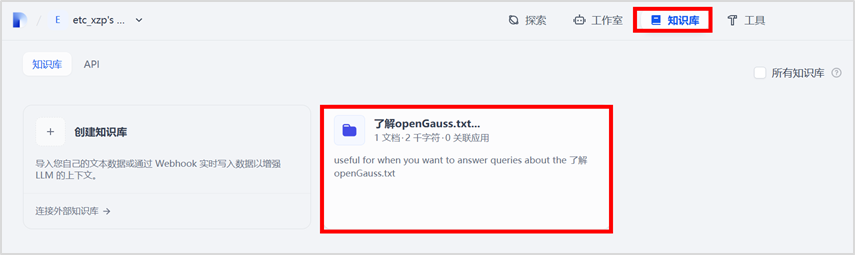
Save processing successfully displays as follows:
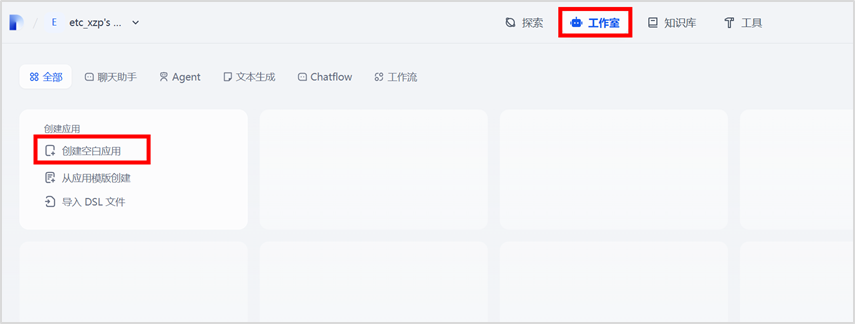
- Step 18: Create a chat assistant,In the studio interface, select to create a blank application.
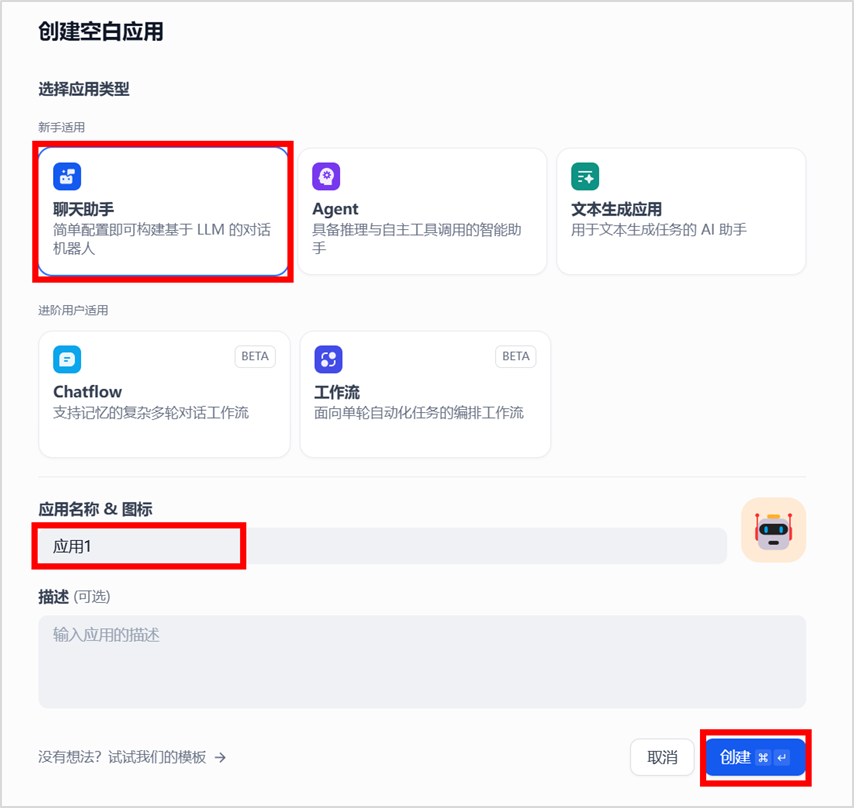
Create a chat assistant, fill in the application name, and then click the “Create” button.
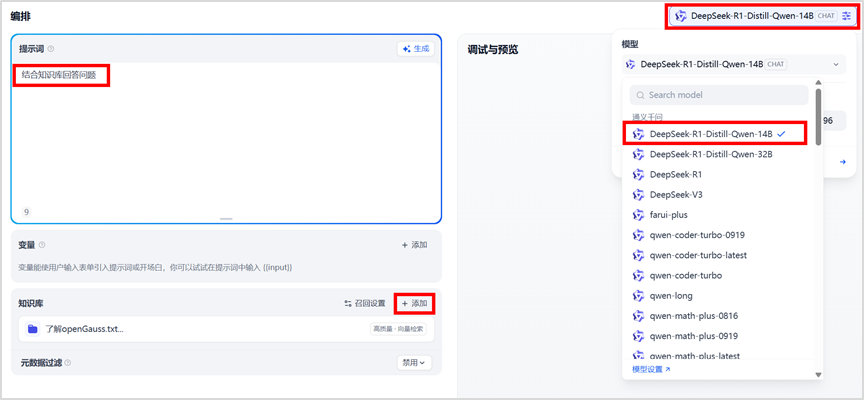
Configure the model, first set the prompt “Answer questions based on the knowledge base”, and import the knowledge base.
Then click publish, select publish update.
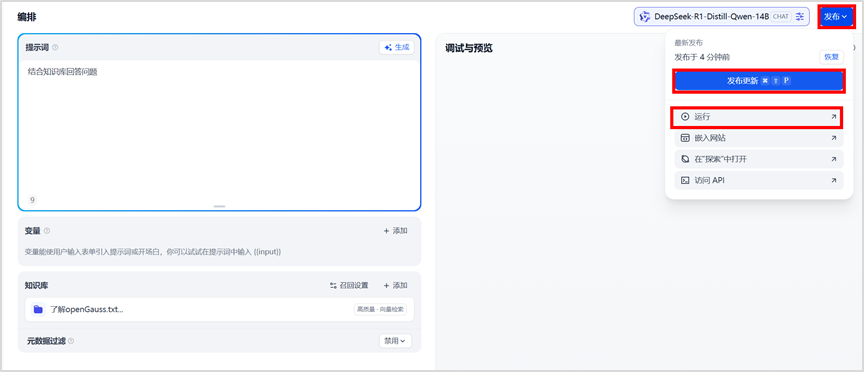
Finally, click run to generate the Q&A interface.

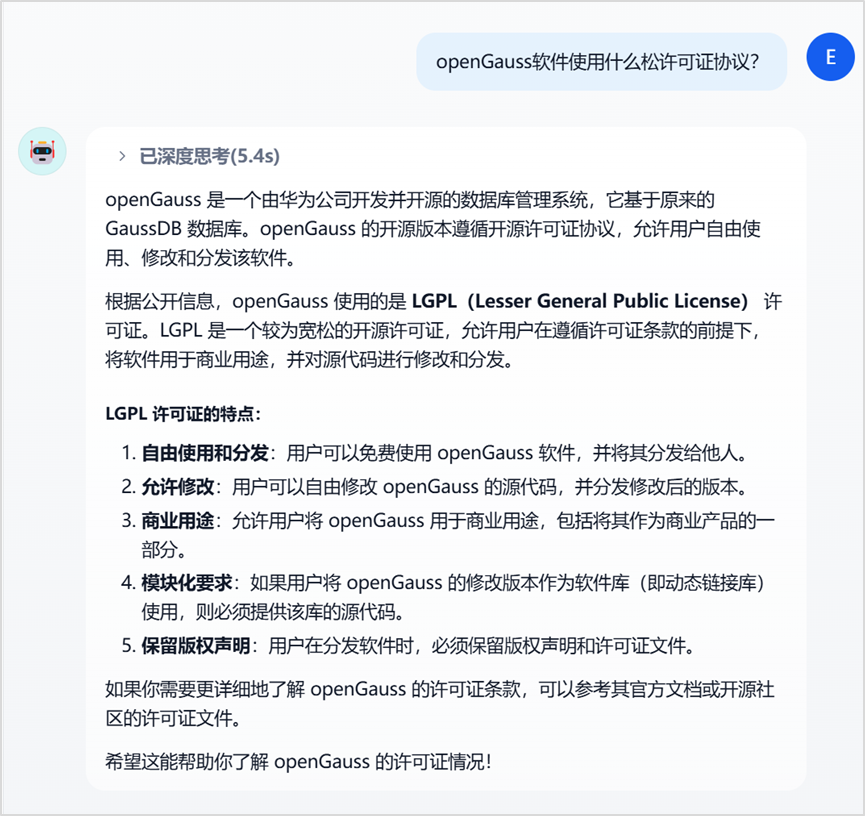
Feedback when not using the knowledge base:
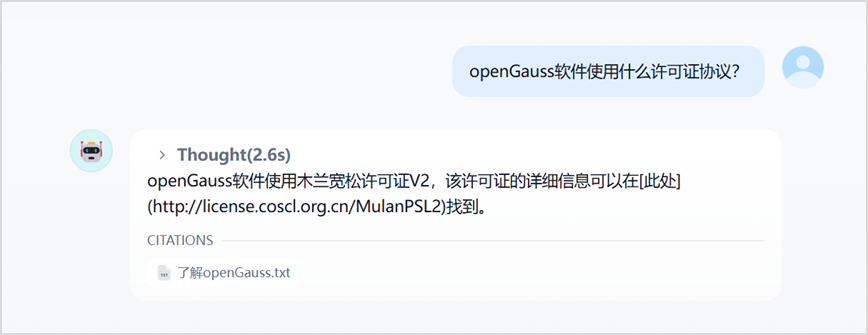
Feedback when using the knowledge base:
The intelligent assistant platform has been successfully built.