NVIDIA Jetson Orin Series – SDK Manager Flashing Guide
This article provides a guide on how to flash the Jetson AGX Orin development kit using the SDK Manager GUI. The Jetson Orin AGX can boot from one of the following devices: eMMC, NVMe, USB drive, or NFS (SD card is not supported in JetPack 5.0.1 DP version).Flashing is the process of placing all necessary files into the selected storage from which Orin will boot. In this section, we will follow three steps to flash Orin.
Step 1: Set the Board to Recovery Mode
To flash Orin, the AGX Orin must be set to recovery mode so that it can accept files. The steps to put Orin into recovery mode are as follows:
First, turn off the Jetson AGX Orin development kit and disconnect it from the power supply.Obtain a USB-A to USB-C cable, connect the USB-A end to the host (the computer with JetPack installed), and connect the USB-C end to the Orin Type-C port L.
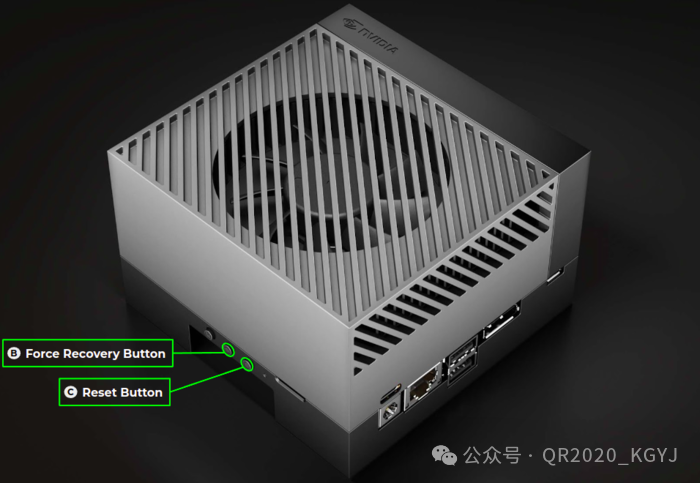
Press and hold the Force Recovery button (B in the image). While holding the Force Recovery button, press and release the Reset button (C in the image).At this point, Orin should be in recovery mode. To verify, you can run the following command on the host:
lsusbIf Orin is in recovery mode, you should see a line similar to the following in the command output:
Bus 001 Device 011: ID 0955:7023 NVidia CorpStep 2: Flashing
Follow the steps 1 to 3 from the JetPack installation section. If you have already installed JetPack, this should be quite quick. When you reach Step 3-L, you should see a window similar to the one below.
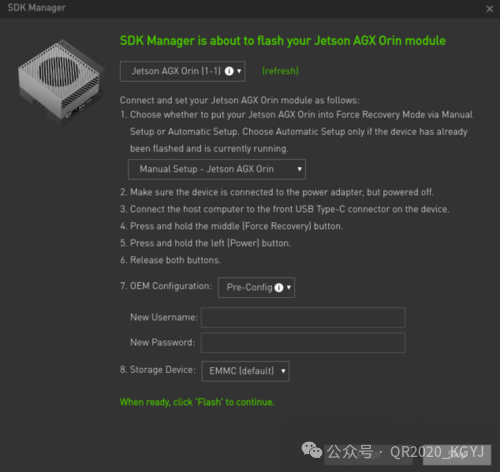
Since you have put Orin into recovery mode, you should see that the SDK Manager has detected it.The image below shows the message displayed by the SDK Manager when Orin is not detected.

The image below shows the expected message when Orin is detected. Before proceeding, make sure Orin is successfully detected.

Once your Orin is detected, select Manual Setup – Jetson AGX Orin from the dropdown in window prompt 1, similar to the image above. Then you can choose the OEM configuration and the storage device to use.For the OEM configuration, you have two options:
- • Runtime: If you choose this option, you will be prompted to create a username/password when you boot Orin after flashing.
- • Pre-configured: With this option, you will create a username/password for Orin before flashing.
The image below shows the username/password prompt displayed when the user selects the pre-configured option for the OEM configuration.

Finally, select the storage device from which to boot. When ready, click the Flash button at the bottom of the window. The SDK Manager will continue with the flashing process, which may take some time. When the SDK Manager is done, if the flashing is successful, you should see a completion window similar to the one below.
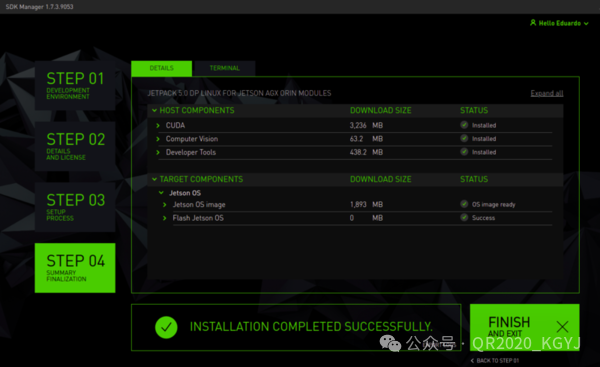
Step 3: Booting
After flashing, Orin should boot automatically. Ensure to connect the display to the Orinport J, connect the keyboard and mouse to the USB-Aport I, and you may also choose to connect the Ethernet cable to theport H.
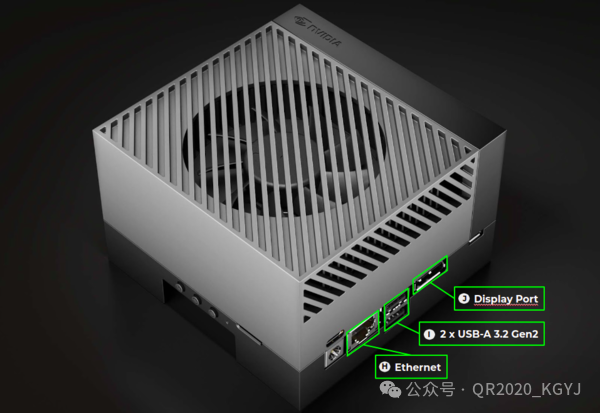
After connecting the display, you should see the Ubuntu login prompt (if you selected OEM pre-configured in Step 2) or the Ubuntu OEM configuration prompt (if you selected OEM runtime in Step 2). Follow the steps to log in for the first time, and then you are all set.