In the previous article in this series, we introduced how to use the face_recognition library’s face_locations() function, using less than 20 lines of Python code to easily locate faces in images and videos. This article will further explore the identity recognition capabilities of the face_recognition library.
The face_recognition library is a face recognition application library based on the dlib machine learning algorithm, which already has very excellent and complete facial feature algorithms at its core. Not only is the function call very simple, but building a feature database is also quite easy; you only need to prepare a “clear frontal image” for each identity, unlike the currently most popular deep learning methods that require collecting dozens to hundreds of images for each identity, which creates a significant gap.
To avoid issues related to portrait rights, this experiment continues to use parts of the NVIDIA GAN adversarial network technology’s public promotional video on Youtube (https://www.youtube.com/watch?v=kSLJriaOumA), specifically from 27 seconds to 1 minute and 4 seconds, and only captures the faces belonging to the GAN-generated section. Here are four images taken from the process, including one child (Kit_A), two women (Miss_B and Miss_C), and one man (Mr_D).
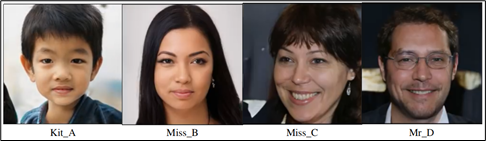
Readers can create their own image library for recognition, allowing each employee in the company or each student in the class to provide a clear frontal photo to build a facial feature library.
Three Stages of Identity Recognition
1. Use the face_encodings() function to establish a “face feature library,” which includes the known images of the identities you want to recognize, as well as the input images to be recognized. This function is used to build the feature library, containing feature parameters for 9 positions of the face.
2. Use face_locations() to find the location of faces in the input image or video frame.
3. Use compare_faces() to compare the faces found in step 2 with the “known feature library” established in step 1, identifying images with similarity within the required range (tolerance).
For details on calling functions in face_recognition, please refer to this documentation.
The remaining task is to frame and label the identified faces found in the input image, then output them to the display.
The entire task can actually be completed by calling the face_recognition library’s face_locations, face_encodings, and compare_faces functions.
Identifying a Single Image
Earlier, we captured four identity images (Kit_A, Miss_B, Miss_C, Mr_D) from the NVIDIA GAN synthetic video, so we first read these four images and perform individual feature encoding (face_encodings), then combine all encodings into idEncodings and specify the corresponding identity names in idNames.
Next, we read the test image testImage and perform face localization and encoding work, then compare it one by one with the idEncodings encoding library. The entire logic is quite straightforward.
import cv2
import face_recognition as fr

# Read identity images
faceKitA  = cv2.imread('Kit_A.png')
faceMissB = cv2.imread('Miss_B.png')
faceMissC = cv2.imread('Miss_C.png')
faceMrD   = cv2.imread('Mr_D.png')

# Perform feature encoding for each identity image
encodeKitA  = fr.face_encodings(faceKitA)[0]
encodeMissB = fr.face_encodings(faceMissB)[0]
encodeMissC = fr.face_encodings(faceMissC)[0]
encodeMrD   = fr.face_encodings(faceMrD)[0]

# Establish encoding list and names
idEncodings=[encodeKitA, encodeMissB, encodeMissC, encodeMrD]
idNames=['Kit_A','Miss_B','Miss_C','Mr_D']

# Read test image, capture face and perform feature encoding
testImage = cv2.imread('GAN_Pic03.png')
testLocation  = fr.face_locations(testImage)
testEncodings = fr.face_encodings(testImage,testLocation)

for (top,right,bottom,left), testFaceEncoding in zip(testLocation,testEncodings):
    name = 'Unknown'
    # compare_faces() returns an array containing "True" and "False"
    matches = fr.compare_faces(idEncodings,testFaceEncoding)
    if True in matches:
        # If a face from the comparison library is found, find the corresponding name
        first_match_index = matches.index(True)
        name = idNames[first_match_index]
        cv2.rectangle(testImage,(left,top),(right,bottom),(255,0,0),2)
    cv2.rectangle(testImage,(left,top-30),(left+120, top),(0,255,255),-1)
    cv2.putText(testImage,name,(left,top-10),0,.75,(255,0,0),2)
cv2.imshow('myWindow',testImage)
cv2.moveWindow('myWindow',0,0)
if cv2.waitKey(0)==ord('q'):
    cv2.destroyAllWindows()
Below are three different images extracted from the NVIDIA GAN promotional video for testing. All these faces are computer-generated, and you can visually compare them with the previous four images.
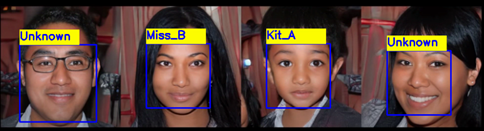
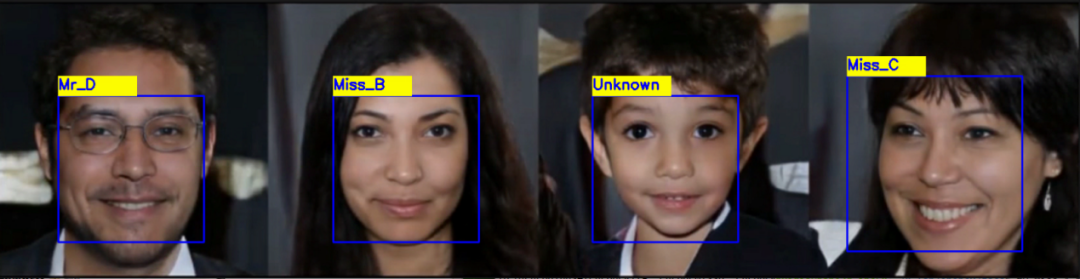
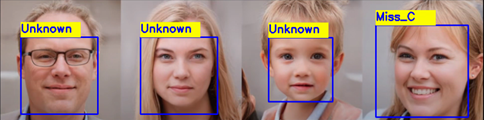
During the execution of this code, you will find that most time is consumed in the feature encoding (face_encodings) part. If you have the jetson-stats tool installed on your system, you can see that the GPU’s execution rate is highest during the encoding process. Once the feature encoding is completed, the time for subsequent comparisons is relatively short.
If each time you perform this identity recognition, you need to re-import images and perform feature encoding, it is very inefficient, and if the number of images increases, this time waste will be even greater. Therefore, we will learn how to establish a fixed identity feature encoding file to reduce unnecessary repetitive encoding work.
Establishing an Identity Feature Encoding File
The principle of this is also very simple: just write the idEncodings and idNames from the previous code into a specified file. As long as the number of identities to be recognized does not increase, there is no need to change this file. This work is somewhat similar to deep learning model training, but unlike deep learning, which requires so many images for feature extraction, each identity only needs one clear frontal photo.
To improve the code’s versatility and facilitate adding more identity images in the future without modifying the code, we will use a “folder” and “filename” approach to manage the contents of this feature encoding file.
First, create a “known” folder to store all images that need to be recognized (Kit_A.png, Miss_B.png, Miss_C.png, Mr_D.png) and use the filename as the recognition name (idName).
Next, let’s see what the face_recognition library can do:
import cv2
import face_recognition as fr
import os
import pickle

image_dir='./known'    # Directory to store image data
idEncodings=[]         # Store encoding data
idNames=[]             # Store identity names as a list of filenames

for root, dirs, files in os.walk(image_dir):
    print('All files under this folder are '+ str(files))
    for file in files:
        # Get filename as identity recognition name
        fullPath = os.path.join(root,file)
        filename = os.path.splitext(file)[0]
        print('This ID Name is ' + filename)
        idNames.append(filename)
        # Read image and perform feature encoding
        person = cv2.imread(fullPath)
        encoding=fr.face_encodings(person)[0]
        idEncodings.append(encoding)
print('Full idName list is ' + str(idNames))
# Use pickle function to serialize data and write to specified file, here is 'myId.pkl'
with open('myId.pkl','wb') as f:
    pickle.dump(idNames,f)
    pickle.dump(idEncodings,f)
The execution result will read and process each image in the directory one by one, ultimately generating a file that stores identity names and feature encodings, in this case, “myId.pkl,” which can be directly read and used in other codes without repeating the high computational encoding work.

Using the Feature Encoding File to Recognize Video
Finally, we will apply this encoding file to the attendance recognition application. Similarly, to avoid portrait rights issues, we will again use segments from the NVIDIA GAN promotional video for the experiment. Users can easily change the data source from a video file to a camera, whether it is CSI or USB.
First, read the feature encoding and recognition names from “myId.pkl”:
import cv2
import face_recognition as fr
import pickle

# Read feature encoding file
with open('myId.pkl','rb') as f:
    idNames=pickle.load(f)
    idEncodings=pickle.load(f)

cap = cv2.VideoCapture('./GAN_Video6.mp4')
while True:
    isRead, frame = cap.read()
    if not isRead:
        break
    faceLocations = fr.face_locations(frame)
    faceEncodings = fr.face_encodings(frame,faceLocations)
    for (top,right,bottom,left), faceOneEncoding in zip(faceLocations, faceEncodings):
        name = 'Unknown'
        matches = fr.compare_faces(idEncodings,faceOneEncoding)
        if True in matches:
            matchIndex = matches.index(True)
            name=idNames[matchIndex]
        cv2.rectangle(frame,(left,top),(right,bottom),(255,0,0),2)
        cv2.rectangle(frame, (left,top-30),(left+120, top),(0,255,255),-1)
        cv2.putText(frame,name,(left,top-10),0,.75,(255,0,0),2)
    cv2.imshow('mywindow', frame)
    if cv2.waitKey(1)==27:
        break
cap.release()
cv2.destroyAllWindows()
Have we completed the entire application? Actually not yet. As with the previous article, the same issue arises: after importing data from a video file or camera, the recognition performance is still relatively slow. The reason is the same, and the solution is also the same: we need to resize the imported data before comparison to save a lot of time.
Here, we will also introduce a rate variable to adjust the size of the image during identity comparison. After reading the frame from the data source (video file or camera), we will use cv2.resize() to change the size ratio according to the rate, and finally multiply the coordinates by the rate before drawing the frame to restore the size.
The adjusted code is as follows:
import cv2
import face_recognition as fr
import pickle

# Read feature encoding file
with open('myId.pkl','rb') as f:
    idNames=pickle.load(f)
    idEncodings=pickle.load(f)

cap = cv2.VideoCapture('./GAN_Video6.mp4')
while True:
    isRead, frame = cap.read()
    if not isRead:
        break
    faceLocations = fr.face_locations(frame)
    faceEncodings = fr.face_encodings(frame,faceLocations)
    for (top,right,bottom,left), faceOneEncoding in zip(faceLocations, faceEncodings):
        name = 'Unknown'
        matches = fr.compare_faces(idEncodings,faceOneEncoding)
        if True in matches:
            matchIndex = matches.index(True)
            name=idNames[matchIndex]
        cv2.rectangle(frame,(left,top),(right,bottom),(255,0,0),2)
        cv2.rectangle(frame, (left,top-30),(left+120, top),(0,255,255),-1)
        cv2.putText(frame,name,(left,top-10),0,.75,(255,0,0),2)
    cv2.imshow('mywindow', frame)
    if cv2.waitKey(1)==27:
        break
cap.release()
cv2.destroyAllWindows()
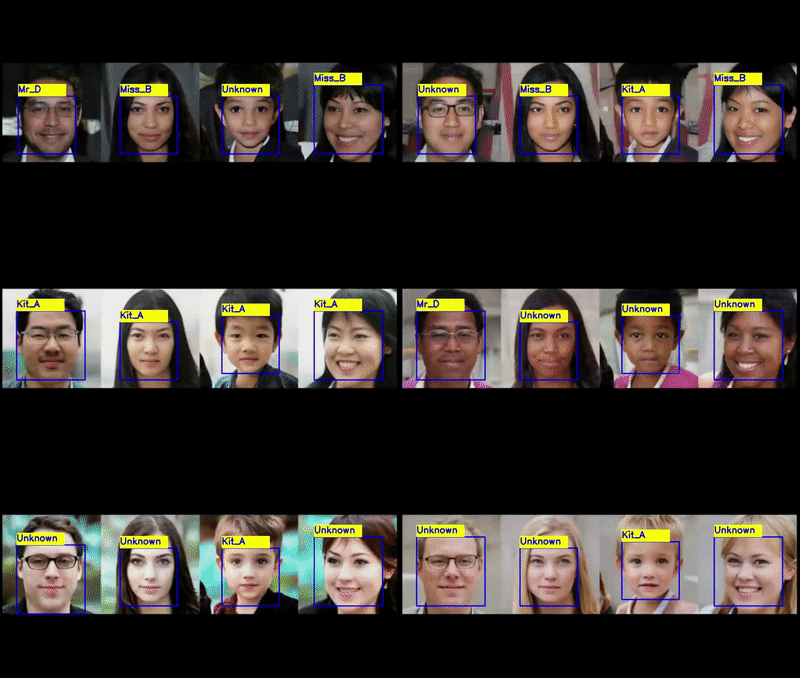
Try adjusting the performance; it should show significant improvement! Here, on the Jetson Nano 2GB, with the video size of 1024 x 576, we can achieve around 8~10 FPS performance when the rate is set to 4.
The execution effect is as follows (GAN_Face.gif)
If you want to learn more about “Jetson Nano 2GB,” please click on “Read the Original“.
Recommended Reading
NVIDIA Jetson Nano 2GB Series Article (1): Unboxing Introduction
NVIDIA Jetson Nano 2GB Series Article (2): System Installation
NVIDIA Jetson Nano 2GB Series Article (3): Network Setup and Adding SWAPFile Virtual Memory
NVIDIA Jetson Nano 2GB Series Article (4): Experiencing Parallel Computing Performance
NVIDIA Jetson Nano 2GB Series Article (5): Experiencing Visual Function Libraries
NVIDIA Jetson Nano 2GB Series Article (6): Installing and Calling the Camera
NVIDIA Jetson Nano 2GB Series Article (7): Calling CSI/USB Cameras via OpenCV
NVIDIA Jetson Nano 2GB Series Article (8): Executing Common Machine Vision Applications
NVIDIA Jetson Nano 2GB Series Article (9): Adjusting CSI Image Quality
NVIDIA Jetson Nano 2GB Series Article (10): Dynamic Adjustment Techniques for Color Space
NVIDIA Jetson Nano 2GB Series Article (11): What You Should Know About OpenCV
NVIDIA Jetson Nano 2GB Series Article (12): Face Localization

GTC 2021 Free registration is now open, welcoming all aspiring individuals riding the waves of the AI era to join and discuss the great challenges of today’s world, sharing insights and establishing new connections through a shared passion for technology!