 1 Introduction
In the field of microcontroller development, 8-bit microcontrollers are the ideal choice for electronics enthusiasts due to their low cost, relatively simple structure, and ease of programming. This article introduces how to use an 8-bit microcontroller to play music. The project is programmed in C language to play audio files, and includes circuit schematics and key code explanations to help readers understand and learn.
 2
2
System Overview
01Project Functionality
● User Interface: An OLED screen is used to display information about the audio being played, receive user command inputs, and convert them into control signals for the music player’s main control unit..
● Control Playback: Based on button operation signals, functionalities such as play, pause, next/previous track, sequential or single track loop, EQ mode settings, and volume adjustments are implemented.
● Audio Processing: The audio chip reads and decodes audio files from a USB drive and plays them through a speaker.
02
Project Hardware Components
(1) The core components of the project include:
● Main Control Chip: The project uses a high-speed 51 core microcontroller from BYD, which has rich resources to meet various control needs and is fundamentally compatible with other 51 microcontrollers.
● Audio Chip MY1690-16S: A serial-controlled voice chip that supports dual decoding of MP3 and WAV formats. This chip uses a standard UART serial interface, operates at 3.3V TTL communication, with a baud rate of 9600; it can play audio through speakers or headphones; supports FAT16 and FAT32 file systems, and can accommodate a maximum of 32GB TF card or USB drive. This project uses a speaker and USB peripherals.
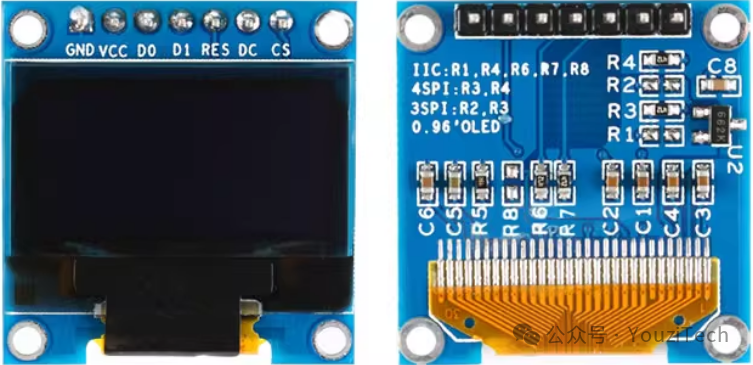
● 0.96-inch OLED Screen: This module is driven by SSD1306, with a default communication method of a 4-wire SPI bus interface. In practical applications, an IIC interface is used, with resistor R3 moved to position R1, and a 0-ohm resistor used to short-circuit position R8; both CS and DC pins are grounded; before initializing the display, the RES pin is pulled low for 200ms through an IO pin, then pulled high to maintain a high state.
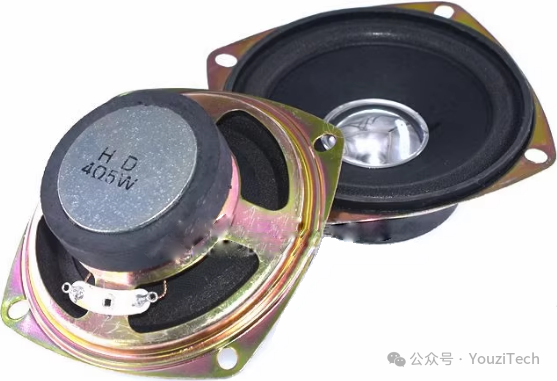
● Speaker: A 3-inch speaker is used, with parameters of 4Ω/5W.
● Power Supply System: Powered by a 5V/2A charger.
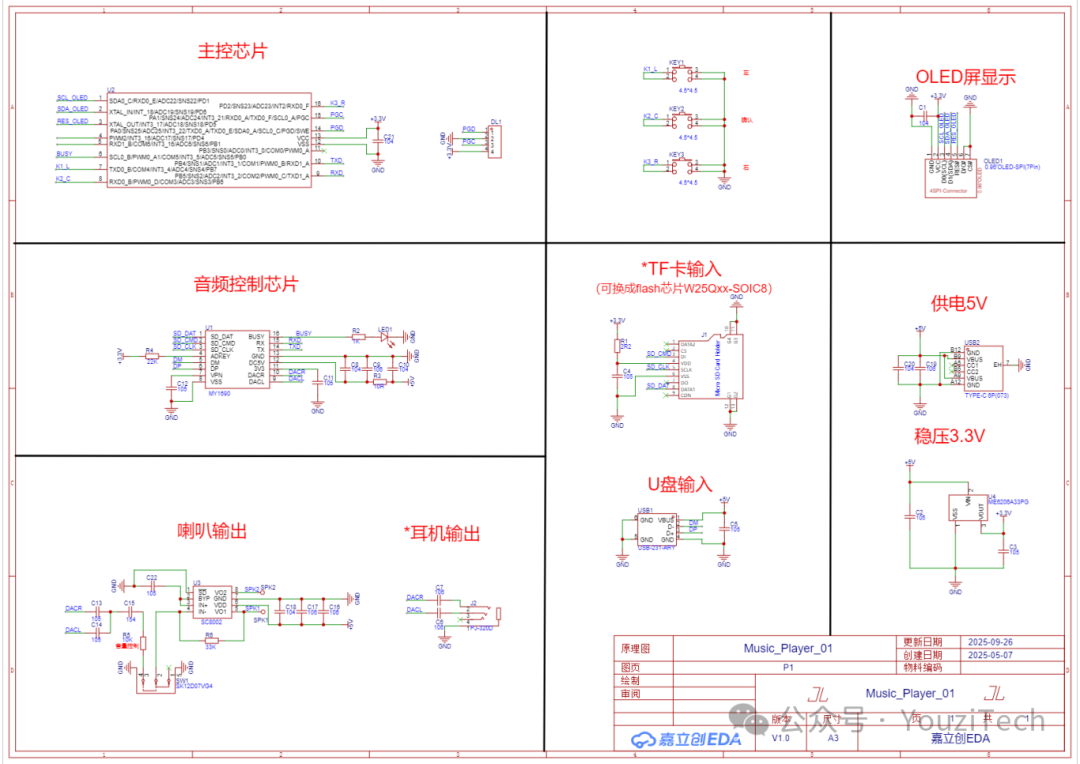
(2) Other components of the project are not introduced in detail, the hardware circuit schematic is as follows:
 3 Project Software Development
The design process of this project mainly includes initialization, button operations, display loading, and audio processing steps.
01Initialization
Initialize the microcontroller system, timer, button detection ports, display SPI interface, and serial communication.
02Button Operations
Detect button inputs and implement audio processing through commands.
(1) Left and Right Button Functions: Short press to select settings, adjust volume, and choose EQ modes; long press to quickly adjust volume.
(2) Confirm/Cancel Button Functions: Short press to toggle power on/off, switch audio playback or pause, select next or previous track, choose single or sequential playback, select different EQ modes, and confirm adjusted volume.
(3) According to the schematic, the button detection port is initialized as input with pull-up enabled, detecting when the button level changes from high to low to determine if the button is pressed. Note that debouncing is required here (the debouncing operation involves multiple checks to see if the detection port is low; using delay-based debouncing will cause blocking and is not recommended).
(4) The project requires both short press and long press functionalities, so the logic for determining short and long presses must be known. There are several judgment logics; based on project requirements, the following logic is selected: when a button press is detected, it is first considered a short press, executing the corresponding function; then continue to check if the press duration exceeds the threshold; if it does, it is considered a long press, executing the corresponding function.
// Short press and long press handlingvoid run_key(void){ key_buff=0; if(KEY1_B==0) key_buff=1; if(KEY2_B==0) key_buff=2; if(KEY3_B==0) key_buff=3; if(key_buff==key_old) { if(key_delay>3) // Debounce handling { if(key_buff>0) { if(!f_onkey) // Content executed when determined as short press { f_onkey=1; switch(key_buff) { case 1:// LEFT break; case 2:// CONFIRM break; case 3:// RIGHT break; default: break; } } else { scan_key_repeat_cnt--; if(scan_key_repeat_cnt==0) // Content executed when determined as long press { scan_key_repeat_cnt=KEY_REPEAT_CNT1;// Assign a shorter long press time threshold when determined as long press switch(key_buff) { case 1: break; case 3: break; default: break; } } } } else // Handling after button release { key_delay=0; f_onkey=0; scan_key_repeat_cnt=KEY_REPEAT_CNT0;// Assign initial value to long press time threshold } } else { key_delay++; } } else { key_delay=0; key_old=key_buff; }}03Display Loading
Set the content displayed on the screen based on different states and user operations.
(1) After power-on initialization, display the logo. Use drawing functions to display the logo pattern.
//function : Display BMP image 128X64//parameters : x0,y0 Starting point coordinates: x0(0~127),y0(0~7)// x1,y1 Ending point coordinates: x1(1~128),y1(1~8)void OLED_DrawBMP(unsigned char x0, unsigned char y0,unsigned char x1, unsigned char y1,unsigned char BMP[]){ unsigned int j=0; unsigned char x,y; for(y=y0;y<y1;y++) { OLED_Set_Pos(x0,y); // Set point address for(x=x0;x<x1;x++) // Point drawing direction: from left to right, from top to bottom { OLED_WR_Byte(BMP[j++],OLED_DATA); } } }(2) Press the power button to turn on, entering the boot display interface, at which point the top left corner of the screen starts to scroll displaying the content “Enjoy the music”. This refreshes every 10ms to avoid blocking.
//function : Display Chinese characters in a limited area (x-axis coordinate range 0~x_range)//parameters : x y Starting point coordinates// x_range Area x coordinate range// *dat Data to be displayedvoid OLED_ShowChineseRange(uchar x,uchar y,uchar x_range,const uchar *dat){ uchar p=0; if(x<=x_range) { p=*(dat); // Each Chinese character's encoding uses two bytes OLED_Set_Pos(x,y); OLED_WR_Byte(p,OLED_DATA); p=*(dat+1); OLED_Set_Pos(x,y+1); OLED_WR_Byte(p,OLED_DATA); } } // Chinese character scrolling display#define X_ORIGIN 63 // Display x-axis range 0~X_ORIGINunigned int x_now=0; // Current x-axis coordinate of the displayunigned int x_star=X_ORIGIN; // Initial x-axis coordinate of the display unigned char *data_all=Hzk[0]; // Starting address of the display data unigned int data_cnt=0; // Record the current address of the dataunigned int offset=0; // Record the display lengthvoid OLED_ShowScrollChinese(void) // Scrolling display content: Enjoy the music { if((pause_en_B==0)&&(set_en_B==0)&&(play_en_B==0)) // Scrolling display conditions { for(data_cnt=0,x_now=x_star; x_now<X_ORIGIN+1; x_now++) { OLED_ShowChineseRange(x_now,0,X_ORIGIN+1,data_all+data_cnt); data_cnt+=2; } x_star--; if(x_star<=0) // When the starting x-axis coordinate of the display is 0, each time the previous column of data will be discarded { x_star=0; data_all+=2; } offset++; if(offset>=7*16+X_ORIGIN+1)// Check if the recorded length exceeds the length of the displayed data plus the length of the display journey { offset=0; x_star=X_ORIGIN; data_all=Hzk[0]; } } else { offset=0; x_star=X_ORIGIN; data_all=Hzk[0]; }} (3) Other static displays of audio playback information can be done using drawing functions. When button operations set audio parameters, corresponding display patterns are shown.
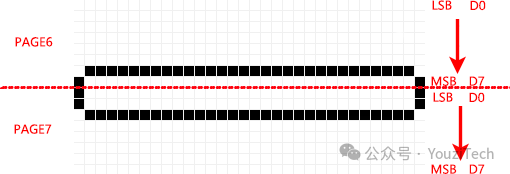
(4) When setting the volume level, the length of the progress bar reflects the volume level, using the drawing function to display the progress of the progress bar. The key to this function is to operate the OLED display’s memory GDDRAM, setting specified pixel points to 1 or 0 (i.e., on or off). For the SSD1306 driven 128*64 OLED display, there are a total of 8 pages, each with 128 columns and 8 rows. One data byte represents 8 pixel points in a column, with data bit D7 written to the bottom row and data bit D0 written to the top row.
The implementation idea of the point drawing function is: Set the displayed X and Y coordinates, determine which row the point is in based on the Y coordinate, modify the corresponding byte in the memory, and write the modified memory data to the OLED screen. The program code implementation is as follows:
//function : Coordinate settingvoid OLED_Set_Pos(unsigned char x, unsigned char y) { OLED_WR_Byte(0xb0+y,OLED_CMD); OLED_WR_Byte(((x&0xf0)>>4)|0x10,OLED_CMD); // High address OLED_WR_Byte((x&0x0f),OLED_CMD); // Low address}// Progress bar handling: Volume level 0~30=> Progress bar process 0~30// 0~Volume: Fill// Volume~30: Clearfor(i=0;i<sound_level;i++) // Fill{ OLED_Set_Pos(i+97,6); // Coordinates of the point drawing position OLED_WR_Byte(0xc0,OLED_DATA); // 0xc0=>0b1100000 OLED_DATA=>1 (write data) OLED_Set_Pos(i+97,7); // Coordinates of the point drawing position OLED_WR_Byte(0x07,OLED_DATA); // 0x07=>0b0000111 OLED_DATA=>1 (write data)}for(i=sound_level;i<30;i++) // Clear{ OLED_Set_Pos(i+97,6); // Coordinates of the point drawing position OLED_WR_Byte(0x40,OLED_DATA); // 0x40=>0b0100000 OLED_DATA=>1 (write data) OLED_Set_Pos(i+97,7); // Coordinates of the point drawing position OLED_WR_Byte(0x04,OLED_DATA); // 0x04=>0b0000100 OLED_DATA=>1 (write data)}04Audio Processing
The microcontroller sends control commands to the voice chip via serial communication protocol to implement various functions. When sending commands, it is important to check whether different voice chips support continuous command sending, carefully review the voice chip’s user manual, and strictly follow the serial communication protocol and precautions outlined in the manual.
The voice chip returns “OK” upon successful command sending, and “STOP” when the song playback is finished. When switching songs after playback, you can send a query for the next song’s title and playback time based on receiving “STOP”; the received data is refreshed on the display using the ASCII code conversion function.
//function : Convert ASCII code to hexadecimal value//parameters : temp is the ASCII code value//retvalue : Returns the hexadecimal value corresponding to the ASCII codeuchar ascii_to_hex(uchar temp){ if((temp>='0')&&(temp<='9')) temp=temp-'0'; else if((temp>='A')&&(temp<='F')) temp=temp-'A'; else if((temp>='a')&&(temp<='f')) temp=temp-'a'; else temp=0x00; return temp;}4 Project Effect Testing
The final test results of the project meet the design requirements. Below are the actual assembly and demonstration of the device.