Mastering HarmonyOS Development BoardHow to get started with HarmonyOS hardware development? How should the development board be utilized? Can one quickly get started from scratch?The HarmonyOS developer public account “Mastering HarmonyOS Development Board” is here! Each issue provides hands-on teaching to help you get started with the development board from scratch, along with source code download links to make it easier for you to get started without getting lost.
In this issue, we present a DIY guide for the keyboard Bluetooth module based on the Runhe Neptune development board (hereinafter referred to as Neptune development board). Utilizing the serial and Bluetooth functionalities supported by the Neptune development board, we transform a wired keyboard into a Bluetooth keyboard, enabling a single keyboard to be recognized and used by multiple operating systems/terminal devices, thus improving work efficiency.
This project is characterized by low time consumption, low cost, and compatibility with 4 operating systems, allowing you to break free from the constraints of a mobile phone screen and directly type exciting text with a physical keyboard.
For more specific information, you can check the OpenHarmony open-source community on Gitee. Click on “Read the Original” to access it directly.
Let’s watch a video to see the effect!~
▼
After watching the video, let’s delve into the principles step by step.
As shown in the figure below, the wired keyboard is connected to the CH9350 tool (which is used to recognize the USB input signals from the keyboard and convert them to serial output for the development board). Meanwhile, the serial output signals from the CH9350 (5V, GND, TXD, RXD) are connected to the corresponding serial ports of the Neptune (5V, GND, PB7, PB6).
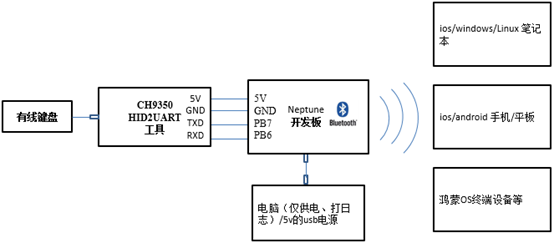
For example, when the wired keyboard inputs “你好” (Hello), the CH9350 tool recognizes the signals output from the wired keyboard’s USB port and converts them into serial signals. These serial signals are transmitted to the Neptune development board through the serial ports (TXD → PB7 and RXD → PB6). The Neptune development board then transmits the signals to the terminal device via Bluetooth.
When we program the development board, we need to connect the computer with the programming tool via a Type-C power cable to the Neptune development board and use the programming tool to upload the program onto the development board. This project is developed based on the OpenHarmony V1.0 version, and future versions will be upgraded based on OpenHarmony V1.1.This project supports:●Upgrading a wired USB keyboard to a Bluetooth keyboard (the modified keyboard can only operate in either wired or Bluetooth mode)●BLE 4.2 protocol, backward compatible with older BLE versions, such as: BLE 4.0●HID protocol (Human Interface Device), theoretically supporting USB devices such as keyboards, mice, joysticks, and game controllers●One device, 4 operating systems (HarmonyOS, Windows, Linux, Android)
▼
So how does the Neptune development board convert the keyboard from wired to wireless? Let’s DIY it!~
Before we start connecting, we need to prepare the following materials:
● Neptune development board● CH9350 HID to UART board (hereinafter referred to as CH9350 board)● 4 Dupont wires● 1 Type-C power cable● Wired keyboard● A computer with Windows OS, used for programming the development board
Once everything is prepared, let’s start building the hardware environment, which means connecting all the hardware components together.
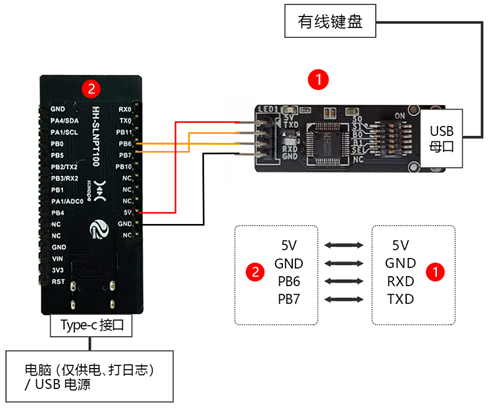
Use the 4 Dupont wires to connect the Neptune development board (board ②) and the CH9350 board (board ①) as shown in the diagram, and connect the Neptune development board and the computer using a Type-C power cable, while connecting the wired keyboard to the CH9350 board.
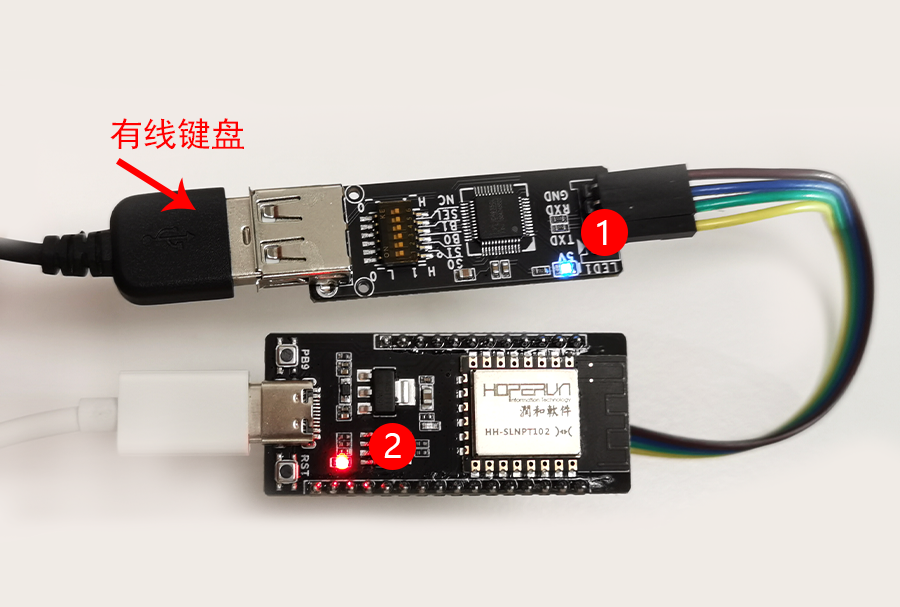
After powering up, as shown in the figure below, when two lights are continuously on, pressing any key on the keyboard will cause the ① light to flash, indicating a successful connection:
Next, we will enter the Bluetooth connection phase. This time we choose a mobile phone as the terminal, and the mobile phone connects to the keyboard via Bluetooth, the keyboard will be recognized as “OpenHarmony_HID-***“: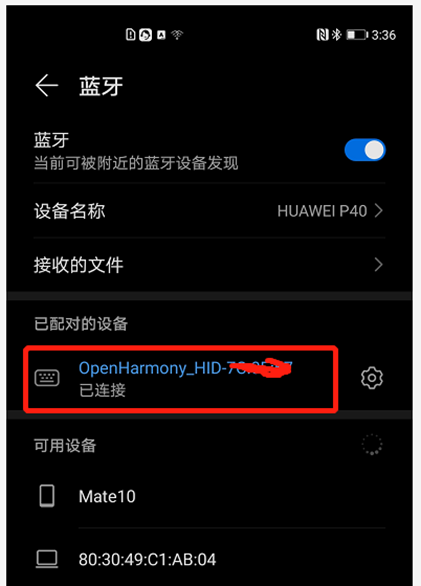 Open any text editor on your mobile phone (any text input box will do), input any text using the keyboard, and if the text editor successfully displays the input text, the connection is successful.
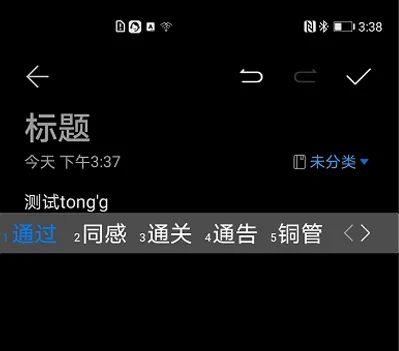
Thus, we have completed the transformation of the wired keyboard into a wireless Bluetooth keyboard.In addition to mobile phones, you can also connect to PCs, tablets, and other devices. The Bluetooth module program added to this development board currently only supports single-device connections, and the OpenHarmony community will release an upgraded version that supports multiple device connections in the future, so stay tuned~▼Next, let me briefly introduce the steps for upgrading and programming the Neptune development board:1. Download the development board program2. Install the USB Serial (CH340) driver3. Install the programming tool4. Program the development board【Please Note】This programming uses the Windows operating system01Download the development board program
1.1 Open the link below to access the Gitee source code repository:
● Link:
https://gitee.com/openharmony-sig/vendor_oh_fun/tree/master/hihope_neptune-oh_hid
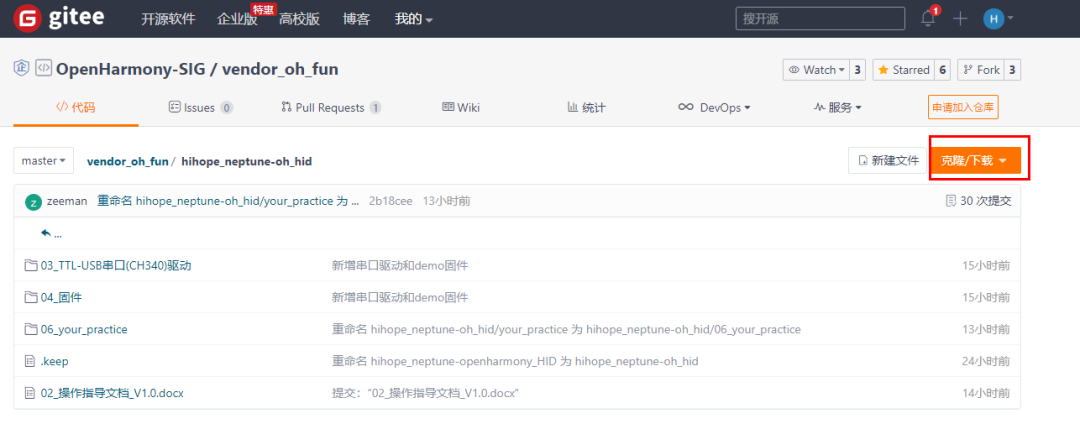
1.2 In the clone/download section, click to download the ZIP file, as shown:
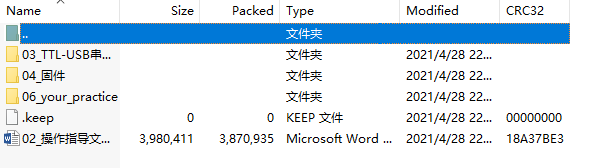
 We unzip the “openharmony-sig-vendor_oh_fun-master.zip” file to enter the “hihope_neptune-oh_hid” folder and obtain the following files:
 02Install the USB Serial (CH340) DriverUsing the USB serial device allows us to conveniently debug the development board, but the prerequisite is to install the driver for this device, so let’s see how to install the driver.This time we are using the TTL-USB serial (CH340) driver,which you can download and install yourself.After downloading on the computer, double-click the .EXE file to install. If the driver is installed successfully, it will look like the image below:
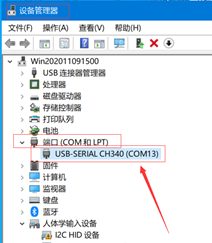
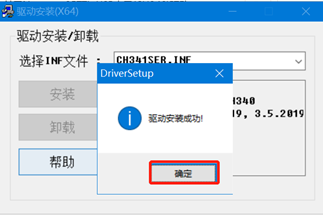 【Please Note】If it prompts “Installation Failed”, please click “Uninstall” and then click “Install” again.Also, search for Device Manager on your computer -> click Ports -> check USB-SERIAL CH340 (COM*), to confirm successful installation and remember the COM* port.【Please Note】If the port does not show, try unplugging and re-plugging the USB, as the COM* may vary for each device.
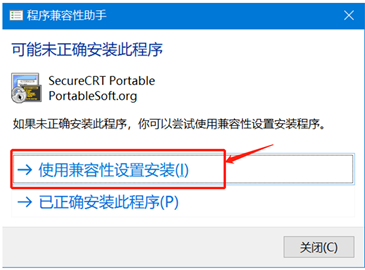
 03Install the Programming ToolThe programming tool is used to write data to programmable integrated circuits. To program the development board, you need to first install the programming tool. This time, the tool used to program the binary image file and print logs for the Neptune development board is SecureCRT, which you can download and install yourself.【Please Note】For the first installation, please select “Install using compatibility settings”
 04Program the Development Board
After installing the programming tool, let’s start the programming process. The general steps for programming are as follows:
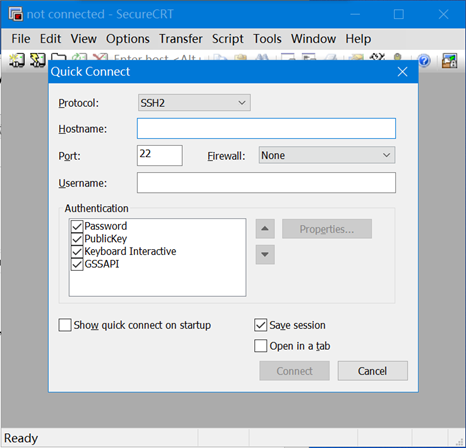
4.1 Open the programming tool SecureCRT:
4.2 Configure the programming tool:
【Notes】
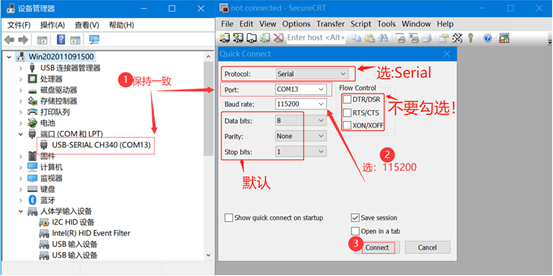
● In Protocol, select Serial (selecting Serial indicates serial programming)● Do not check Flow Control (if checked, the programming process cannot be displayed)● Ensure that the USB-SERIAL in the left-side “Device Manager” matches the Port in the right-side “SecureCRT” (if they do not match, you cannot open the specified serial port)● Additionally, set Baud rate to 115200 (representing the programming speed of the serial port)
Refer to the image for clearer configuration. Once configured, click Connect, as shown:
4.3 Confirm the connection between the programming tool and the development board:
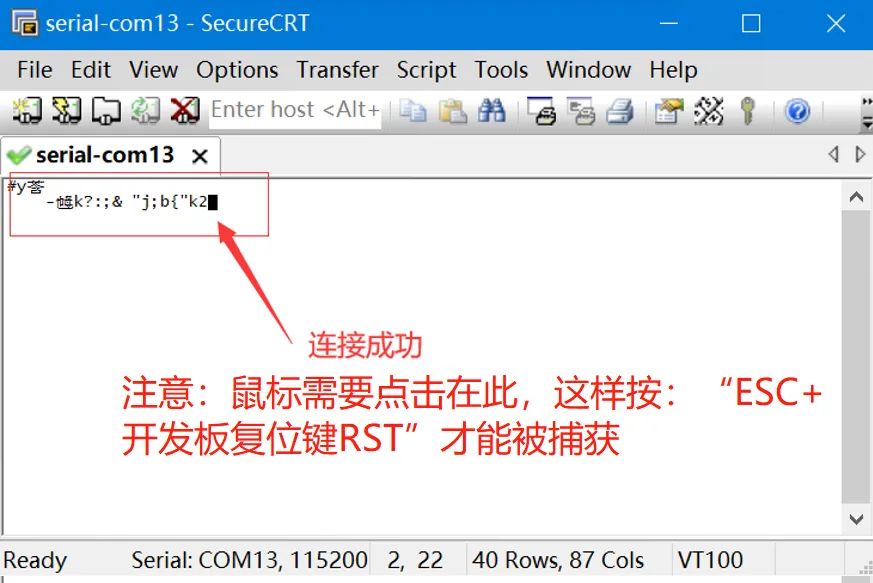
4.4 Test the connection status of the development board: Click on the SecureCRT window, and the subsequent “ESC + Reset Key RST” will be captured.
4.5 Start programming: Hold down the “ESC” key on the computer. Click the reset (RST) key on the Neptune development board.
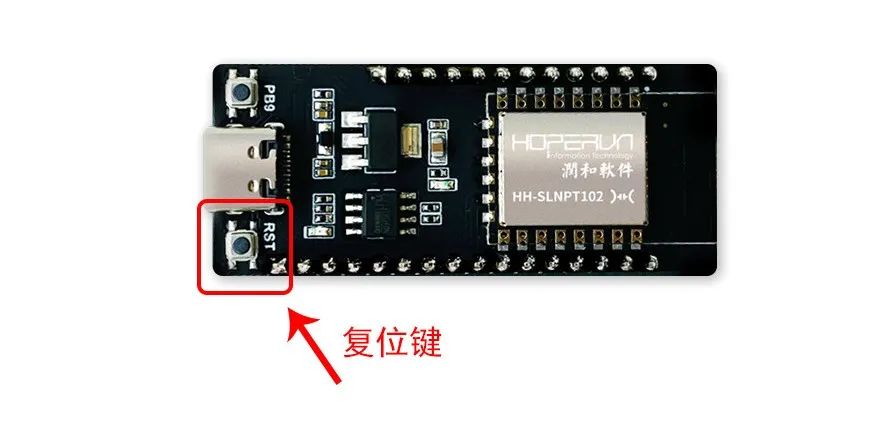
When the display shows “cccccccccc“, it indicates that the board has entered programming mode, and you can release the “ESC” key on the computer.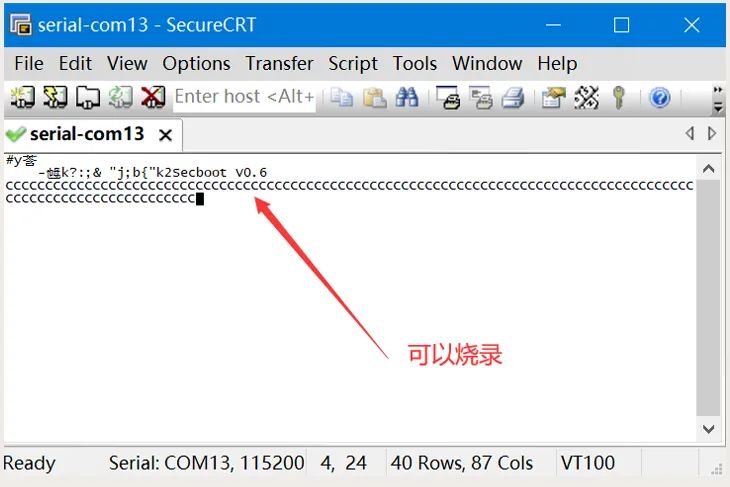
Select “Transfer -> Send Xmodem” to enter the programming interface, as shown:
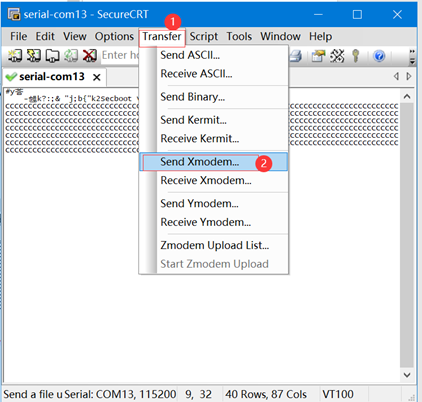 Select the “OpenHarmony_HID_V0.1.img” file from the ”
04_Programming Firmware” in the previously downloaded compressed package, and click “Send”, as shown: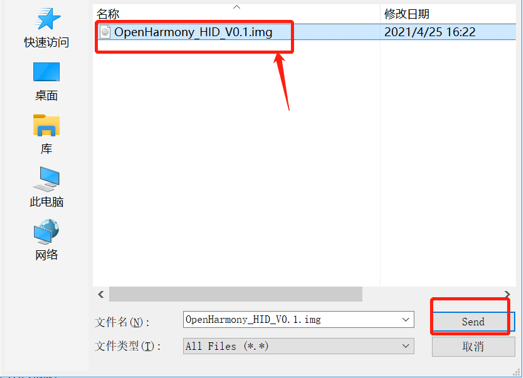 During the programming process, the progress will be displayed as shown in the figure below.【Please Note】Please do not click randomly on this page during the process to avoid interruption
 After the programming is complete, as shown below, the progress will show 100%, indicating that the programming was successful:
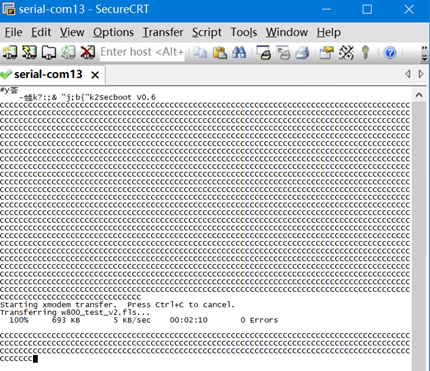 Click the reset (RST) key on the Neptune development board to exit programming mode: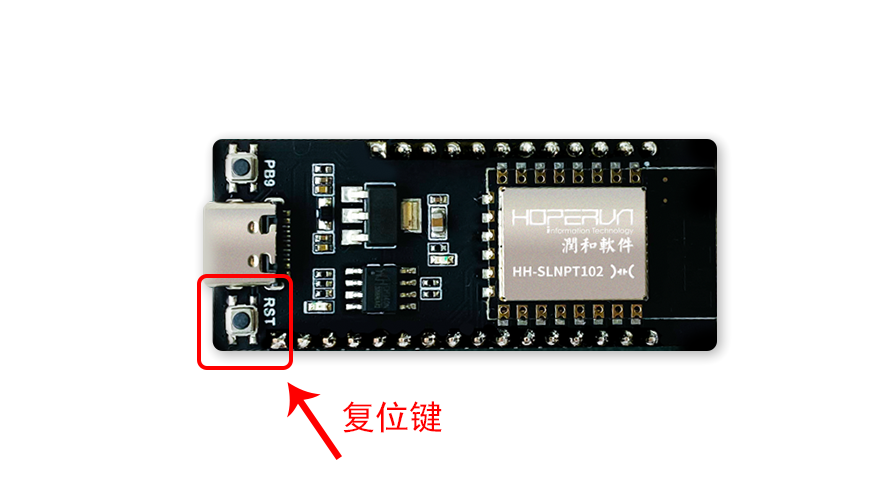
▼
Thus, we have completed all programming operations. Do you now have a better understanding of how to convert a keyboard from wired to wireless using the Neptune development board? Theoretically, the Neptune development board supports USB devices such as keyboards, mice, joysticks, and game controllers. We look forward to developers exploring new possibilities!In the near future, we will continue to upgrade and bring more fun and interesting content, allowing developers to master the development board with less time and cost, so stay tuned~Click “Read the Original” to obtain relevant operational materials and development board programs to start your journey with the development board!
END

Scan to Follow for More Updates
This issue brings you the development process of a childhood classic game on HarmonyOS mobile phones, contributed by developer Zhang Zhaotian. This simple and easy-to-use mini-game demo is hoped to inspire your HarmonyOS development journey.