
The Core Programming Concept – break: The “Emergency Brake” in Loops, Stop When You Need To!
Introduction: Young makers, we just learned how to use <span>continue</span> to make the loop “skip” a round and take a break. But sometimes, the situation is more urgent — we need to make the entire loop stop immediately! For example, when you are looking for your keys, once you find them, you won’t continue searching through other drawers. Today, let’s introduce the “emergency brake” in loops — <span>break</span>, which allows you to decisively exit the loop at a critical moment!
👉 Follow our WeChat public account 【Hardware Programming and Innovation】, reply with 【break】 to get the source code package for this article!
1. 3-Minute Concept: What is break?
Life Analogy:
- Running in PE class: “Once you hear the bell for class dismissal, stop running immediately and leave the playground.”
- You do not stop after completing a set number of laps, but rather are interrupted by an external condition (the bell), which causes you to stop immediately the entire running activity.
In programming, <span>break</span> is like this “class dismissal bell” or “emergency brake”. When encountering <span>break</span> in a loop, it will immediately terminate the entire loop and jump to continue executing the program after the loop.
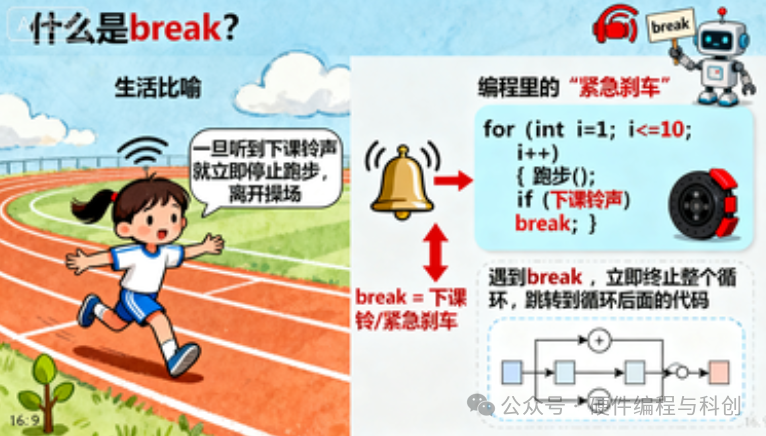
2. Hands-On Practice! Exploring 3 break Examples
Example 1: Number “Treasure Hunt” Game
- Learning Objective: Understand the basic usage of break — stop searching immediately after finding the target.
- Required Components: Arduino board × 1 (no additional components needed, use the serial monitor).
Arduino IDE code is as follows:
// Example 1: Number "Treasure Hunt" Game
// Task: Search for our set "treasure number" from 1 to 100, stop immediately once found
void loop() {
  for (int i = 1; i <= 100; i++) {
    Serial.print("Checking number: ");
    Serial.println(i);

    // If the treasure number is found!
    if (i == treasure) {
      Serial.println("🎉 Congratulations! Treasure found!");
      Serial.print("The treasure number is: ");
      Serial.println(treasure);
      break; // Emergency brake! Exit the entire for loop immediately
    }
    delay(100); // Slow down for observation
  }

  // Omitted...
}
✅ What did you see? The program starts counting from 1, but when it reaches 47, it stops searching immediately and announces that the treasure has been found. It does not continue counting to 48, 49…100, which demonstrates the power of <span>break</span>!
Example 2: Button Interrupt for Chasing Lights
- Learning Objective: Use break in hardware control to achieve a “one-button interrupt” function.
- Required Components: LED × 3, Button × 1, 220Ω Resistor × 3, 10kΩ Resistor × 1, Breadboard and Wires.
Connection Diagram:【3 LEDs connected to pins 11, 12, 13; button connected to pin 2 (with pull-up resistor).】
Code is as follows:
// Example 2: Button Interrupt for Chasing Lights
// Task: Chasing lights normally cycle, but once the button is pressed, all light shows stop immediately
void loop() {
  // This for loop will light up 3 LEDs in sequence
  for (int pin = 11; pin <= 13; pin++) {
    // Before lighting each LED, check if the button is pressed
    if (digitalRead(2) == LOW) { // Button is LOW when pressed
      Serial.println("🚨 Emergency stop!");
      // First turn off all LEDs
      for (int p = 11; p <= 13; p++) {
        digitalWrite(p, LOW);
      }
      break; // Exit the chasing lights loop immediately
    }

    digitalWrite(pin, HIGH);
    delay(500);
    digitalWrite(pin, LOW);
    delay(200);
  }
  // Omitted...
}
✅ What did you see? While the chasing lights are running normally, as soon as you press the button, all LEDs will turn off immediately, and the program stops. This is a real “emergency stop” button!

Example 3: Smart Temperature Monitor
- Learning Objective: Use break to implement safety threshold monitoring, stopping work when exceeding dangerous temperatures.
- Required Components: Potentiometer × 1 (simulating temperature sensor).
Connection Diagram:【Potentiometer connected to pin A0.】
Code is as follows:
// Example 3: Smart Temperature Monitor
// Task: Continuously monitor temperature, trigger alarm and stop monitoring once exceeding dangerous value
void loop() {
  // This while loop will continuously monitor temperature
  while (true) { // Infinite loop, equivalent to our usual loop()
    // Use potentiometer to simulate temperature sensor reading (0-1023 mapped to 0-100 degrees)
    int sensorValue = analogRead(A0);
    float temperature = (sensorValue / 1023.0) * 100.0;

    Serial.print("Current temperature: ");
    Serial.print(temperature);
    Serial.println(" °C");

    // If temperature exceeds dangerous value!
    if (temperature > dangerousTemp) {
      Serial.println("🔥 Warning! Temperature exceeds safe threshold!");
      Serial.println("🚨 Triggering emergency shutdown procedure!");
      break; // Exit the monitoring loop immediately
    }
    delay(1000); // Check once every second
  }

  // Omitted...
}
✅ Operation and Observation: Rotate the potentiometer, when the simulated “temperature” exceeds 80°C, the monitoring program will stop immediately and trigger an alarm. This can prevent equipment from overheating and causing damage in real projects!
3. Parent-Child Interactive Playground: Reaction Speed Competition
Experiment Name:“Who is the Reaction King”
- Objective: Create a fun parent-child reaction speed testing game using the break statement.
- Preparation: Complete the circuit from 【Example 2】 (LED + button).
Task Steps:
- Game Rules:
- The LED will light up after a random delay.
- Players must press the button as quickly as possible after seeing the LED light up.
- The program will calculate the time from when the LED lights up to when the button is pressed, which is the reaction time.
- Programming Implementation:
void setup() {
  pinMode(13, OUTPUT);
  pinMode(2, INPUT_PULLUP);
  Serial.begin(9600);
  randomSeed(analogRead(A0)); // Use the floating A0 pin to get a random seed
}

void loop() {
  Serial.println("Get ready...");
  delay(random(2000, 5000)); // Random wait of 2-5 seconds
  Serial.println("GO!");
  digitalWrite(13, HIGH);    // Light up LED

  // Omitted...
  delay(3000); // Wait 3 seconds for the next round
}- Family Competition:
- Children and parents take turns testing to see who has the shortest reaction time.
- Record scores, conduct multiple rounds of competition, and select the “Reaction King” of the family!
- Discussion: Why use
<span>break</span>instead of<span>continue</span>? (Because after pressing the button, the waiting task is complete, and it should completely end the wait, rather than skip a round)
This experiment can help children: Understand event-driven programming, timer usage, and the application of break in real game scenarios.

4. Programming English Mini-Class
Now let’s learn today’s key English word:
<span>break</span>[breɪk] – to break; to interrupt
- Meaning in programming: To break out of a loop, immediately interrupt and exit.
- Memory Tip: The original meaning is “to break”. Imagine
<span>break</span>breaking the “walls” of the loop and jumping out from inside.
<span>terminate</span>[ˈtɜːrmɪneɪt] – to terminate
- Although not a keyword, it is the best explanation for understanding break.
- Memory Tip: Pronounced “ter-mi-nate”, imagine a particularly sensitive button A that, when pressed, terminates everything.
Ultimate Comparison: break vs continue: Let’s use PE class for the ultimate comparison:
<span>continue</span>: Take a break for one round – “Teacher, I have a stomachache this round, I will skip this lap and run the next one.”<span>break</span>: Leave class early – “Teacher, I have an urgent matter at home, I need to stop training and go home now.”
English Mini Challenge: Tell your parents: “When the temperature is too high, the program will break out of the loop.” (When the temperature is too high, the program will exit the loop.)
Summary of Loop Control:
Great! You have fully mastered the two key players in loop control:<span>continue</span> (skip this round) and <span>break</span> (exit the loop)! Now you are a true master of loop control.
📢 Want to test your learning results? Reply with 【Loop Challenge】 in the WeChat public account to get 5 comprehensive loop programming challenge questions!
 |
 |
Follow us to stay updated!
Article Tags: #Core Programming Concepts #Break Statement #Loop Control #Emergency Stop #Parent-Child Programming #Arduino Projects #Reaction Test