Most SEs engaged in the networking industry now have various VPSs, which can be used to set up an Ocserv service on a minimal VPS for normal access to Google, OpenAI, etc.
Ocserv is an open-source SSLVPN server that provides a secure way for remote access, allowing users to securely connect to private networks or internal resources over the internet. Its full name is “OpenConnect Server,” which uses the OpenConnect protocol, an open-source protocol for establishing virtual private network connections.
If using CentOS 7 as the underlying operating system, preliminary work on the yum repository is required, as the official repository has become invalid (optional).This article uses CentOS 7 as the underlying OS.Preliminary work for updating the yum repository:1. Enter the yum configuration file directory
cd /etc/yum.repos.d2. Backup the system’s default yum repository configuration file
mv CentOS-Base.repo CentOS-Base.repo.bk3. Download the new yum repository configuration, this article uses the Aliyun yum repository as an example
wget -O /etc/yum.repos.d/CentOS-Base.repo http://mirrors.aliyun.com/repo/Centos-7.repo4. Clean the yum cache
yum clean all5. Generate a new yum cache
yum makecache6. Update the yum repository to check if it is effective
yum updateFor non-CentOS preliminary work, you can search online; the preliminary work only ensures that you can download the ocserv resources normally, and you can also download and upload for local compilation.Ocserv service configuration1. Install the yum extended repository
yum install epel-release -y2. Enable IP forwarding
vi /etc/sysctl.conf net.ipv4.ip_forward = 13. Install ocserv
yum install ocserv -y4. Generate Server keys and certificates
Install dependency libraries
yum install gnutls-utilsCreate a working directory
mkdir -p /data/sslcd /data/sslCreate CA template
vi ca.tmplca.tmplExample configuration (can be left unchanged)
cn = "CA"
organization = "organization"
serial = 1
expiration_days = 3650
ca
signing_key
cert_signing_key
crl_signing_key
Generate CA private key
certtool --generate-privkey --outfile ca-key.pemGenerate CA certificate
certtool --generate-self-signed \
--load-privkey ca-key.pem \
--template ca.tmpl \
--outfile ca-cert.pem
Create Server certificate template
vi server.tmplserver.tmpl example configuration (only modify the public IP)
cn = "x.x.x.x"   # x.x.x.x is your public IP
organization = "organization"
expiration_days = 3650
signing_key
encryption_key
tls_www_server
Generate Server private key
certtool --generate-privkey --outfile server-key.pem Generate Server certificate
certtool --generate-certificate \
--load-privkey server-key.pem \
--load-ca-certificate ca-cert.pem \
--load-ca-privkey ca-key.pem \
--template server.tmpl \
--outfile server-cert.pem
5. Client keys and certificates (optional, certificate login must be configured)
Create Client certificate template
vi client-demo.tmplclient-demo.tmpl example configuration (can be left unchanged)
cn = "demo"
unit = "demo unit"
expiration_days = 3650
signing_key
tls_www_client
Generate Client private key
certtool --generate-certificate \
--load-privkey client-zhangsan-key.pem \
--load-ca-certificate ca-cert.pem \
--load-ca-privkey ca-key.pem \
--template client-zhangsan.tmpl \
--outfile client-zhangsan-cert.pem
Convert to p12 certificate
openssl pkcs12 -export \
-inkey client-zhangsan-key.pem \
-in client-zhangsan-cert.pem \
-certfile ca-cert.pem \
-out client-zhangsan.p12
After configuring, it will prompt for a password. The default password can be set to: 8888
6. Configure the ocserv.conf configuration file
cd /etc/ocserv/
cp ocserv.conf ocserv.conf.org
Example configuration (can be copied directly)
auth = "plain[passwd=/etc/ocserv/ocpasswd]"   # Use plaintext password authentication, password file stored at /etc/ocserv/ocpasswd
tcp-port = 4443                               # TCP port to listen on, used by OpenConnect, recommended to change the port
udp-port = 4443                               # UDP port to listen on (DTLS channel), improves performance, recommended to change the port
run-as-user = ocserv                          # User identity under which the process runs
run-as-group = ocserv                         # Group identity under which the process runs
socket-file = ocserv.sock                     # Local socket file for occtl management
chroot-dir = /var/lib/ocserv                  # Chroot restriction directory, enhances security
server-cert = /data/ssl/server-cert.pem       # Path to the server certificate file
server-key = /data/ssl/server-key.pem         # Path to the private key corresponding to the server certificate
max-clients = 124                             # Maximum number of clients allowed to connect simultaneously
max-same-clients = 4                          # Maximum concurrent connections allowed for the same account
rate-limit-ms = 100                           # Rate limit for each client's requests (milliseconds)
keepalive = 32400                             # Interval for sending keepalive (seconds), to maintain the session
dpd = 90                                      # Dead Peer Detection, time to detect client disconnection (seconds)
mobile-dpd = 1800                             # DPD time for mobile clients (seconds), more lenient
switch-to-tcp-timeout = 25                    # Timeout for switching to TCP when DTLS is unreachable (seconds)
try-mtu-discovery = true                      # Attempt to automatically discover MTU size
cert-user-oid = 0.9.2342.19200300.100.1.1     # OID to extract username from the certificate (user unique identifier)
tls-priorities = "NORMAL:%SERVER_PRECEDENCE"  # TLS cipher suite priority configuration
auth-timeout = 240                            # Login authentication timeout (seconds)
min-reauth-time = 300                         # Minimum interval for client re-authentication (seconds)
max-ban-score = 80                            # Anti-brute force: exceeding this score will ban the client
ban-reset-time = 1200                         # Ban score resets after this time (seconds)
cookie-timeout = 300                          # Cookie validity period (seconds)
deny-roaming = false                          # Whether to prohibit roaming (allow session to persist when client IP changes)
rekey-time = 172800                           # Time to force re-negotiate keys (seconds), here is 2 days
rekey-method = ssl                            # Method for re-negotiating keys (ssl or new-tunnel)
use-occtl = true                              # Whether to enable occtl control tool
pid-file = /var/run/ocserv.pid                # Path to the process PID file
log-level = 1                                 # Log level (0=least, 5=most detailed)
device = vpns                                 # Name of the created virtual network device
predictable-ips = true                        # Assign fixed IPs to clients (predictable)
ping-leases = false                           # Whether to periodically ping assigned IP addresses
no-route = 10.0.0.0/255.0.0.0                 # Block access to 10.0.0.0/8 network
no-route = 172.16.0.0/255.240.0.0             # Block access to 172.16.0.0/12 network
no-route = 192.210.248.0/255.255.255.0        # Block access to a specific subnet, here is the VPS's class C, ensuring dialing does not affect access to the VPS
no-route = 192.168.0.0/255.255.0.0            # Block access to 192.168.0.0/16 network
cisco-client-compat = true                    # Compatibility with Cisco AnyConnect client
dtls-legacy = true                            # Compatibility with older versions of DTLS
cisco-svc-client-compat = false               # Whether to be compatible with Cisco Secure VPN Client
client-bypass-protocol = false                # Whether to allow clients to bypass protocol detection
camouflage = false                            # Whether to enable obfuscation (disguise traffic)
camouflage_secret = "mysecretkey"             # Key for obfuscation mode
camouflage_realm = "Restricted Content"       # Authentication realm for obfuscation mode
ca-cert = /data/ssl/ca-cert.pem               # Path to CA root certificate
cert-user-oid = 2.5.4.3                       # Extract username from the Common Name (CN) field of the certificate
ipv4-network = 172.16.1.10                    # Starting address of the IPv4 address pool assigned to clients
ipv4-netmask = 255.255.255.0                  # Subnet mask for the IPv4 address pool
dns = 8.8.8.8                                 # DNS server assigned to clients
#route = default                              # (commented out) Default route: all traffic goes through VPN
7. Add client accounts
ocpasswd -c /etc/ocserv/ocpasswd vpnuser
输入密码
8. Configure the firewall
iptables
iptables -I INPUT -p tcp --dport 4443 -j ACCEPT  # Insert a rule at the top of the INPUT chain in the firewall rules
# Allow traffic to TCP port 4443 on the local machine (ocserv's TCP VPN channel)
iptables -I INPUT -p udp --dport 4443 -j ACCEPT  # Insert a rule at the top of the INPUT chain in the firewall rules
# Allow traffic to UDP port 4443 on the local machine (ocserv's DTLS/UDP VPN channel)
iptables -t nat -A POSTROUTING -j MASQUERADE  # Append a rule to the POSTROUTING chain in the NAT table
# Perform source address masquerading (SNAT) for all traffic forwarded through the local machine
# This allows VPN clients to access the internet with the source address replaced by the server's public IP
firewalld
firewall-cmd --add-port=443/tcp --permanent  # Permanently open TCP port 443 in firewalld (usually used for HTTPS or VPN TCP channel)
firewall-cmd --add-port=443/udp --permanent  # Permanently open UDP port 443 in firewalld (usually used for VPN DTLS/UDP channel)
firewall-cmd --add-masquerade --permanent  # Enable address masquerading (SNAT) in the firewall, allowing VPN clients to access the internet using the server's public IP
firewall-cmd --reload  # Reload the firewall configuration to immediately apply the added rules
9. Start ocserv (common commands)
# Start the ocserv service
systemctl start ocserv
# Stop the ocserv service
systemctl stop ocserv
# Restart the ocserv service (commonly used after modifying configuration to take effect)
systemctl restart ocserv
# Smoothly reload configuration (without restarting the process)
systemctl reload ocserv
# Check the status of ocserv
systemctl status ocserv
# Set to start on boot
systemctl enable ocserv
# Cancel start on boot
systemctl disable ocserv
10. Client dialing
OpenConnect download address
OpenConnect official website: https://github.com/openconnect/openconnect-gui
Baidu Cloud shared file: OpenConnect link: https://pan.baidu.com/s/16o9d0ZlTwijmmdx1XNI-Rw?pwd=ecy9  Extraction code: ecy9
Baidu Cloud shared file: Cisco AnyConnect 4.10.04065 all-in-one link: https://pan.baidu.com/s/1uCet4VS3jRPuFM8kngV2wA?pwd=ecy9  Extraction code: ecy9
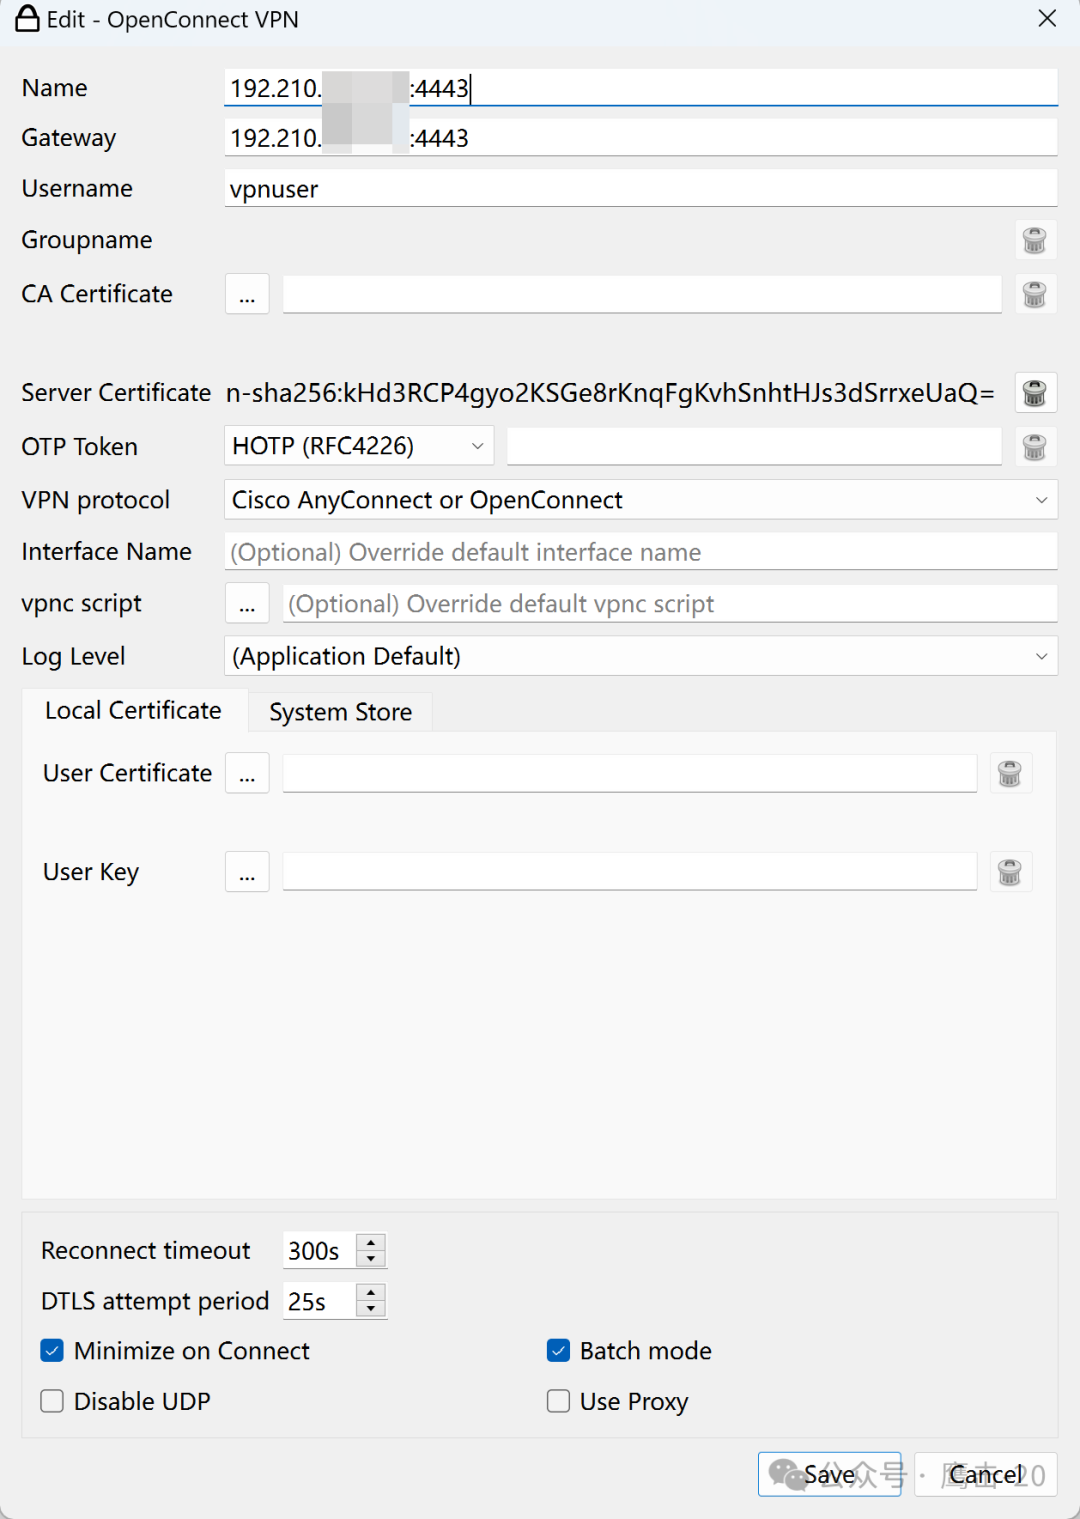
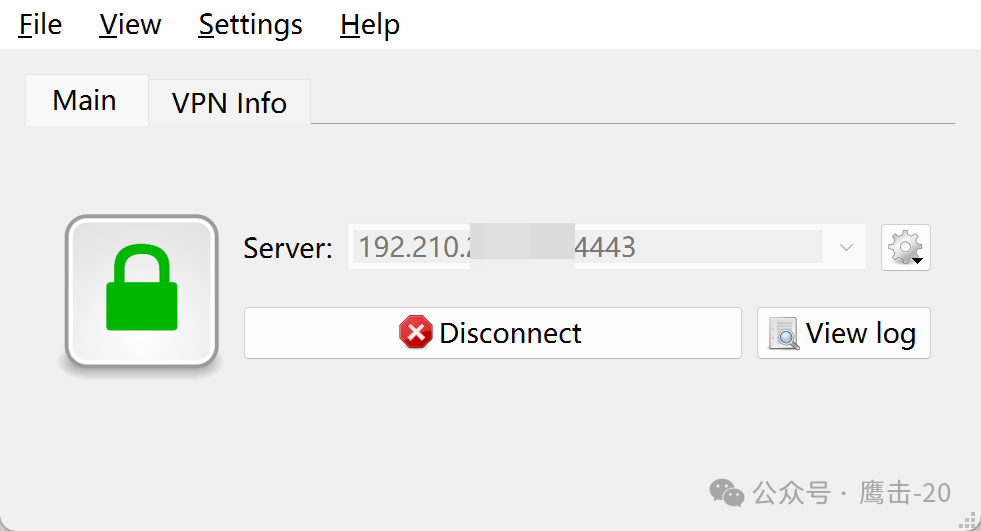
OpenConnect client configuration: