Word count: 1715, reading time approximately 9 minutes
Mark “Home Cloud Life” as a “Star⭐” to never miss the latest articles
My home broadband does not have a public IPv4 address, but fortunately, it is NAT1 type, allowing for hole punching with tools. However, RustDesk has a peculiar design where the server’s port 21116 must have both UDP and TCP enabled, which cannot be satisfied with hole punching. Therefore, I can only consider placing the server on a remote VPS. Due to high network latency, I plan to set up the relay at home to expose it for lower latency. By specifying relay parameters on the server, the client can use the relay without configuration, directly obtaining the relay from the server. This leads to the sharing in this article.
Configuring the Server
Deploy the RustDesk server on the VPS. As usual, I will use Docker Compose for orchestration. Edit the <span>/data/tools/rustdesk/compose.yaml</span> file as follows.
services:
  hbbs:
    container_name: hbbs
    image: rustdesk/rustdesk-server:latest
    command: hbbs -r $RELAY -k _
    environment:
      - RELAY
    volumes:
      - ./data:/root
    network_mode: "host"
    restart: always
Create a .env file in the same project directory with the following configuration. The relay node can be set arbitrarily; it will be dynamically updated after the service starts.
RELAY=127.0.0.1:80Create a FastAPI Python file in this directory to quickly build an API for client calls. Considering security issues, the API call requires an API key. Please install the Python environment, pip package management, and dependencies yourself. The content of the file named <span>rustdesk_relay_update.py</span> is as follows:
#!/usr/bin/env python3
# -*- coding: utf-8 -*-
from fastapi import FastAPI, HTTPException, Depends, Header
from pydantic import BaseModel, Field, field_validator
import logging
import subprocess
import re
import argparse

# Configure logging
logging.basicConfig(
    level=logging.INFO,
    format='%(asctime)s - %(name)s - %(levelname)s - %(message)s'
)
logger = logging.getLogger("ip_port_receiver")

# Parse command line arguments
def parse_args():
    parser = argparse.ArgumentParser(description='FastAPI with command line arguments')
    parser.add_argument('--env-file', default='.env', help='.env file path (default: .env)')
    parser.add_argument('--compose-file', default='docker-compose.yml', help='Docker Compose file path (default: docker-compose.yml)')
    parser.add_argument('--api-key', required=True, help='API key')
    return parser.parse_args()

# Parse parameters
args = parse_args()
# Get API Key from command line arguments
API_KEY = args.api_key
API_KEY_NAME = "X-API-Key"
# IP address validation regex
IPV4_PATTERN = r'^((25[0-5]|2[0-4][0-9]|[01]?[0-9][0-9]?)\.){3}(25[0-5]|2[0-4][0-9]|[01]?[0-9][0-9]?)$'
IPV6_PATTERN = r'^([0-9a-fA-F]{1,4}:){7}[0-9a-fA-F]{1,4}$|^::1$|^::$|^([0-9a-fA-F]{1,4}:){1,7}:$|^([0-9a-fA-F]{1,4}:){1,6}:[0-9a-fA-F]{1,4}$|^([0-9a-fA-F]{1,4}:){1,5}(:[0-9a-fA-F]{1,4}){1,2}$|^([0-9a-fA-F]{1,4}:){1,4}(:[0-9a-fA-F]{1,4}){1,3}$|^([0-9a-fA-F]{1,4}:){1,3}(:[0-9a-fA-F]{1,4}){1,4}$|^([0-9a-fA-F]{1,4}:){1,2}(:[0-9a-fA-F]{1,4}){1,5}$|^[0-9a-fA-F]{1,4}:((:[0-9a-fA-F]{1,4}){1,6})$|^:((:[0-9a-fA-F]{1,4}){1,7}|:)$'

# Define request data model
class ConnectionInfo(BaseModel):
    ip: str = Field(..., description="IP address")
    port: int = Field(..., description="Port number", ge=1, le=65535)
    @field_validator('ip')
    @classmethod
    def validate_ip(cls, v: str) -> str:
        """Validate IP address format using regex"""
        if not v:
            raise ValueError('IP address cannot be empty')
        # Check IPv4 format
        if re.match(IPV4_PATTERN, v):
            return v
        # Check IPv6 format
        if re.match(IPV6_PATTERN, v):
            return v
        raise ValueError('Invalid IP address format')

# Create FastAPI application
app = FastAPI(
    title="IP and Port Receiver Service",
    description="Service with API Key authentication to receive and print IP and port information",
    version="1.0.0"
)

# API Key validation dependency
async def get_api_key(api_key: str = Header(..., alias=API_KEY_NAME)):
    if api_key != API_KEY:
        raise HTTPException(
            status_code=401,
            detail="Invalid API Key"
        )
    return api_key

def update_relay(new_relay):
    # Read and update the file
    with open(args.env_file, 'r') as f:
        content = f.read()
    new_content, count = re.subn(r'^RELAY=.*$', f'RELAY={new_relay}', content, flags=re.M)
    if count == 0:
        new_content = content.strip() + f'\nRELAY={new_relay}\n'
    if content != new_content:
        with open(args.env_file, 'w') as f:
            f.write(new_content)
        logger.info(f"Updated RELAY to: {new_relay}")
        subprocess.run(["docker", "compose", "-f", args.compose_file, "up", "-d"], check=True)
        logger.info("Docker service restarted")
    else:
        logger.info("RELAY value unchanged")

@app.post("/update_relay")
async def update_relay(
        info: ConnectionInfo,
        api_key: str = Depends(get_api_key)
):
    """Receive IP and port information and print it"""
    relay = f'{info.ip}:{info.port}'
    logger.info(f"Received relay information: {relay}")
    update_relay(relay)
    logger.info(f"Received IP and port information: IP={info.ip}, Port={info.port}")
    return {
        "status": "success",
        "message": "Information received and relay updated",
        "data": {
            "ip": info.ip,
            "port": info.port
        }
    }

@app.get("/")
async def root():
    """Root endpoint providing basic information"""
    return {
        "message": "IP and Port Receiver Service (with API Key authentication)",
        "version": "1.0.0",
        "endpoint": "POST /receive-ip-port",
        "auth_required": True,
        "auth_header": f"{API_KEY_NAME}: "
    }

if __name__ == "__main__":
    import uvicorn
    uvicorn.run(app, host="0.0.0.0", port=8000)
Since our file name is quite unique, we can use crontab to periodically execute it, detecting if it is not running and starting the service. Remember to provide an API key as a startup parameter, which can be generated using a UUID. Here is an example of the crontab entry; do not use my default API key:
* * * * * ps aux | grep -v grep | grep -q rustdesk_relay_update || python3 /data/tools/rustdesk/rustdesk_relay_update.py --api-key=C166FD68-E26D-49E6-BB29-XXXXXXXX2AA1 --compose-file=/data/tools/rustdesk/compose.yaml --env-file=/data/tools/rustdesk/.envThus, the server configuration is complete.
Configuring the Client
The client and relay are on the same machine at home, so let’s start the relay service first. The compose.yaml content is as follows:
services:
  hbbr:
    container_name: hbbr
    image: rustdesk/rustdesk-server:latest
    command: hbbr
    volumes:
      - ./data:/root
    network_mode: "host"
    restart: always
Start the Docker service
docker compose up -dNext is the hole punching phase. I made slight modifications based on the headscale project, adding the core startup command to expose the relay port 21117 while triggering the execution of the specified script.
python3 /opt/natter.py -m nftables -e /opt/natter-rustdesk-relay.py -p 21117 &<span>client/entrypoint.sh</span> should be modified as follows:
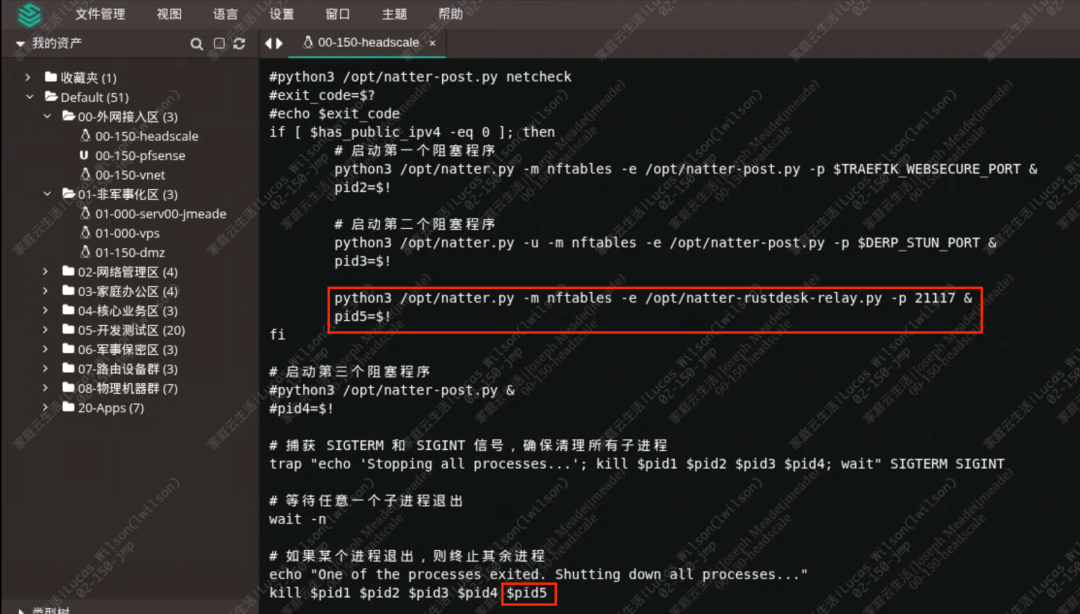
The specified script <span>natter-rustdesk-relay.py</span> is as follows. Update the API address and API key to your own:
#!/usr/bin/env python3
# -*- coding: utf-8 -*-
import json
import time
import urllib.request
import sys
protocol, private_ip, private_port, public_ip, public_port = sys.argv[1:6]

api_url = 'http://your_vps_ip:8000/update_relay'
api_key = 'C166FD68-E26D-49E6-BB29-XXXXXXXX2AA1'
req = urllib.request.Request(api_url, data=json.dumps({'ip': public_ip, 'port': int(public_port)}).encode('utf-8'), method='POST')
req.add_header('X-API-Key', api_key)
req.add_header('Content-Type', 'application/json')

for i in range(5):
    try:
        with urllib.request.urlopen(req, timeout=10) as res:
            ret = json.load(res)
            print(ret)
        break
    except Exception as e:
        time.sleep(5)
        print(e)
Then restart the headscale client node to complete the dynamic update of the RustDesk relay.
Validation of Effectiveness
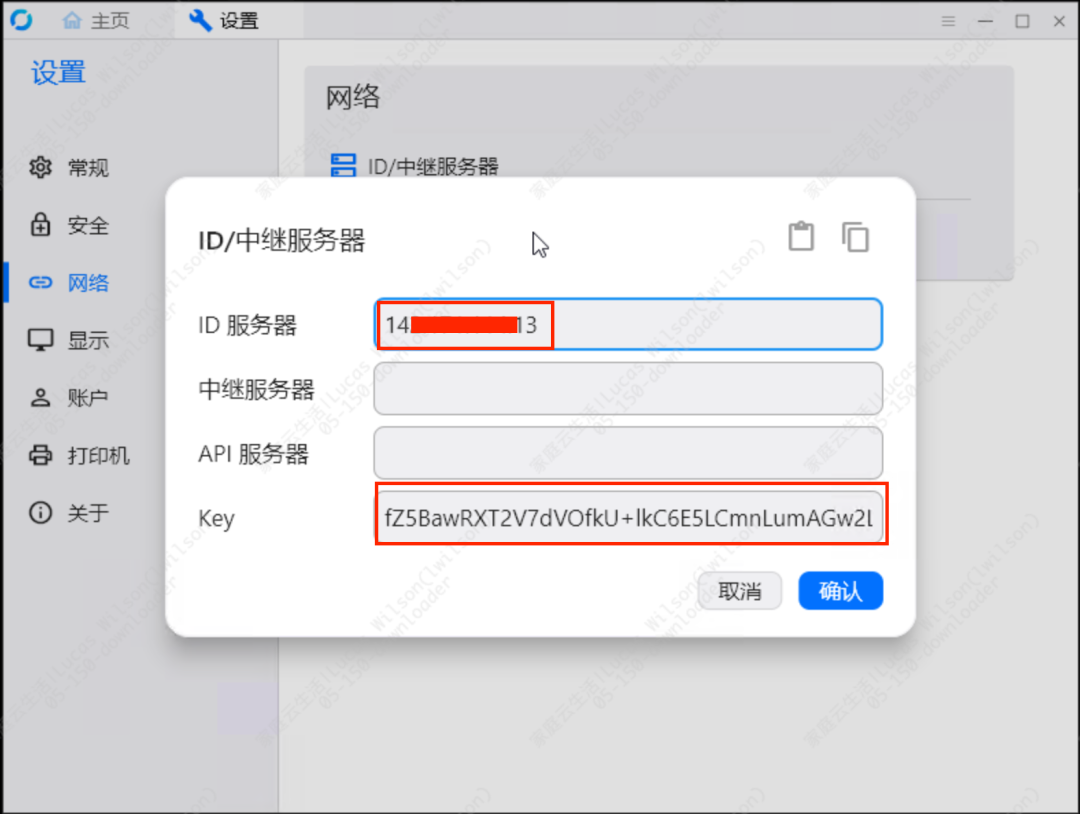
Go to the RustDesk client program and configure the ID server and key.
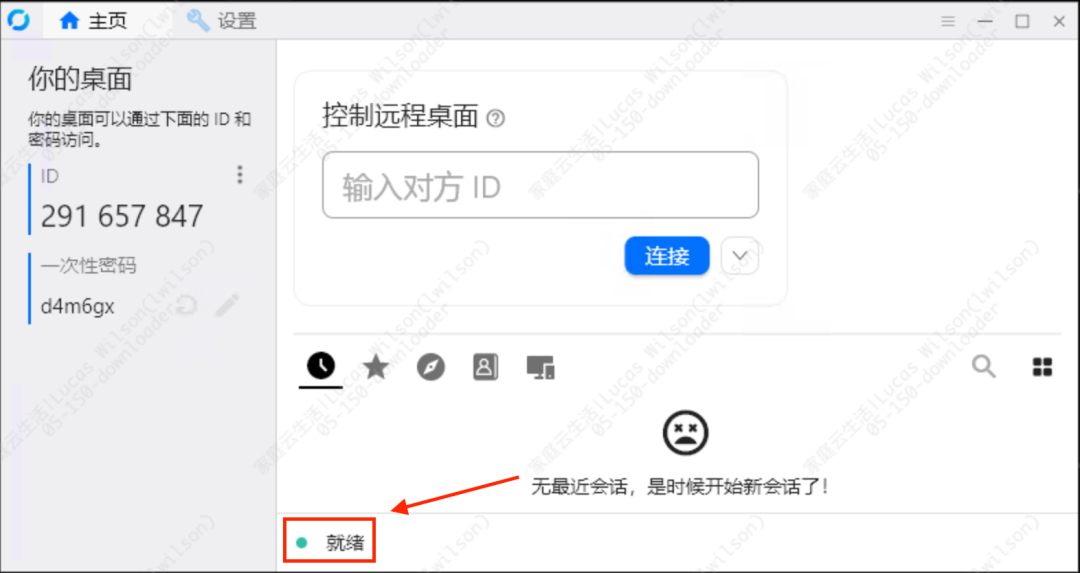
You will see that the client is ready to connect to the server.
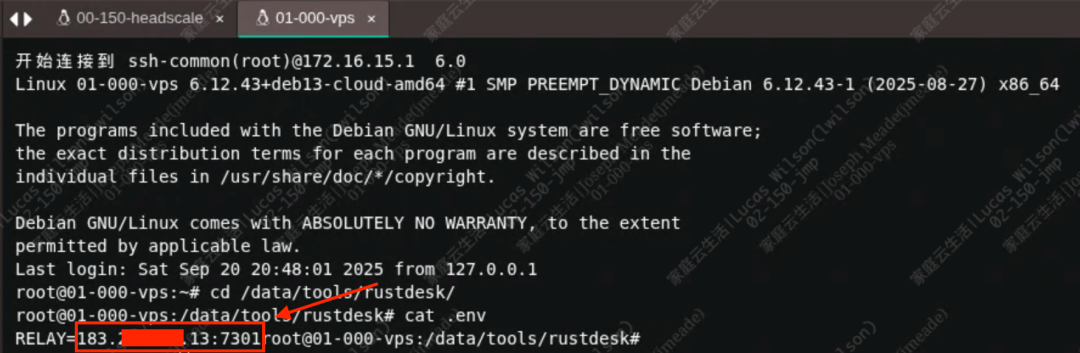
Using a mobile device to control this RustDesk node, find the relay connection information in the RustDesk desktop client.

The IP and port 7301 match those of the server, indicating that the relay is effective.
Conclusion
This article shared how to elegantly and cost-effectively implement a combination solution for remote desktop access. The source code has been uploaded to my code repository; feel free to take it. If you have any questions, please leave a comment.
Recommended Reading
- • Join the home infrastructure learning and communication group!
- • How to connect my home private cloud through VLAN with Feiniu NAS
- • Solving pre-allocation of PVE storage in home networks, avoiding resource oversubscription issues, performance close to the host
- • Advanced practical application of the new Feiniu NAS: obtaining the real IP of the client through WAF, permission isolation for Time Machine backups
- • Using Feiniu NAS more securely after installation!
- • I successfully upgraded my NAS mini-host to Feiniu NAS; what do you think?
Don’t forget to like👍 and clickif you like it▼