
To be good at work, one must first sharpen their tools.
The STM32Cube ecosystem is a software ecosystem built by ST for STM32 developers, making it a powerful tool for embedded development.
To enhance the usability of the feature-rich and high-efficiency STM32 series microcontrollers, in 2019, STMicroelectronics added a free multifunctional STM32 development tool: STM32CubeIDE, to the STM32Cube software ecosystem.
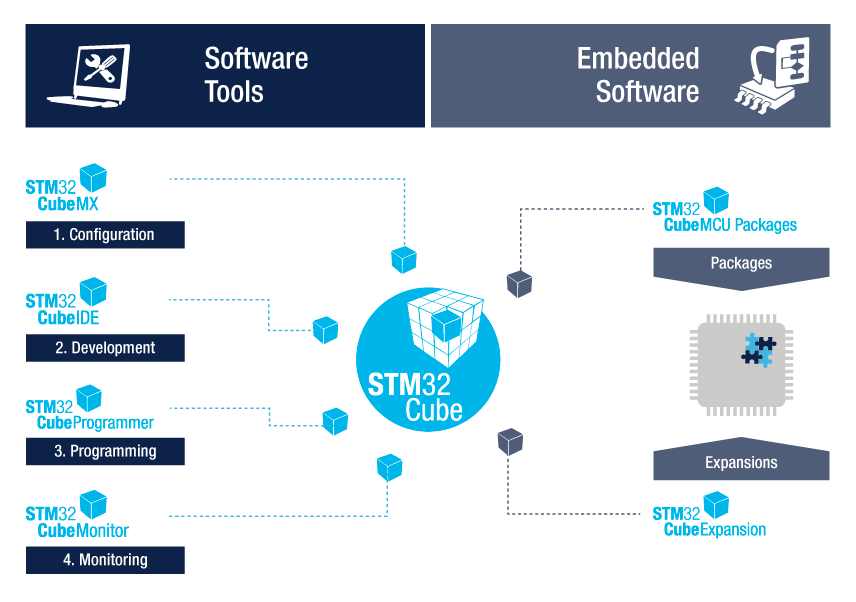
To make STM32CubeIDE as user-friendly as commercial integrated development environment (IDE) tools, it fully leverages the technical advantages of Atollic®, an embedded development tool company acquired by STMicroelectronics in 2017. This IDE software adopts industry-standard open licensing terms and adds STM32-specific features, including the powerful STM32CubeMX microcontroller configuration and project management tool, to simplify and accelerate STM32-based embedded design.
By integrating STM32CubeMX with STM32CubeIDE, STMicroelectronics has created a more powerful development environment. The complete STM32Cube ecosystem also includes the STM32CubeProgrammer code writer and the STM32CubeMonitor series code runtime monitors, as well as numerous independent MCU firmware packages.
STM32CubeIDE is a free software development tool officially provided by ST and is a key player in the STM32Cube ecosystem. It is based on the Eclipse®/CDT framework, GCC toolchain, and GDB debugger, and supports the addition of third-party functional plugins. At the same time, STM32CubeIDE also integrates some functions of STM32CubeMX and STM32CubeProgrammer, making it a “multi-in-one” STM32 development tool.
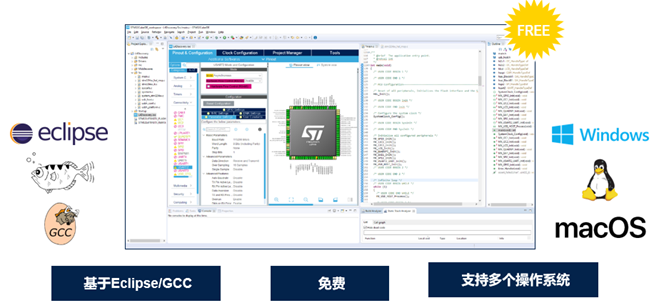
Users only need this one tool, STM32CubeIDE, to complete all tasks from chip selection, project configuration, code generation, to code editing, compiling, debugging, and programming.
During development, users can easily switch to the embedded CubeMX initialization window to add or modify previous peripheral and middleware configurations without needing to switch between multiple tools.
The compilation and stack analysis tools provided by STM32CubeIDE offer users useful information about project status and memory usage. It also provides many advanced debugging features to help users debug efficiently.
Like STM32CubeMX and STM32CubeProgrammer, it is also a multi-platform STM32 development tool that allows users to develop software on Windows, Linux, and macOS operating systems using STM32CubeIDE.
STM32CubeIDE Interface
STM32CubeIDE is based on the Eclipse framework, inheriting some features that may be unfamiliar to users, such as perspectives and workspaces.
Workspace: STM32CubeIDE manages projects through workspaces. When opening STM32Cube, it creates a default workspace. Users can also select another folder as a workspace using the Browse button. All newly created or imported projects will belong to this selected workspace. Projects within the same workspace have the same IDE-level configurations (set in Window→Preferences), such as display and editing style settings. From a file system perspective, a workspace is a folder that contains multiple project folders and a folder named “.metadata”, which contains information about all projects in that workspace. Users can switch between different workspaces through the File→Switch Workspace menu.
Perspective: A perspective is a combination of a series of windows related to a particular function. Commonly used perspectives include C/C++ editing perspective, debugging perspective, and CubeMX configuration perspective.
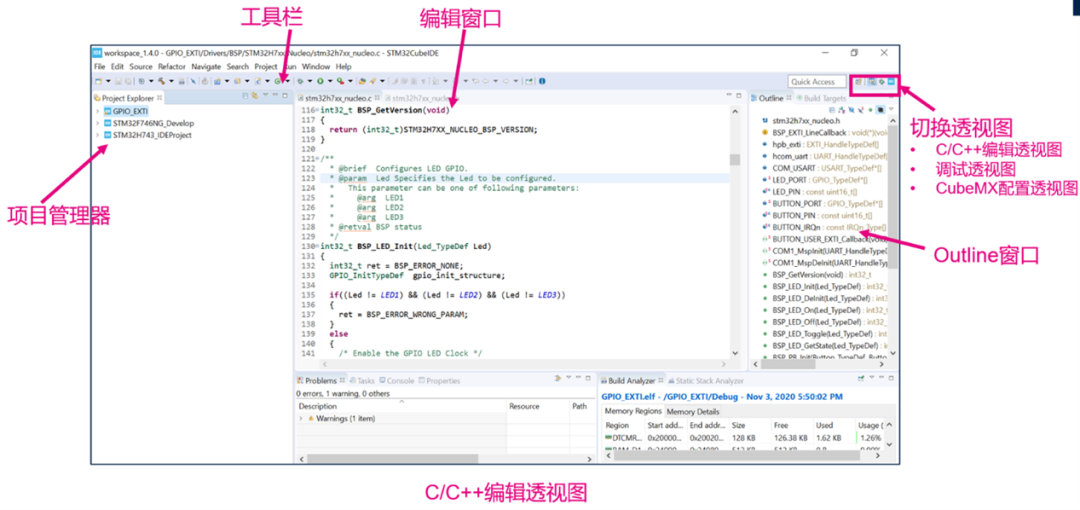
The C/C++ editing perspective includes the project manager, editing window, and Outline window. In the project manager, users can view and operate all projects in the current workspace. Double-clicking a file in a project opens its content in the editing window, where it can be edited. The rightmost Outline window lists all functions, variables, and macros defined in the currently opened file.
In the Window Show View menu, users can open and close the windows they want to display in the C/C++ editing perspective.
Users can switch between different perspectives using the icons in the upper right corner. For example, clicking the bug icon switches to the debugging perspective. After starting debugging by clicking the Debug button in the C/C++ editing perspective, it will automatically switch to the debugging perspective.
Project Management
11. Create and Import Projects
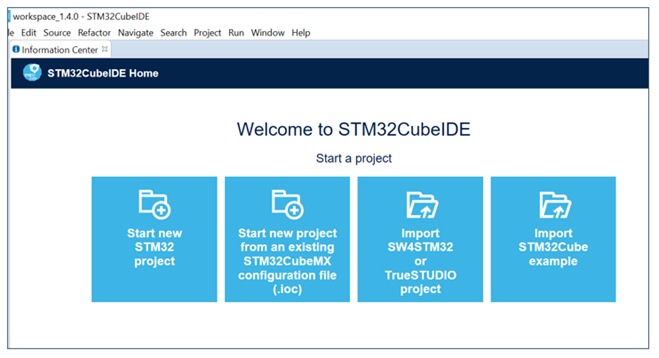
Using STM32CubeIDE, users can start creating a new project in various ways. The welcome interface of STM32CubeIDE lists shortcuts for creating/importing projects corresponding to the following four scenarios. Users can also achieve the same functionality through the New and Import options in the File menu. • Create a new STM32 project from scratch • Create a new STM32 project based on an existing STM32CubeMX configuration file (*.ioc file) • Convert an existing SW4STM32 or TrueSTUDIO project to an STM32CubeIDE project • Create a new project based on examples in the STM32Cube library
2 STM32CubeIDE Project Structure
STM32CubeIDE has two types of project structures, as shown in the image below.
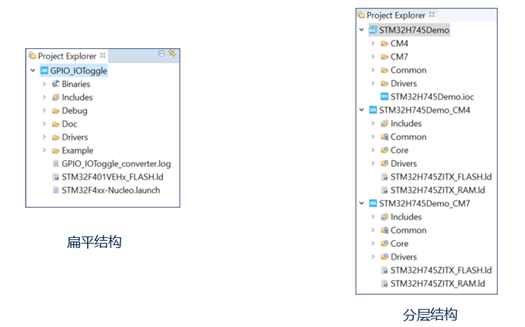
Single-core MCUs have a flat structure.
For dual-core or secure MCUs, such as the STM32H7, STM32L5, and STM32MP1 series, the STM32CubeIDE project has a layered structure. Taking STM32H7 as an example, after creating or importing an STM32H7 project, the Project Explorer shows a three-layer project structure: the top layer is the “root” project, followed by two “sub” projects corresponding to the CM7 and CM4 cores, with the project files underneath the “sub” projects. These two CM7 and CM4 “sub” projects are the actual compilable and debuggable projects, while the “root” project serves merely as a “container” that includes the CM7 and CM4 “sub” projects. AN5361, AN5394, AN5360, and AN5564 describe how to create, import, compile, and debug STM32H7 dual-core, STM32L5, STM32MP1, and STM32WL projects in STM32CubeIDE.
3 Open/Close/Delete/Switch/Export STM32CubeIDE Projects
In the Project Explorer window, users can see all projects in the current workspace. Users can perform operations such as opening/closing/deleting/importing/exporting/renaming any project here. For specific operations, please refer to “Basic Operations on Projects” (coming soon, stay tuned).
4Firmware Library Management
STM32CubeIDE integrates some functions of STM32CubeMX, allowing users to directly select chip/development board models or examples to generate a new project. The drivers and example codes needed for the projects generated by STM32CubeIDE come from the firmware libraries of various STM32 series.
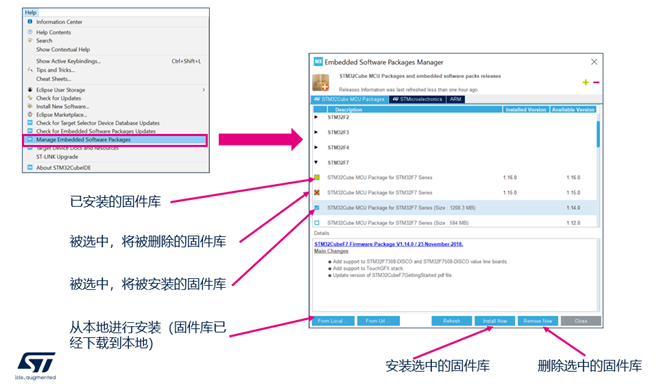
In Help→Manage Embedded Software Packages, users can manage all STM32 firmware libraries and other plugins (install/delete firmware libraries).
Users can click the Install Now button to let STM32CubeIDE automatically download and install from the network, or use the From Local button to install firmware libraries that have been pre-downloaded.
Users can delete selected firmware libraries using the Remove Now button.
In the Window Preferences window under the STM32Cube Firmware Updater tab, users can set the installation path and update method for firmware libraries.
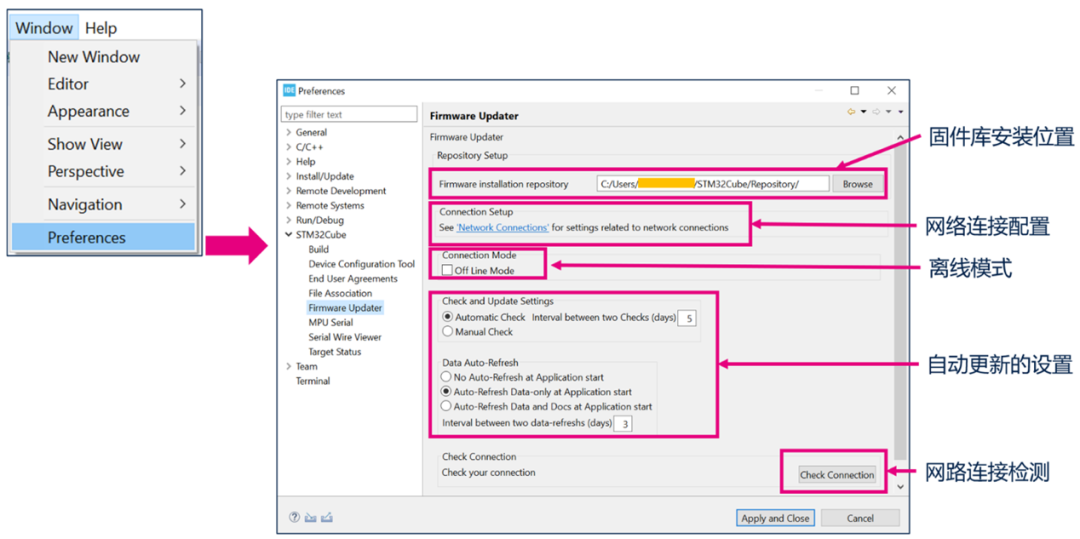
By default, STM3CubeIDE attempts to connect to the network when opening or creating projects. Users can also choose “Offline Mode” to prevent STM32CubeIDE from going online. However, they must use the From Local button in the Embedded Software Packages Manager window to install pre-downloaded firmware libraries; otherwise, it will not be able to automatically generate code for newly created STM32 projects.
Clicking the Check Connection button can check the current network connection status. If a red “×” appears after the check, it indicates a network configuration issue, and users need to set it up in the Network Connection page.
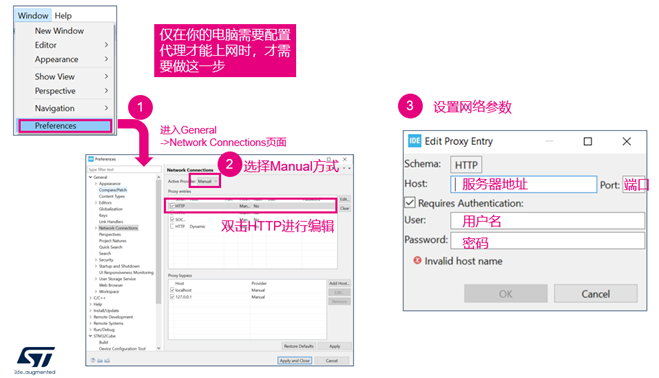
In addition to actively checking the network status, if there are firmware download failures, users should also check if the network configuration of STM32CubeIDE is correct.
Configuration steps are shown in the image below: 1. Go to the Window Preferences menu and select the General Network Connections tab 2. Choose Manual mode 3. Select HTTP, double-click to open the editing window, and set the network connection parameters.
Code Editing
STM32CubeIDE is based on Eclipse, and some common shortcuts and editing techniques from Eclipse also apply to STM32CubeIDE. Mastering these small tips can improve development efficiency and make programming more effective.
Code Compilation
1 Project Properties Settings and Compilation
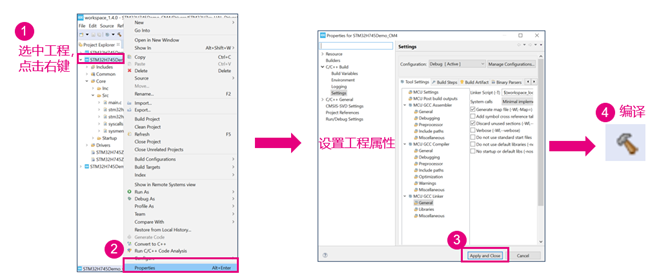
Select a project in the Project Explorer, right-click and go to the properties menu, where compilation items can be configured. For details on common configuration operations, please refer to “STM32CubeIDE Project Properties Configuration Tips”.
After configuration, users can compile using one of the following three methods: • Method 1: Select the project, right-click, and choose “Build Project” • Method 2: Select the project, go to the Project menu, and choose “Build Project” • Method 3: Select the project and directly click the Build icon in the toolbar
2 Improve Compilation Speed
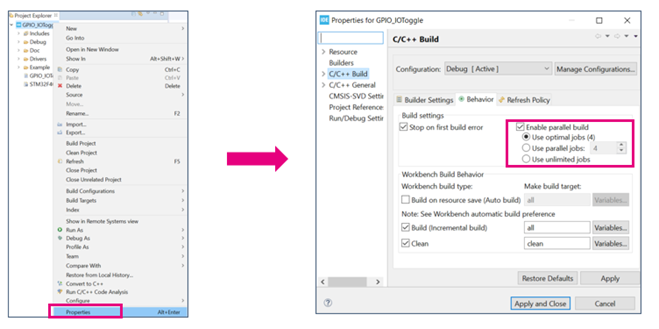
By enabling parallel compilation, users can improve the compilation speed of STM32CubeIDE. Select the project, right-click, and go to the properties menu, select “C/C++ Build”, and check the “Enable parallel build” feature under the Behavior tab.
3 Compilation Related Auxiliary Tools
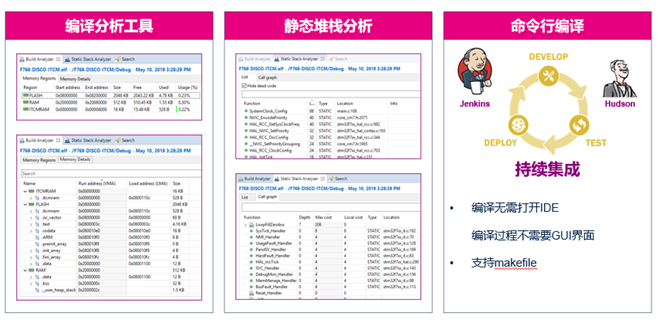
After project compilation is complete, the “Build Analyzer” window displays all memory regions and sections defined in the link file, including loading addresses, running addresses, how many bytes are occupied, and how many bytes remain.
The “Static Stack Analyzer” window shows the usage of the static stack.
STM32CubeIDE also offers a Headless Build feature, allowing compilation via command line without opening the CubeIDE graphical interface.
Code Debugging and Programming
1 Debugging and Running Configurations
Once the STM32CubeIDE project is compiled successfully without any errors, debugging and downloading can proceed.
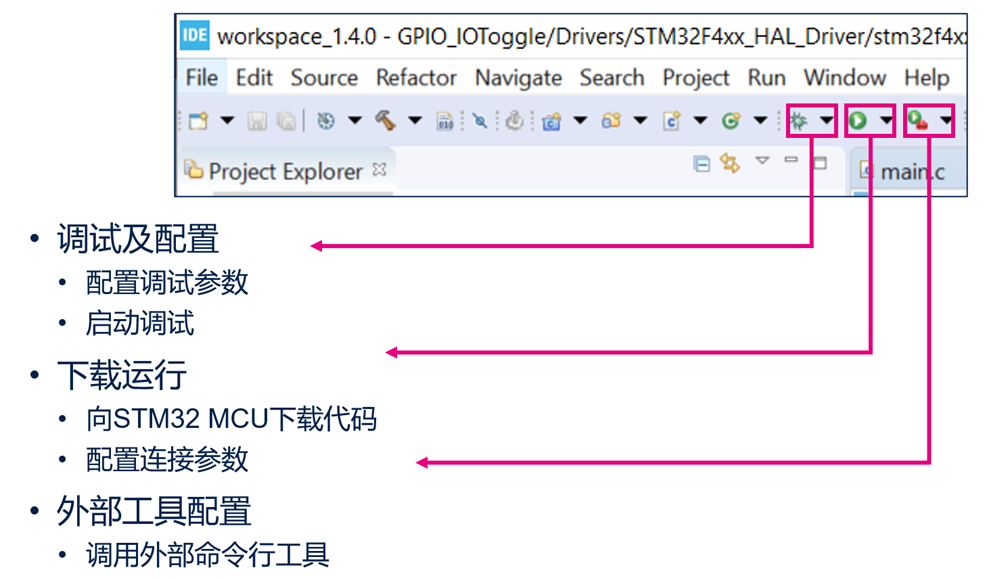
In the C/C++ perspective toolbar, there are three buttons related to downloading and debugging: Debug, Run, and External Tools.
By clicking the small triangle next to the “Debug” button, users can open the Debug Configurations menu to configure debugging parameters, such as selecting the debugger, setting up GDB connections, configuring ST-LINK, and setting external Flash Loader, and then start debugging.
By clicking the “Run” button, users can download the program without starting debugging.
By clicking the “External Tools” button, users can invoke external command-line tools.
For debugging parameter configuration and debugging tips, please refer to “STM32CubeIDE Project Debug Configuration and Tips” (coming soon, stay tuned).
2 Start Debugging
STM32CubeIDE uses GDB for debugging and supports STLink and SEGGER J-Link debuggers, allowing connection to the target MCU via SWD or JTAG interfaces.
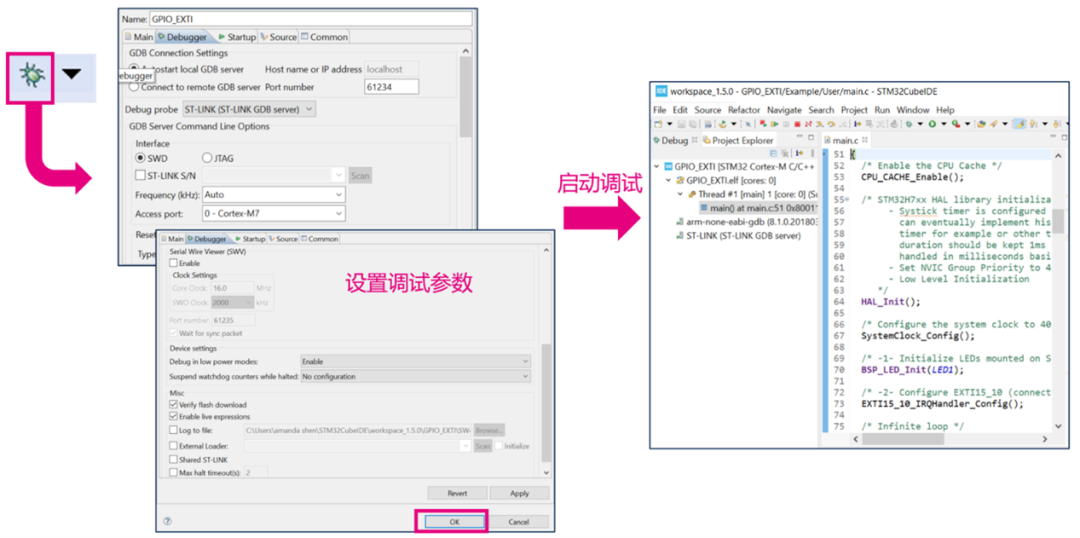
After compiling the STM32CubeIDE project, users can start debugging by clicking the bug icon in the toolbar or selecting Run–>Debug from the menu.
If it is the first time debugging the current project, STM32CubeIDE will first compile the project and then open the debug configuration window. The debug configuration window includes options for selecting the debug interface, configuring STLink, reset settings, and external flash loader settings, where users can verify or modify each configuration. Once all configurations are confirmed to be correct, users can click OK to start debugging.
Then, STM32CubeIDE will download the program to the MCU and execute it starting from the entry point specified in the link file (*.ld). The program will default to start execution from Reset_Handler and pause at the first line of the main function, waiting for subsequent debugging instructions.
3 Basic Debugging Operations
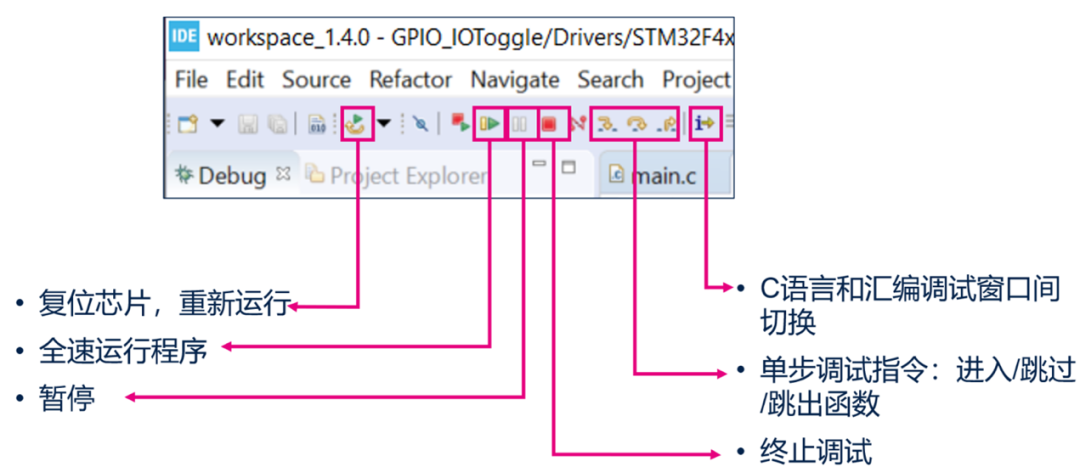
After starting debugging, STM32CubeIDE will automatically switch to the debugging perspective, where the debugging operation buttons are listed in the toolbar. As shown in the image below.
Using Plugins
STM32CubeIDE also supports Eclipse plugins.
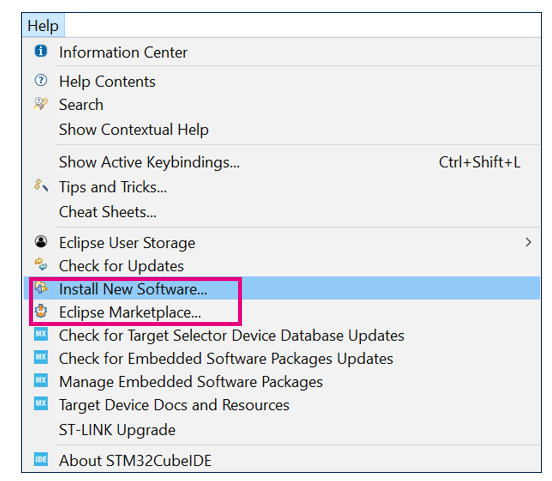
Users can search for and install plugins through the “Eclipse Marketplace” under the Help menu; or install plugins from a specified URL through “Install New Software” under the Help menu.
STM32CubeIDE Example Usage
Next, we will experience the software development process using STM32CubeIDE through a simple LED blinking example.
The example uses the NUCLEO-H743ZI development board to create a new project from scratch in STM32CubeIDE. This project implements a simple function: the onboard LED1 automatically toggles every 500ms. Through this example, users can learn the following: • Create an STM32CubeIDE project • Configure the STM32 chip • Add user code and compile • Set debugging parameters • Debug the code (view variables and registers) • Set breakpoints
First, select File–>New–>STM32 Project, and STM32CubeIDE will open the MCU selection window. In this window, users can select a specific model of chip, an ST development board, or an example. Here, we will type STM32H743ZI in the search box to directly select this chip and then click Next.
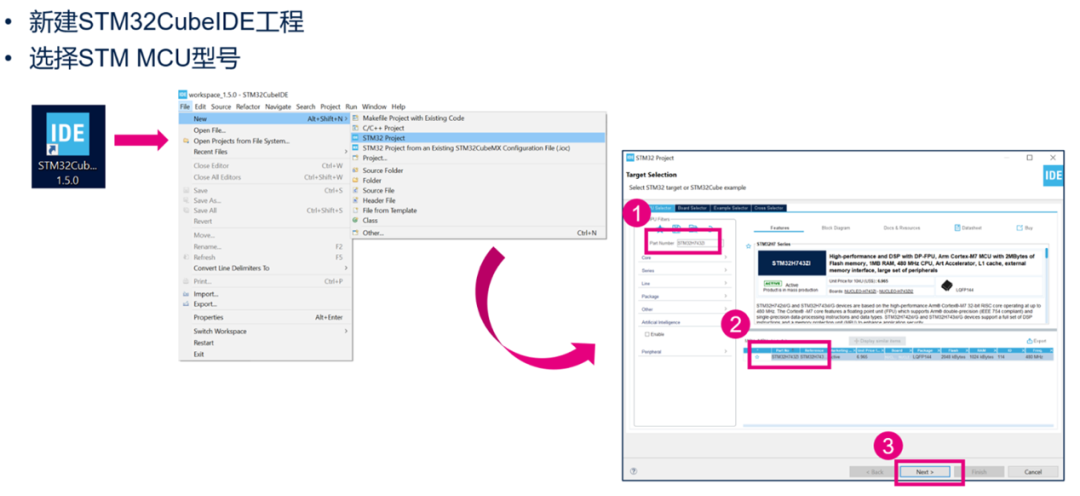
In the next pop-up window, users need to set the project name, type, and save location. By default, the new project will be saved in the current workspace, but users can uncheck “Use default location” and customize the project save location as shown below. It is important to note that if you attempt to place two projects in the same path, errors may occur during the subsequent creation process. Therefore, you can add the project name to the path to distinguish different projects.
Once the settings are complete, click Finish, and STM32CubeIDE will create a project and open the chip configuration interface, which is the same as STM32CubeMX.
During this process, a prompt may pop up to indicate that the CubeMX configuration perspective will be opened; click Yes to proceed.
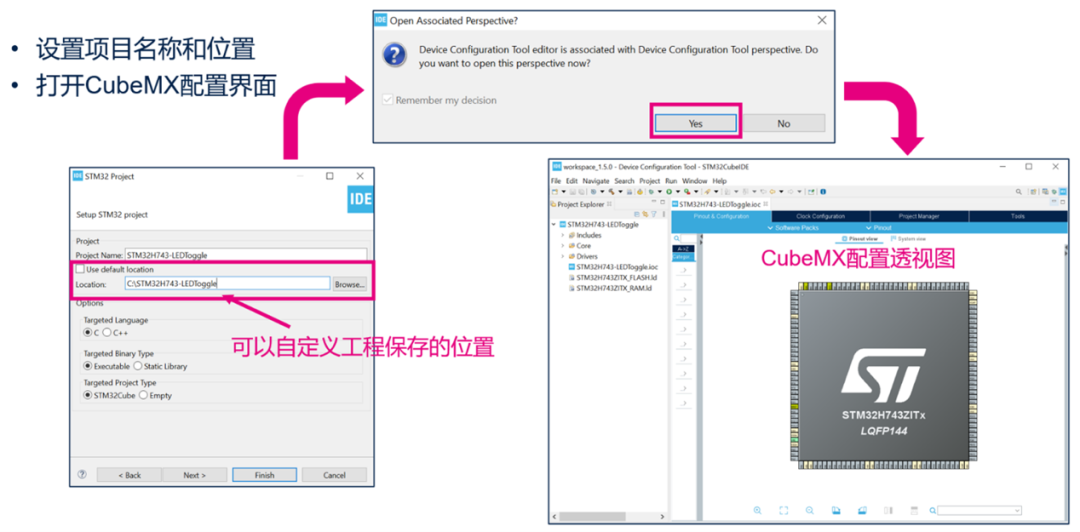
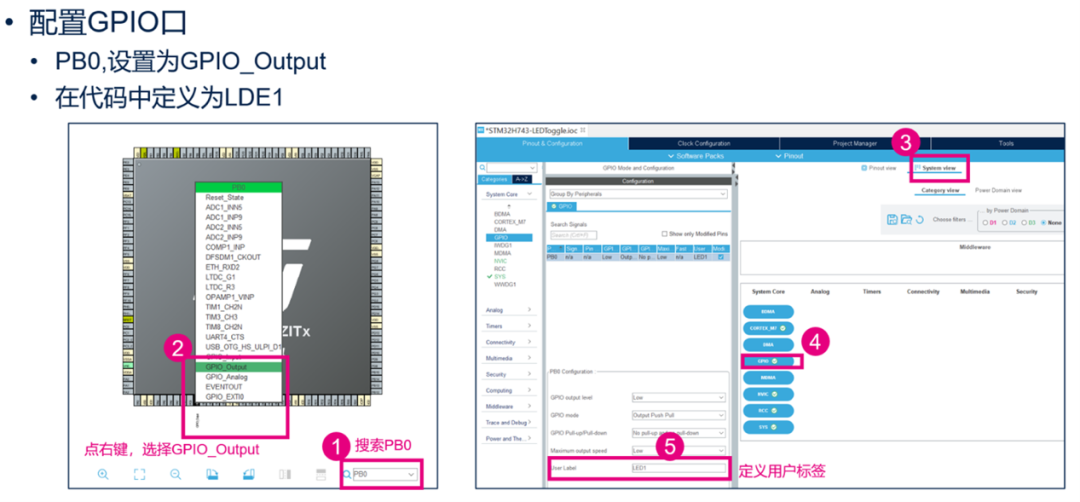
The next step is to configure the clock, GPIO, peripherals, middleware, etc., according to functional requirements in the chip configuration interface. In this example, we only use PB0 to control LED1 output, so we only need to configure it. The clock will use the default configuration.
In the Pinout view, users can quickly find the pin to configure on the chip package diagram using the search bar.
Select the pin, right-click, and choose the GPIO_Output function.
Then go to the System view, click on the GPIO module, and users will see the configured PB0 pin. In this window, users can further adjust other parameters of PB0, such as pull-up/pull-down, speed, etc. Users can also define a user label LDE1 for it, making it easier to reference in the code.
Once all configurations are completed, select Project–>Generate Code to regenerate the code. At this point, STM32Cube will switch to the C/C++ perspective, and users can add their files or modify a specific C file.
Here, we add a piece of code to toggle PB0. It is important to note that all user-added code must be placed between the declarations of “USER CODE BEGIN xxx” and “USER CODE END xxx”. This way, when regenerating the code again, this part will not be lost.
Once the code is added, click “Build” to start compiling.
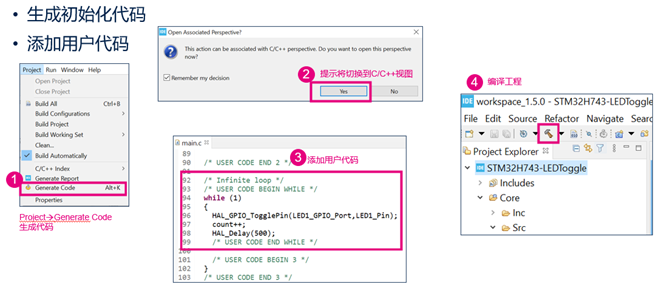
If the compilation ends without any errors, users can click Debug to start debugging.
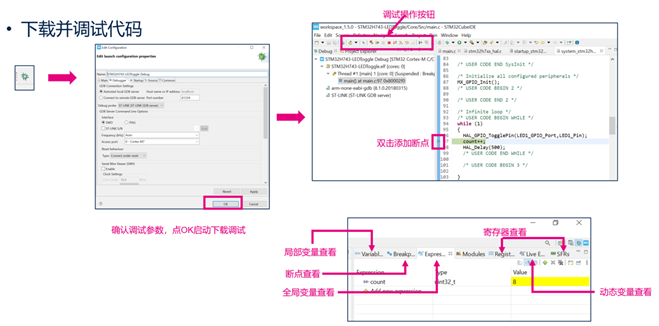
The first time debugging starts, a debug parameter configuration window will pop up. Once all parameters are confirmed to be correct, click OK, and STM32CubeIDE will automatically switch from the editing interface to the debugging interface. As shown in the image below.
In the debugging interface, users can perform step-by-step debugging using the operation buttons in the toolbar.
Double-clicking the leftmost marker area of a line of code allows users to add a breakpoint at that line.
On the right side, multiple debugging windows will open, including: local variables, breakpoints, global variables, and registers, etc. These windows can be opened or closed in the Window–>Show View menu.
Related Resources
1 How to View STM32CubeIDE Documentation Set
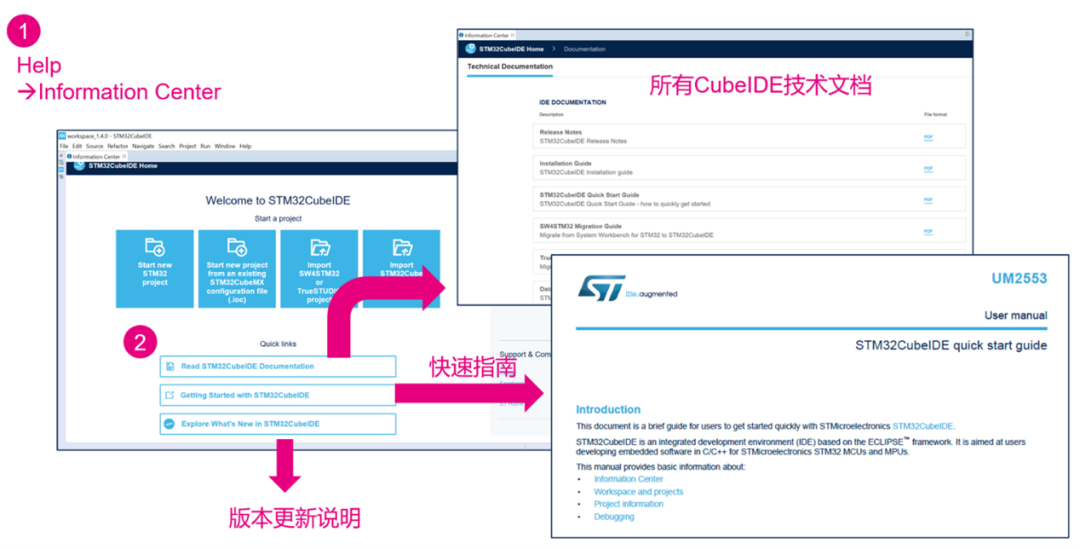
When STM32CubeIDE is opened for the first time, the “Information Center” page is displayed first. This page provides a quick channel for creating projects and an entry point for using STM32CubeIDE documentation. Users do not need to read all this documentation before using STM32CubeIDE, but they can use it as an entry point to search for relevant documentation when needed.
2 User Manual/Application Notes
|
User Manual/Application Notes |
|
|
UM2563 |
STM32CubeIDE installation guide《STM32CubeIDE安装指南》 |
|
UM2553 |
STM32CubeIDE quick start guide《STM32CubeIDE快速指南》 |
|
UM2579 |
Migration guide from System Workbench to STM32CubeIDE《从System Workbench移植到STM32CubeIDE》 |
|
UM2578 |
Migration guide from TrueSTUDIO® to STM32CubeIDE《从TrueSTUDIO移植到STM32CubeIDE》 |
|
AN5361 |
Getting started with projects based on dual-core STM32H7 microcontrollers in STM32CubeIDE《使用STM32CubeIDE开发STM32H7双核工程》 |
|
AN5394 |
Getting started with projects based on the STM32L5 Series in STM32CubeIDE《使用STM32CubeIDE开发STM32L5工程》 |
|
AN5360 |
Getting started with projects based on the STM32MP1 Series in STM32CubeIDE《使用STM32CubeIDE开发STM32MP1工程》 |
|
AN5564 |
Getting started with projects based on dual-core STM32WL microcontrollers in STM32CubeIDE《使用STM32CubeIDE开发STM32WL工程》 |

1.AIoT时代,计算机技术的新机遇与新挑战
2.STM32F1和GD32F1有什么区别?
3.PCB元器件摆放十条小技巧,绝对有用!
4.英特尔回归技术流,原CTO帕特·基辛格回来担任CEO!
5.内嵌专业接口的RISC-V架构MCU,谁家有?
6.深度剖析C语言的main函数!

Disclaimer: This article is a reprint from the internet, and the copyright belongs to the original author. If there are any copyright issues, please contact us, and we will confirm the copyright based on the copyright certificate provided by you and pay for the manuscript or delete the content.