Introduction:WiFi is not just for internet access! By analyzing signal fluctuations, it can “see through” the environment and perceive vital signs without additional sensors. With just an ESP32, you can unlock this technology.
Seeing this title, I can tell you are skeptical, thinking this is just another one of those “academic gimmicks” that sounds impressive. Honestly, when I first heard that WiFi could sense the environment and even measure heartbeats, my reaction was the same as yours: this is too fantastical, how could it be possible?
However, as I delved deeper into this field, I discovered that the potential of WiFi goes far beyond just “internet access.” Some studies even made me feel it was “absurd”: for example, when you are within a WiFi signal coverage area, it can determine whether you are sleeping, measure your breathing rate, count how many people are in a room, identify whether you are walking, jumping, or standing still; and even—perhaps more surprisingly—when you are using your phone, it can infer which app you are running.
All of this sounds like “mysticism,” but behind it is a real and rapidly developing technology—WiFi Channel State Information Sensing, commonly referred to as CSI (Channel State Information).
You might think that even if this technology exists, it is far from our daily lives. In fact, it is not as complicated as you might imagine. To implement it, you do not need expensive equipment or a deep professional background. All you need is a regular router and an ESP32 IoT development board that costs less than 20 yuan. Yes, with just these two commonly available items, you can personally experience this “black technology.”
The principle is also very simple. First, we need to change our perception of Wi-Fi signals. We usually think of Wi-Fi signals as a “data pipeline” for internet access, but in reality, they are radio waves traveling through our space. They are emitted from the router and do not fly in a straight line to your phone; instead, they undergo reflection, diffraction, and penetration through objects in space… ultimately arriving at the receiver via multiple paths and at different times. It is these “twisted” journeys that allow WiFi signals to carry rich environmental information.
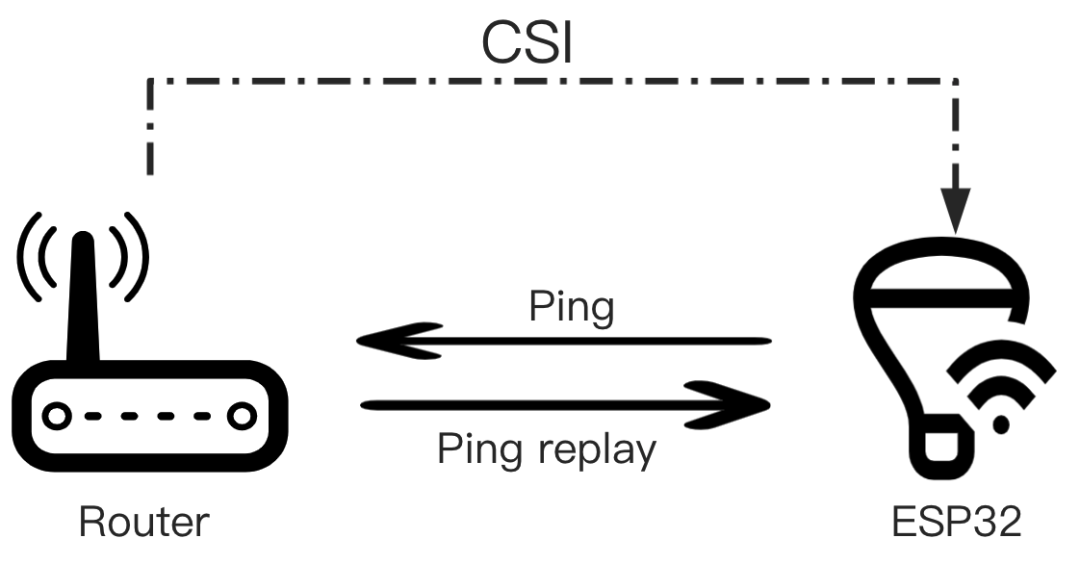
CSI is like an “identity card” that records these path characteristics. It accurately describes the amplitude and phase of the signal on each path—amplitude tells us how much the signal has attenuated on that path, while phase records how long the signal has been delayed. In other words, CSI data is like an “environmental fingerprint”; once we learn to interpret it, we can infer what is happening in the space.
In practical applications, the CSI data we receive is a sequence of values that change over time. For example, the following is a CSI sample captured at a certain moment t: (within one second, you can receive hundreds of such data)
CSI[t] = [ -20, 15, -20, 15, -50, 15, 16, 0, -86, 15, 38, 0, -120, 15, 37, 0, 119, 15, 24, 0, 125, 15, -2, 15, -107, 15, -19, 15, -73, 15, -14, 15, -44, 15, 14, 0, -34, 15, 49, 0, -43, 15, 80, 0, -62, 15, 98, 0, -84, 15, 91, 0, -81, 15, 58, 0, -55, 15, 51, 0, -26, 15, 52, 0, -7, 15, 72, 0, -2, 15, 88, 0, -9, 15, 101, 0, -22, 15, 100, 0, -19, 15, 87, 0, -14, 15, 73, 0, 2, 0, 62, 0, 18, 0, 61, 0, 41, 0, 69, 0, 23, 0, 32, 0, -32, 0]These numbers are not gibberish; they represent amplitude and phase information on different subcarriers. Every two numbers form a pair that together depict the state of the signal on a certain subcarrier.
For example, in detecting heartbeats using CSI:
We need to understand that even slight movements can change the propagation path of radio waves.
The human body itself is an “interfering body.” When WiFi signals pass through or are reflected by the body, the tiny fluctuations in our chest cavity caused by heartbeats—even just a few millimeters—will change the length of a certain propagation path. This slight change is reflected in the CSI data as periodic fluctuations in phase.
This process is somewhat like bouncing a ball against a wall: if the wall moves slightly, the time it takes for the ball to bounce back will also change slightly and regularly. Here, your chest cavity is that “moving wall,” and the WiFi signal is the “ball.”
Of course, there are many interferences in the environment: other people’s movements, air flow, device noise… all of these will mix into the CSI data, creating background “noise.” However, the frequency of a heartbeat has distinct characteristics, typically ranging from 0.8 to 2.0 Hz in a resting adult. By using signal processing techniques such as Fourier Transform, we can convert the CSI data from the time domain to the frequency domain, allowing us to “extract” the frequency peak that represents the heartbeat from the chaotic noise.
The entire process can be summarized as:
WiFi signal transmission → Multi-path propagation in space (one path is reflected by the human chest cavity) → Heartbeat causes periodic micro-movements of the chest cavity → Changes in reflection path length → Leads to periodic changes in CSI phase → ESP32 captures raw CSI data → Algorithms filter out noise and extract phase patterns → Finally converted to heartbeat frequency.
Of course, if the environment is complex and the target behavior is subtle, traditional signal processing methods may struggle. At this point, we can leverage artificial intelligence—such as LSTM, GRU, or Transformer time-series neural networks—to perform supervised learning on the CSI data, allowing the model to learn to identify the “signal” we care about from the chaos.
By now, you might have a question: does it have to be the ESP32 as the receiver? Can’t a phone or computer connected to the network also act as a receiver for CSI information? You are correct; in principle, any device that can connect to WiFi (phones, computers, network cards) is receiving CSI data, as this is necessary information for normal communication in an OFDM system (the technical basis of WiFi).
However, “being able to receive” and “being able to obtain” are two different things. This is precisely why the ESP32 is irreplaceable in this field.
Our everyday devices, such as phones and laptops, have their WiFi chips “protected” by the operating system. Manufacturers hide low-level raw data like CSI to ensure network stability and security, only exposing us to the result of “whether we can access the internet,” without revealing the “process” of signal propagation.
In contrast, the ESP32 is an open-source hardware designed for developers. We can programmatically communicate directly with the WiFi chip, commanding it to output all the CSI information attached to each data packet. This “God’s eye view” permission is something we cannot easily obtain on phones and computers.
It is this openness, combined with its extremely low cost (less than 20 yuan) and an active developer community, that makes the ESP32 the ideal and almost the only “ticket” for entering the field of WiFi sensing.
You must be curious: since it is so powerful, why haven’t we seen this technology applied in our daily lives? This is indeed a pertinent question, as there are several hurdles that we currently cannot bypass.
CSI data is extremely sensitive to environmental interference, especially the **phase information** that is crucial for perceiving subtle movements, which is easily affected by environmental noise. Wireless frequency interference in everyday environments, including co-frequency WiFi networks, Bluetooth devices, and other wireless signal sources, will introduce significant noise. More complex is that any slight changes in the indoor environment—such as moving furniture, opening and closing doors and windows, or even thermal expansion and contraction due to air flow—will alter existing channel characteristics, causing signal baseline drift. Even AI analysis can struggle to train effectively.
Moreover, this technology is still in a “customization” phase and has not yet reached a “generalization” level. A model trained in your home office to accurately recognize your sitting action may completely fail when placed in my living room tomorrow. This is because it has become familiar with the unique signal reflection environment created by your office’s bookshelf and wooden table. Change the space, and all the “reference objects” change, requiring it to learn from scratch. This “incompatibility” characteristic makes it difficult to be plug-and-play like traditional sensors that can be set up to work anywhere right out of the box.
Furthermore, although the ESP32 hardware itself is very cheap, making the entire system work reliably incurs significant “hidden costs.” You need to specifically plan and set up device locations, debug AI algorithms, and process massive amounts of data. This is clearly not as straightforward as simply installing a sensor that costs a few dozen yuan, which also offers higher accuracy.
After understanding these limitations, if your curiosity has not been extinguished and you are eager to try this technology yourself, the next step is the tutorial section. Below, I will teach you how to use the ESP32 device to transmit these invisible CSI signal data via the MQTT protocol, like a continuous stream, in real-time to your computer for storage, preparing for subsequent data processing and analysis. Note that this tutorial does not cover the subsequent data processing and analysis steps; you will need to explore that on your own (this requires some background in data processing and artificial intelligence).
First, prepare the devices: a signal source that continuously emits Wi-Fi signals and a receiver for capturing channel state information. In daily life, the most convenient solution is to use your phone as a hotspot for the transmitter; of course, you can also use a router. The receiver will use the ESP32 development board.
Regarding the selection of the ESP32, Espressif has a recommended order for the CSI performance of different chips, roughly: ESP32-C5 > ESP32-C6 > ESP32-C3 ≈ ESP32-S3 > ESP32. However, please note that for initial experiments or basic applications, even the classic ESP32 model is completely sufficient; you do not need to overly pursue the latest models.
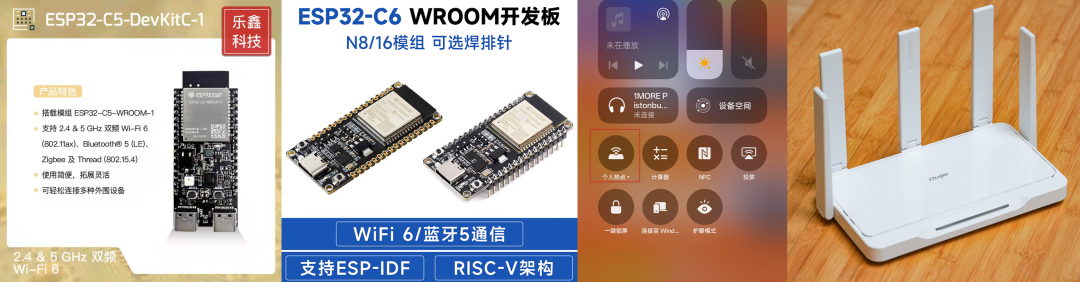
In actual experimental operations, I strongly recommend using the mobile hotspot solution. This has a clear advantage: you can freely and flexibly place the signal source. Also, be sure to pay attention to the AP frequency band settings of the hotspot—some older ESP32 models may not support connecting to 5GHz networks, so it is advisable to set it to the 2.4GHz band in your mobile hotspot settings to ensure compatibility.
The following image is a simple physical connection demonstration; you can set up your experimental environment in a similar way:
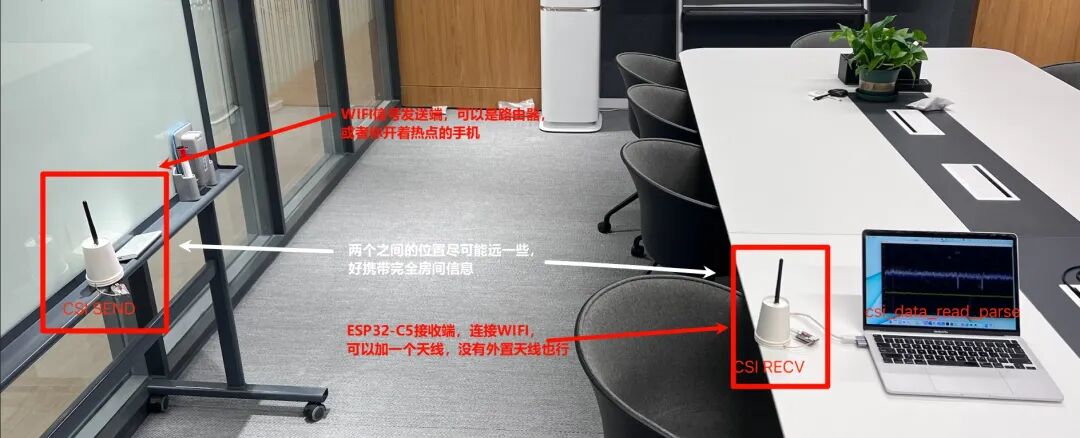 To give you a clear understanding of the overall data flow, let’s first look at the architecture diagram of the entire system:The entire workflow is very intuitive: your phone opens a Wi-Fi hotspot, and both the ESP32 development board and your computer connect as clients to this same network. The ESP32 is responsible for capturing CSI data, while your computer runs as an MQTT server (or Broker). Once the system starts working, the ESP32 will continuously send the collected data to this server on your computer for storage.
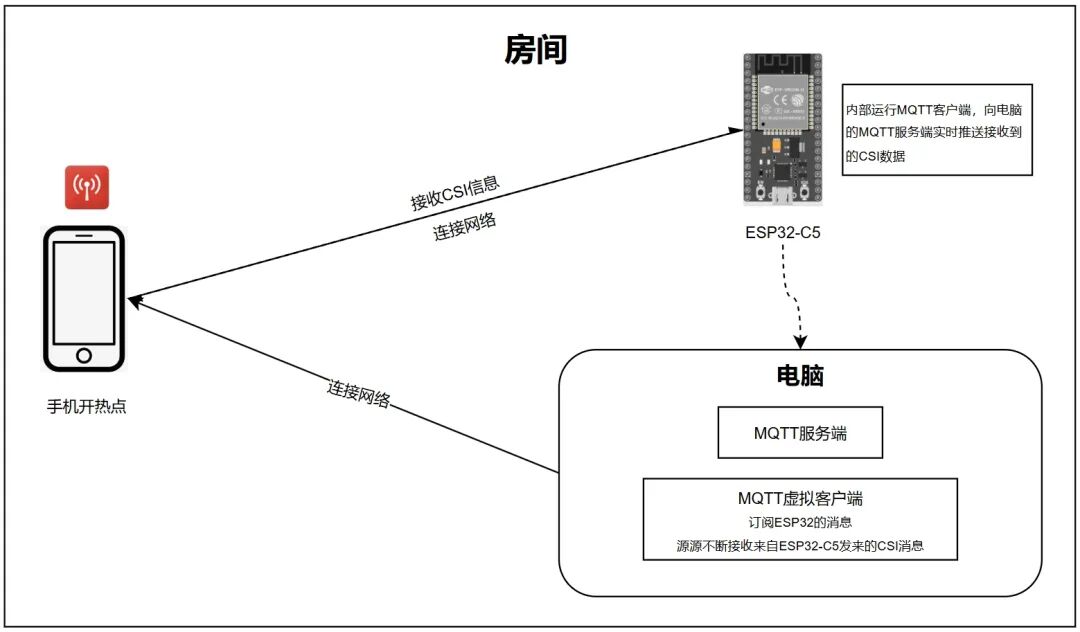 You may ask, why choose MQTT instead of more common serial communication or HTTP protocols? There are very practical considerations behind this.First, serial communication is simple, but it has a physical “chain”—the ESP32 must always be connected to the computer via a USB data cable. This not only limits the freedom of device placement but also diverges from the future application scenarios we hope for, where we can independently deploy for real-time data analysis.Secondly, while HTTP protocol is ubiquitous, its design is not suitable for high-frequency, continuous data streams. Each transmission is accompanied by lengthy request and response headers, like sending a small part but packaging it in a huge box filled with foam, making it cumbersome and inefficient.In contrast, MQTT perfectly avoids these issues. It was designed to connect sensors in the physical world to the network, being a lightweight, low-power “machine-to-machine” protocol. It is specifically designed for continuous data streams, with minimal protocol overhead and high transmission efficiency.Once all hardware is ready, the next step is to write a program for the ESP32, which must use the ESP-IDF framework released by Espressif. You may wonder why not use simpler Arduino or MicroPython? The reason is that ESP-IDF is Espressif’s official IoT development framework, providing the lowest-level WiFi drivers and CSI data interfaces, while other frameworks do not offer such low-level interfaces.How to install ESP-IDF on your computer? It’s very simple; installing ESP-IDF has become very straightforward. Whether you are using Windows, macOS, or Linux, I strongly recommend setting up the environment by installing the ESP-IDF plugin in VSCode. Yes, ESP-IDF can now be used as a plugin in VSCode. This plugin integrates the entire toolchain, compiler, and flashing tools, greatly simplifying the configuration process.You can refer to the [official installation guide](https://docs.espressif.com/projects/vscode-esp-idf-extension/zh_CN/latest/installation.html). If you find the official documentation not intuitive enough, you can also search online for “VSCode ESP-IDF installation tutorial”; many community developers have created high-quality graphic or video tutorials that can help you avoid many pitfalls.Once installed, create a new empty project and follow the steps below: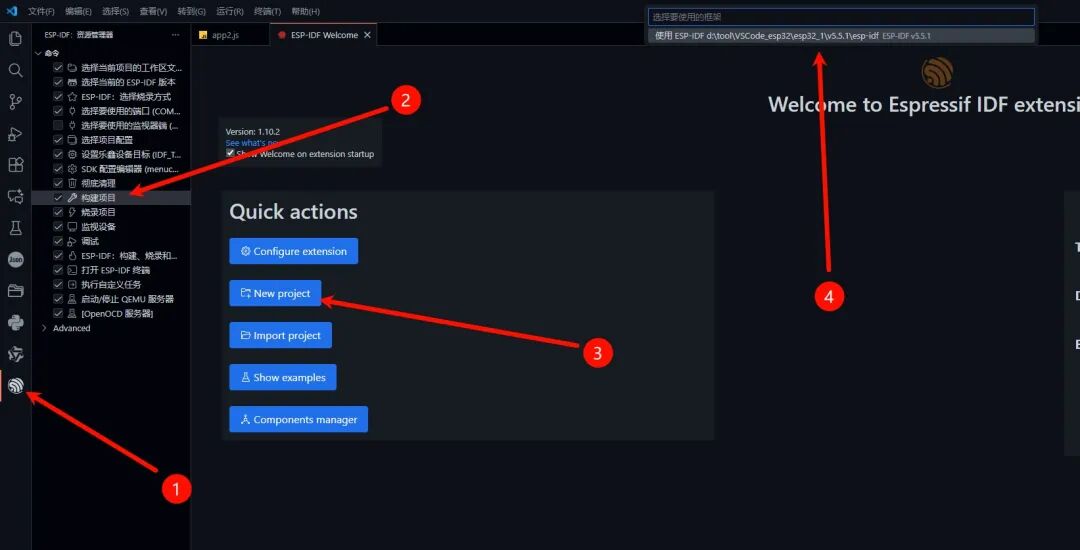
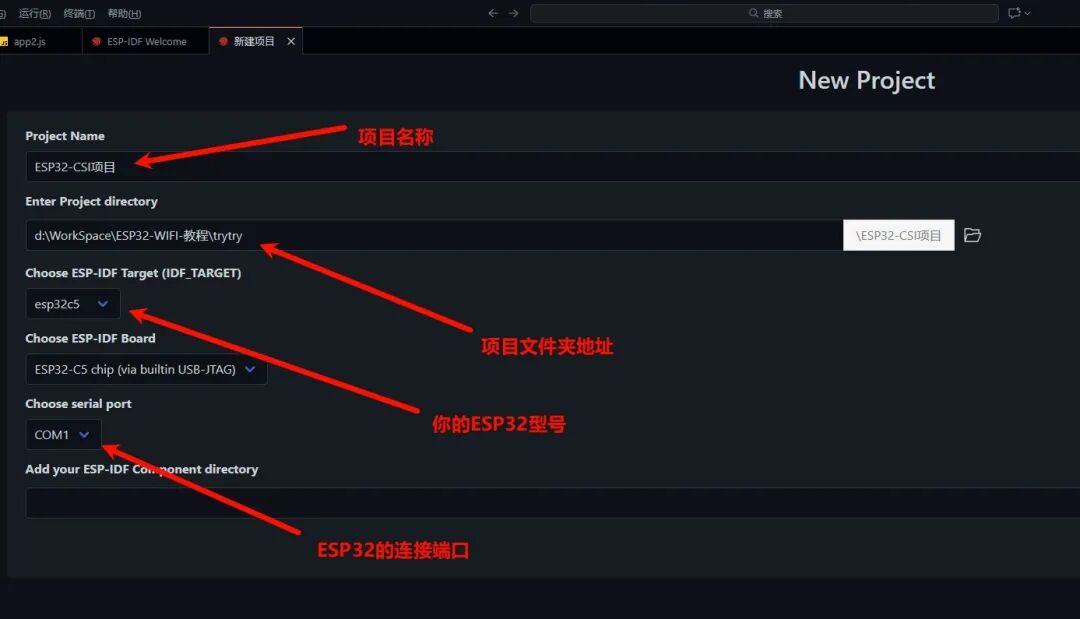
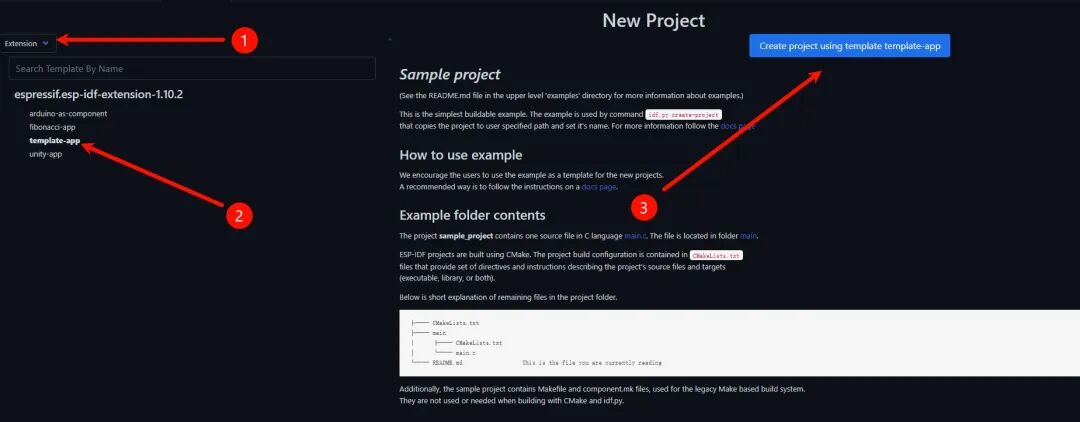
Once the project is created successfully, let’s familiarize ourselves with the standard ESP-IDF project structure, which typically includes the following key parts:
-
main directory: This is the core, where our application code mainly resides.
-
CMakeLists.txt file: Informs the build system how to compile your project.
-
Other component directories: Used to store libraries that the project depends on.
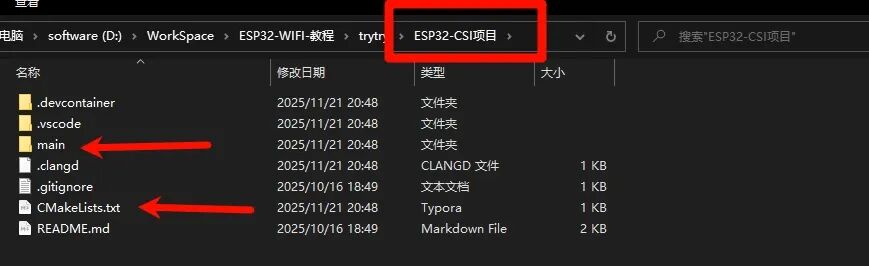 Next, you need to download the project files from my provided [Gitee repository](https://gitee.com/narrastory/esp32-csi-wifi) to your local machine. Please copy the files in the project documents folder directly into your newly created project folder, overwriting the existing files.Now, open the main directory’s main.c source file and locate the WiFi and MQTT configuration parameters section around lines 49 to 63; this is the “control center” of the entire program, and you need to modify it according to your actual situation:
// WiFi configuration parameters#define WIFI_SSID "Your WiFi Network Name"     // Please fill in your mobile hotspot or router name#define WIFI_PASS "WiFi Password"          // Corresponding WiFi password#define WIFI_MAX_RETRY 5              // Number of retries on connection failure
// MQTT configuration parameters#define MQTT_BROKER_URL "mqtt://192.168.80.102:1883"  // Your computer's (MQTT server) IP address#define MQTT_USERNAME "esp_ikd4s"     // Custom device username#define MQTT_PASSWORD "1234567890"    // MQTT connection password (can be ignored if the server does not require a password)#define MQTT_CLIENT_ID "ecc1-esp1"    // Unique ID for this device in the MQTT network#define MQTT_TOPIC "electric/vi"      // Topic name for sending CSI data
Special note: The IP address in MQTT_BROKER_URL needs to be changed to the IP address of the computer running the MQTT server, ensuring that the ESP32 and the computer can communicate with each other on the same network.After configuration, use the button in the status bar of VSCode (or terminal command) to compile and flash. If all goes well, open the serial monitor, and you will see logs of the ESP32 attempting to connect to WiFi and eventually successfully connecting to the MQTT server. When you see the CSI data starting to flow continuously, congratulations, the most difficult part is already done!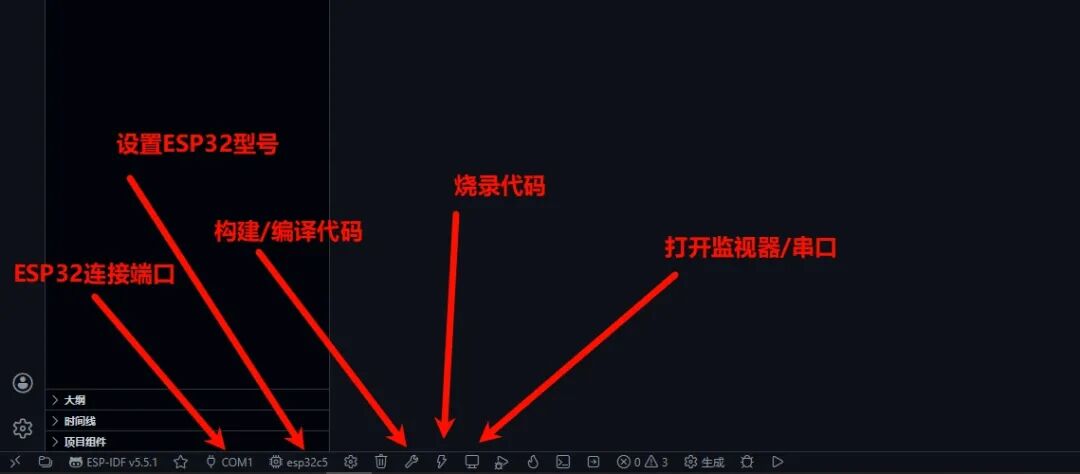 Now that the CSI data has been sent from the ESP32, we need to set up a receiving platform on the computer.For developers familiar with MQTT, you can easily set up a Mosquitto or other MQTT server and subscribe to the electric/vi topic to receive data.If you are not familiar with MQTT but know how to use JavaScript/Node.js, I have prepared a simple-to-use MQTT server suite for you in the Gitee repository, which is the file named MQTT_Server.7z. After extracting, you will see several JS files, among which mqttServer.mjs and app.mjs are the core. At this point, the MQTT configuration parameters above can remain unchanged (the IP address still needs to be changed to your own).Before running, there are two places you may need to customize:
// In mqttServer.mjs line 45, you can change the MQTT server portconst server = createServer(broker.handle);const port = 1883; // Set the MQTT server portserver.listen(port, () => { const msg = `MQTT Broker Start, listening port ${port}`; logToFile(0,msg);}); // In app.mjs lines 61 to 69, process the received data client.on("message", (topic, message) => { let msg = message.toString(); if (msg) { let datas = JSON.parse(msg) if (datas) { // Here, datas is the received CSI data, and you can continue processing it here } } });After configuration, run node app.mjs in the terminal to start the service. One last reminder: please temporarily disable your computer’s firewall or add inbound rules for the corresponding port; otherwise, you may not be able to receive data properly.Taking my ESP32-C5 as an example, after successful operation, approximately 120 CSI data can be received per second, with each data containing a CSI complex array of length 106, providing a rich data foundation for subsequent analysis of physiological signals such as heartbeats and breathing.Finally, if you are interested and want to learn more about the cutting-edge dynamics of this technology, I recommend following the [Awesome-WiFi-CSI-Sensing](https://github.com/NTUMARS/Awesome-WiFi-CSI-Sensing) repository on GitHub. This project collects a wealth of academic papers and interesting projects utilizing WiFi CSI for sensing, from basic human detection to fine gesture recognition, heartbeat and breathing monitoring, and even emotion recognition. You will find many “magical” projects in this field.