In embedded development, bare-metal and RTOS programming are two core implementation methods. This article focuses on the STM32F4xx series MCUs, first explaining the concepts and applicable scenarios of both, and then comparing the code implementation differences between bare-metal and FreeRTOS through three examples: multi-LED blinking, sensor data processing, and button-controlled motor. Finally, it provides selection recommendations to offer developers a clear technical reference.
01
—
Bare-Metal Programming and RTOS Programming Concepts
Bare-metal programming involves writing code directly on the hardware without relying on an operating system, typically implementing functionality through a “super loop”, interrupt-driven methods, or a “foreground-background system” (where the foreground handles urgent interrupts and the background executes loop tasks). In simple systems, it offers fast response times and predictable real-time performance, consuming almost no additional hardware resources; however, in complex systems, multitasking coordination must be handled manually, and frequent interrupts can lead to unstable real-time performance.

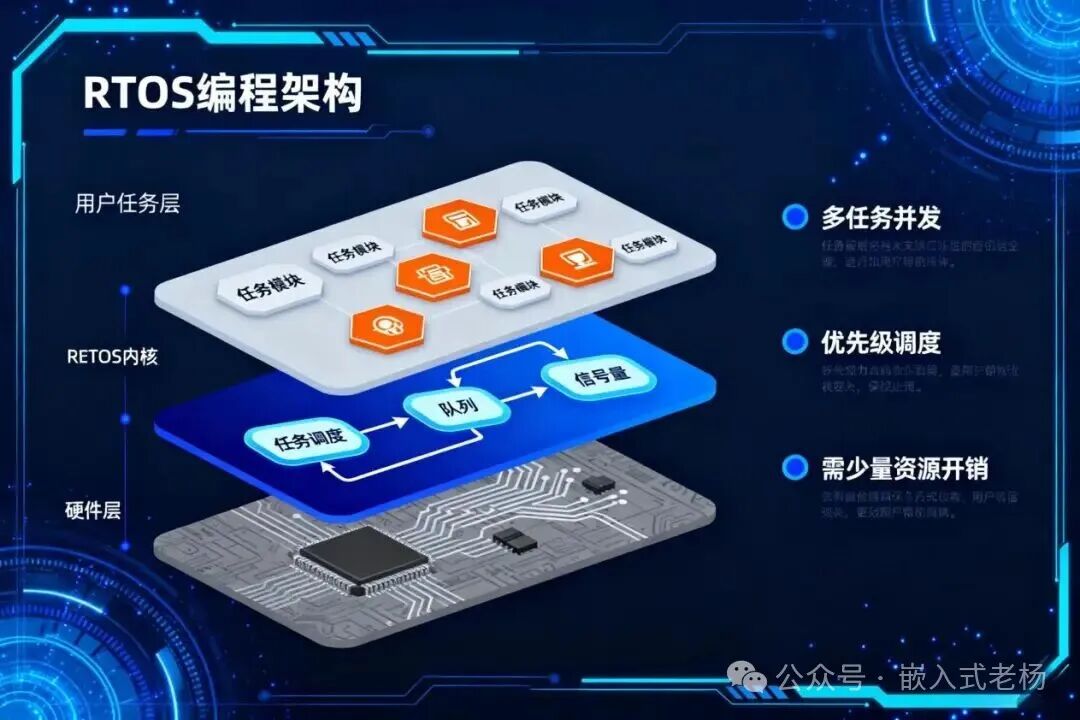
RTOS (Real-Time Operating System, such as FreeRTOS) is a lightweight “task management tool” that achieves multitasking concurrency on single-core STM32F4xx through “time-slicing + priority preemption”. It allocates priorities based on task importance, providing more reliable real-time performance in complex systems, and offers tools like queues and semaphores for task communication; however, it consumes a small amount of Flash (about 3KB) and RAM (a few hundred bytes), with microsecond-level scheduling overhead.
02
—
Bare-Metal Programming and RTOS Programming Application Scenarios
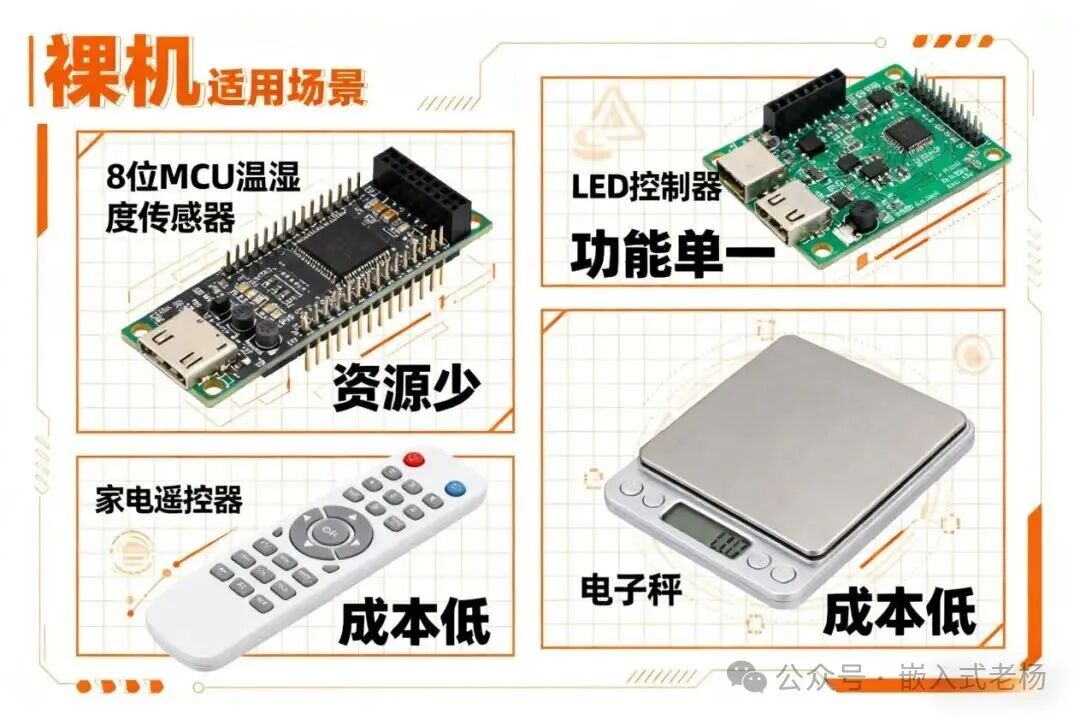
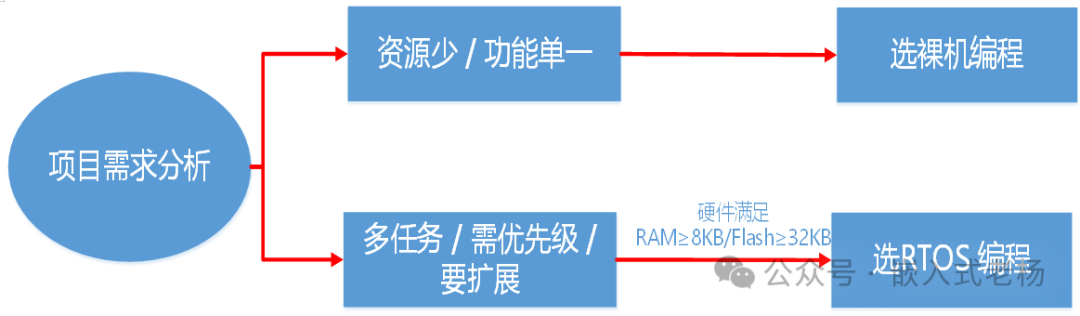
Bare-metal programming is suitable for three types of scenarios: first, devices with extremely limited hardware resources, such as simple sensors using 8-bit MCUs, with RAM < 1KB and Flash < 16KB (e.g., temperature and humidity collection nodes); second, single-function scenarios, like single-channel LED blinking, simple fan speed control, and remote controls for home appliances; third, cost-sensitive products, such as electronic scales and children’s toys, which do not need to bear the costs of OS development and resources.
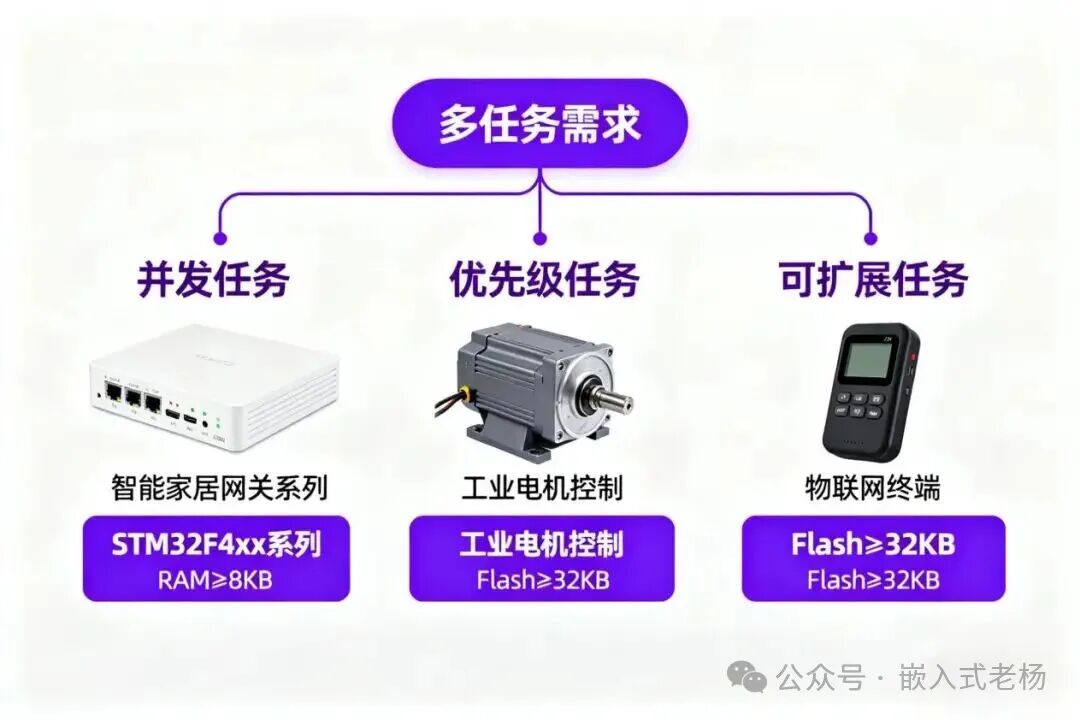
RTOS programming is more suitable for complex systems: multitasking concurrency scenarios, such as smart home gateways (which need to handle WiFi communication, sensor collection, and relay control simultaneously); scenarios where tasks have priority distinctions, such as industrial motor controllers (where the “emergency stop” task has the highest priority and the “data logging” task has the lowest); and scenarios that require flexible expansion, such as IoT terminals (where adding a new LoRa communication function later only requires adding a new task). It is recommended to use 32-bit MCUs like STM32F4xx, with at least 8KB RAM and 32KB Flash.
03
—
Bare-Metal Programming and RTOS Programming Examples
Example 1: Multi-LED Blinking at Different Frequencies
Function Description
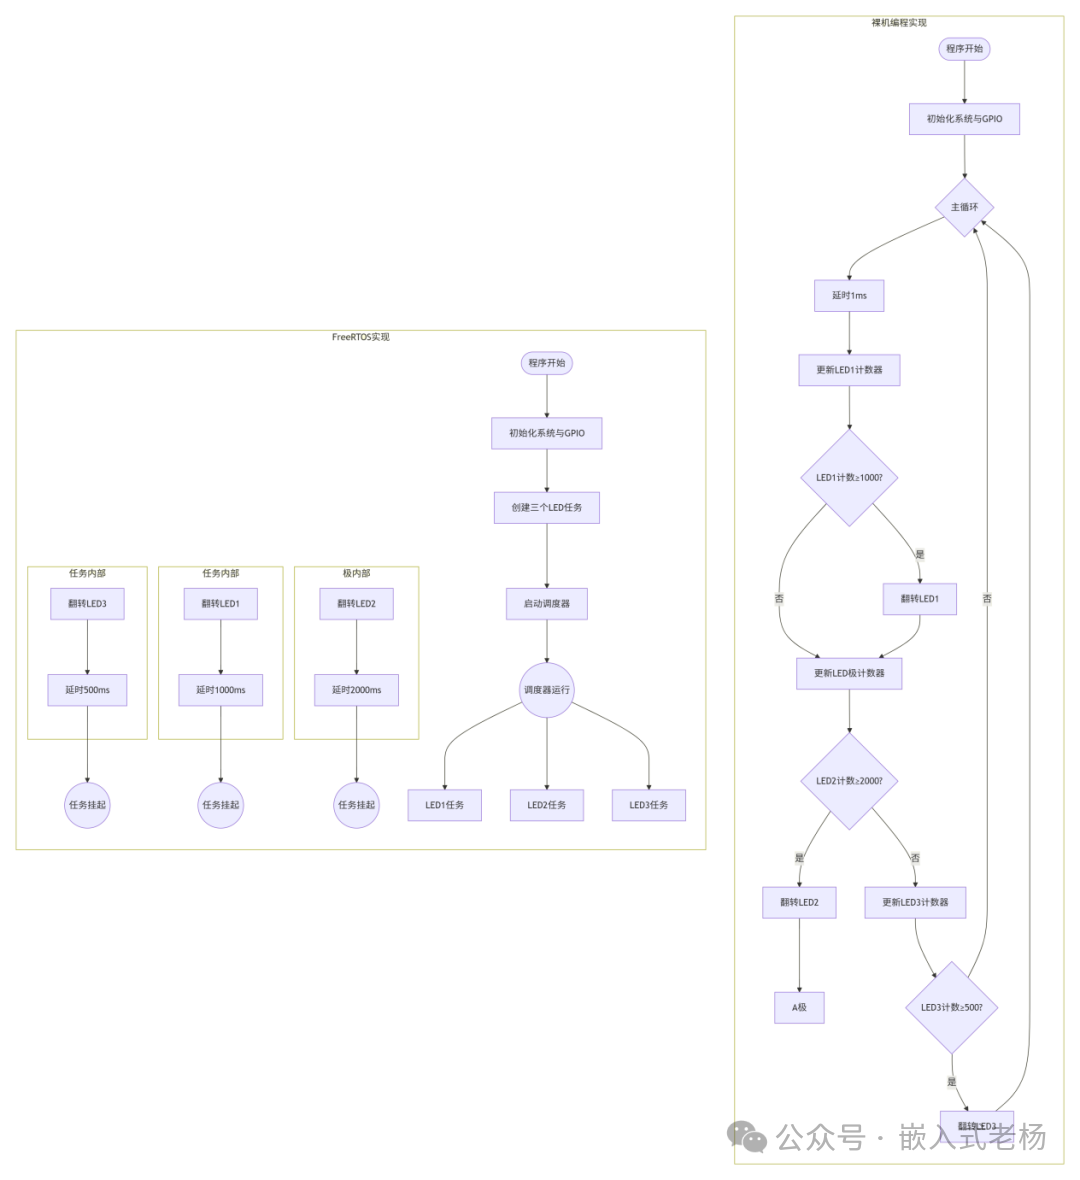
Control 3 LEDs to blink at different frequencies: LED1 blinks once every 1 second, LED2 blinks once every 2 seconds, and LED3 blinks once every 500 milliseconds.
Bare-Metal Implementation
int main(void) { // Initialize HAL library HAL_Init(); // Configure system clock SystemClock_Config(); // Initialize GPIO GPIO_Init(); while (1) { // Execute every 1ms delay_ms(1); // LED1: blink once every 1 second (1000ms) led1_counter++; if (led1_counter >= 1000) { led1_counter = 0; HAL_GPIO_TogglePin(GPIOA, GPIO_PIN_0); } // LED2: blink once every 2 seconds (2000ms) led2_counter++; if (led2_counter >= 2000) { led2_counter = 0; HAL_GPIO_TogglePin(GPIOA, GPIO_PIN_1); } // LED3: blink once every 500ms led3_counter++; if (led3_counter >= 500) { led3_counter = 0; HAL_GPIO_TogglePin(GPIOA, GPIO_PIN_2); } }FreeRTOS Implementation
int main(void) { // Initialize HAL library HAL_Init(); // Configure system clock SystemClock_Config(); // Initialize GPIO GPIO_Init(); // Create tasks xTaskCreate(vLED1Task, "LED1 Task", configMINIMAL_STACK_SIZE, NULL, 1, NULL); xTaskCreate(vLED2Task, "LED2 Task", configMINIMAL_STACK_SIZE, NULL, 1, NULL); xTaskCreate(vLED3Task, "LED3 Task", configMINIMAL_STACK_SIZE, NULL, 1, NULL); // Start scheduler vTaskStartScheduler(); // If everything is normal, the program will not reach here while (1) { }}// LED1 Task: blink once every 1 secondvoid vLED1Task(void *pvParameters) { for (;;) { HAL_GPIO_TogglePin(GPIOA, GPIO_PIN_0); vTaskDelay(pdMS_TO_TICKS(1000)); // Delay 1000ms }}// LED2 Task: blink once every 2 secondsvoid vLED2Task(void *pvParameters) { for (;;) { HAL_GPIO_TogglePin(GPIOA, GPIO_PIN_1); vTaskDelay(pdMS_TO_TICKS(2000)); // Delay 2000ms }}// LED3 Task: blink once every 500msvoid vLED3Task(void *pvParameters) { for (;;) { HAL_GPIO_TogglePin(GPIOA, GPIO_PIN_2); vTaskDelay(pdMS_TO_TICKS(500)); // Delay 500ms }}Code Comparison:
In the multi-LED blinking function, bare-metal uses software counters in the main loop to time each LED, continuously checking whether each LED has reached its blinking period, with all logic concentrated in the while loop, requiring manual management of each LED’s state transitions. FreeRTOS creates independent tasks for each LED, using vTaskDelay to implement delays, with task scheduling handled by the system, making it clearer to modify frequencies by simply changing the corresponding task delay parameters.
Example 2: Sensor Data Collection and Display
Function Description
Periodically collect temperature sensor data, display the data on an LCD, and send the data to a host computer via serial port. The sensor collection period is 100ms, the LCD display refresh period is 500ms, and the serial port sending period is 1000ms.
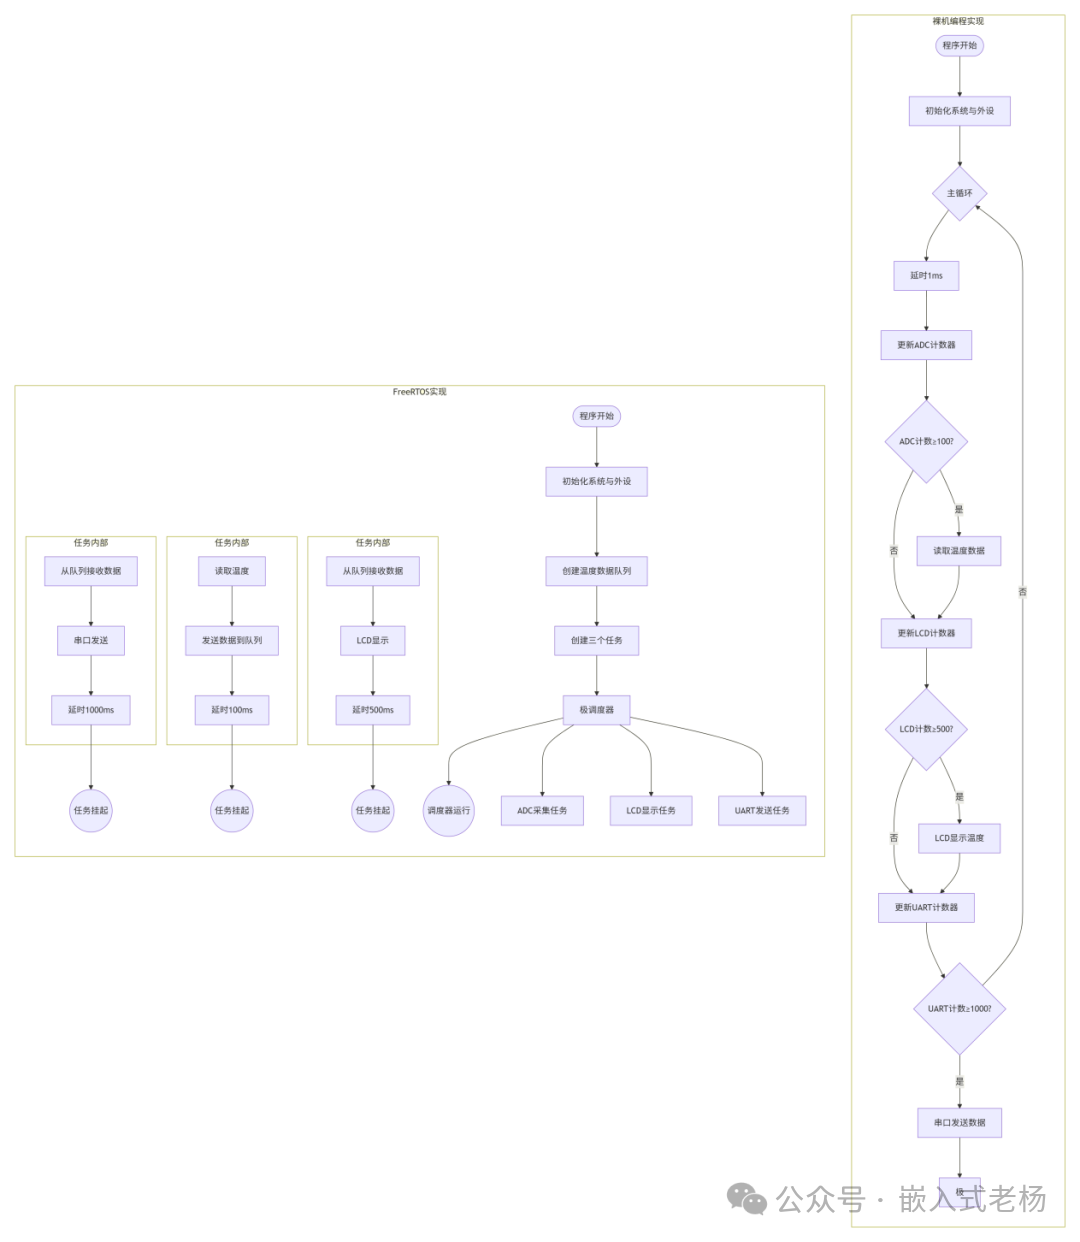
Bare-Metal Implementation
int main(void) { // Initialize HAL library HAL_Init(); // Configure system clock SystemClock_Config(); // Initialize peripherals GPIO_Init(); ADC_Init(); UART_Init(); I2C_Init(); while (1) { // Execute every 1ms delay_ms(1); // Sensor collection: 100ms period adc_counter++; if (adc_counter >= 100) { adc_counter = 0; temperature = ReadTemperature(); } // LCD display: 500ms period lcd_counter++; if (lcd_counter >= 500) { lcd_counter = 0; LCD_DisplayTemperature(temperature); } // Serial sending: 1000ms period uart_counter++; if (uart_counter >= 1000) { uart_counter = 0; UART_SendTemperature(temperature); } }FreeRTOS Implementation
int main(void) { // Initialize HAL library HAL_Init(); // Configure system clock SystemClock_Config(); // Initialize peripherals GPIO_Init(); ADC_Init(); UART_Init(); I2C_Init(); // Create queue for passing temperature data xTemperatureQueue = xQueueCreate(5, sizeof(float)); // Create tasks xTaskCreate(vADCTask, "ADC Task", configMINIMAL_STACK_SIZE, NULL, 2, NULL); xTaskCreate(vLCDTask, "LCD Task", configMINIMAL_STACK_SIZE, NULL, 1, NULL); xTaskCreate(vUARTTask, "UART Task", configMINIMAL_STACK_SIZE, NULL, 1, NULL); // Start scheduler vTaskStartScheduler(); // If everything is normal, the program will not reach here while (1) { }}// ADC collection task: 100ms periodvoid vADCTask(void *pvParameters) { float temp; for (;;) { temp = ReadTemperature(); // Send temperature data to queue xQueueSend(xTemperatureQueue, &temp, 0); vTaskDelay(pdMS_TO_TICKS(100)); }}// LCD display task: 500ms periodvoid vLCDTask(void *pvParameters) { float temp; for (;;) { // Receive latest temperature data from queue if (xQueueReceive(xTemperatureQueue, &temp, portMAX_DELAY) == pdTRUE) { LCD_DisplayTemperature(temp); } vTaskDelay(pdMS_TO_TICKS(500)); }}// UART sending task: 1000ms periodvoid vUARTTask(void *pvParameters) { float temp; for (;;) { // Receive latest temperature data from queue if (xQueueReceive(xTemperatureQueue, &temp, portMAX_DELAY) == pdTRUE) { UART_SendTemperature(temp); } vTaskDelay(pdMS_TO_TICKS(1000)); }}Code Comparison:
In the sensor data processing function, bare-metal uses three counters to control different periodic tasks, with data passed through global variables, making the main loop increasingly complex as functionality increases. FreeRTOS separates collection, display, and sending into independent tasks, safely passing data through queues, with single-task responsibilities, allowing for easy expansion by simply adding tasks.
Example 3: Button Control and Motor Speed Regulation
Function Description
Control a motor using two buttons: Button 1 is used to start/stop the motor, and Button 2 is used to adjust the motor speed (cycling through 3 speed levels). It also needs to detect long presses (greater than 1 second) to execute a special function (reset speed to default).
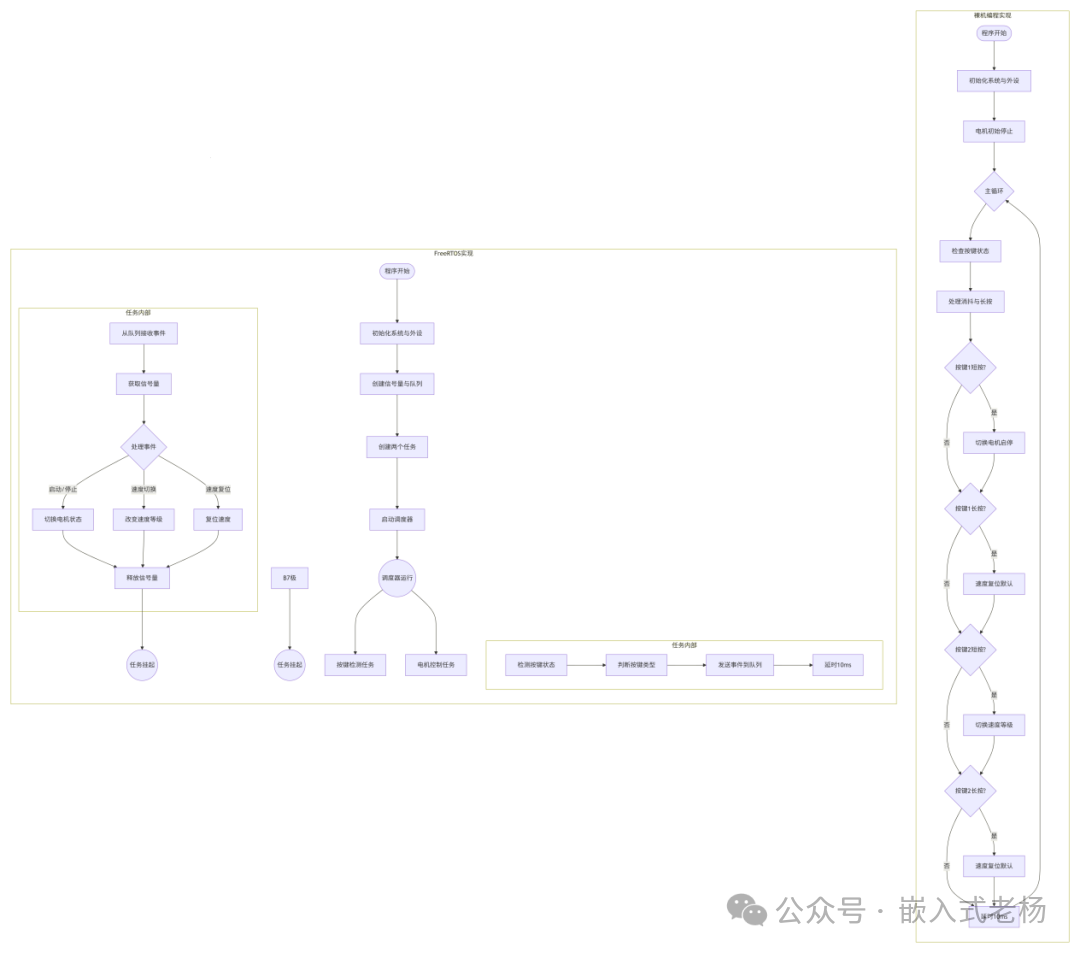
Bare-Metal Implementation
int main(void) { // Initialize HAL library HAL_Init(); // Configure system clock SystemClock_Config(); // Initialize peripherals GPIO_Init(); TIM_PWM_Init(); // Initially stop the motor Motor_SetSpeed(0); while (1) { // Check button states CheckButtons(); // Handle short press of Button 1: start/stop motor if (button1_pressed &&& !button1_long_press) { button1_pressed = 0; if (motor_state == MOTOR_STOPPED) { motor_state = MOTOR_RUNNING; Motor_SetSpeed(speed_level); } else { motor_state = MOTOR_STOPPED; Motor_SetSpeed(0); } } // Handle long press of Button 1: reset speed to default if (button1_long_press) { button1_long_press = 0; speed_level = 1; // Reset to default speed if (motor_state == MOTOR_RUNNING) { Motor_SetSpeed(speed_level); } } // Handle short press of Button 2: switch speed level if (button2_pressed &&& !button2_long_press) { button2_pressed = 0; speed_level++; if (speed_level > 3) { speed_level = 1; } if (motor_state == MOTOR_RUNNING) { Motor_SetSpeed(speed_level); } } // Handle long press of Button 2: reset speed to default if (button2_long_press) { button2_long_press = 0; speed_level = 1; // Reset to default speed if (motor_state == MOTOR_RUNNING) { Motor_SetSpeed(speed_level); } } HAL_Delay(10); // Loop every 10ms }}
FreeRTOS Implementation
int main(void) { // Initialize HAL library HAL_Init(); // Configure system clock SystemClock_Config(); // Initialize peripherals GPIO_Init(); TIM_PWM_Init(); EXTI_Init(); // Create semaphore and queue xMotorSemaphore = xSemaphoreCreateMutex(); xButtonQueue = xQueueCreate(10, sizeof(ButtonEvent)); // Create tasks xTaskCreate(vMotorControlTask, "Motor Control", configMINIMAL_STACK_SIZE, NULL, 2, NULL); xTaskCreate(vButtonDebounceTask, "Button Debounce", configMINIMAL_STACK_SIZE, NULL, 1, NULL); // Initially stop the motor Motor_SetSpeed(0); // Start scheduler vTaskStartScheduler(); // If everything is normal, the program will not reach here while (1) { }}// Motor control taskvoid vMotorControlTask(void *pvParameters) { ButtonEvent event; for (;;) { // Wait for button events if (xQueueReceive(xButtonQueue, &event, portMAX_DELAY) == pdTRUE) { // Get motor control semaphore if (xSemaphoreTake(xMotorSemaphore, portMAX_DELAY) == pdTRUE) { switch (event) { case BUTTON1_SHORT_PRESS: // Start/stop motor if (motor_state == MOTOR_STOPPED) { motor_state = MOTOR_RUNNING; Motor_SetSpeed(speed_level); } else { motor_state = MOTOR_STOPPED; Motor_SetSpeed(0); } break; case BUTTON1_LONG_PRESS: case BUTTON2_LONG_PRESS: // Reset speed to default speed_level = 1; if (motor_state == MOTOR_RUNNING) { Motor_SetSpeed(speed_level); } break; case BUTTON2_SHORT_PRESS: // Switch speed level speed_level++; if (speed_level > 3) { speed_level = 1; } if (motor_state == MOTOR_RUNNING) { Motor_SetSpeed(speed_level); } break; } // Release semaphore xSemaphoreGive(xMotorSemaphore); } } }}// Button debounce taskvoid vButtonDebounceTask(void *pvParameters) { ButtonEvent event; for (;;) { // Button 1 state detection if (HAL_GPIO_ReadPin(GPIOB, GPIO_PIN_0) == GPIO_PIN_SET) { if (!button1_state) { button1_state = 1; button1_press_time = xTaskGetTickCount(); } else { // Check for long press if (xTaskGetTickCount() - button1_press_time > pdMS_TO_TICKS(1000)) { event = BUTTON1_LONG_PRESS; xQueueSend(xButtonQueue, &event, 0); button1_state = 0; // Avoid repeated triggers } } } else { if (button1_state) { button1_state = 0; // Check for short press if (xTaskGetTickCount() - button1_press_time <= pdMS_TO_TICKS(1000)) { event = BUTTON1_SHORT_PRESS; xQueueSend(xButtonQueue, &event, 0); } } } // Button 2 state detection if (HAL_GPIO_ReadPin(GPIOB, GPIO_PIN_1) == GPIO_PIN_SET) { if (!button2_state) { button2_state = 1; button2_press_time = xTaskGetTickCount(); } else { // Check for long press if (xTaskGetTickCount() - button2_press_time > pdMS_TO_TICKS(1000)) { event = BUTTON2_LONG_PRESS; xQueueSend(xButtonQueue, &event, 0); button2_state = 0; // Avoid repeated triggers } } } else { if (button2_state) { button2_state = 0; // Check for short press if (xTaskGetTickCount() - button2_press_time <= pdMS_TO_TICKS(1000)) { event = BUTTON2_SHORT_PRESS; xQueueSend(xButtonQueue, &event, 0); } } } vTaskDelay(pdMS_TO_TICKS(10)); // Check every 10ms }}Code Comparison:
In the motor control function, bare-metal continuously scans the buttons in the main loop, tracking states with global variables, manually handling debounce and long presses. FreeRTOS uses interrupts to detect button presses, determining the button type in the interrupt and sending events to the motor task via a queue, using semaphores to protect critical sections, allowing for more timely responses and clearer task responsibilities.
04
—
Conclusion
Choosing between bare-metal and RTOS primarily depends on “system complexity” and “hardware resources”: for simple scenarios (single-task, limited resources, cost-sensitive), bare-metal is preferred due to its direct code and no additional overhead, leading to high development efficiency; for complex scenarios (multitasking, priority needs, and expansion requirements), RTOS is preferred as it simplifies task coordination and communication, allowing for functionality additions without code restructuring, especially suitable for mid-to-high-end 32-bit MCUs like STM32F4xx.
For embedded developers, bare-metal is a foundational skill that helps you understand the underlying hardware logic; RTOS is a “tool” for complex projects that can enhance development efficiency and system stability. In actual projects, there is no need to blindly pursue RTOS; the optimal solution is the one that meets the requirements.
Previous Articles:
Development Board “Battle Royale”: Which of the 5 popular development boards, including Feilin, Youzan, and Tianmai, is your “favorite”?
Calculating FreeRTOS Task Stack Size
5 Major State Machine Design Patterns in Embedded Systems
Differences Between MCU and MPU
In-Depth Analysis of AMD Ryzen Embedded 8000 Series Processors
Usage of the “volatile” Keyword in Embedded C Language
Samsung and Yangtze Memory Cooperation Launches 10th Generation 430 Layer V-NAND
FreeRTOS Critical Section
GPIO Low Power Mode
Firmware Burning Methods for Embedded Systems