In 2024, Binh Lake Education has carefully prepared and launched a series of professional courses in the field of intelligent manufacturing, covering cutting-edge technology directions such as PLC industrial control programming, electrical assembly and debugging, industrial robotics, industrial vision, mechanical assembly and debugging, and non-standard mechanical design. Everyone is welcome to sign up enthusiastically!


Scan to Register
Scan for Consultation
Please confirm that the screen you are using is from the Comfort series. You can check the label on the back of the screen to confirm by the model and order number.
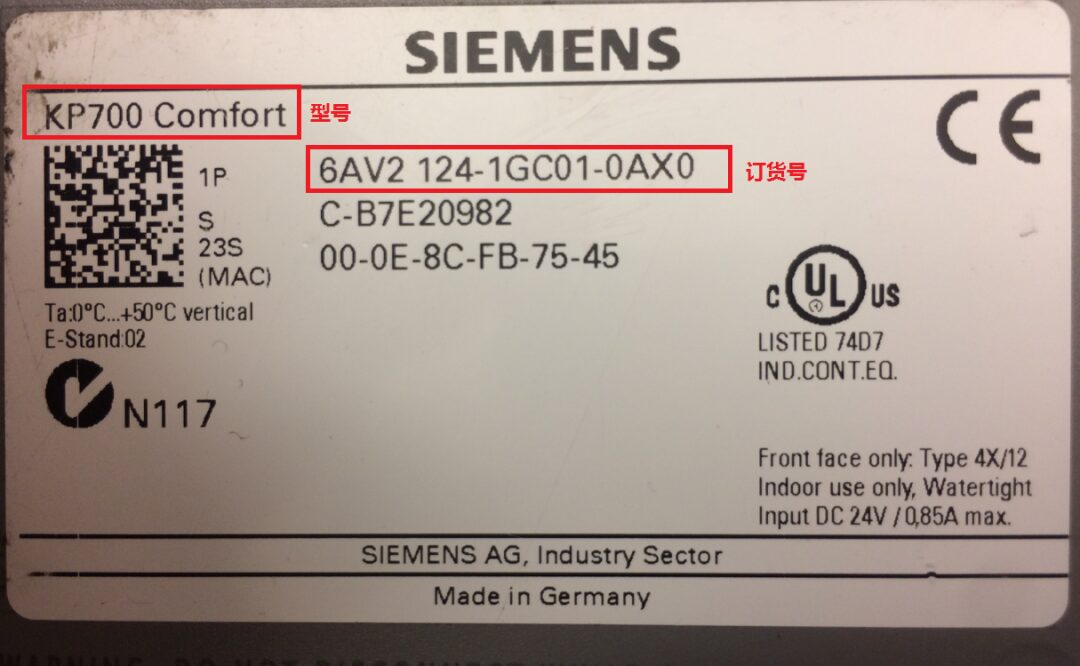
The order numbers for common Comfort screens usually start with 6AV2124-XXXXX-XXXX
Download Cable
Using Siemens’ genuine cable PC Adapter and CP cards (such as CP5611, CP5711), you can download to the Comfort screen via Profibus.
Here we take CP5711 (order number: 6GK1571-1AA00) as an example to explain how to download via Profibus. The CP5611 connects to the 9-pin port at the bottom of the screen via MPI cable (order number: 6ES7 901-0BF00-0AA0) or Profibus cable + DP bus connector.
Settings on the Comfort Screen
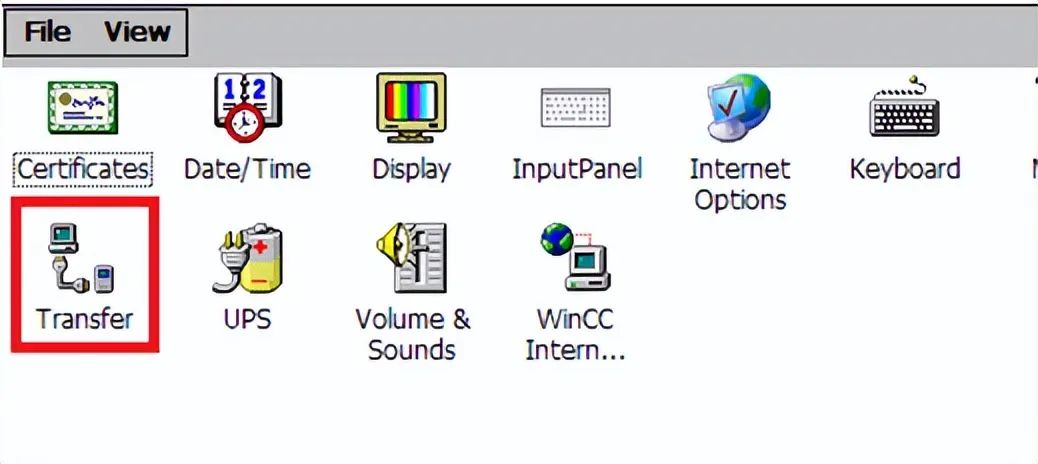
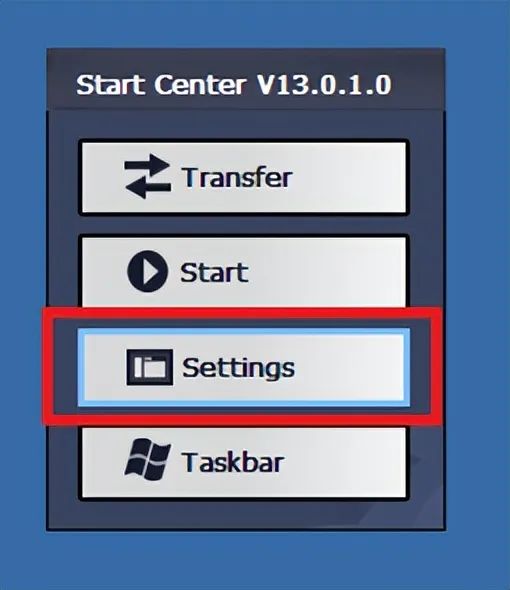
After powering on the screen, the Windows CE operating system will automatically display the Start Center. Click the “Settings” button to open the settings interface.

In “Settings”, double-click “Transfer” to open the “Transfer Settings” dialog.
In the “General” tab, set the transfer settings:
1. Select “Automatic”.
2. Choose “PROFIBUS”.
3. Click the “Properties” button for parameter settings.

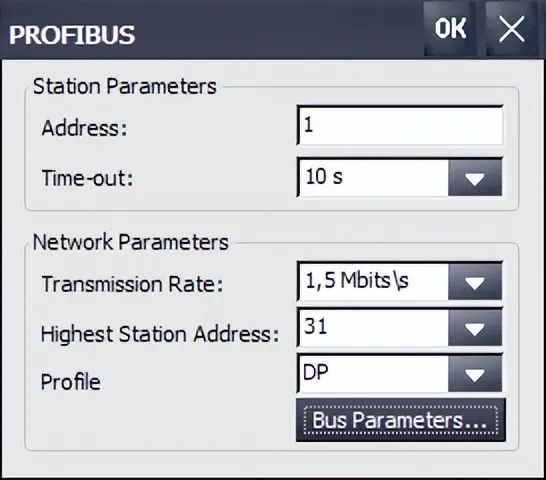
Parameter settings:
1. Address, input the operating screen address as 1.
2. Transmission rate, input the operating screen baud rate as 1.5 Mbits/s.
3. Highest station address, set to 31.
4. Configuration document as DP.
5. Click “OK” to confirm the settings.
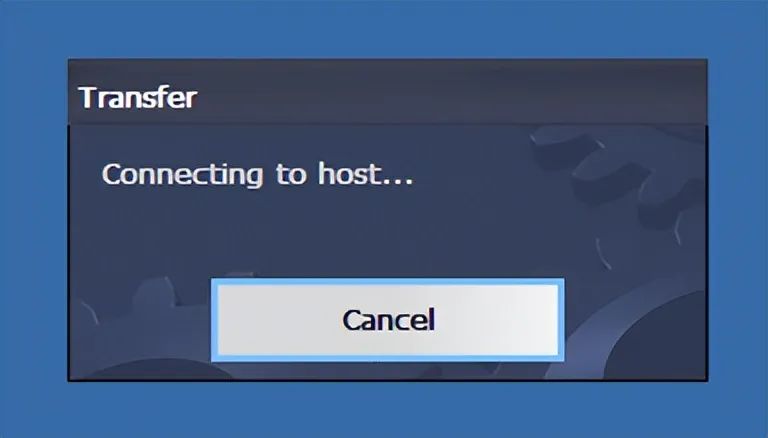
After completing the parameter settings, close the settings interface, click the “Transfer” button in the original “Start Center” interface to switch the screen to transfer mode. The screen will display “Connecting to host…”, completing the settings on the screen.
Settings on the Computer
In the computer’s operating system, click the “Start” menu and open the “Control Panel” option.
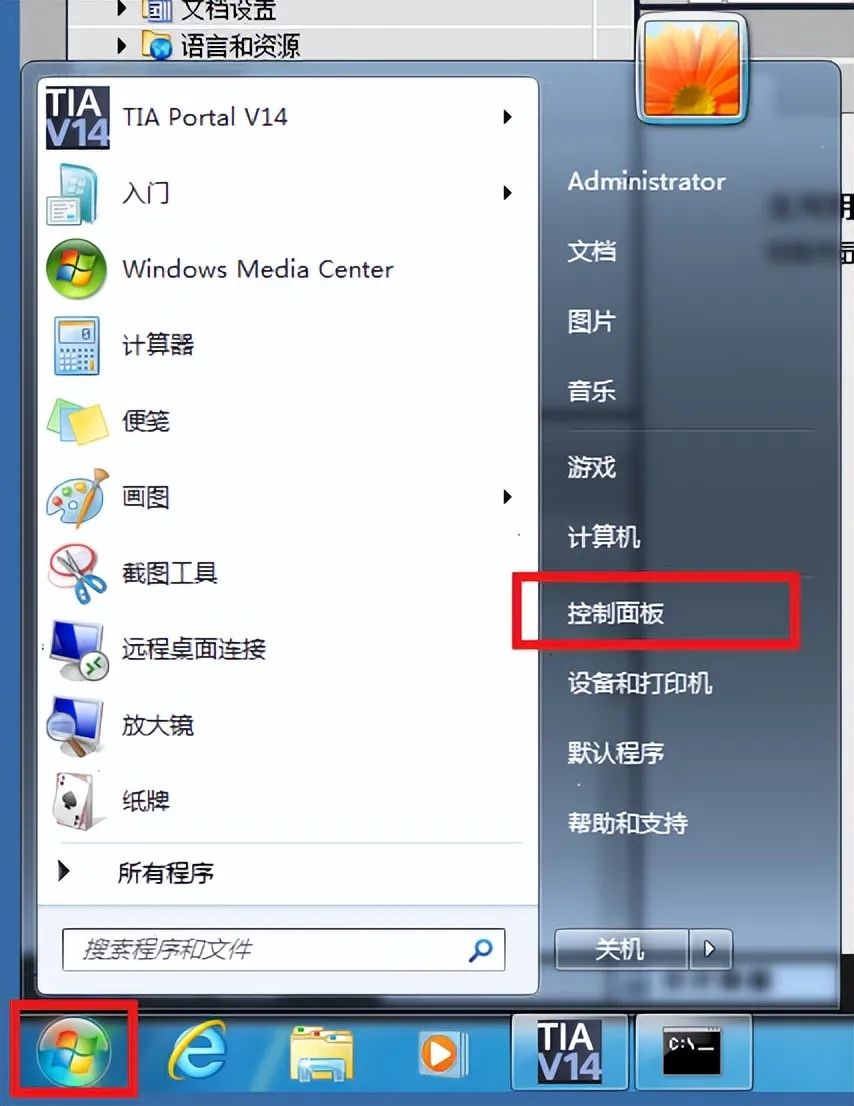
In the Control Panel, select “Set PG/PC Interface”, double-click to open.

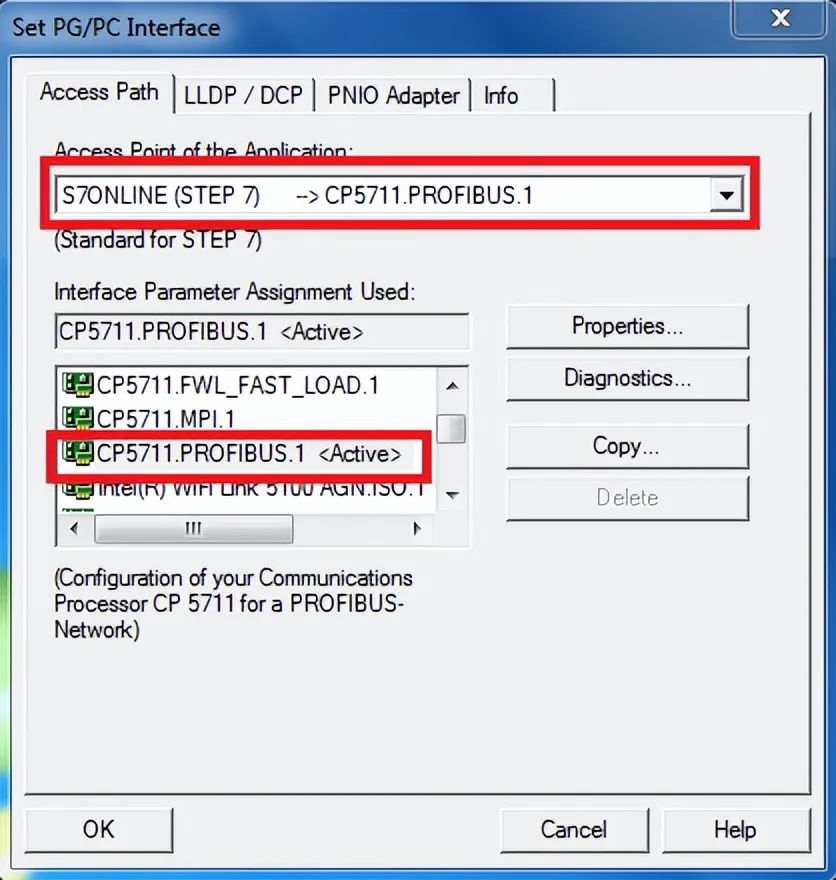
In the dropdown list of “Access Point of the Application”, select “S7ONLINE (STEP7)”, in the “Interface Parameter Assignment Used”, select “CP5711.PROFIBUS.1”, then click the “Properties” button on the right to open the dialog.
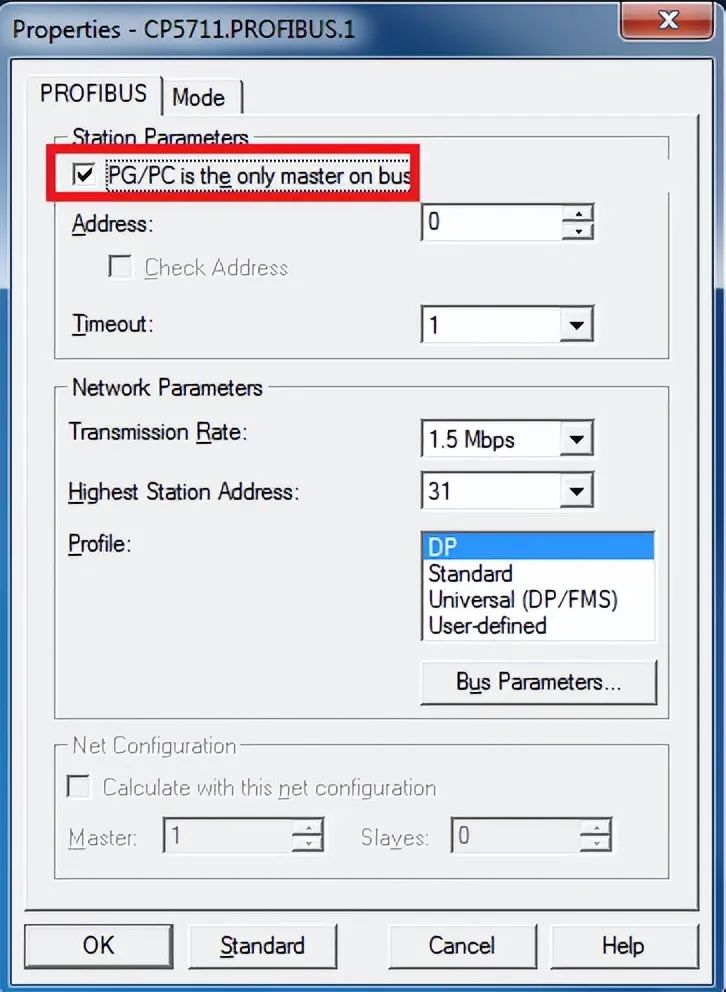
Parameter Settings:
-
Check “PG/PC is the only master on the bus”
-
Address, input the address as 0.
-
Transmission rate, input the baud rate as 1.5 Mbps.
-
Highest station address, set to 31.
-
Configuration document, select DP.
-
Click “OK” to confirm the settings.
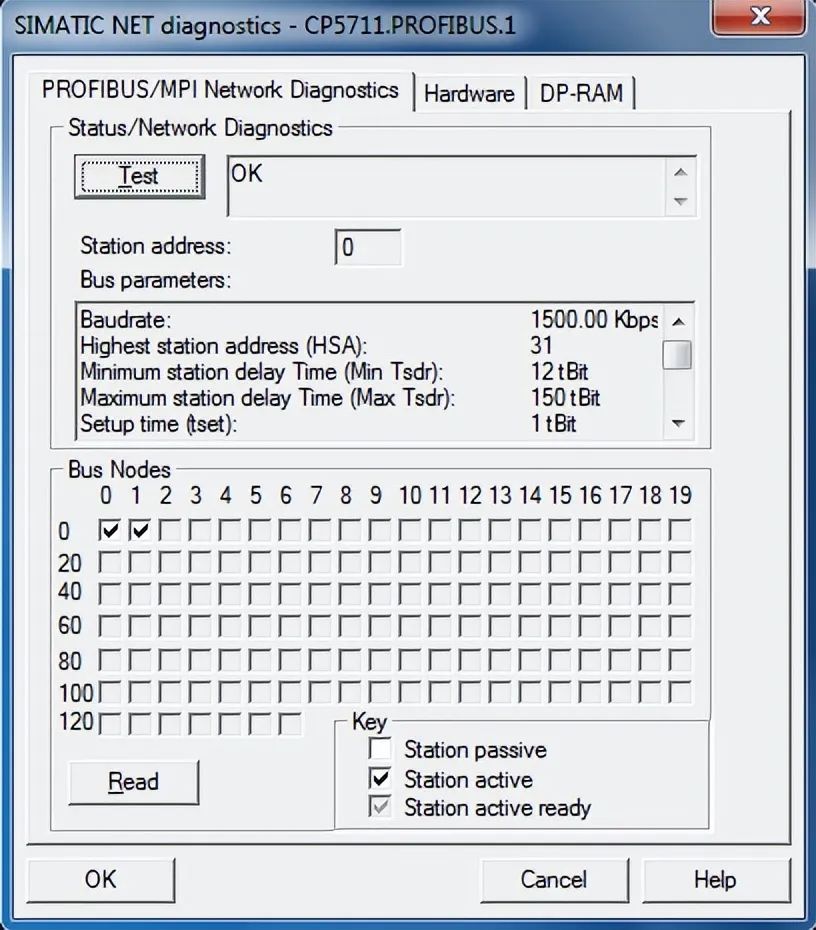
 Note: All devices on the Profibus network must maintain consistent baud rates, and station addresses must not conflict. CP5711 has network diagnostic capabilities; after completing the above settings, click the “OK” button, then click the “Diagnostics” button for network diagnostics.
Click the “Test” button; if “OK” is displayed, it indicates that CP5711 is functioning normally; click the “Read” button, and in “Bus Nodes” you can see all nodes on the Profibus network; 0 indicates CP5711, 1 indicates the screen. Here you can see the node of the screen, indicating that Profibus communication has been established. If you cannot see the screen’s node information, possible reasons include:
1. The screen has not switched to transfer mode;
2. The Profibus communication parameters of the screen are set incorrectly; check the address and baud rate settings;
3. Cable failure;
4. Conflict with Profibus addresses of other devices in the network.
Parameter Settings in Portal Software
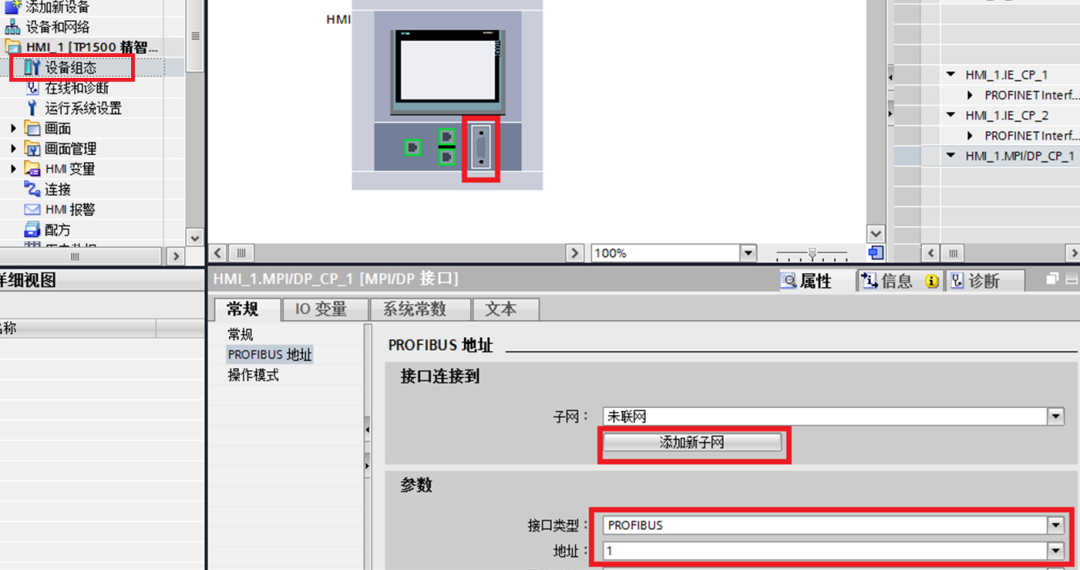
In Portal software, open the project file that needs to be downloaded, double-click the device configuration, select the MPI/DP interface of the Comfort screen, in the properties window, select interface type “PROFIBUS”, address “1”, then click to add a new subnet.
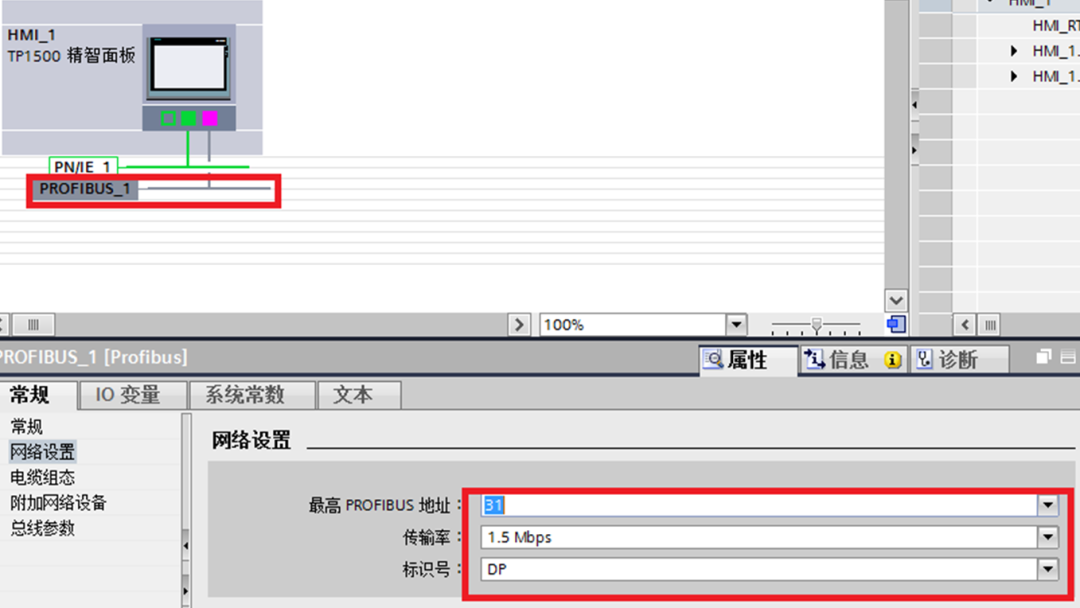
Double-click on the device and network, and select the Profibus connection line of the Comfort screen; set the highest Profibus address to “31”, the transmission rate to “1.5Mbps”, and the identification number to “DP”.
Download Settings in Portal Software
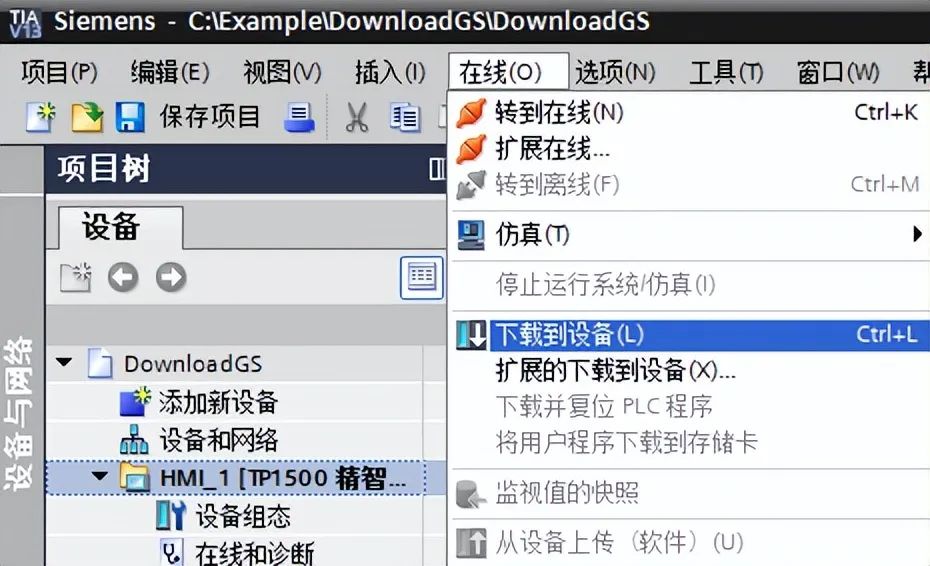
Select the device in the project tree, click the download icon in the toolbar , or click the menu “Online” > “Download to Device”. When downloading the project to the operating screen for the first time, the “Extended Download to Device” dialog will pop up automatically.
 Note: This dialog will not pop up in subsequent downloads; the download will automatically select the previous parameter settings. If you wish to change the download parameter settings, you can open the dialog for re-setting by clicking the menu “Online > Extended Download to Device”.
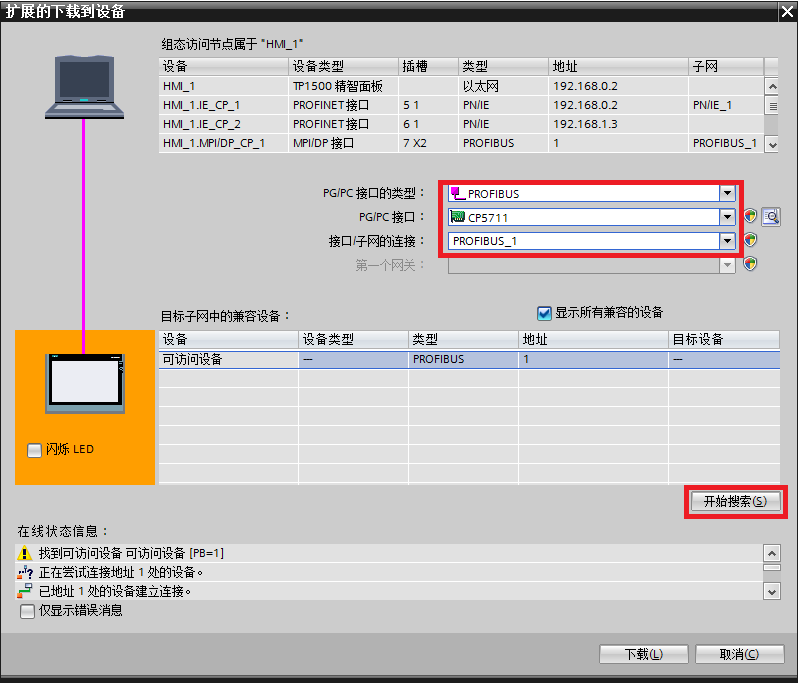
Select the PG/PC interface type as “PROFIBUS”, PG/PC interface “CP5711”, and choose the previously created subnet “PROFIBUS_1”. After completing the selection, click to start searching; the software will scan the device using this interface. If the parameter settings and hardware connections are correct, the scanning will finish in a few seconds; at this point, the “Download” button will not be greyed out, allowing you to click this button to download the project, and the download preview window will pop up automatically.
 Note: If CP5711 is not correctly recognized by the computer, you will not be able to select Profibus in the PG/PC interface type; please check the hardware connection and driver installation of CP5711.
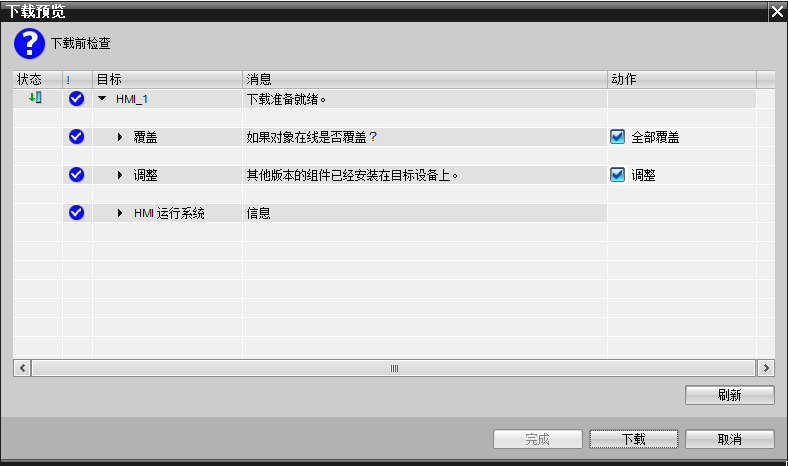
Before downloading, the software will compile the project; only after the compilation is error-free can the download proceed. If there are compilation errors, please resolve them before attempting to download again. If the project includes configuration user management and recipes, select “Overwrite All”, then click the “Download” button to complete the project download for the operating screen.
Download Cable
You can use the internet cable we normally use in the office as the download cable; both straight-through and crossover cables (Siemens screens have adaptive Ethernet cards, and most computer network cards also support adaptive functions) can be used. Whether connecting the screen directly to the computer or through a switch or hub, as long as we can ping the screen from the computer, the physical connection is normal. This is the basis for successful downloading.
Settings on the Comfort Screen
After powering on the screen, the Windows CE operating system will automatically display the Start Center. Click the “Settings” button to open the settings interface.
In “Settings”, double-click “Transfer” to open the “Transfer Settings” dialog.

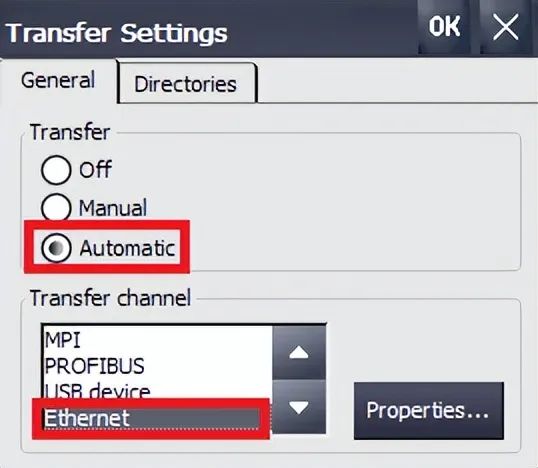
In the “General” tab, set the transfer settings:
-
Select “Automatic”.
-
Select “Ethernet”.
-
Click the “Properties” button for parameter settings.
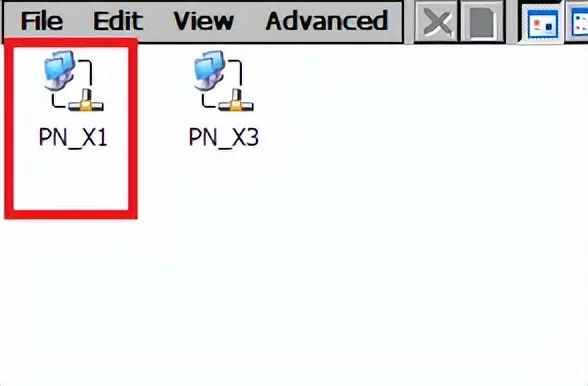
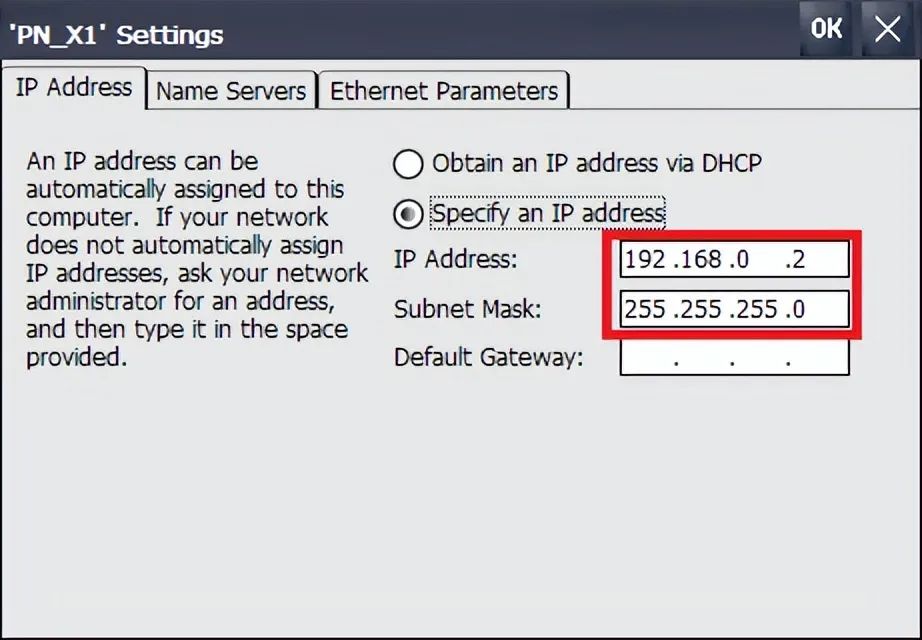
Double-click the PN_X1 network connection icon to open the network card settings dialog, assigning an IP address and subnet mask to the network card.
Input the screen’s IP address (the address and the computer network card’s IP address for downloading must be in the same subnet), for example, we use 192.168.0.2, and the subnet mask is 255.255.255.0 (the subnet mask must match that of the computer’s network card for downloading), other settings do not need to be specified.
After completing the parameter settings, close the settings interface, click the “Transfer” button in the original “Start Center” interface to switch the screen to transfer mode, and the screen will display “Connecting to host…” indicating that the screen settings are complete.

Settings on the Computer
In the computer’s operating system, click the “Start” menu and open the “Control Panel” option.

In the Control Panel, select “Network and Sharing Center”, double-click to open.
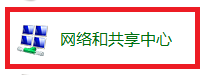
Select “Change Adapter Settings”.
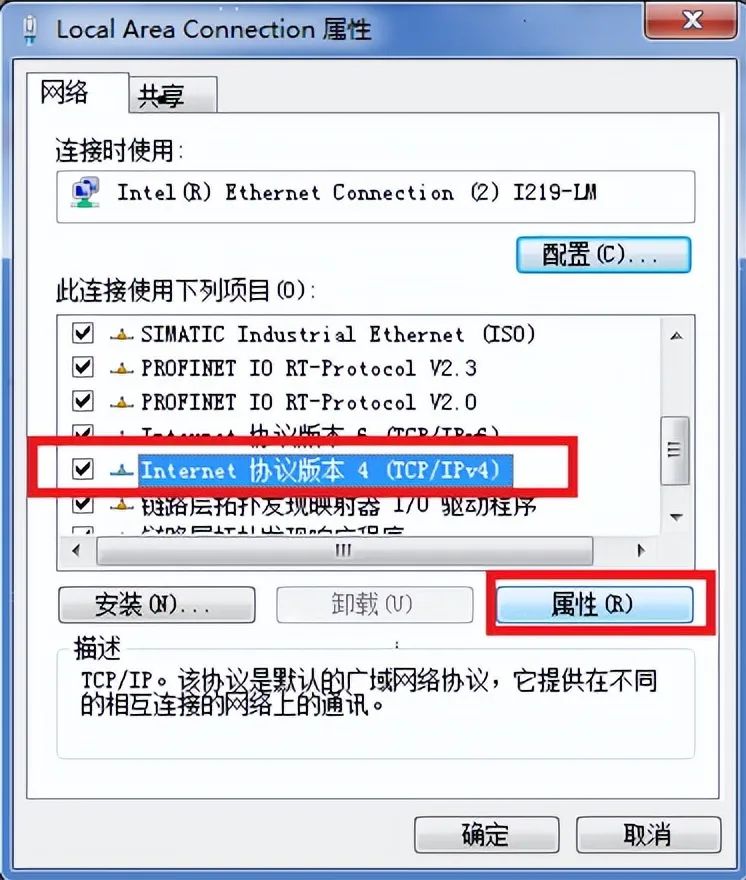
In the list of Ethernet cards, double-click the Ethernet card icon connected to the Siemens screen. The Local Area Connection properties dialog will pop up. In the list, select Internet Protocol Version 4 (TCP/IPv4) and double-click it.
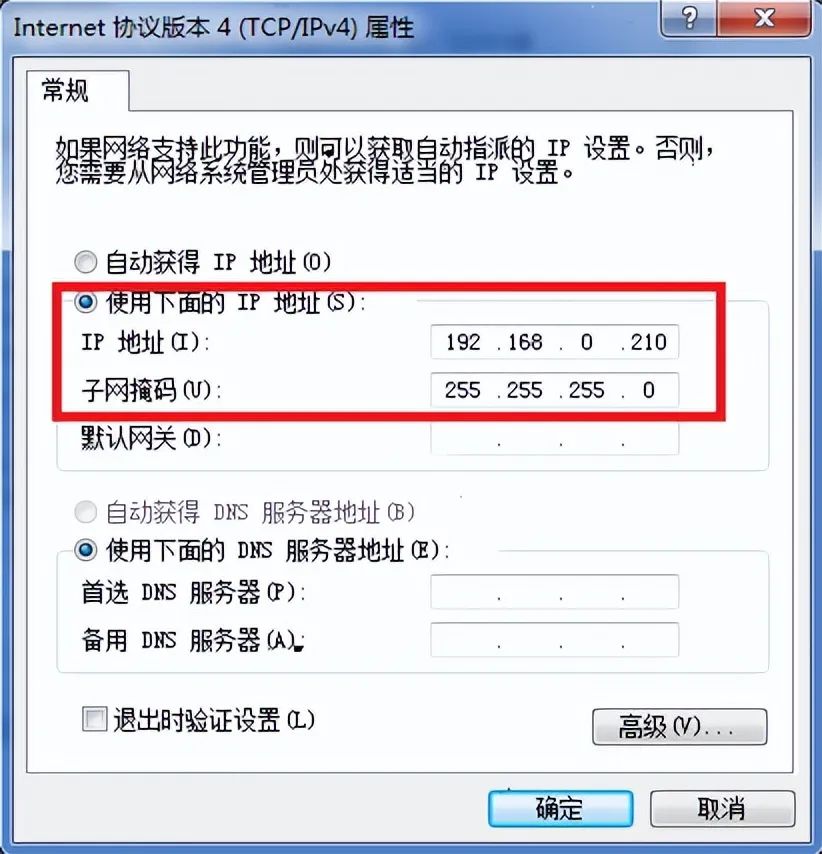
In the Internet Protocol Version 4 (TCP/IPv4) properties dialog, specify the IP address and subnet mask; the IP address must be in the same subnet as the screen’s IP address. In this example, it is 192.168.0.210, and the subnet mask is set to 255.255.255.0. Save the settings.
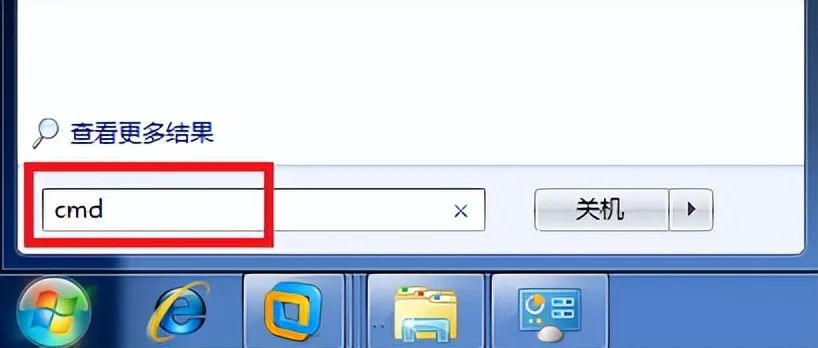
Use the DOS Ping command to determine whether the physical connection between the computer and the screen is normal. Click the computer’s “Start Menu” – “Run” or press “Windows key + R” on the keyboard, type cmd in the pop-up “Run” window, and click OK.
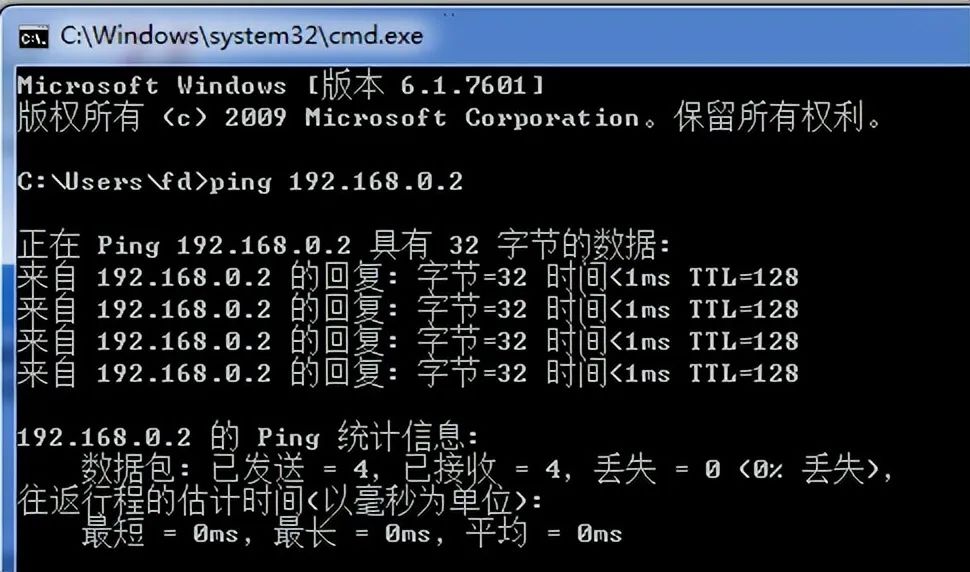
In the pop-up MS-DOS window, type ping followed by the IP address of the Comfort screen. If the number of lost packets is 0, it indicates that the physical connection is normal. If the number of lost packets is not equal to 0, recheck whether the IP addresses of the two devices are in the same subnet and replace the cable. Execute the ping command again until the number of lost packets is 0 to proceed to the next step.
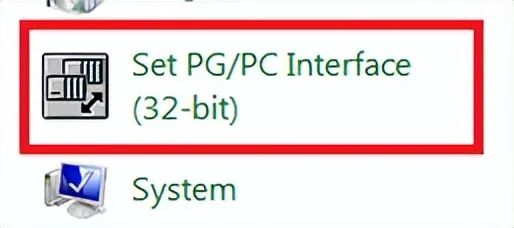
Return to the computer control panel, select “Set PG/PC Interface”, double-click to open.
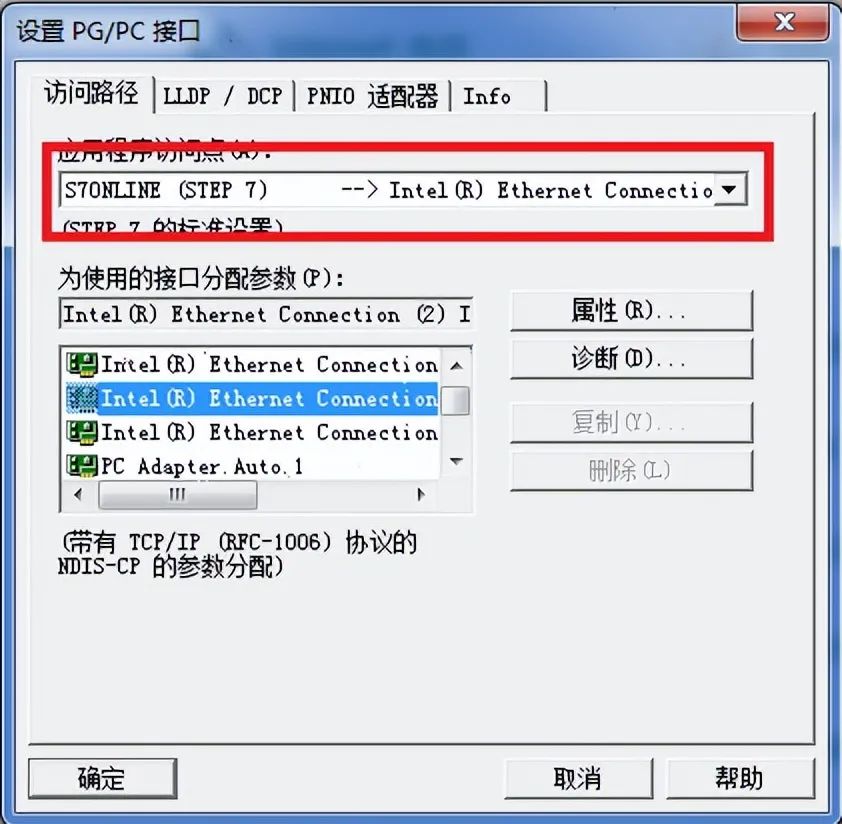
In the dropdown list of “Access Point of the Application”, select “S7ONLINE (STEP7)”, in the “Interface Parameter Assignment Used”, select “TCP/IP Intel…” (choose the network card that communicates with the screen; do not select options with the word “Auto”. In 64-bit operating systems, the network card name will have the letters .TCPIP.1 at the end).
Parameter Settings in Portal Software
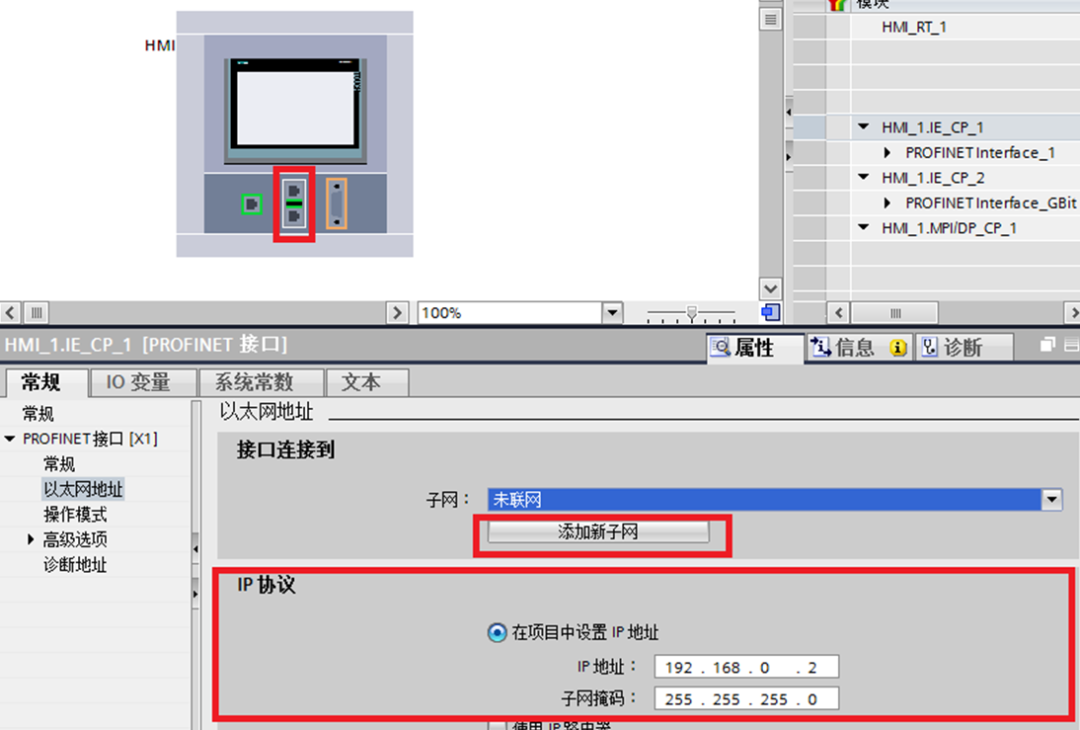
In Portal software, open the project file that needs to be downloaded, double-click the device configuration, select the X1 Ethernet port of the Comfort screen, in the properties window, assign IP address: 192.168.0.2, subnet mask: 255.255.255.0, then click to add a new subnet.
Download Settings in Portal Software
Select the device in the project tree, click the download icon in the toolbar or click the menu “Online” > “Download to Device”. When downloading the project to the operating screen for the first time, the “Extended Download to Device” dialog will pop up automatically.

 Note: This dialog will not pop up in subsequent downloads; the download will automatically select the previous parameter settings. If you wish to change the download parameter settings, you can open the dialog for re-setting by clicking the menu “Online > Extended Download to Device”.
Select the PG/PC interface type as “Ethernet”, PG/PC interface “Ethernet”, after completing the selection, the software will scan the device using the assigned IP address in the project. If the parameter settings and hardware connections are correct, the scanning will finish in a few seconds; at this point, the “Download” button will not be greyed out, allowing you to click this button to download the project, and the download preview window will pop up automatically.
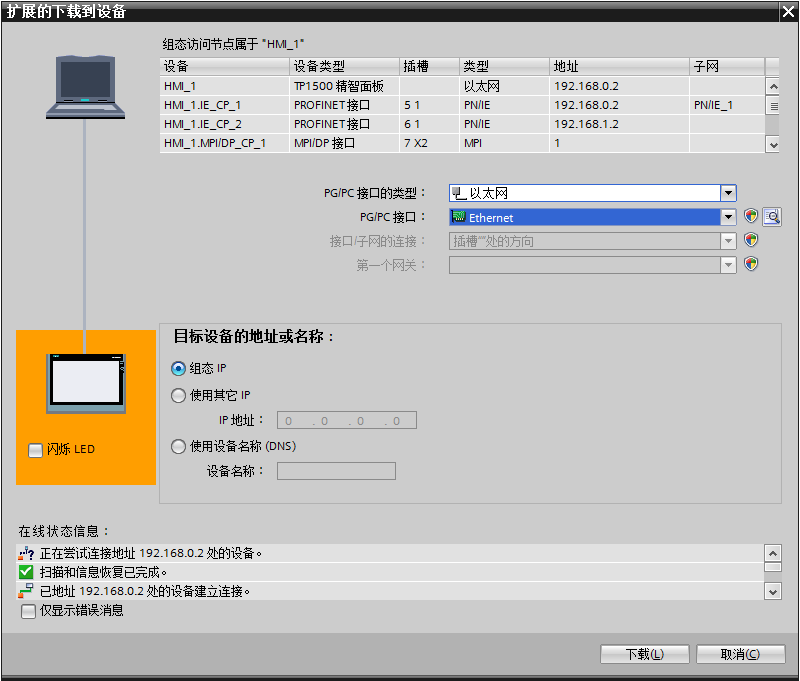
 Note: If the IP address assigned in the screen is different from that assigned in the project, an error will occur during downloading. You can select “Use Other IP” in the dialog and fill in the IP address assigned in the screen to achieve downloading.
Before downloading, the software will compile the project; only after the compilation is error-free can the download proceed. If there are compilation errors, please resolve them before attempting to download again. If the project includes configuration user management and recipes, select “Overwrite All”, then click the “Download” button to complete the project download for the operating screen.


Statement: The publication of this article by the “Binh Lake Education” WeChat public account is intended to disseminate more information. If there are any errors in the source annotation or infringement of your legitimate rights and interests, please contact us in a timely manner, and we will correct, delete, or handle it according to the law.