The touch screen, also known as the “touch panel” or “touch control panel”, is an inductive LCD display device that can receive input signals such as touch. When a graphical button on the screen is touched, the haptic feedback system can drive various connected devices based on pre-programmed routines, replacing mechanical button panels and creating vivid audio-visual effects through the LCD display. As a modern computer input device, it represents the simplest, most convenient, and natural form of human-computer interaction. It gives multimedia a new look, making it an attractive new multimedia interactive device, capable of displaying/inputting/outputting/storing/alerting functionalities. In industrial applications, the touch screen serves as an intelligent device that can both display and communicate with the PLC (Programmable Logic Controller) to achieve various functions. It also has memory and programming capabilities.
For instance, buttons can be drawn on it to replace actual buttons for on/off control; data input buttons can be drawn to input data into registers in the PLC; it can display the running status of the PLC, such as the on/off status of I and Q, indicated by lights, and it can also display real-time processed workpiece counts, production line speed, motor current, etc. Some brands and models also have advanced features, such as creating recipe tables that can be stored on the touch screen instead of the PLC.
1. Check the IP Address of Siemens S7-1200 (there are multiple methods)
First, click on “Accessible Devices”, as shown in Figure 1. After opening the interface, as shown in Figure 2, select the type of PG/PC interface. Choose the network card that connects to the PLC in the PG/PC interface, click “Start Search”, and after a while, the IP addresses of all accessible devices, including the PLC, will appear.
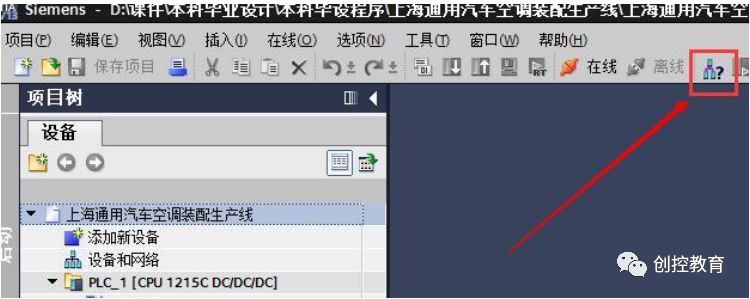
Figure 1. Accessible Devices Button
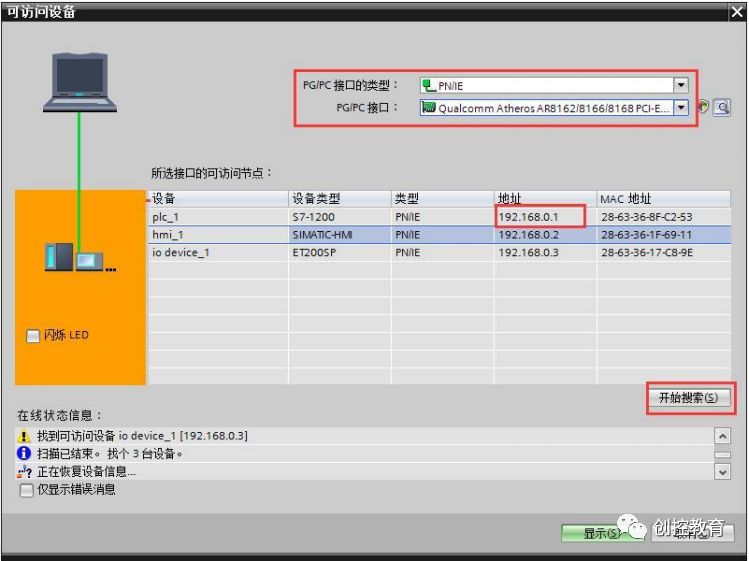
Figure 2. Finding the PLC’s IP Address
2. Establishing and Viewing the DB Block of 1200 PLC
To communicate with the PLC, the “optimized block access” of the data block must be disabled. Right-click the DB block and select properties, uncheck the option, as shown in Figure 3. At this point, the variables of the DB block will have an offset, as shown in Figure 4. Here, we will take the variables testfloat and testbool as examples, and we observe that their offsets are 50 and 54, respectively, with the DB block number being 10.
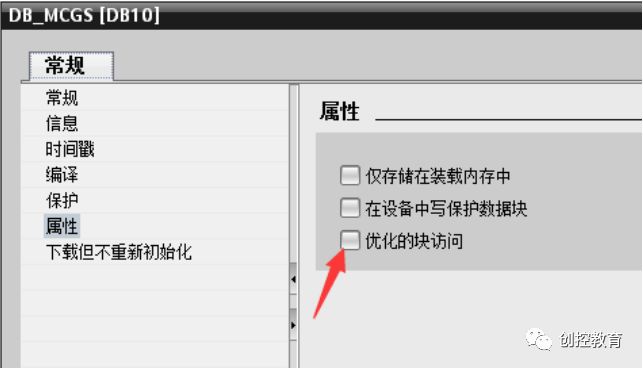
Figure 3. DB Block Properties
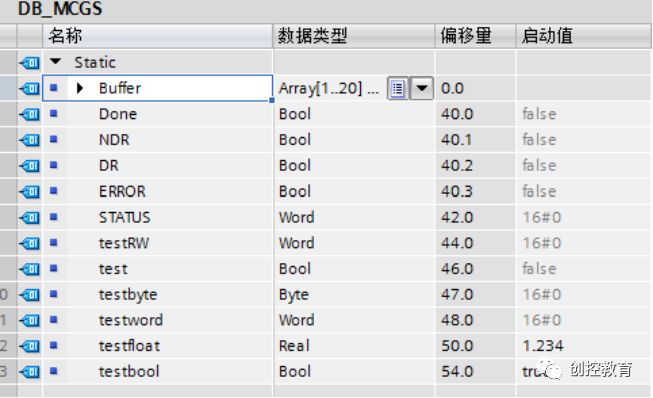
Figure 4. Variables of DB Block
3. MCGS Operations
1. Check MCGS’s IP Address
If there is a USB cable (for example, one end is USB-A type male and the other end is USB-B type male), this step of checking the current IP can be ignored.
Method 1: When powering on the touch screen, press and hold any position on the touch screen, and after a while, the startup interface of MCGS will appear, where the current IP address can be checked (see Figure 5).
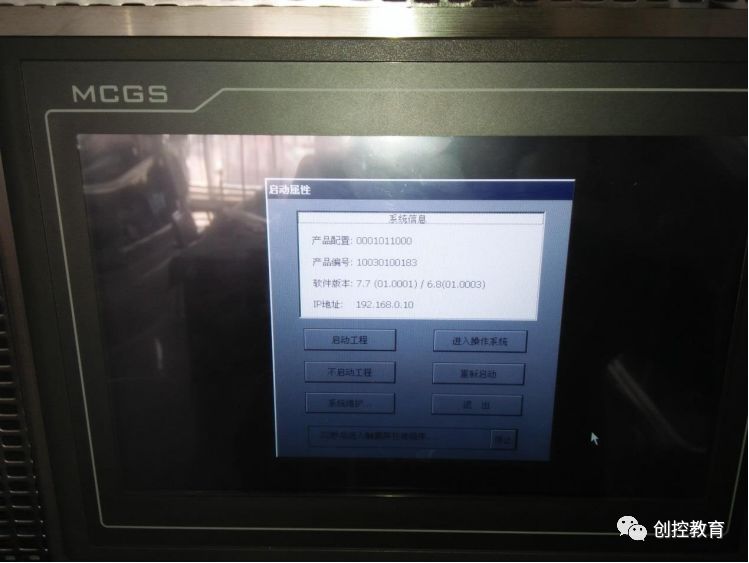
Figure 5. MCGS Startup Settings Interface
2. Set MCGS’s IP Address
To communicate with the PLC, the IP of MCGS should be set to the same subnet. If there is a USB cable (for example, one end is USB-A type male and the other end is USB-B type male), Method 1 can be used to connect to the screen. If the network cable is used to download the MCGS program conveniently, Method 2 can be adopted to connect to the screen. After successful connection, the steps to change the IP are the same.
Method 1: After normally starting the screen, connect it to the screen via USB cable, as shown in Figure 6, and click download. The download interface will appear, as shown in Figure 7. In Figure 7, select “USB Communication” for the connection method, click connect, and then click “Communication Test” to check if the connection is successful.
Figure 6. Click Download
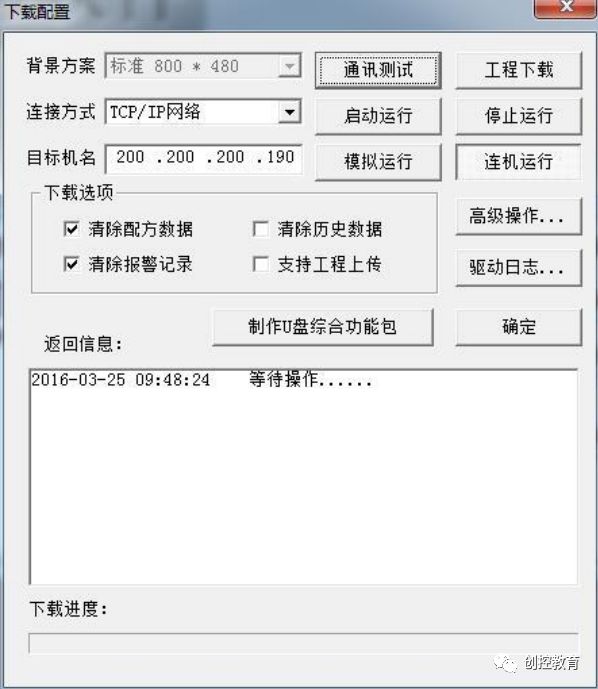
Figure 7. Download Interface
Method 2: Connect to the touch screen with a network cable, open the download interface shown in Figure 7, select “TCP/IP Network” for the communication method, fill in the IP address obtained from the previous step as the target machine name, and ensure that your computer’s IP is also in the same subnet as the touch screen (the subnet mask is the same, the first three digits of the IP address are the same, and the last digit is different). Click “Connect” and run, then click “Communication Test” to check if the connection is successful.
After successfully connecting using either Method 1 or Method 2, click “Advanced Operations” to open the interface shown in Figure 8. Click “Set IP Address” to open the interface shown in Figure 9, where you fill in the IP and subnet mask that match the PLC. Click “Confirm” and then click to exit Figure 8. At this point, the touch screen needs to be powered off and on again to make the new IP effective.
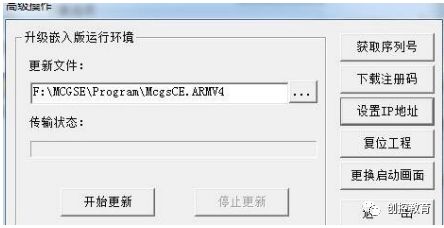
Figure 8. Advanced Operations Interface
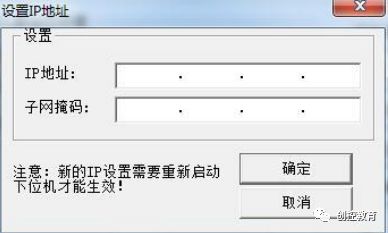
Figure 9. Set IP Interface
3. Add Siemens_1200 Device
Open the device window, right-click on a blank area to open the “Device Toolbox”, find Siemens_1200 in the toolbox, and double-click to add it. If it cannot be found, click on “Device Management” in the “Device Toolbox” to find and install Siemens_1200, as shown in Figure 10.
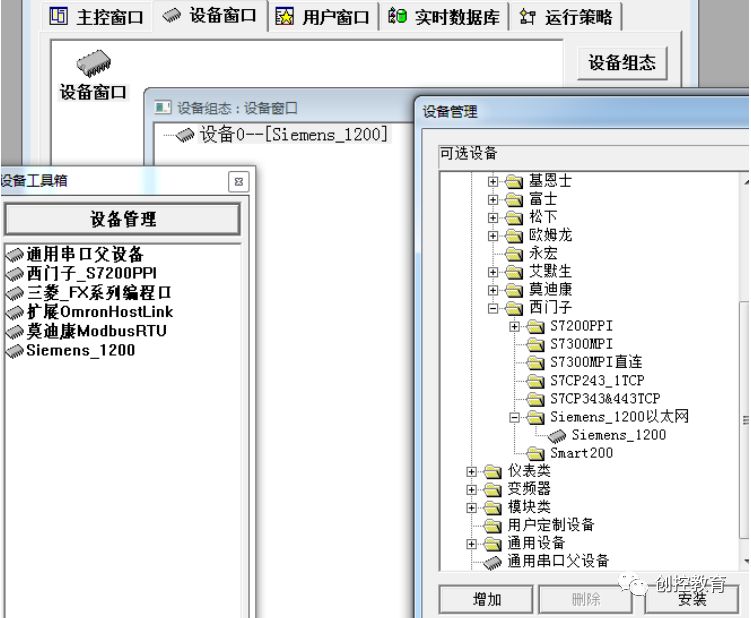
Figure 10. Adding 1200 Device
4. Add Communication Channel
After adding the driver “Siemens_1200” to the device window in the MCGS software, double-click to open the “Device Edit Window”, as shown in Figure 11. In this window, enter the S7-1200’s IP address in the remote IP address field and the touch screen’s IP address in the local IP address field. After completing the settings, download the program to the touch screen. The touch screen will be connected to the S7-1200 via a network cable, thus completing the communication.
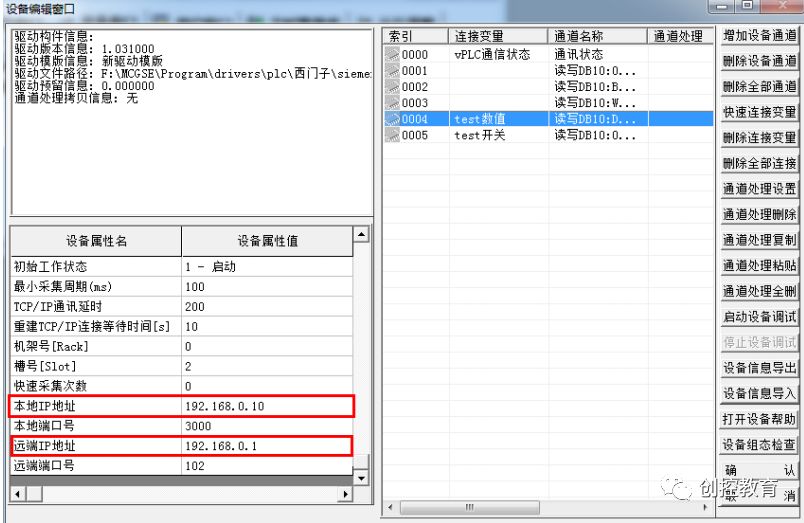
Figure 11. Device Edit Window
Click “Add Device Channel”. For the data of the DB block, select “V Data Register” as the channel type. In the previous steps, we know that the DB block number is 10, and the offset of testfloat is 50, while the offset of testbool is 54. Therefore, for one channel, select “32-bit floating point” as the data type, and the channel address will be 10.50 (10 indicates the DB number, and 50 represents the offset), as shown in Figure 12. For another channel, select “Channel’s 00th bit” as the data type, and the channel address will be 10.54. If the offset for the bool type is 54.1, then the channel type should be selected as “Channel’s 01st bit”, while the channel address remains unchanged.

Figure 12. testfloat
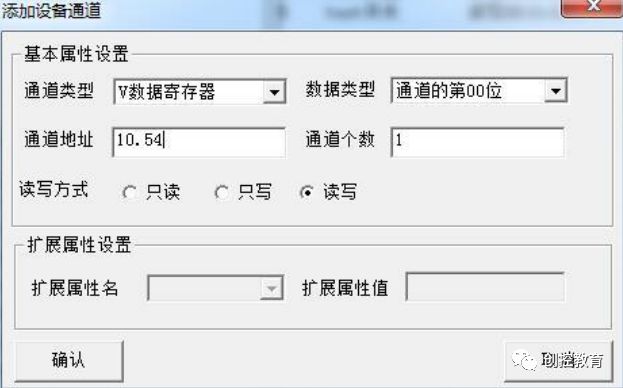
Figure 13. testbool
Double-click the channel to select the variable in MCGS to connect it. This completes the Ethernet communication between MCGS and the 1200 PLC.
(Content sourced from the internet, copyright belongs to the original author)
Disclaimer: If there are copyright issues, please contact for removal! No individual or organization bears related legal responsibilities.