Follow/Star Public Account to not miss any updates!

This tutorial was updated and published by the original author strongerHuang in November 2018.
Tags: Keil, MDK-ARM, µVision
Copyright: Commercial Use Prohibited
Statement:This document is for personal learning use only. For reprints, please contact the author through the public account for authorization.
1Introduction
This article discusses the “Options for Target”, which refers to the configuration of target options in a project, a common aspect of project setup.
Due to the numerous options for target configuration, I will divide this topic into two articles: Configuring Target Options (Part 1) and Configuring Target Options (Part 2).
The target options include all configuration information for a project target, which is saved in our project (.uvprojx) and corresponding (.uvoptx) files.
2
Key Points
This article mainly discusses the configuration of target options. To help more people understand what target options are, I will first briefly explain the meanings and differences between workspace, project, and target.
2.1 Three Ways to Open Target Options
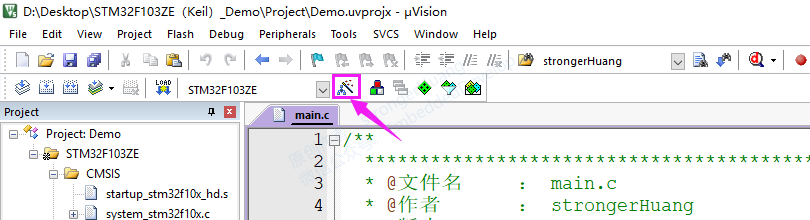
A. Click the “Target Options” shortcut button, as shown in the first image.
B. Shortcut: Alt + F7
Note: If configuring a project, you need to select the project and then press Alt + F7. (If you select a file, it configures the file instead.)
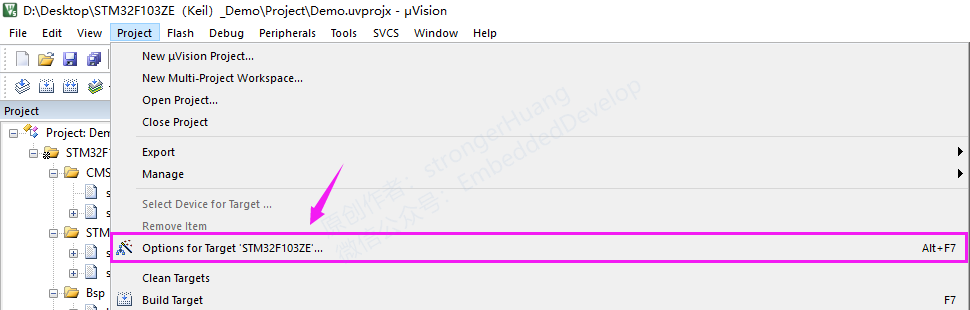
C. Open from the menu, Project -> Options for Target, as shown below:
2.2 Target Options Discussed in This Article

Due to the extensive content of target options, this article will only cover the first five items: Device, Target, Output, Listing, User. The remaining five items will be discussed in the next article.
This article aims to help most people understand the configuration of target options. To keep the content concise, overly simple or complex topics will be briefly mentioned.
3
Meanings and Differences of Workspace, Project, and Target
What is project target option configuration? Some may be unclear about the meanings and differences of workspace, project, and target. Here, I will briefly explain their meanings and differences.
You can follow this series for upcoming articles on creating multiple projects and targets.
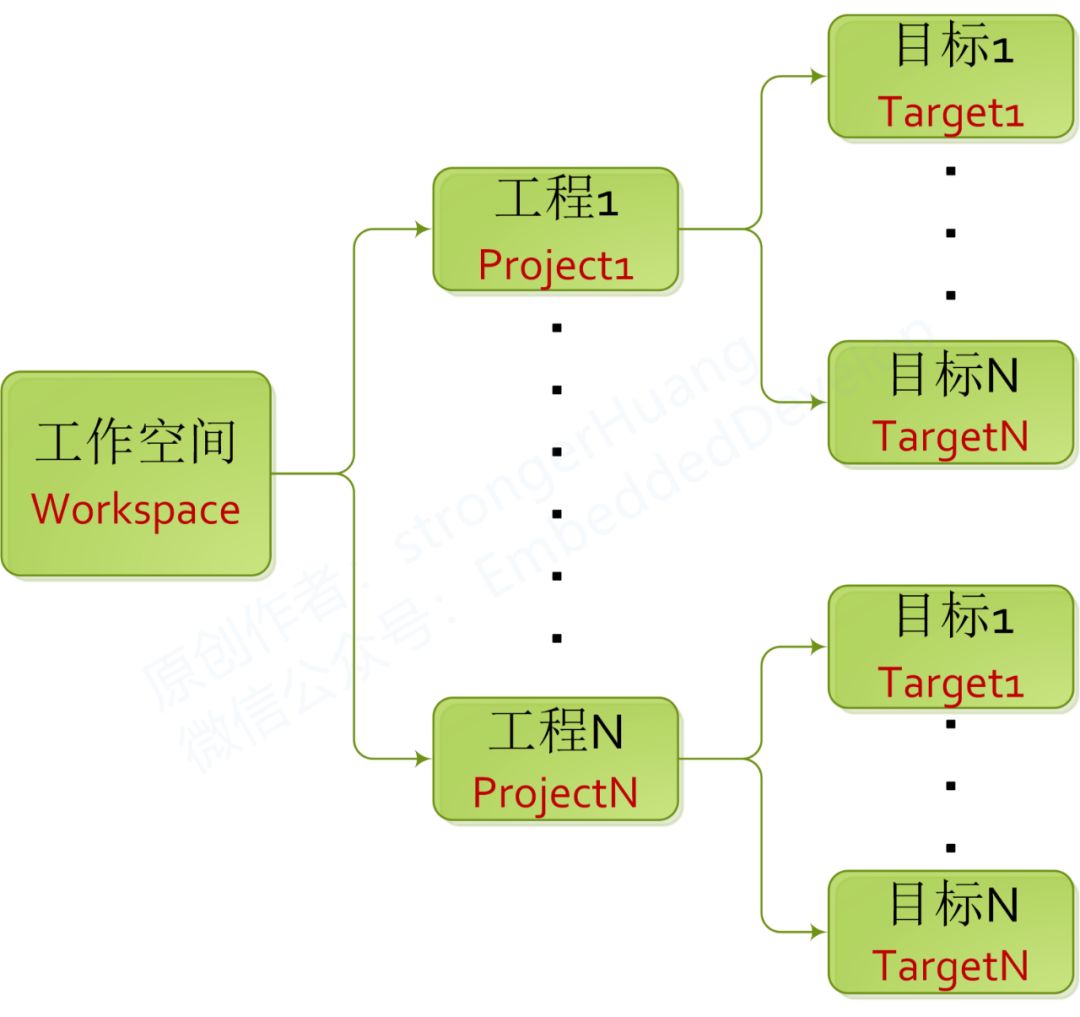
Workspace, project, and target are hierarchical: Workspace > Project > Node. In other words: one workspace can have multiple projects, and one project can have multiple targets. The illustration is as follows:
For example: a project consists of a master and a slave, but to differentiate high-end and low-end products, the project is made into simple and complex versions (the simple version retains only part of the complex version’s functions). An illustrative example is shown below:
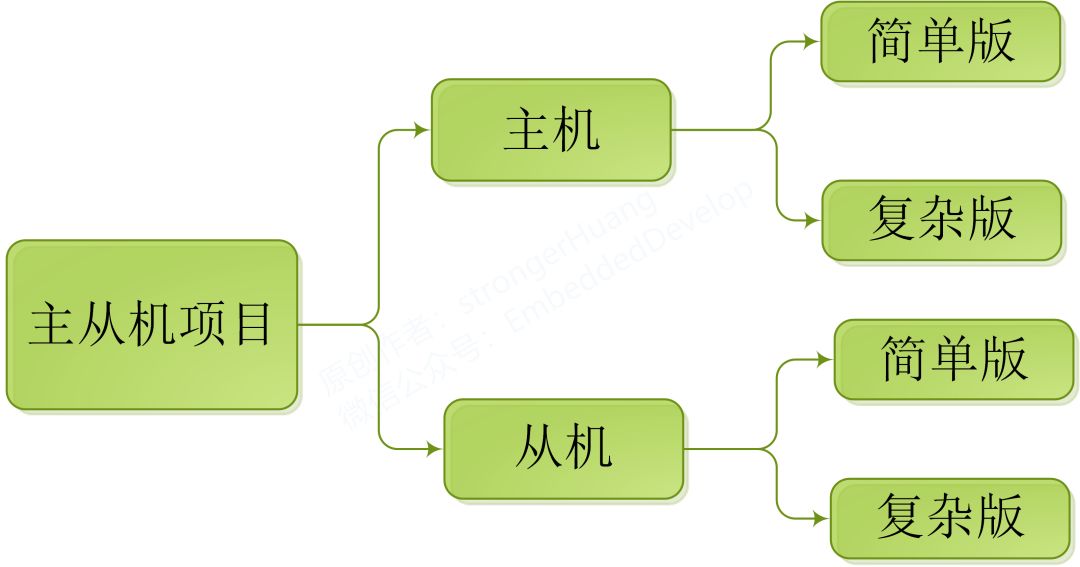
This section will not be overly descriptive; it is common in large projects. Generally, in smaller projects, there is basically one project and one target or multiple targets.
Beginners usually have one project corresponding to one target, which is straightforward. If you are a beginner and do not understand, you can skip this.
4
Device
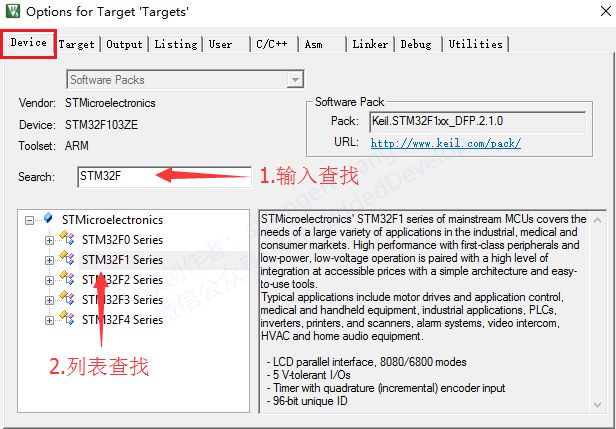
The first step in Creating a New Software Project in Keil is to select the device. It is important to note that the device can be searched by input or found in the list.
5
Target
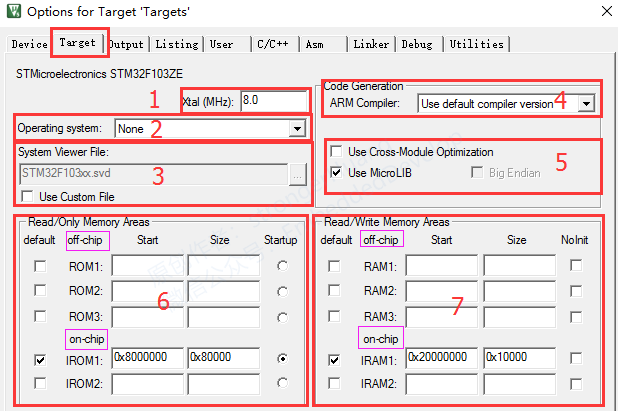
The target mentioned here is different from the project target discussed above; it refers to the target of the project. From the content, it can be seen that it includes the debugging oscillator frequency, selected compiler, and the allocated address space for RAM and ROM.
Item 1: Oscillator Frequency
This value is mainly used for simulation debugging; generally, we do not need to worry about this value when using hardware debugging.
Item 2: Operating System
This is easy to understand; it indicates whether to choose the built-in RTX operating system from Keil, which we generally do not select.
Item 3: System Preview File
Here we generally use the default system settings and do not choose our own definitions.
Item 4: Compiler Selected for Code Generation
Item 5: Use Cross Module Optimization, Use Micro Library
We generally do not use cross modules; the micro library function is commonly used with the printf function.
Item 6: ROM Storage Address
The ROM storage refers to the address where the program is stored, which can be internal or external.
Storing the program internally is straightforward (beginners generally download the program to internal FLASH), while storing it externally is less common for beginners and usually occurs when the project is large or has special requirements, necessitating external storage.
Item 7: RAM Storage Address
The RAM storage address follows the same principle as ROM and can be internal or external.
6
Output
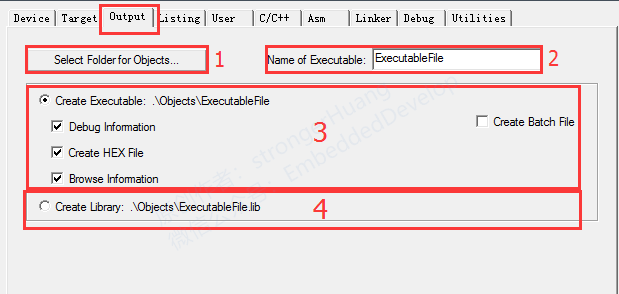
Output can be classified into two types:
1. Output (Create) Executable File: The program we download to the processor falls under this category;
2. Output Library: Beginners generally do not use libraries, but many companies engaged in specialized technical development may frequently use this function.
Item 1: Output Path
The output path is the folder where these files are saved during the project compilation process. (Keil V5 generally defaults to saving in the Objects folder)
Item 2: Output Executable File Name
The name of the output executable file and library is defined here. For example, the common output Hex file name is defined here.
Item 3: Output Executable File
This and the output library are mutually exclusive; if you choose to output the executable file, you cannot choose to output the library.
Debug Information: Output Debug Information. Checking this option allows us to perform debugging.
Create HEX File: Output Executable Hex File. Many beginners ask, “Where to set the generation of Hex?” Just check this option.
Browse Information: Output Browse Information. Checking this allows us to use the go to definition feature. Many people ask, “Why can’t I trace the code?” The reason lies here.
Note: Outputting these intermediate files takes a lot of time; if you do not check these options, the compilation speed will be much faster.
Item 4: Output Library
If you choose to output the library, the executable file cannot be output.
Note: The output (generation) here is a static library, not a dynamic library.
7
Listing
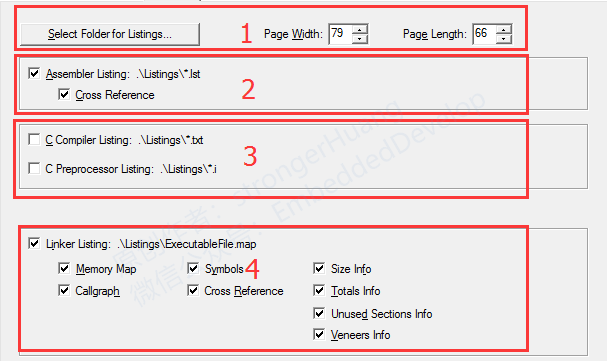
This option is related to generating listing files, which engineers who analyze code thoroughly need to understand. The common map address distribution is configured here.
Item 1: Output Path, Width, Height
Select the folder for outputting the listing file. You can set the width and height of the file page.
Item 2: Output Assembly Listing
Checking this will output assembly listing information (producing files with the .lst suffix). If there are no assembly files in the project, no information will be output.
Item 3: C Compilation Listing
This option for C compilation will generate .txt and .i files if checked.
Item 4: Link Listing
You can choose to generate or prevent the generation of .map files. This option allows you to set detailed information about the generated code and selectively output the MAP file.
8
User Options
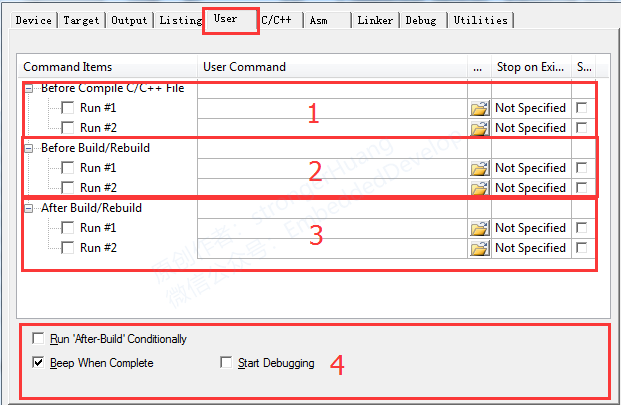
This option is designed for the user, facilitating the execution of some programs. For example: after compiling the code, I want to copy the generated Hex file to another location.
From the above image, you can see that items 1, 2, and 3 have similar functions; they all allow the user to run programs, just under different conditions.
Here you can refer to a previous article shared on the public account “How MDK-ARM Generates Bin Files Through Command Configuration”.
Item 1: Run User Program Before Editing
Item 2: Run User Program Before Compilation
Item 3: Run User Program After Compilation
Item 4: Conditional Execution After Compilation
Run “After Build” conditionally:
Beep When Complete: Sound alert upon compilation completion;
Start Debugging: Launch the debugging program.
9
Notes
1. This document is for personal learning use only, copyrighted, and commercial use is prohibited.
2. This article was edited and organized by me alone, so there may be some errors.
3. This article is included in the public account “Embedded Column”. Follow the public account and reply with [Keil Series Tutorial] to view the entire series of tutorials.
10Conclusion
If you find this article helpful, a thumbs up or share is a great support and encouragement for me.
Scan the QR code below to follow the public account and see more exciting content in the bottom menu!

Long press to recognize the QR code in the image and follow