Follow+Star Public Number, don’t miss out on exciting content

Video Account | strongerHuangWeChat Official Account | strongerHuang
1Introduction
SWO:Serial Wire Output, serial wire output
RTT:Real Time Transfer, real-time transfer
The previous SWO article implemented the principle of outputting information through the MCU’s SWO pin (to the display terminal SWV).
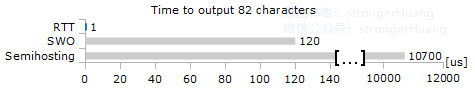
The RTT discussed in this article does not require an additional SWO pin to achieve printf output, and its performance (time consumption) is far superior to SWO.
2About RTT
SEGGER Real-Time Transfer (RTT) is a technology for implementing interactive user I/O in embedded applications.
It combines the advantages of SWO and semihosting, offering very high performance.
Using RTT, information can be output from the target microcontroller and input can be sent to the application at very high speeds without affecting the real-time performance of the target.
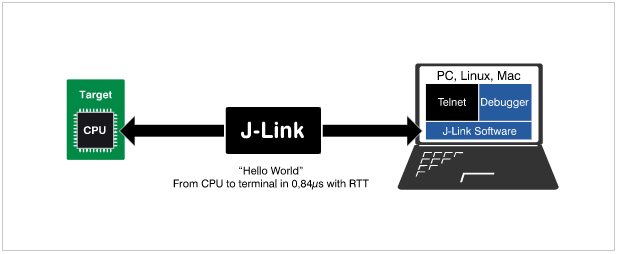
The Cortex-M0 does not support SWO, while the RTT discussed in this article supports Cortex-M0, and an STM32F0 project is provided at the end.
3About J-Link RTT Viewer
J-Link RTT Viewer is a Windows GUI application for using RTT functionality on the debugging host.
RTT Viewer can be used independently, opening its own connection to J-Link and connecting to a running debug session target or in parallel, using an existing J-Link connection.
RTT Viewer supports the main features of RTT:
·Terminal output on Channel 0
·Send text input to Channel 0
·Up to 16 virtual terminals, with only one target channel
·Control text output: colored text, clear console
·Log data on Channel 1
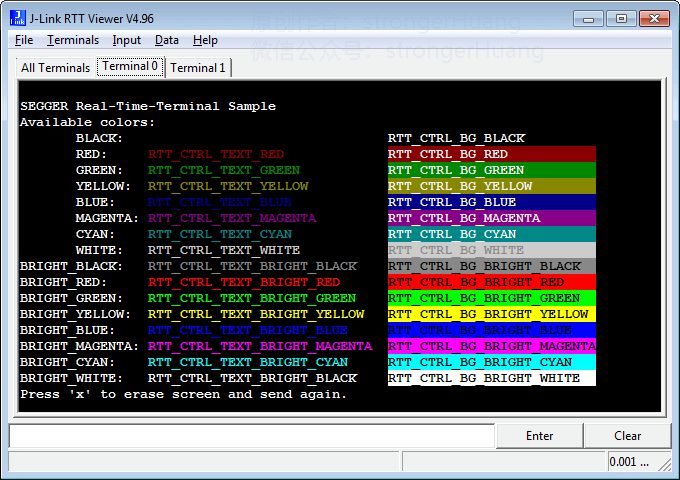
This article mainly discusses J-Link RTT Viewer, of course, J-Link RTT Client and J-Link RTT Logger also support RTT.
For more related introductions, please refer to:
https://www.segger.com/products/debug-probes/j-link/technology/about-real-time-transfer
(The official account does not support external links, please copy the link to the browser to open)
4Getting RTT Source Code
We need to add the RTT source code to the project, and J-Link RTT Viewer support is also required.
J-Link / J-Trace download link (Windows version):
https://www.segger.com/downloads/jlink/JLink_Windows.exe
After installation, the RTT source code is included in the installation directory:
C:\Program Files (x86)\SEGGER\JLink\Samples\RTT
After extracting SEGGER_RTT_V***.zip, copy the entire RTT directory source code to your project.
Tip:
After extracting, just copy the RTT directory.
1. Add RTT to the project
Adding source files to the project mainly involves two steps: 1. Add source files to the project. 2. Add file paths.
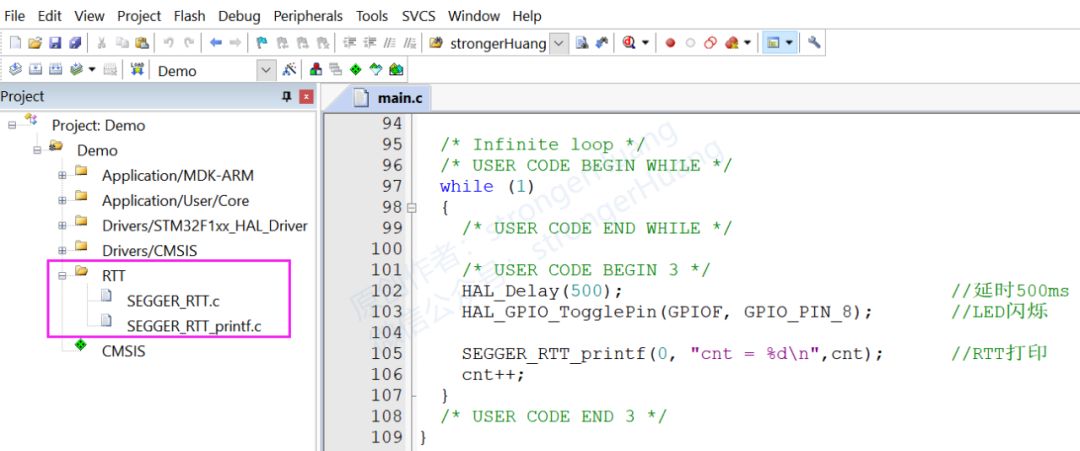
The specific addition process is not described here; there have been discussions on Keil and IAR before, please refer to my articles:
Creating a Basic Software Project in Keil
Creating a Basic Software Project in IAR
Of course, I have provided a ready-made source project below.
2. Application
Calling the print of RTT is similar to the conventional printf.
Add the header file: #include “SEGGER_RTT.h”
Then call the SEGGER_RTT_printf function to print output:
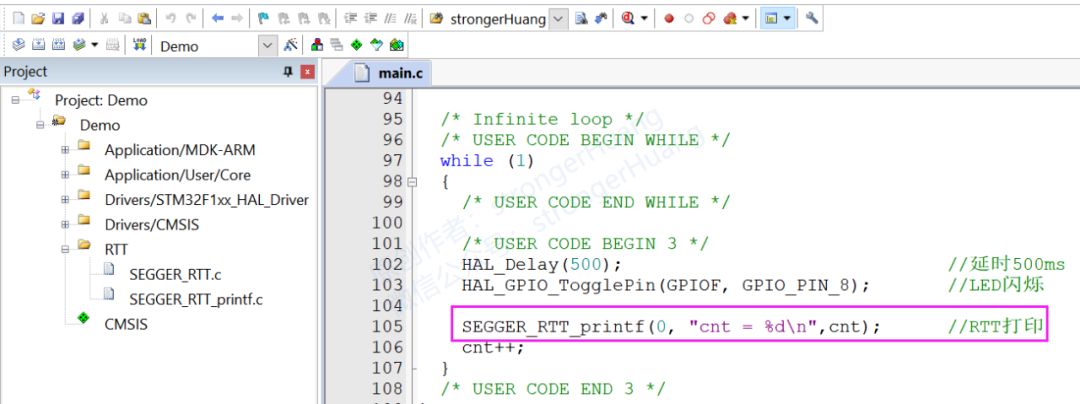
Here, SEGGER_RTT_printf is different from print in that it has an additional “terminal number” parameter (we use terminal 0).
5RTT Viewer Configuration and Output
Similar to the previously described SWV viewer, configure the relevant information to output.
Installation directory: C:\Program Files (x86)\SEGGER\JLink
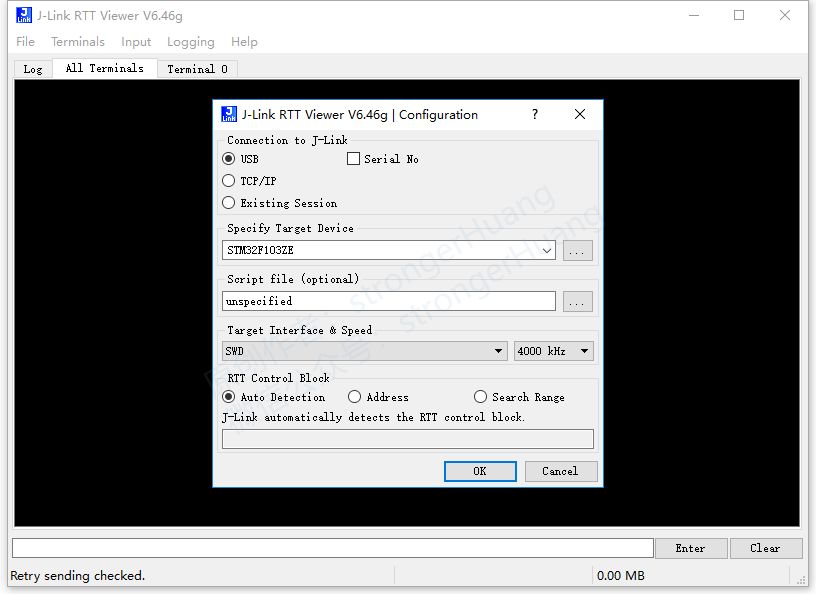
Download the program to the MCU, connect J-Link, open the J-Link RTT Viewer in the installation directory, and configure the parameters:
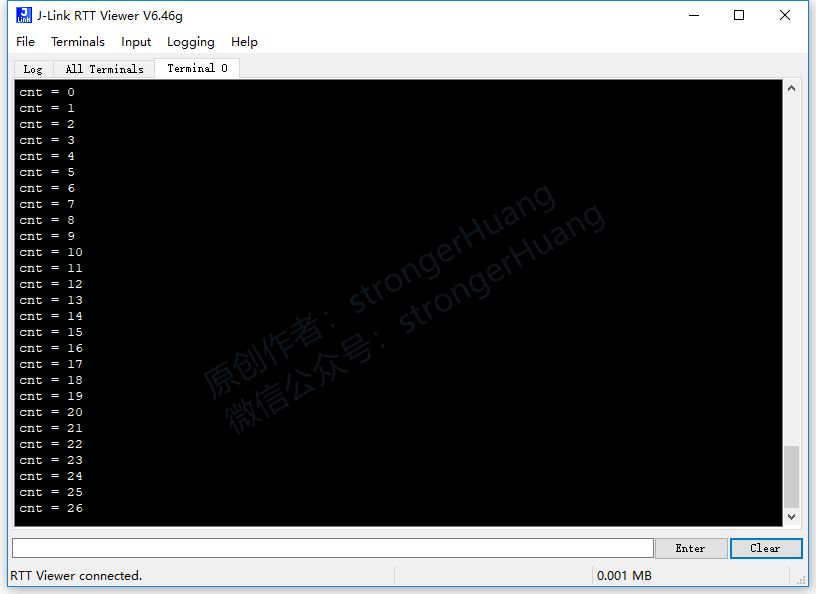
Output Effect:
6Example Code
To help everyone understand, a source project download is provided, reference code:
STM32F051 (HAL)_JLink-RTT
STM32F103 (HAL)_JLink-RTT
Baidu Cloud Disk:
https://pan.baidu.com/s/1aYBuHtOgtLqLvj6SsMYlQA
(Extraction Code: nbd3)
Tip:
1. The official account does not support external links, please copy the link to the browser to open.
2. The source code is for personal learning reference only and may not be suitable for actual projects.
3. The link may become invalid later; you can reply with ‘printf series tutorial’ to see the updated link.
———— END ————Follow the official account and reply 『Print Output Tutorial』『Software Tools』 to read more related articles.Reply ‘Join Group’ to join the technical exchange group according to the rules, reply ‘1024’ to see more content.


Click ‘Read the Original’ for more sharing.