Hello everyone, I am CY-CHENYUE,
Today, let’s talk about the newly released Banana 2. To facilitate future understanding,
we will refer to Banana 1 as V1, and the new version Banana 2 as V2.
Some test results and comments online are praising V2🐂🍺
However, today I plan to discuss the model’s capabilities and corresponding scenarios without delving into technical details.
Let’s explore the uses of V2, especially in the e-commerce field.
To better understand V2’s capabilities, we will start with a comparison between V1 and V2.
From Diffusion to Inference-Guided Synthesis
Issues with V1:
V1 uses a diffusion model. It generates quickly, but lacks intelligence. If you say, “put the clock on the left,” it might draw it incorrectly. If you say, “write this line of text,” it might turn into gibberish.
So you have to repeatedly specify details: “blue sky, 4K, high definition, realistic, rich in detail.” But even then, complex scenes can still fail.
Changes in V2:
V2 is divided into two parts:
-
Brain (Gemini 3.0 Pro): Reads prompts, understands what you want, and plans the scene
-
Hand (GemPix 2): Draws images based on the brain’s instructions
The brain checks before drawing. For example:
-
Are the clock hands correct?
-
Is the text written correctly?
-
Are the object positions reasonable?
After checking, it instructs the hand to draw.
Changes in Prompt Writing
V1 Era: Descriptive Pixels
Blue sky, white clouds, high detail, 4K, realistic, professional photography
You are telling it, “paint blue here, draw a cloud there.”
V2 Era: Descriptive Logic
A glass burger, the light refraction must conform to the density laws of glass.
You are saying, “You understand physics, right? Follow the laws of physics.”
Why the Change?
V1 is like a paintbrush; you have to teach it how to paint step by step. V2 is like a photographer; you tell it what effect you want, and it figures out how to shoot.
For example, if you want to photograph a glass product:
-
V1: You have to say, “transparent, reflective, highlights in the upper right corner, shadows in the lower left corner.”
-
V2: You say, “glass material, natural light coming in from the window,” and it calculates how the light travels on its own.
This is why V2 can draw complex scenes. It is not piecing together pixels; it is understanding what you want.
Four-Step Generation Process
Step 1: Decompose the Requirement You say: “A robot hacker working in front of three monitors,” and the model breaks it down into:
-
A robot
-
Three monitors
-
The hacker’s working scene (like a code interface)
-
Spatial relationship: The robot is in front of the monitors
Step 2: Sketch It does not directly produce a high-definition image. It first draws a low-resolution layout. Just like an architect sketches before building.
Step 3: Self-Check The LLM will ask itself:
-
“Are there three monitors?”
-
“Is the text in the code interface correct?”
-
“Is the robot’s hand on the keyboard?”
If not, it goes back to Step 2 and redraws the layout.
Step 4: Output High-Definition Image Only after confirming there are no issues does it render the final version.
Issues with V1 You say, “The clock shows 3:15.” V1 draws directly, and the hour hand might point to 4, and the minute hand to 8. You can only regenerate (reroll), and if you’re unlucky, you might have to try 10 times.
Advantages of V2 V2 checks in Step 3: “Is the hour hand pointing between 3 and 4? Is the minute hand pointing to 3?” If not, it corrects it and then outputs the image.
You get it right on the first generation.
Actual Effects
Complex Scenes Won’t Fail “A robot hacker working in front of three monitors”
-
V1: It might draw two monitors, or the monitors might display gibberish.
-
V2: All three monitors are present, and the screens show real code.
Text Won’t Be Messy “The bottle says ‘The Way to AGI'”
-
V1: It might write “通住AGl2路” or be completely unrecognizable.
-
V2: The text is correct, and the position and angle of the engraving on the bottle are reasonable.
Practical Significance for You
If you are working on e-commerce image generation projects, this mechanism means:
-
Higher Success Rate: If a client requests “XX brand written on the product packaging,” it gets it right the first time.
-
Saves Time: No need to repeatedly generate until it is correct.
-
Can Handle Complex Requirements: Requirements like “three products lined up, the middle one enlarged, with a gradient background” that were previously impossible can now be done.
Essentially, V2 has built in the process of “trial and error.” The first image you see is already the result of several internal trials.
From Nano Banana 1 to Nano Banana 2.
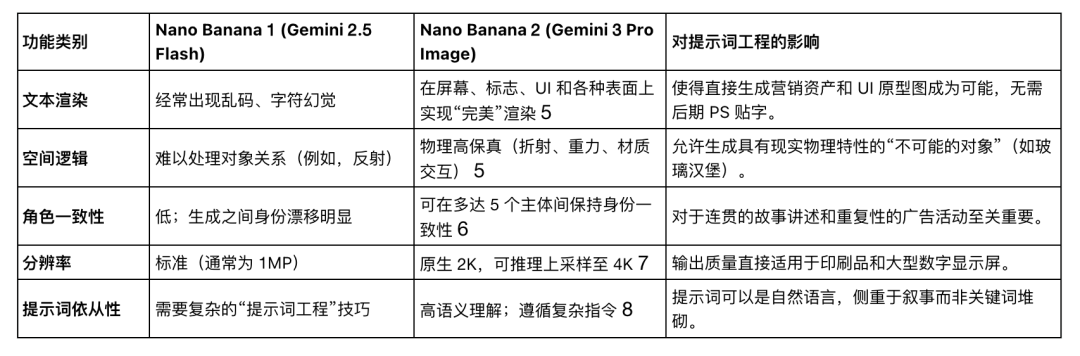
Let’s Illustrate with Examples
Drawing a Multi-layer Nested Scene
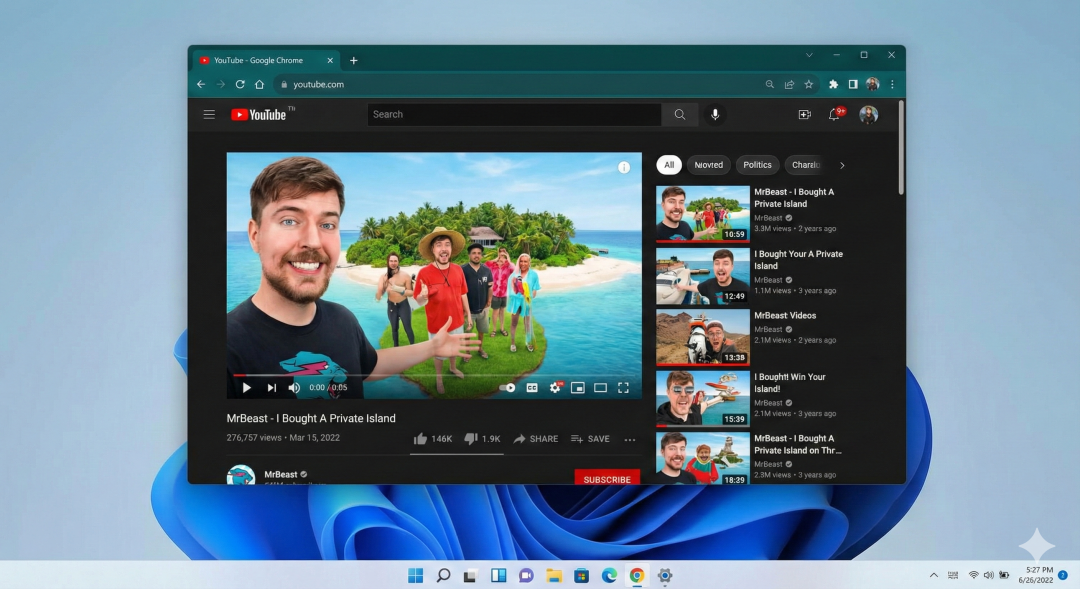
Generate a screenshot of a Windows 11 desktop, with Google Chrome open, showing a YouTube thumbnail of Mr. Beast on YouTube.comThis prompt has four layers:
-
Windows 11 operating system
-
Chrome browser
-
YouTube website
-
MrBeast’s face
Each layer must be correct.
V2 Achieves Three Things
1. Hierarchy is Maintained
-
The Windows 11 taskbar is at the bottom, centered.
-
The positions of the Chrome tabs and address bar are correct.
-
The layout of the YouTube interface is correct.
-
MrBeast’s thumbnail is in the right place.
Old models often fail at the second layer. For example, the browser’s tab bar might be drawn in Firefox style.
2. Faces are Accurate MrBeast is a public figure. The face drawn by V2 looks like him. Old models often distort faces.
3. UI Details are Accurate
-
The Windows start button icon is correct.
-
The lock icon to the left of the Chrome address bar is correct.
-
The YouTube red logo is correct.
-
The font is the system default font.
This is called “world knowledge.” The model has seen these interfaces and knows what they look like.
It can generate contextual product images.
Example 1: “The phone screen displays your app, placed on a café table.”
-
The phone model is correct (like the iPhone’s notch).
-
The app interface layout is reasonable.
-
The table, coffee cup, and lighting are all realistic.
Example 2: “The computer screen displays our website, with product images, and the background is an office.”
-
The computer model is correct.
-
The browser interface is accurate.
-
The website layout is normal.
-
The screen has reflections.
-
The keyboard casts a shadow on the table.
Previously, you had to take photos and use Photoshop. Now, you just need to write one sentence.
Moreover, V2 automatically handles perspective and lighting.
Drawing Accurate Numbers and Physical Phenomena
Next,
Old models cannot draw numbers accurately. You say, “The clock shows 3 o’clock,” and it might draw it as 3:20. You say, “The cup is full,” and it draws a half-full cup.
V2’s “brain” can calculate.
A clock showing 11:15, with a red wine glass filled to the brim. The wine's surface tension creates a meniscus just above the rim.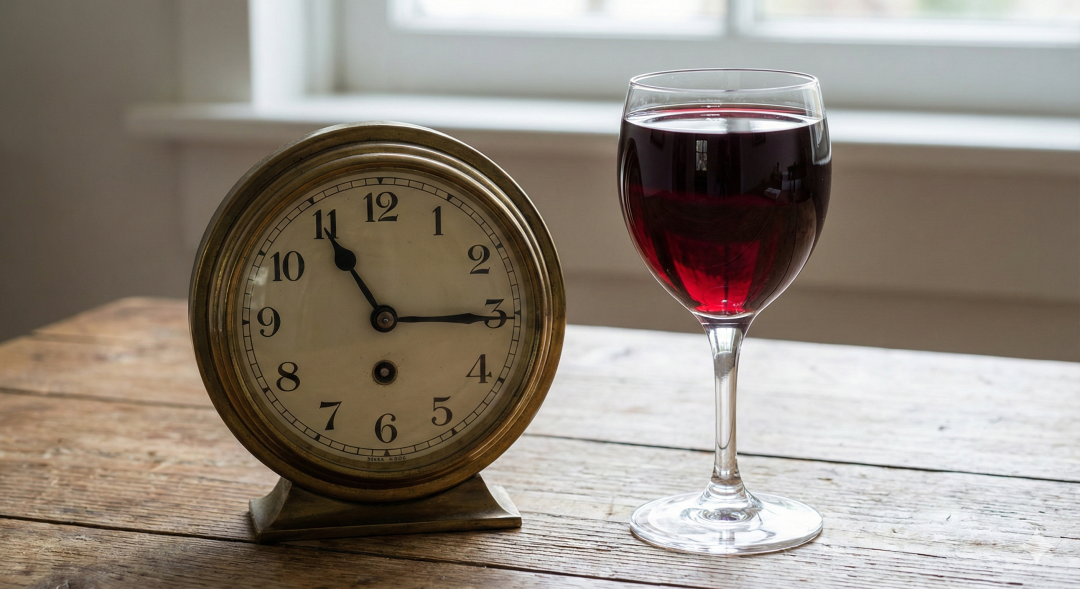
V2 Achieves Two Things Correctly
-
Time is Accurate The hour hand points between 11 and 12 (close to 11). The minute hand points to 3 (15 minutes).
This requires calculation. It is not enough to just “look like a clock.”
Old models typically:
-
The hour hand points to 12.
-
The minute hand points to a random position.
-
Or the two hands overlap.
-
Physical Phenomena are Correct The red wine fills to the edge of the glass. The surface of the liquid is slightly above the rim. This is called a meniscus, caused by surface tension.
Old models cannot draw this. Either the surface is flat, or the wine spills out.
Why Old Models Cannot Achieve This
Old models rely on “pattern matching.” They have seen many pictures of clocks. But they do not know how to calculate the angles of the hour and minute hands.
V2 has a “brain.” It knows:
-
At 11:15, the hour hand has moved 11.25 hours (11 + 15/60).
-
The hour hand turns 30 degrees per hour (360/12).
-
So the hour hand is at 337.5 degrees.
This is reasoning, not memory.
You can request precise details.
Example 1: “The watch shows 10:10, and the dial is white.” Old model: The time is drawn incorrectly. V2: The time is correct.
Example 2: “The perfume bottle is filled to 80%, and the liquid level is visible.” Old model: The bottle is either full or empty. V2: The liquid level is at the correct position.
Example 3: “The thermometer shows 36.5 degrees.” Old model: The numbers are drawn incorrectly. V2: The numbers are accurate.
This is crucial for e-commerce images. If a client requests, “Show the product capacity of 500ml,” you need to draw it accurately.
Practical Uses in E-commerce Scenarios
V2 can handle text, maintain product consistency, and understand the rules of commercial photography. This is not a toy; it can be directly used in production processes.
Extract Clothing from Models
Extract the clothing from and present it as a clean e-commerce product photo. Remove the mannequin. Keep the outfit in natural 3D shape, with realistic fabric folds, seams, and textures. Display the garment as if photographed on an invisible ghost mannequin, centered on a pure white background. High-resolution, professional lighting.Effect Upload a photo of a real person wearing the clothes. V2 outputs:
-
The clothes remain unchanged.
-
The mannequin disappears.
-
White background.
-
The clothes have a three-dimensional feel (not flat).
-
The fabric’s folds and texture are preserved.
Why This is Useful E-commerce product images usually require a white background. Previously, you had to:
-
Take model photos.
-
Use Photoshop to cut out the model.
-
Remove the model.
-
Adjust the shape of the clothes to make them look three-dimensional.
Now, it can be done with one sentence.
Change Scene
Generate a lifestyle photo of a model wearing [the clothing in the image]. The model is walking on the cobblestone streets of Paris in autumn. Soft golden hour lighting. The fabric texture of [the clothing] should be clear and high-fidelity. 4k resolution.Effect The same piece of clothing, in a different scene:
-
The model is walking on the street.
-
The background is Parisian architecture.
-
The lighting is warm evening light.
-
The texture of the clothing remains unchanged.
Why This is Useful A piece of clothing needs multiple scene images:
-
Product image (white background).
-
Lifestyle image (street, café, outdoor).
-
Detail image (fabric close-up).
Previously, you had to shoot multiple times. Now, you take one product image, and the other scenes can be generated using AI.
Saves Costs
-
Model fees: Saved.
-
Outdoor shooting costs: Saved.
-
Post-editing costs: Saved.
And it allows for quick testing of different scenes. For example, if a client wants to see the effect “by the seaside,” it can be done with just one sentence.
Product Packaging with Text
Old models cannot write clearly on bottles or boxes. It is either gibberish or the font is distorted.
V2 can write clearly.
A professional product shot of a luxury perfume bottle named 'Way to AGI'. The brand name '通往AGI之路' is embossed in gold serif font on the glass bottle. The bottle is sitting on a black marble surface with water droplets. Cinematic lighting, side angle, 85mm lens.Effect The image generated by V2:
-
English “Way to AGI” is clear.
-
Chinese “通往AGI之路” is also clear.
-
The font is a serif font (with decorative strokes).
-
The text has a relief effect (raised).
-
The golden reflection is realistic.
-
The position and size of the water droplets are reasonable.
Why is it Difficult?
Writing on a bottle has three challenges:
-
The text must be correct (no mistakes).
-
The text must curve (fit the bottle’s surface).
-
The lighting must be correct (gold text will reflect light).
Old models usually fail at the first step.
E-commerce product images often require:
-
Displaying the brand name on the packaging.
-
Displaying the product name on the bottle.
-
Displaying specifications on the label.
Previously, you had to:
-
Take product photos.
-
Use Photoshop to overlay text.
-
Adjust perspective and lighting to make the text look realistic.
Now, it can be generated directly.
And it allows for quick testing of different designs:
-
Change font.
-
Change color.
-
Change position.
It can be done in one sentence.
Infographics and Structural Diagrams
E-commerce needs to explain how products work. V2 can draw annotated technical diagrams.
Internal Structure Diagrams
Create a visual cross-section of a DSLR camera. Labels: Clearly label the 'Pentaprism', 'Reflex Mirror', and 'Image Sensor' with pointer lines. Style: Technical vector illustration, clean lines, blue and white color scheme. Grounding: Ensure internal placement is technically accurate.Effect V2 generates:
-
Camera cross-section diagram.
-
Internal parts are positioned correctly.
-
Label text is clear.
-
Pointer lines point to the correct locations.
-
Style resembles textbook illustrations.
Role of “Grounding”
“Grounding: Ensure technical accuracy” prompts the model to reference real knowledge.
If this sentence is omitted:
-
The pentaprism might be drawn in the wrong position.
-
The angle of the reflex mirror might be incorrect.
If this sentence is included:
-
The model will reference the structure of real cameras.
-
The positions of the parts conform to physical laws.
Comparative Infographics
A split-screen comparison image for a skincare cream advertisement. Left side: "Before Use" text label, close-up showing dry skin texture. Right side: "After Use" text label, showing hydrated, glowing skin texture. Text labels should be concise, sans-serif, and float at the top corner. Professional medical aesthetics.Effect V2 generates:
-
Left and right split screen.
-
Left side shows dry skin with texture.
-
Right side shows hydrated skin with glow.
-
“Before Use” and “After Use” text is clear.
-
Text is positioned at the top corner.
-
The font is sans-serif (clean and simple).
-
Overall, it looks like a medical advertisement.
Comparative images are a common format in e-commerce:
-
Skincare: Before and after use.
-
Cleaning products: Before and after cleaning.
-
Fitness products: Before and after training.
-
Renovation materials: Before and after construction.
Previously, you had to:
-
Take two photos (or find materials).
-
Use Photoshop to stitch them into a left-right comparison.
-
Add text labels.
-
Adjust colors to unify the style.
The key is:
-
Text labels must be clear (“Before Use” and “After Use”).
-
Comparison must be obvious.
-
Style must be unified.
V2 can generate it all at once without needing to piece it together.
Change Scene Without Reshooting
Product images can change seasons, weather, and atmosphere without needing to reshoot.
Change the weather in [Product Image] to a snowy winter scene. Add soft falling snow and frost on the edges of the product. Adjust the lighting to be cool and diffuse. Keep the product label sharp and legible.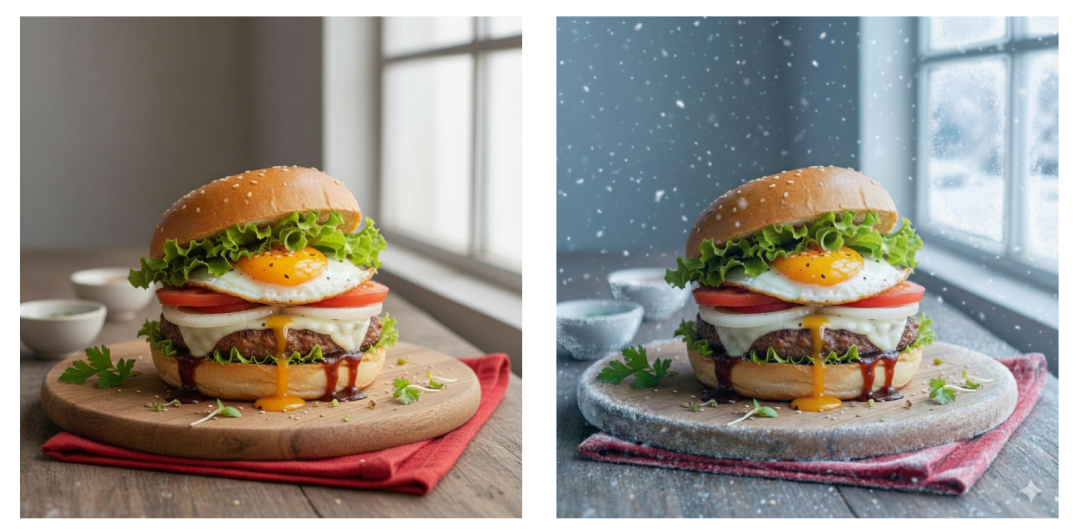
Effect Upload a product image (like one taken in summer). V2 outputs:
-
The background changes to a snowy scene.
-
The edges of the product have frost.
-
Snowflakes are falling in the air.
-
The lighting is cool (blue-white).
-
The text on the product remains clear.
E-commerce often requires seasonal marketing images:
-
Spring: Cherry blossoms, tender green.
-
Summer: Beach, sunshine.
-
Autumn: Falling leaves, warm colors.
-
Winter: Snow, cool tones.
Previously:
-
Wait for the season to arrive to shoot.
-
Or set up a scene for shooting (high cost).
-
Or use Photoshop to change the background (time-consuming).
Now:
-
Take one product image.
-
Write four prompt sentences.
-
Generate four seasonal versions.
Key Point
Every time, you must say, “Keep the product label/logo clear.” Otherwise, V2 might blur the text as well.
This is useful for quickly responding to marketing needs.
Change Colors to Generate Multiple SKUs
A product may have multiple color versions. No need to shoot each color.
Change the colors of the sneaker in [Image 1] to a pastel pink and mint green colorway. Keep the main subject and composition intact. Adjust lighting, shadows, and overall color balance to match the new color scheme. Photorealistic, high-resolution.Effect Upload a product image of a white sneaker. V2 outputs:
-
The sneaker changes to pink and green.
-
The shape, angle, and position of the shoe remain unchanged.
-
The lighting and shadows adjust with the color (the pink reflection is pink).
-
It looks like a real photo.
Clothing, shoes, bags, and phone cases typically have 5-10 colors.
Previously:
-
Prepare samples in 5-10 colors.
-
Photograph each one.
-
Or use Photoshop to change colors (but lighting and shadows are hard to adjust correctly).
Now:
-
Take one color photo.
-
Write a prompt sentence.
-
Generate other colors.
Key Point
You must say, “Adjust lighting, shadows, and color balance.” Otherwise, the new colors might look like they were pasted on with Photoshop, appearing unrealistic.
For example, the reflection of a pink object should be light pink. The reflection of metallic blue should be blue highlights.
V2 will automatically handle these details.
Saves Costs
Assuming a product has 8 colors:
-
Shooting costs: Saved 7 times.
-
Sample costs: Only one is made.
-
Modification costs: Changing colors is just one sentence.
This feature allows clients to quickly test new color schemes for e-commerce projects without needing to produce them first.
Universal Background Switching Template
A product can be placed in any scene. Just fill in this template.
Place the product on [material: e.g., rustic wooden table]. Environment: Lighting: Constraints: The product must cast realistic shadows on the table. Perspective must match a 50mm product photography lens.Upload a product image. Fill in the blanks to generate different scenes.
Example 1: Café Scene
Place the product on a dark wooden table. Environment: Café, background with coffee cups and a laptop, blurred. Lighting: Natural light from the window, soft side light. Constraints: The product must cast realistic shadows on the table. Perspective must match a 50mm product photography lens.Example 2: Outdoor Scene
Place the product on a stone surface. Environment: Outdoor mountain view, background with distant mountains and sky. Lighting: Noon sunlight, strong contrast. Constraints: The product must cast realistic shadows on the stone. Perspective must match a 50mm product photography lens.Example 3: High-End Scene
Place the product on a black marble countertop. Environment: Luxurious interior, background with golden decorative elements. Lighting: Dramatic side light, high contrast. Constraints: The product must cast realistic shadows on the countertop. Perspective must match a 50mm product photography lens.Why Add “Constraints”?
“The product must cast realistic shadows on the table”:
-
If this sentence is omitted, the product might appear to float in the air.
-
Shadows make the product look like it is actually placed there.
“Perspective must match a 50mm lens”:
-
If this sentence is omitted, the perspective might be distorted.
-
50mm is a standard product photography lens, providing natural perspective.
Change Models but Keep Clothes the Same
Fashion photos can change different models while keeping the clothes exactly the same.
Use this template to change the diversity of models in fashion photos.
Swap the model in Image 1 with the girl in Image 2. Constraint: Keep the clothing completely consistent. Preserve the folds, lighting effects, and fit of the clothing. Expression: The new model should have a confident smile and look directly at the camera. Background: Blur the background to achieve a bokeh effect at f/2.8 aperture.Prepare two images:
-
Image 1: A model wearing your clothes.
-
Image 2: The new model you want to swap (any photo).
V2 outputs:
-
The new model wears the clothes from Image 1.
-
The folds, lighting, and fit of the clothes remain the same.
-
The expression of the new model is as requested.
-
The background is blurred.
Fashion brands need to showcase diversity:
-
Models of different skin tones.
-
Models of different ages.
-
Models of different body types.
Previously:
-
Find multiple models.
-
Photograph each model.
-
High costs, long cycles.
Now:
-
Take one model photo.
-
Upload the photo of the model you want to swap.
-
Generate the new version.
“Constraint: Keep the clothing completely consistent” is crucial. Without this sentence, the clothing might:
-
Change color.
-
Change style.
-
Have incorrect fold positions.
“Preserving folds, lighting, and fit” makes the clothing look like it is genuinely worn, not just pasted on.
For E-commerce Projects
Clients selling clothing need:
-
A/B testing with different models.
-
Showcasing brand inclusivity.
-
Quickly responding to market demands.
One shoot, multiple model versions.
And it can test:
-
How the clothing looks on different people.
-
Which model has a higher conversion rate.
You don’t have to find models to shoot; you can generate and see the effects first.
Generate Multiple Ad Variants at Once
A product image can generate multiple scene versions for A/B testing.
Generate 4 variant versions of this image. Variant 1: Scene is a gym floor, dynamic lighting effects. Variant 2: Scene is street style shooting, concrete background. Variant 3: Scene is a clean studio shoot, light blue background. Variant 4: Scene is an outdoor running environment, dirt and grass background. Quality requirements: All outputs must be 4K resolution, achieving photo-realistic quality.Ad placements need to test which scene has a higher conversion rate:
-
Gym scenes attract fitness enthusiasts.
-
Street scenes attract trendsetters.
-
Studio scenes highlight the product itself.
-
Outdoor scenes attract sports lovers.
Previously:
-
Go to 4 different locations for shooting.
-
Or find 4 different material backgrounds.
-
Use Photoshop to composite 4 images.
Now:
-
Write a prompt sentence.
-
Wait a few seconds.
-
Get 4 images.
You don’t have to decide in advance which scene to use. Generate them all, and let the data speak.
And it can quickly respond to different channels:
-
Xiaohongshu: Use the studio version (clean).
-
Douyin: Use the street version (with atmosphere).
-
Official website: Use the factory version (professional).
-
E-commerce platform: Use the office version (application scene).
Add QR Codes in Designs
This is interesting, and I accidentally tested it,
And it can be scanned!!!
V2 can place QR codes in images without distorting the QR code.
Place this QR code in the lower right corner of the image, a scannable QR code. The QR code should blend slightly with the aesthetics but maintain enough contrast for scanning. Ratio 16:9.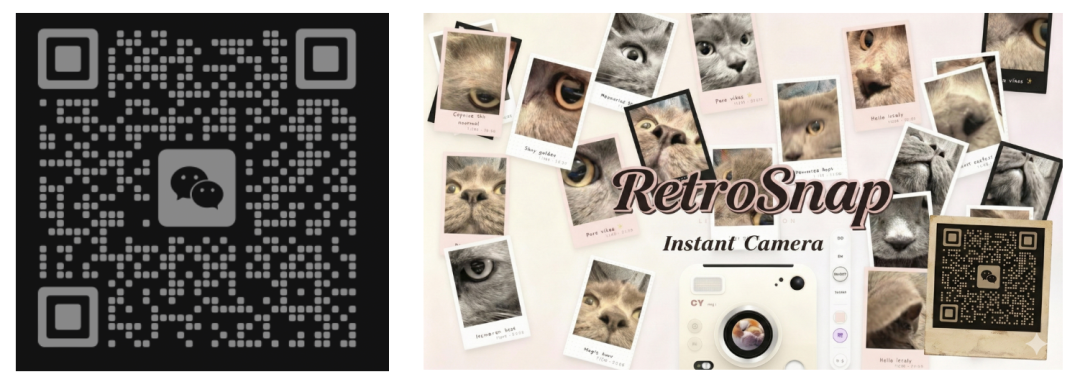
Old models would:
-
Draw the squares crooked.
-
Blur the black and white dots.
-
Or draw random noise instead.
V2 can maintain the geometric structure of the QR code:
-
The squares are square.
-
Black and white are distinct.
-
The position is accurate.
Key Point
“Maintain enough contrast for scanning” is crucial. Without this sentence, V2 might make the QR code too faint for aesthetic reasons, making it unscannable.
Advanced Prompting Techniques
V2 is not just a simple “drawing tool.” You need to use specific syntax to trigger its reasoning capabilities.
These syntaxes are like functions in programming languages. When used correctly, V2 will take your requests more seriously.
Technique 1: Add “Constraints”
Format
[Subject] + [Context] + Constraints: Keep X consistent + [Other Details]Example
A portrait of a woman. Constraints: Keep facial features exactly the same as in Image A. Details: The lighting must be the sunlight at 11:00 AM.If “Constraints” is not added:
-
V2 might change the face shape.
-
The features might not resemble the original image.
If “Constraints” is added:
-
V2 will focus on checking facial features during generation.
-
“Constraints” increases the weight of this part.
Practical Application
Change scenes but keep the face unchanged:
A man running on the beach. Constraints: Keep facial features and hairstyle exactly the same as in Image A. Lighting: Golden light at dusk.Change clothes but keep the product unchanged:
A model wearing a summer dress. Constraints: Keep the details and logo of the bag exactly the same as in Image A. Background: City street.Technique 2: Write in Steps
Format
Step 1: [First Action] Step 2: [Second Action] Step 3: [Third Action]Example
Step 1: Add a gray sofa in the center of the room. Step 2: Add a coffee table and chairs in the foreground. Step 3: Change the wallpaper to warm beige.If not written in steps:
-
V2 processes all elements at once.
-
Position conflicts are likely (the sofa and coffee table overlap).
If written in steps:
-
V2 plans in order.
-
First place the sofa, then place the coffee table based on the sofa’s position.
-
Finally, adjust the wall color.
Practical Application
Complex product photography:
Step 1: Place the watch in the center of the black marble countertop. Step 2: Add soft light at a 45-degree angle to the left of the watch. Step 3: Add a brand logo watermark in the lower right corner. Step 4: Blur the background to achieve an f/1.8 effect.Multi-product combinations:
Step 1: Place the perfume bottle in the center of the frame. Step 2: Add matching hand cream to the left of the perfume bottle. Step 3: Add the same series of shower gel to the right. Step 4: Adjust the lighting to ensure all three products have highlights.Technique 3: Add “Grounding”
Format
[Subject Description] Grounding: [Require real-world knowledge to be used]Example
An infographic about cardamom tea. Grounding: Use real-world facts about its origins and benefits. Include multilingual text.If “Grounding” is not added:
-
V2 might fabricate information.
-
Technical details might be inaccurate.
If “Grounding” is added:
-
V2 will reference a real knowledge base.
-
Data and facts will be more accurate.
Practical Application
Technical diagrams:
Internal structure diagram of a DSLR camera, labeling the main components. Grounding: Ensure the positions and names of the components are technically accurate.Historical scenes:
Shanghai Bund street scene in the 1920s. Grounding: Architectural styles, clothing, and vehicles conform to historical facts of the 1920s.Product ingredient information:
Infographic of skincare product ingredients, listing main ingredients and their effects. Grounding: Use real chemical names and scientifically validated effects.Combining Three Techniques
Example: Complex Product Advertisement
Step 1: Place a smartwatch in a sports scene. Step 2: Display the heart rate monitoring interface on the watch screen. Constraints: The watch model and screen interface must be exactly the same as in Image A. Step 3: Add sports elements (track, timer). Grounding: Heart rate data shows normal exercise range (120-150 bpm). Lighting: Natural light in the early morning, energetic atmosphere. Quality: 4K, photo-realistic quality.This prompt:
-
Uses “steps” to control the generation order.
-
Uses “constraints” to maintain product consistency.
-
Uses “grounding” to ensure data is real.
-
Adds lighting and quality requirements.
If you are generating e-commerce images for Feishu integration, you can write a template:
Step 1: [Product Subject] Step 2: [Scene Elements] Constraints: [Features that must be maintained] Grounding: [Parts that need to be real and accurate] Lighting: [Lighting requirements] Quality: 4K, photo-realistic quality.Clients can fill in the blanks to generate professional images.
The core of these techniques is:
-
Clearly articulate your requirements.
-
Tell V2 what is most important (constraints).
-
Tell V2 in what order to do things (steps).
-
Tell V2 where accuracy is needed (grounding).
High-Fidelity Text Series
These prompts test the model’s ability with Chinese text.
Newspaper Close-Up
A close-up photo of a vintage newspaper. The Chinese headline reads "Artificial Intelligence Conquers Art." The subheading is clear and readable, stating "Nano Banana 2 Release Shocks the World." The paper texture is fibrous and aged.Handwriting Test
A handwritten note on a computer monitor. The note is written in blue ballpoint pen ink, stating "Don't forget to deploy the code!" The handwriting is messy but legible.Nested Context Series (Inception)
These prompts test the model’s hierarchical understanding ability.
Photographer’s Eye
A photo of a DSLR camera's LCD screen. The screen shows a photo of a beautiful sunset. The background behind the camera is the actual sunset, but out of focus. The image on the LCD is sharp.Infinite Painting
An artist holding a painting of themselves holding a painting of themselves. The recursion continues for at least 3 layers, maintaining consistency of the artist's face.