Summary of the previous article!
Impacting the industrial sector! The Raspberry Pi CM0 has officially launched!
Still buying the Raspberry Pi CM0 at full price? Here’s the guide to mastering the Raspberry Pi CM0!
This chapter introduces the specific operations for installing the operating system, connecting cables, and initializing configurations.
Installing the Operating System
The CM0 Dev Board is shipped without an operating system installed by default. Users need to install the operating system before use. Before installing the operating system, the image must be downloaded and then flashed to the eMMC. The following describes the specific operations for downloading the image and flashing the eMMC.
1. Downloading the Image
You can download the corresponding official Raspberry Pi system image based on your actual needs. The download paths are as follows:
Raspberry Pi OS (Desktop) 64-bit-bookworm (Debian 12)
https://downloads.raspberrypi.com/raspios_arm64/images/raspios_arm64-2025-05-13/2025-05-13-raspios-bookworm-arm64.img.xz
Raspberry Pi OS (Lite) 64-bit-bookworm (Debian 12)
https://downloads.raspberrypi.com/raspios_lite_arm64/images/raspios_lite_arm64-2025-05-13/2025-05-13-raspios-bookworm-arm64-lite.img.xz
Raspberry Pi OS (Desktop) 32-bit-bookworm (Debian 12)
https://downloads.raspberrypi.com/raspios_armhf/images/raspios_armhf-2025-05-13/2025-05-13-raspios-bookworm-armhf.img.xz
Raspberry Pi OS (Lite) 32-bit-bookworm (Debian 12)
https://downloads.raspberrypi.com/raspios_lite_armhf/images/raspios_lite_armhf-2025-05-13/2025-05-13-raspios-bookworm-armhf-lite.img.xz
Note: It is recommended to use the Lite version of the image. For the latest version of the image, please refer to the Raspberry Pi official website: Raspberry Pi OS.
https://www.raspberrypi.com/software/operating-systems/
2. Flashing the eMMC
It is recommended to use the official Raspberry Pi flashing tool, which can be downloaded from the following path:
- Raspberry Pi Imager:
- https://downloads.raspberrypi.org/imager/imager_latest.exe
- SD Card Formatter:
- https://www.sdcardformatter.com/download/
- Rpiboot:
- https://github.com/raspberrypi/usbboot/raw/master/win32/rpiboot_setup.exe
Prerequisites:
- The flashing tool has been downloaded and installed on the computer.
- A Micro USB to USB-A cable (USB flashing cable) is prepared.
- The image file to be flashed has been obtained.
Steps:
The steps are described using a Windows system as an example.
Identify the position of the RPIBOOT jumper pins on the CM0 Dev Board (as indicated in the diagram below) and use a jumper cap to short the two pins.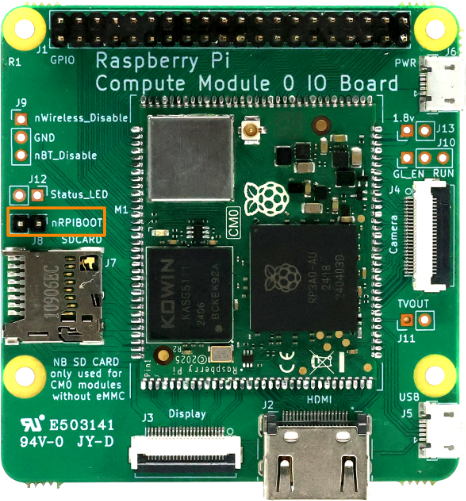 Identify the position of the Micro USB port on the CM0 Dev Board, as indicated in the diagram below.
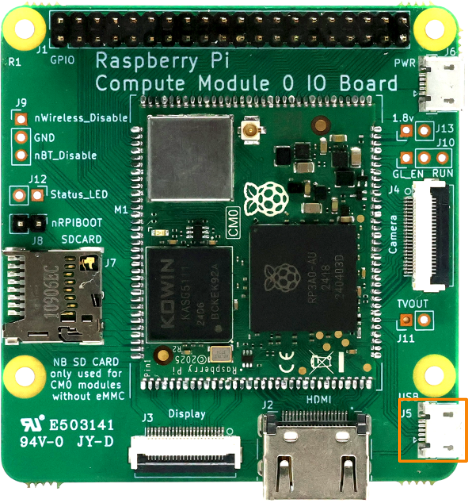 Connect the USB flashing cable (Micro USB to USB-A).Connect the USB flashing cable: one end to the Micro USB port on the device, and the other end to the USB port on the PC.
Note: Since the CM0IO board only requires a 5V power supply, the USB flashing cable can also provide power, so there is no need to connect an additional power supply.
Warning: Do not connect a 5V power supply through the power port of the CM0 Dev Board during eMMC flashing. If both the power port and USB port are connected simultaneously, it may damage the CM0IO board.
Open the installed rpiboot tool, which will automatically assign a drive letter.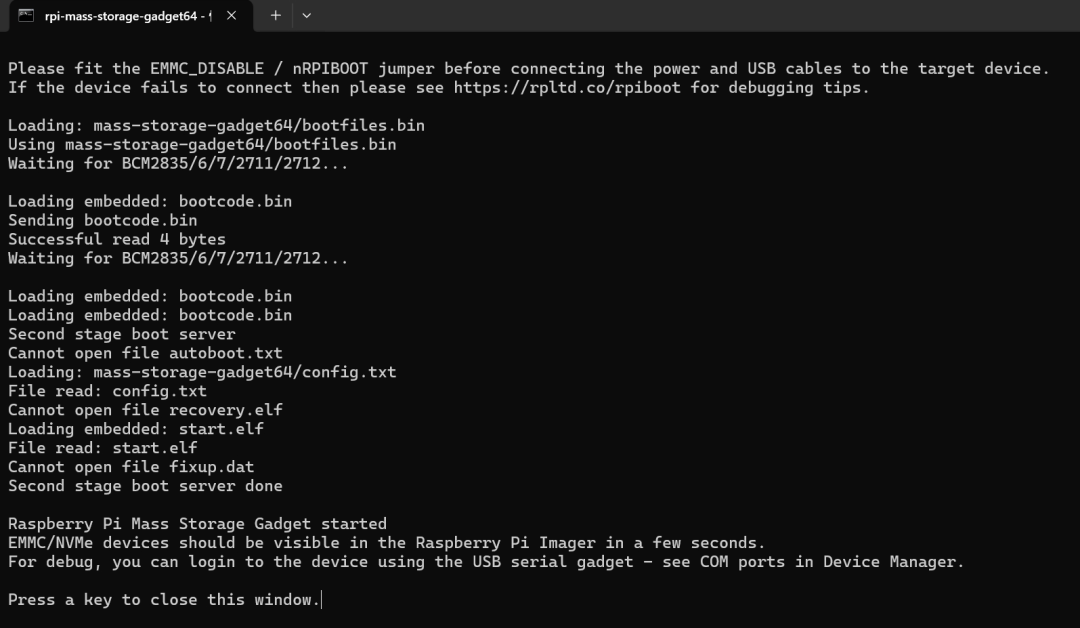
Once the drive letter assignment is complete, a drive letter will pop up in the lower right corner of the computer.
Open the SD Card Formatter, select the formatted drive letter, and click “Format” in the lower right corner to format it.
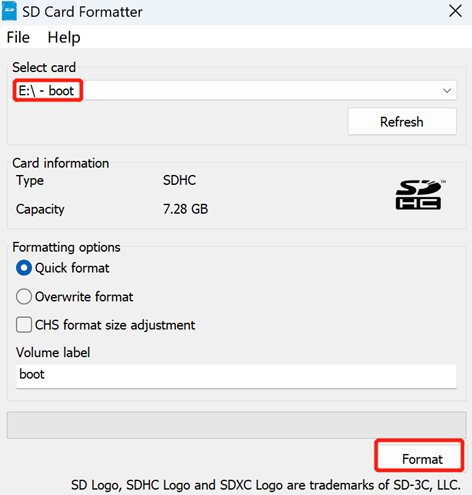 In the pop-up prompt, click “Yes”.
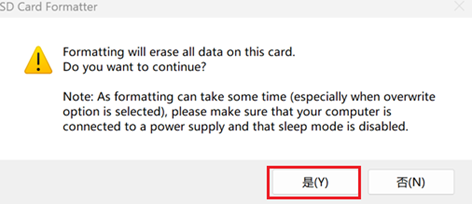 After formatting is complete, click “OK” in the prompt box.
Close the SD Card Formatter.
Open the Raspberry Pi Imager, click “Select Operating System”, and in the pop-up pane, select “Use custom”.
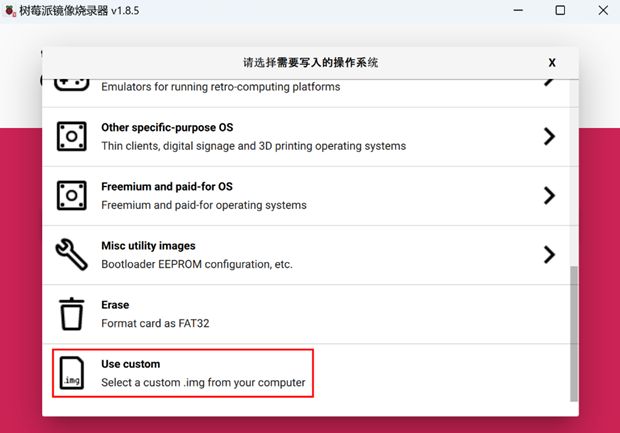
According to the prompt, select the obtained image file from the custom path and return to the main flashing interface.
Click “Select SD Card”, select the default SD card in the “Storage Card” interface, and return to the main flashing interface.
 Click “NEXT”, and in the pop-up “Use OS customization?” prompt box, select “No” to start writing the image.
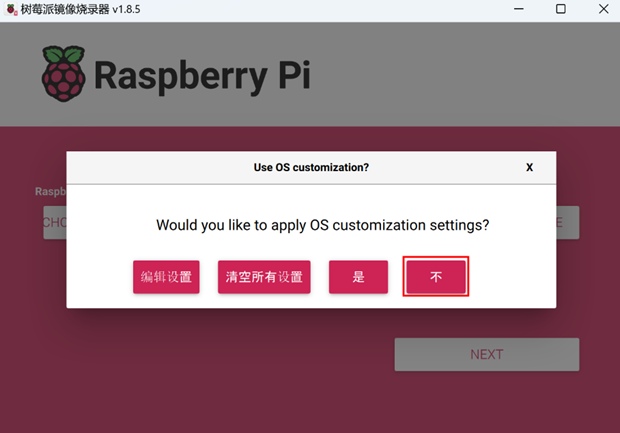 In the pop-up “Warning” prompt box, select “Yes” to start writing the image.
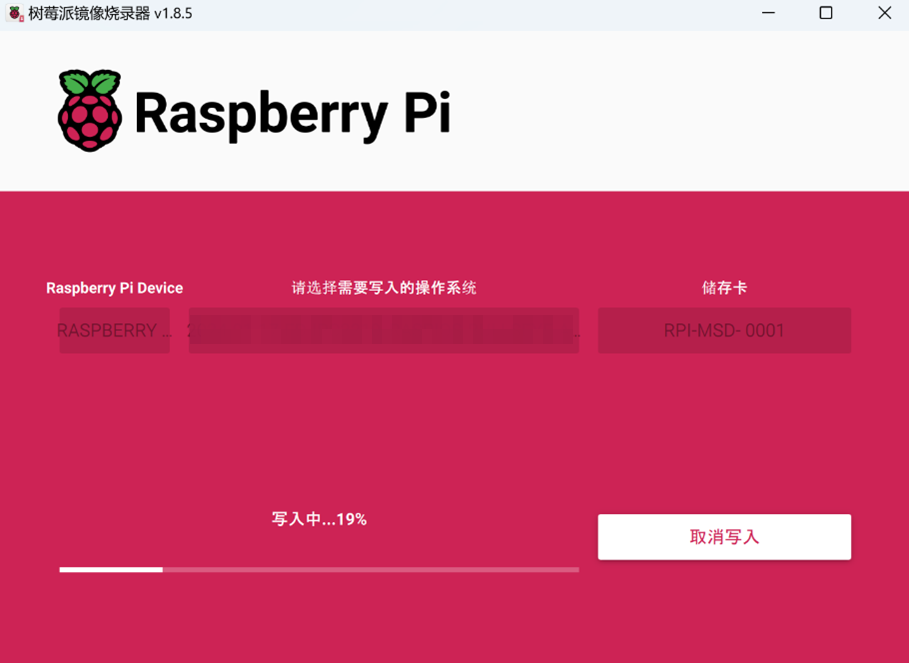 Once the image writing is complete, file verification will be performed.
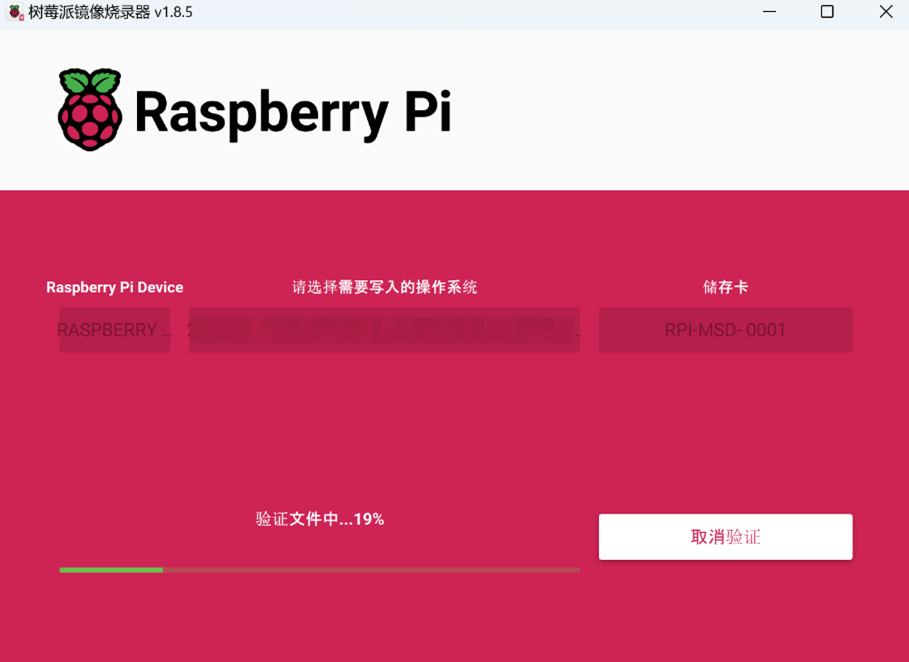 After verification is complete, a “Flashing Successful” prompt box will pop up. Click “Continue” to complete the flashing.
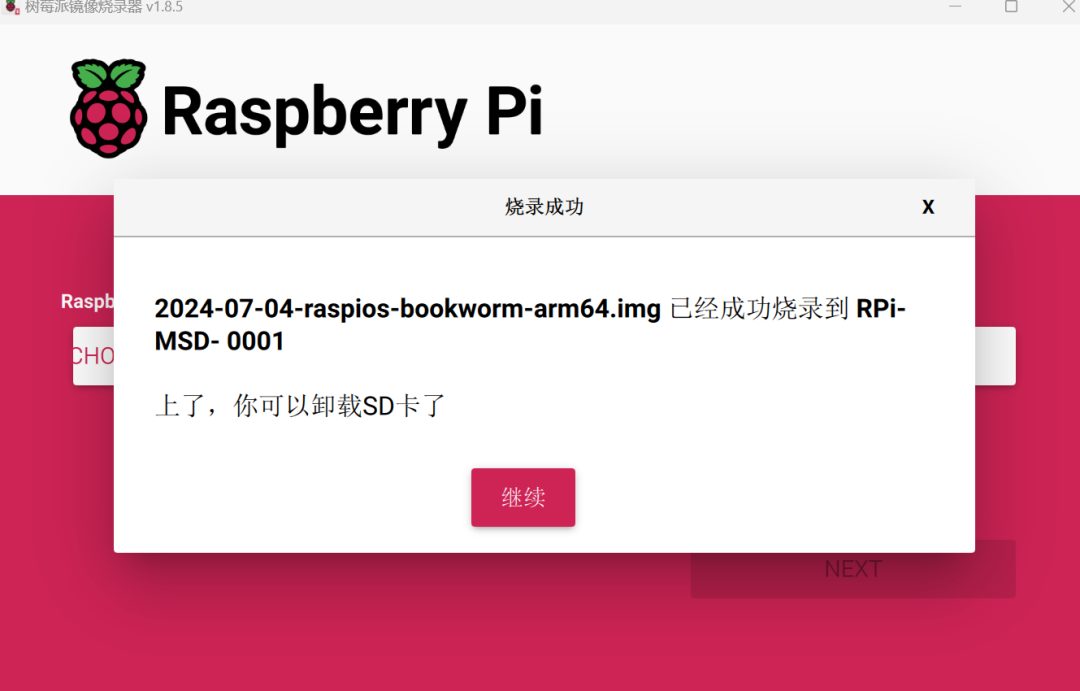 Close the Raspberry Pi Imager, remove the USB flashing cable, and power the device back on.
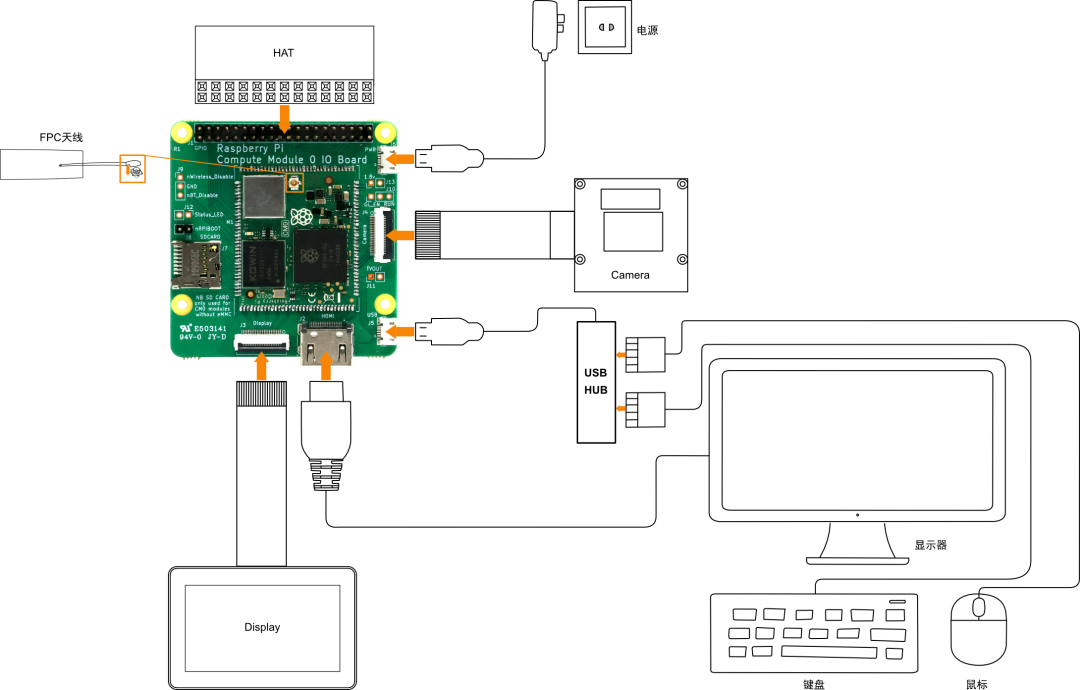
Connecting Cables
This section introduces the method for connecting cables.
Preparation:
- Have a functioning USB hub, monitor, mouse, keyboard, and power adapter ready.
- Have a functioning network ready.
- Have a functioning HDMI cable ready.
Cable Connection Diagram:
For the pin definitions of each interface and the specific connection methods, please refer to section 1.4.
First Boot of the System
The CM0 Dev Board does not have a power switch; the system will start booting once power is connected.
- The green ACT light blinks, indicating that the system is booting normally.
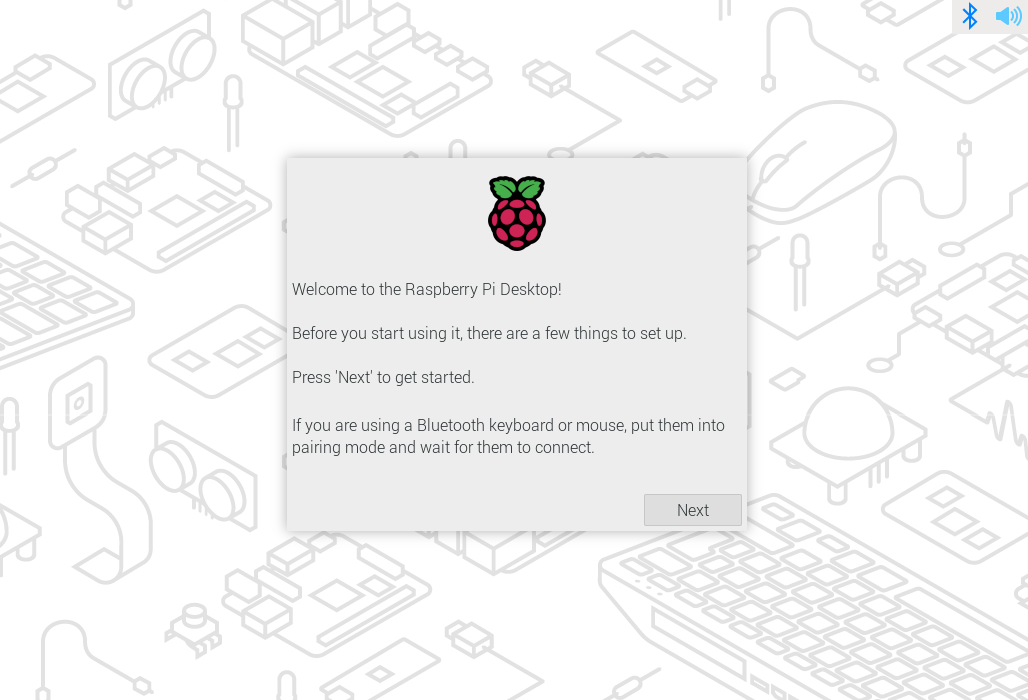
1. Raspberry Pi OS (Desktop)
If the product is shipped with the Desktop version of the system installed, the CM0 Dev Board will directly enter the initialization configuration desktop after booting (as shown in the figure below). You can refer to the following steps for initialization configuration.
 Click “Next” to enter the “Set Country” interface, and configure parameters such as “Country”, “Language”, and “Timezone” as needed.
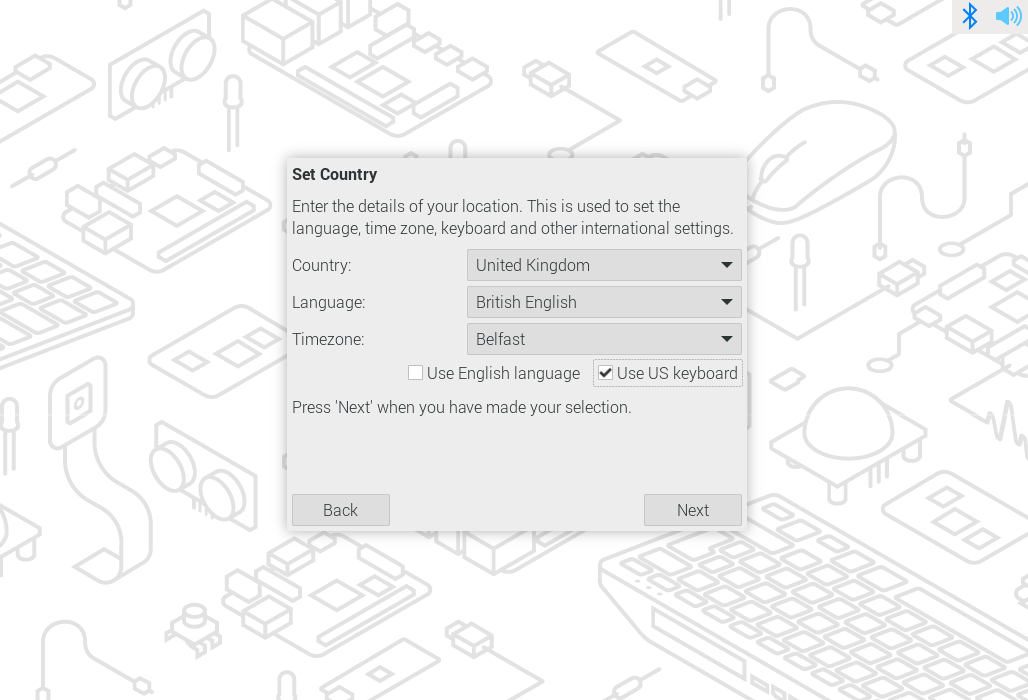
Note: It is recommended to check “Use US keyboard”.
Click “Next” to enter the “Create User” interface, and create a “username” and “password” as needed.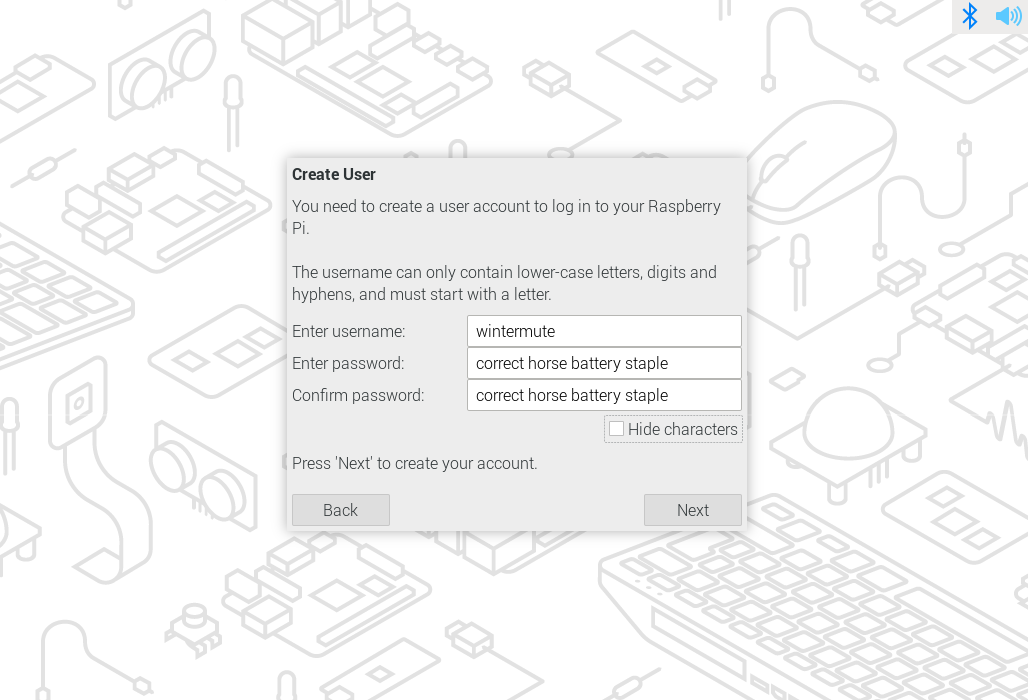 Click “Next” to enter the “Select Wireless Network” interface, and select the Wi-Fi name to connect to as needed.
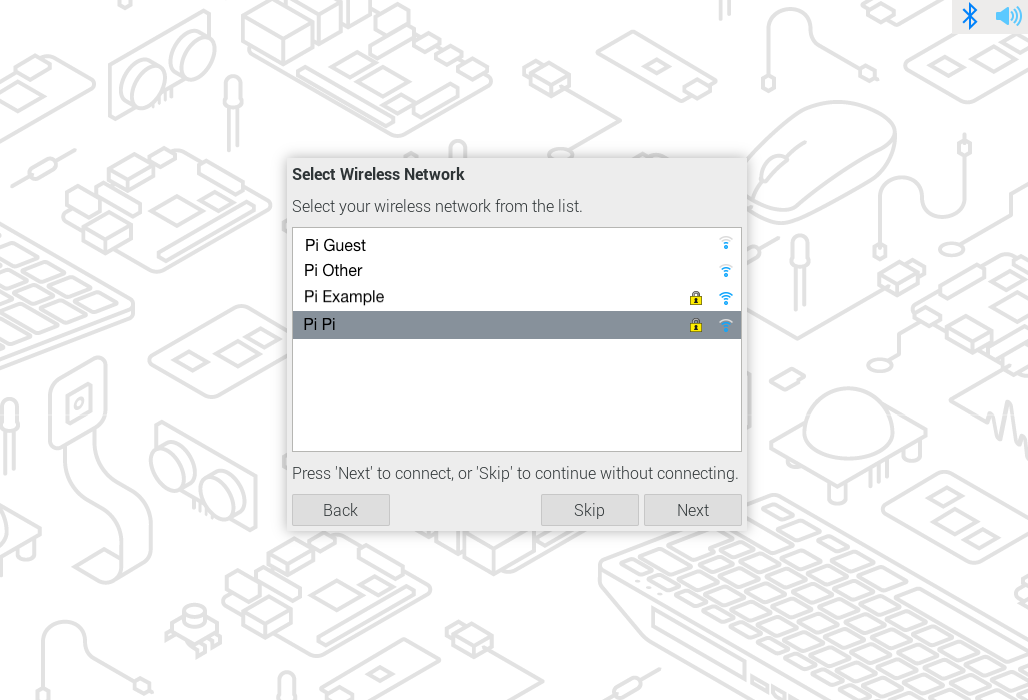
Note: You can also click “Skip” here to skip the Wi-Fi connection.
Click “Next” to enter the “Enter Wireless Password” interface, and input the Wi-Fi password.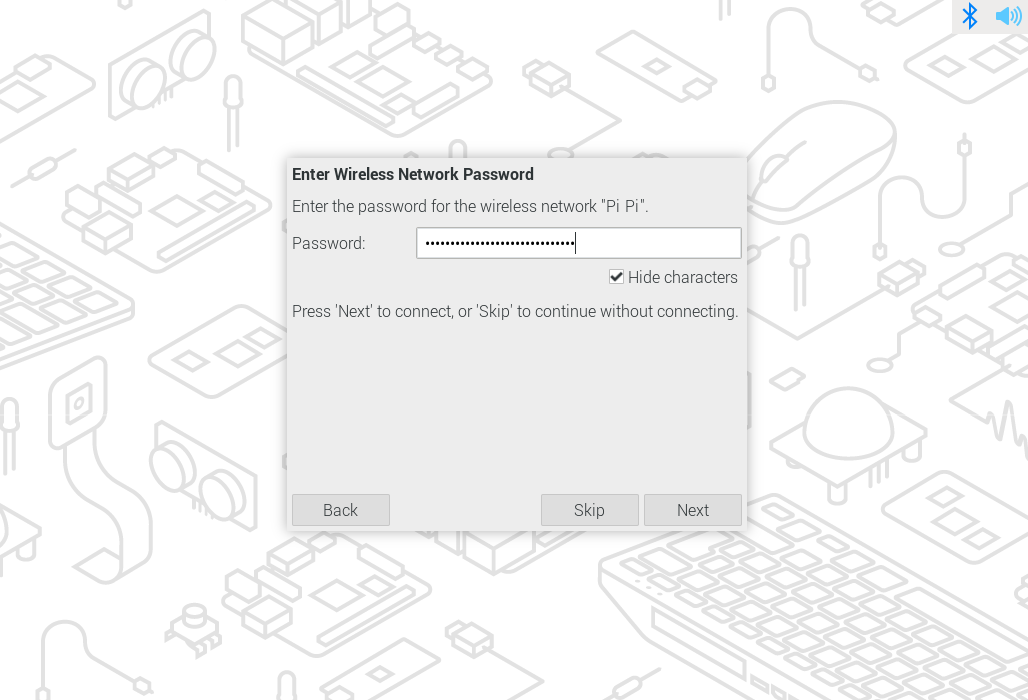 Click “Next” to enter the “Choose Browser” interface, and select the default browser as needed.
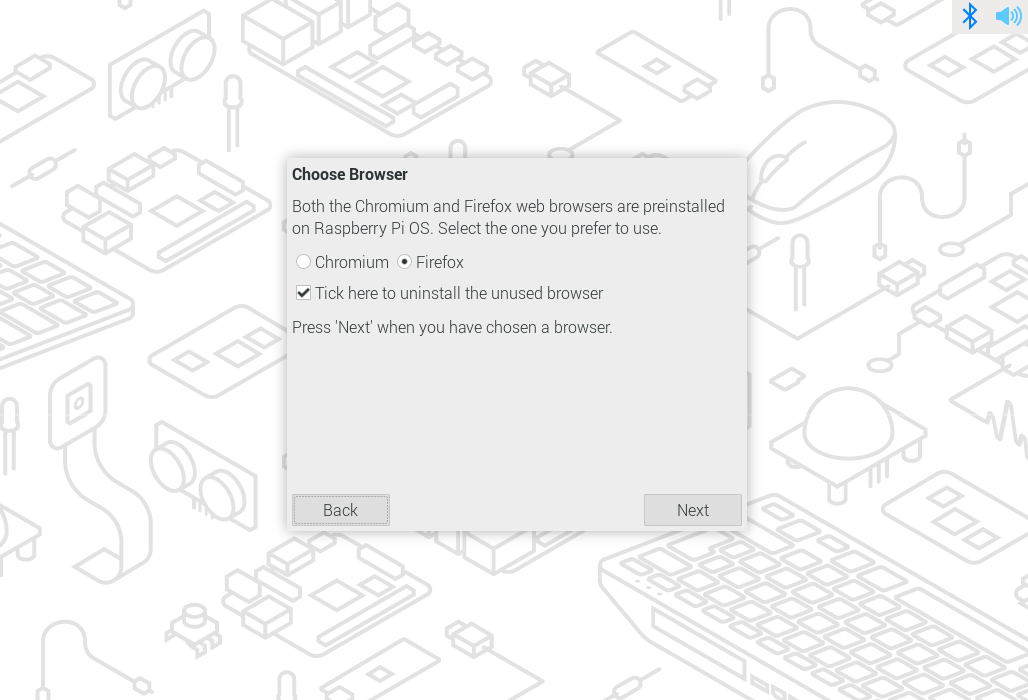 Click “Next” to enter the “Enable Raspberry Pi Connect” interface, and set the enable switch as needed.
 Click “Next” to enter the “Update Software” interface.
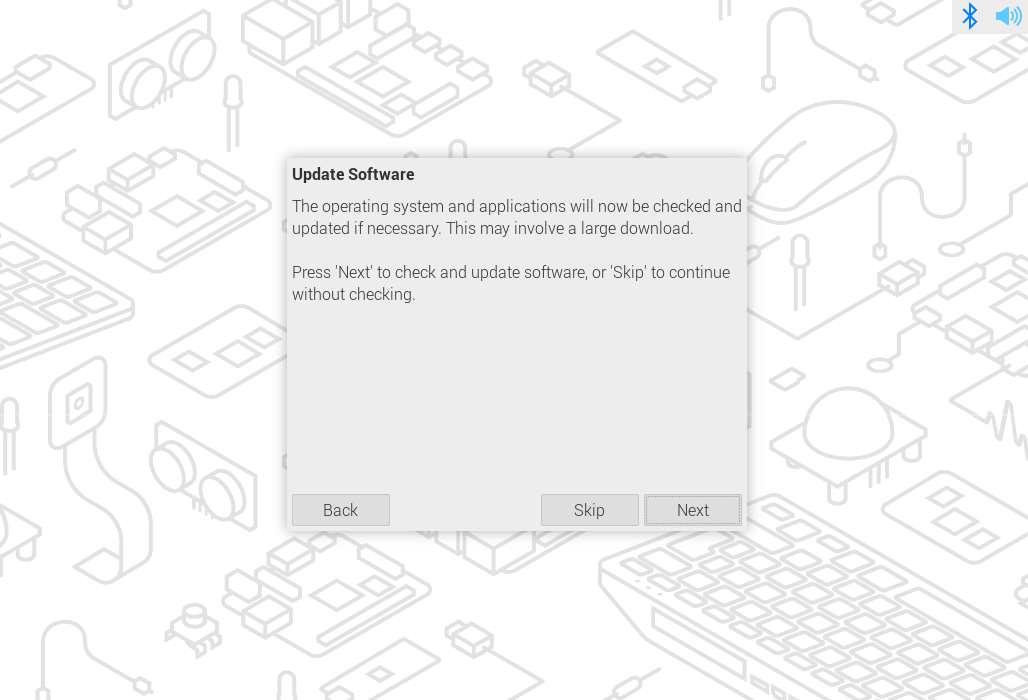
Note: You can also click “Skip” here to skip the software update.
Click “Next” to perform the software update. After the software update is complete, you will enter the “Setup Complete” interface.
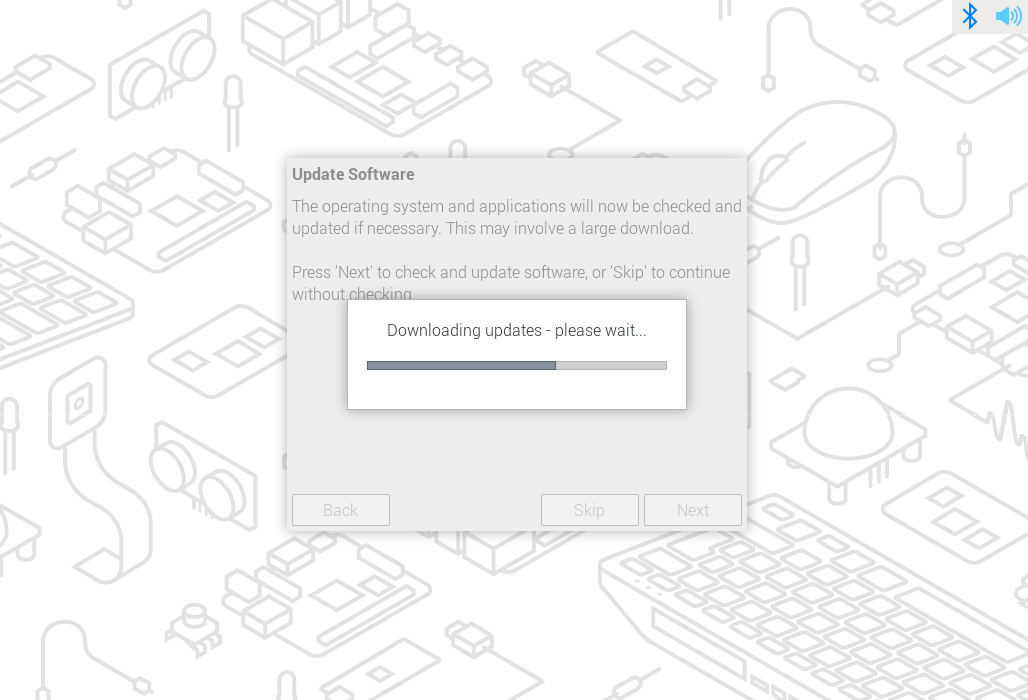 Click “Restart” to enter the system desktop.
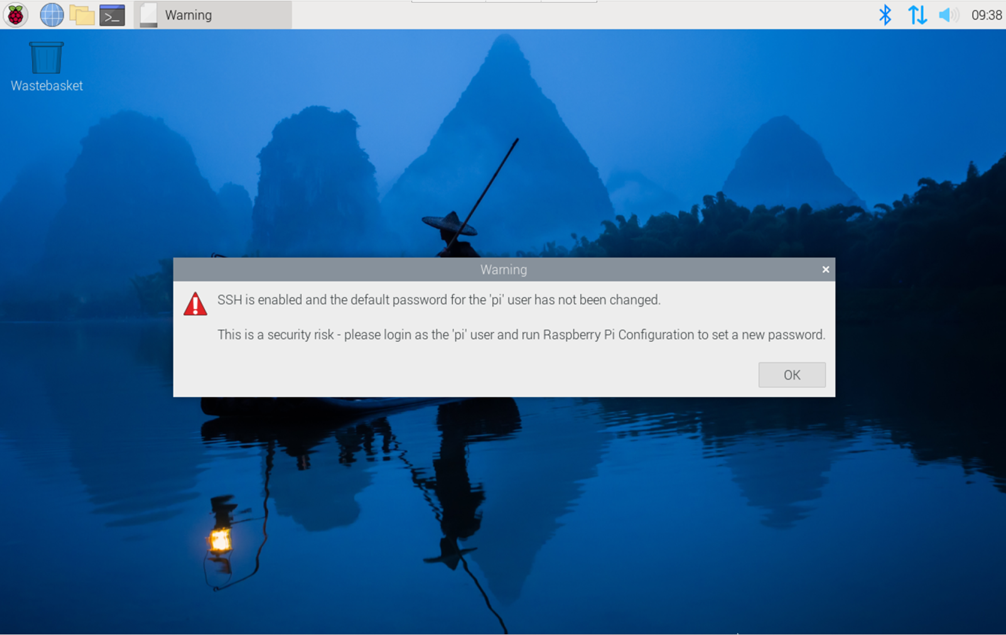
2. Raspberry Pi OS (Lite)
If the product is shipped with the Lite version of the system installed, the CM0 Dev Board will display the “Configuring keyboard-configuration” interface after booting (as shown in the figure below). You can refer to the following steps for initialization configuration.
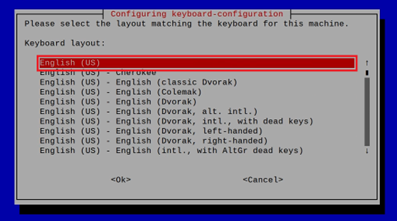 Set the keyboard type as needed, then select “OK” and press “Enter” to enter the user creation interface.
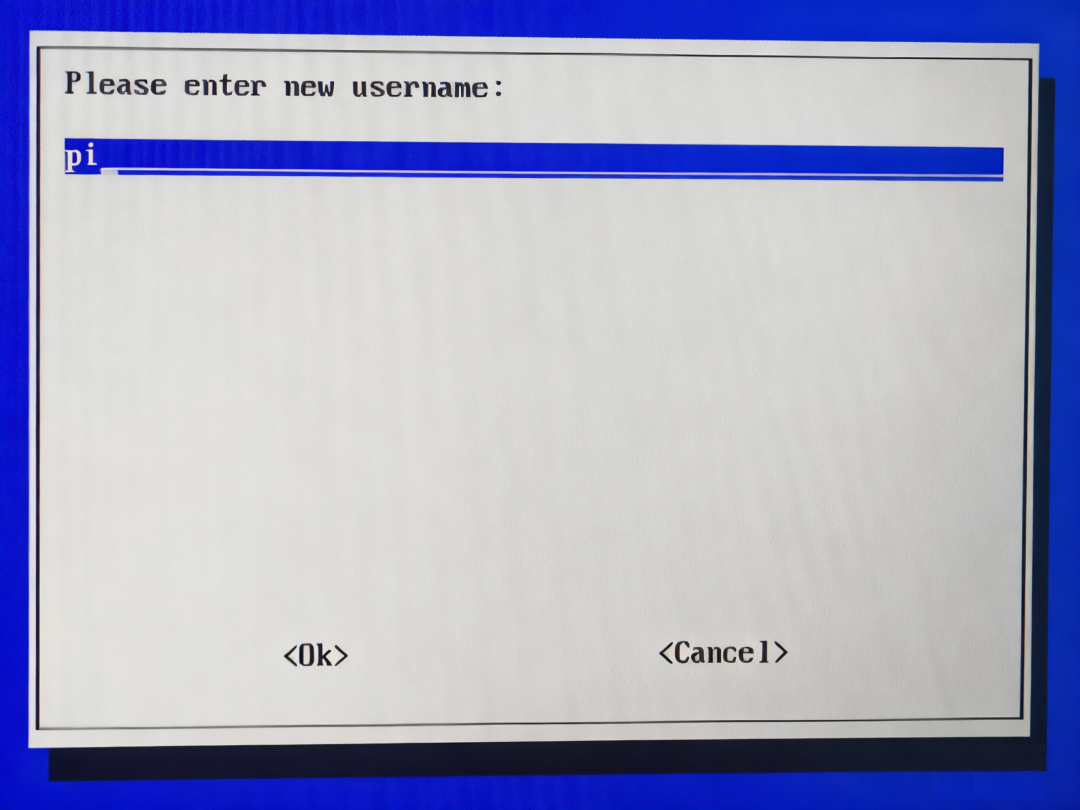 Create a username as needed, then select “OK” and press “Enter” to enter the user password setting interface.
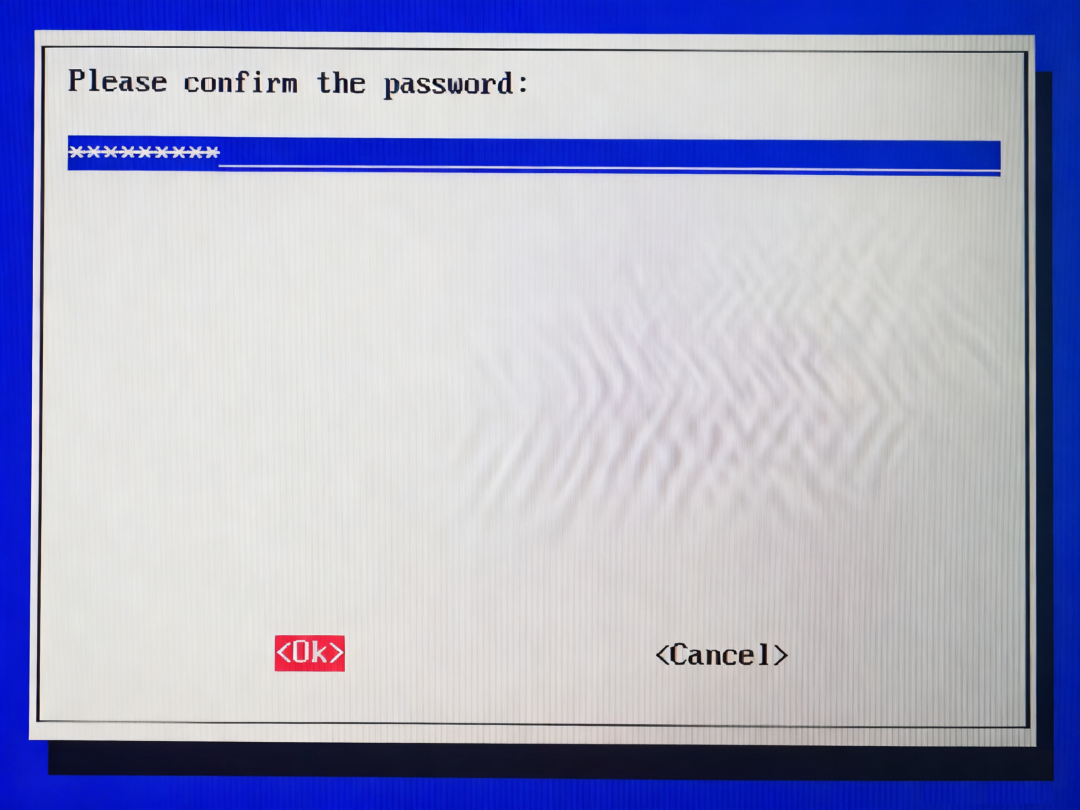 Input the password as needed, then select “OK” and press “Enter” to enter the user password confirmation interface.
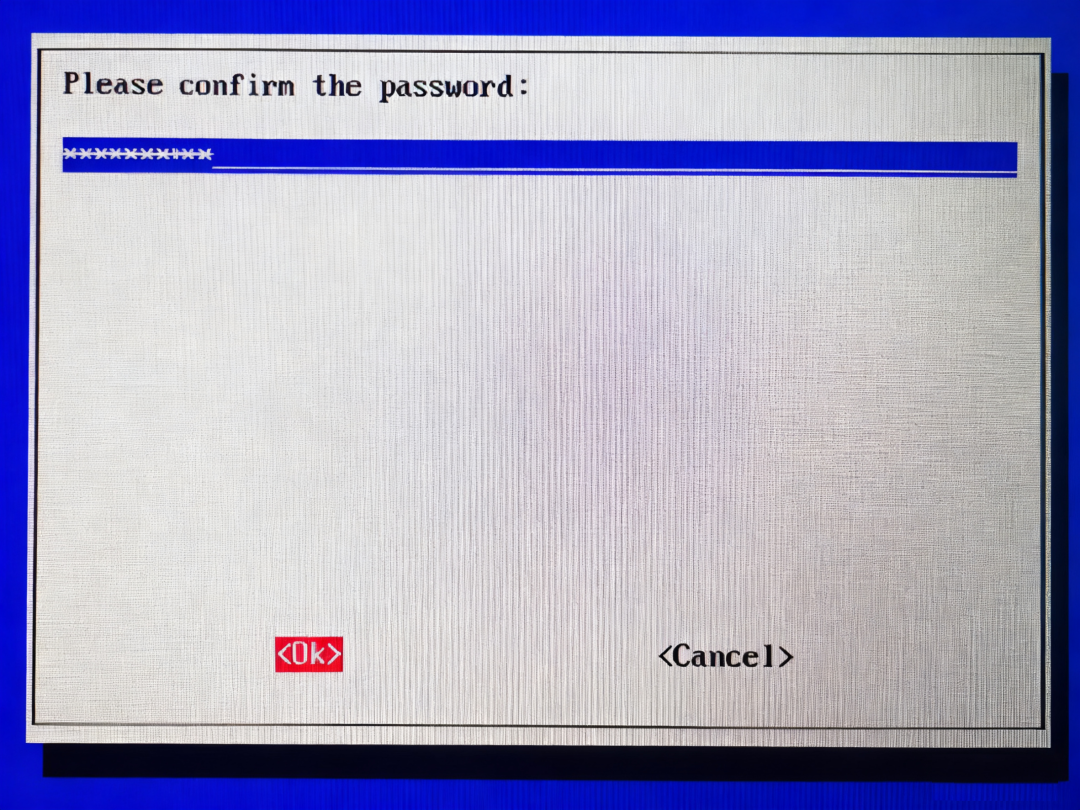
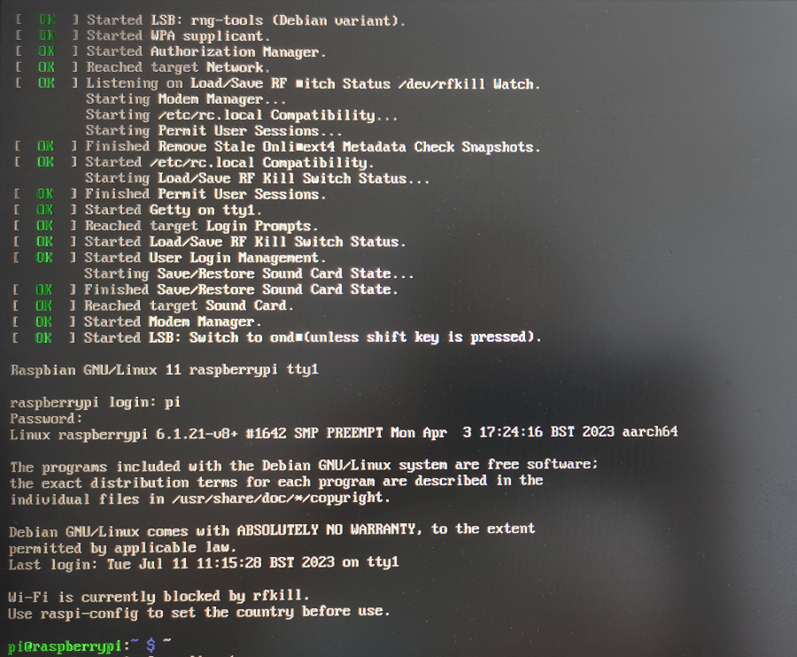
Re-enter the password, then select “OK” and press “Enter” to complete the initial setup and enter the login interface.
Follow the prompts to enter the username and password to log into the system. The following image indicates a successful login.
Attention, attention, attention!
The key point is here! During this launch event, the official has opened aTaobaodiscount purchase channel, and through an online lottery event, you can obtain a largeTaobaocoupon (ding, price -50 yuan!), and there is also a chance to win aRaspberry Pi CM0 Dev Board for free. The event is time-limited!
The Raspberry Pi exhibition is not over yet, from September 23 to September 27, in Shanghai at the National Exhibition and Convention Center, Hall 6.1, E248.
If you find the content useful, remember to like, bookmark, follow, and share~ We are happy to provide you with industrial Raspberry Pi solutions. If you have project needs, please contact us~