In the toolbox of Linux system management, <span>chroot</span> is a powerful yet somewhat understated command. Its name comes from Change Root, meaning “change root directory”. For beginners, it may seem like a simple directory switching command; however, for system administrators, developers, and security experts, <span>chroot</span> is a robust tool for system recovery, software testing, and environment isolation.
This article will delve into the principles, functions, usage methods, and typical application scenarios of <span>chroot</span>.
1. The Principles and Essence of chroot
What is chroot?
<span>chroot</span>’s core function is to change the visible root directory for a running process and its child processes. In simple terms, it makes a specified directory the “root” (i.e., <span>/</span>) of the file system that the process can see.
- Normal Process: The file system structure it sees is
<span>/</span>-><span>/home</span>-><span>/usr</span>-><span>/etc</span>… - Process after chroot: If we set
<span>/mnt/new_root</span>as the new root, then the process sees<span>/</span>as the host system’s<span>/mnt/new_root</span>. It cannot access any file paths outside of<span>/mnt/new_root</span>.
How It Works
Every process in a Linux system has an associated concept of a “current working directory” and a “root directory”. <span>chroot</span> modifies the root directory attribute of the process through a system call (<span>chroot()</span>).
Key Points:
- Not Virtualization:
<span>chroot</span>does not create a virtualized environment (like Docker or virtual machines). It merely performs a “clipping” or “redirection” of the file system view. - Process-Level Isolation: The isolation only applies to the processes that are
<span>chroot</span>ed and their child processes. Other processes in the host system are unaffected. - Not Completely Secure:
<span>chroot</span>was not originally designed for security isolation, and experienced users may find ways to “escape” through specific methods (such as gaining root privileges, accessing certain device files, etc.). Therefore, it should not be used as a primary security sandbox. For secure isolation, modern container technologies such as namespaces, cgroups, and Seccomp (the foundational implementations of Docker) should be used.
2. The Role and Value of chroot
Despite its limitations, <span>chroot</span> remains indispensable in many scenarios:
- System Recovery and Boot Repair: When the main system fails to boot, you can boot from a Live CD/USB, mount the root directory of the damaged system to a subdirectory of the Live environment (e.g.,
<span>/mnt/sysroot</span>), and then<span>chroot</span>into it for repairs (such as reinstalling the bootloader or fixing core configuration files). - Software Testing and Dependency Isolation: Create an independent root environment for software or services that includes all the necessary libraries and files for their operation. This avoids conflicts with the library versions of the host system and facilitates testing different versions of software.
- Building a Clean Compilation Environment: When building large software (such as the Linux distribution itself), you can use
<span>chroot</span>to create a clean, unpolluted base environment, ensuring that the compilation process only relies on explicitly specified tools and libraries, thus improving the reproducibility and reliability of the build results. - Running Legacy or Specific Environment Services: Some outdated or specific software may need to run on certain versions of system libraries. By using
<span>chroot</span>, you can tailor an environment for it without disturbing the host system.
3. Detailed Usage Methods and Steps
Using <span>chroot</span> typically requires root privileges and a prepared “root file system”.
Basic Command Syntax
chroot [OPTION] NEWROOT [COMMAND [ARG]...]
<span>NEWROOT</span>: The path to be used as the new root directory.<span>COMMAND</span>: The command to be executed in the new root environment. If not specified, the default shell specified by the<span>$SHELL</span>environment variable is executed; otherwise,<span>/bin/sh</span>is executed.
Typical Operation Process
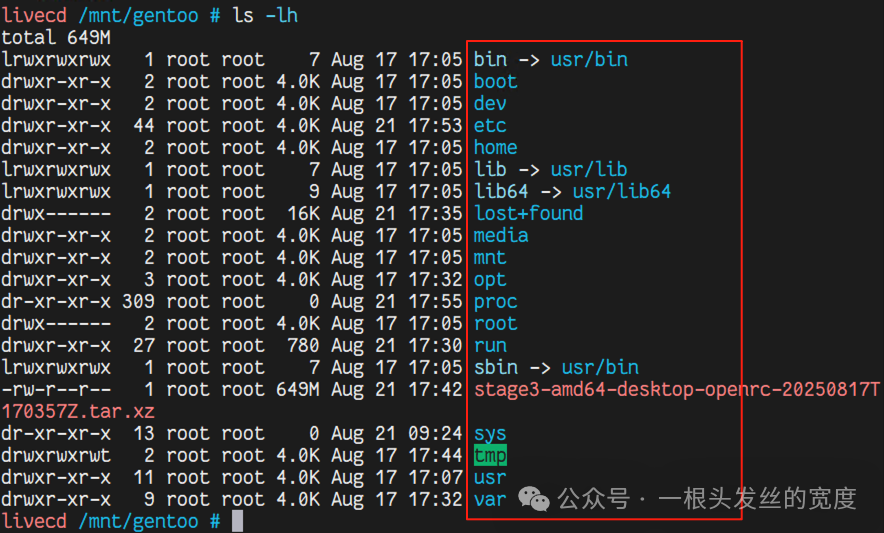
Step 1: Prepare the Target Root File System This system can be copied from another Linux system, built with tools like <span>debootstrap</span>, or be a mounted disk partition.
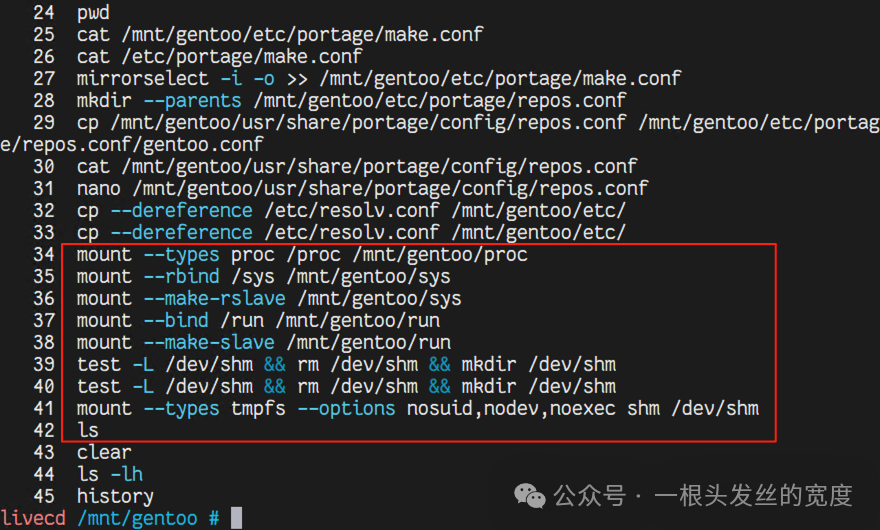
Step 2: Mount Necessary Virtual File Systems<span>chroot</span> environments need access to core virtual file systems to function properly.
# Mount proc file system (provides process information)
sudo mount -t proc /proc /mnt/new_root/proc

# Mount sys file system (provides system device and driver information)
sudo mount -t sysfs /sys /mnt/new_root/sys

# Mount devtmpfs file system (provides device files)
sudo mount -t devtmpfs /dev /mnt/new_root/dev

# It is also recommended to mount devpts (for pseudo terminals) and tmpfs (for temporary files)
sudo mount -t devpts /dev/pts /mnt/new_root/dev/pts
sudo mount -t tmpfs /tmp /mnt/new_root/tmp

# If network access is needed, also copy the host's resolv.conf for DNS
sudo cp /etc/resolv.conf /mnt/new_root/etc/resolv.conf
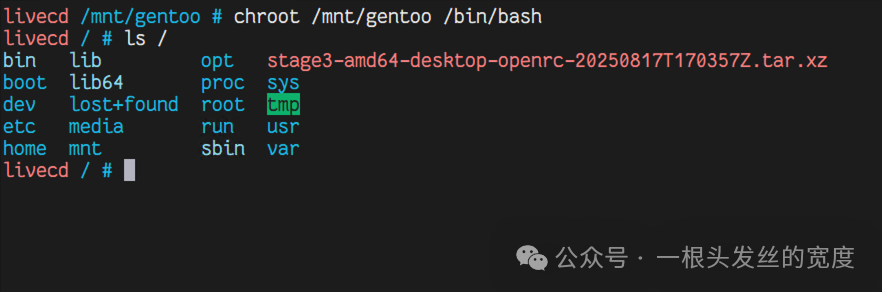
Step 3: Execute chroot Now you can enter the prepared environment.
# Basic usage, enter the new root and start a shell
sudo chroot /mnt/new_root

# Or specify the program to run
sudo chroot /mnt/new_root /bin/bash
Step 4: Work in the chroot Environment At this point, you are in a “brand new” system. You can install software, modify configurations, run services, etc.
Step 5: Exit and Clean Up After completing your work, exit the chroot shell and then unmount the previously mounted file systems.
# Exit the chroot environment
exit

# After returning to the host, unmount the virtual file systems
sudo umount /mnt/new_root/proc
sudo umount /mnt/new_root/sys
sudo umount /mnt/new_root/dev/pts
sudo umount /mnt/new_root/dev
sudo umount /mnt/new_root/tmp
# Finally, unmount the root directory itself (if it is a separate partition)
sudo umount /mnt/new_root
4. Classic Use Case Examples
Scenario 1: Repairing the Grub Bootloader
-
Boot from a Linux Live USB.
-
Mount the original root partition (assumed to be
<span>/dev/sda1</span>) to<span>/mnt</span>.sudo mount /dev/sda1 /mnt -
Mount the virtual file systems.
sudo mount --bind /dev /mnt/dev sudo mount --bind /proc /mnt/proc sudo mount --bind /sys /mnt/sys -
Chroot into the original system.
sudo chroot /mnt -
Reinstall and configure Grub.
grub-install /dev/sda update-grub -
Exit, unmount, and reboot.
Scenario 2: Building a Minimal Testing Environment
Use <span>debootstrap</span> to build a base environment for Ubuntu 22.04:
# 1. Install debootstrap
sudo apt install debootstrap

# 2. Build a minimal root file system
sudo debootstrap jammy /opt/jammy-chroot http://archive.ubuntu.com/ubuntu

# 3. Enter the environment
sudo chroot /opt/jammy-chroot
5. Precautions and Common Issues
- Permission Issues:
<span>chroot</span>must be executed by the root user. - Architecture Consistency: The target root file system must be compatible with the CPU architecture of the host (e.g., you cannot chroot into an ARM file system on an x86_64 host).
- Missing Dependencies: If the target environment lacks the dynamic libraries required for the command to be executed after
<span>chroot</span>, the command will fail. Use the<span>ldd</span>command to check the dependencies of the binary file. - “chroot: cannot run command ‘/bin/bash’: No such file or directory”: This is a common error, usually not because
<span>/bin/bash</span>does not exist, but because its dependent libraries (like<span>libc.so.6</span>) cannot be found in the new root environment. Ensure your root file system is complete.
<span>chroot</span> is a fundamental tool for achieving file system-level isolation by changing the root directory of a process. Although it is old, it still plays an irreplaceable role in system recovery, environment isolation, and software building. Understanding its principles and the correct workflow is key to using it effectively.
However, it must also be recognized that it is not a silver bullet, especially with inherent flaws in security. For more advanced isolation needs, modern container technologies (such as Docker and LXC) are better choices, as they build upon <span>chroot</span> and combine mechanisms like Namespace and Cgroup to provide a more complete and secure isolation environment.
Recommended Reading:👉 1. Easily Manage Linux Systemd Services with Systemd-manager-tui👉 2. Understanding User Space Reboot (soft-reboot) Operations in Linux — No Real Shutdown, Kernel Steady as a Rock, Services Instantly Renewed👉 3. Learn Automatic Backups in 3 Minutes! Set Up Incremental Backups on Linux Using rsync and cron