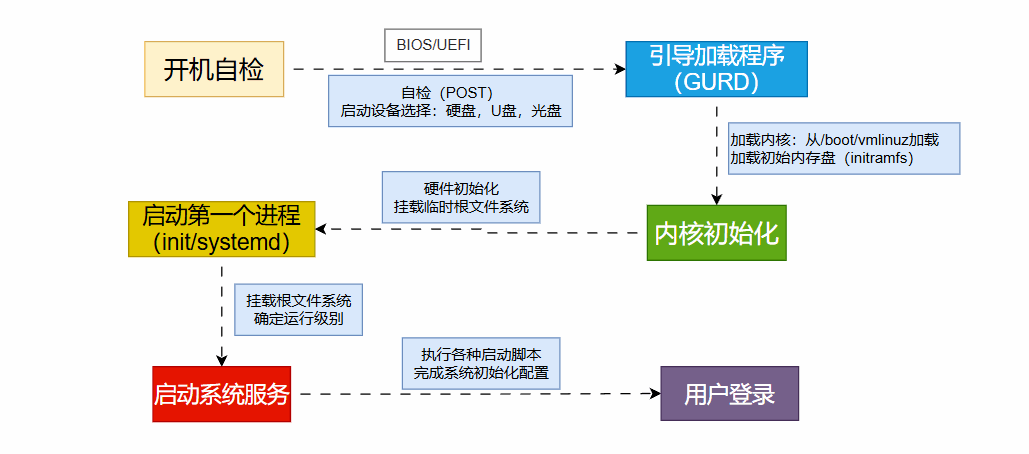
The Linux boot process is one of the core aspects of the operating system, involving multiple stages such as hardware initialization → boot loading → kernel loading → user space initialization. Understanding the boot process not only aids in troubleshooting (e.g., system not booting, getting stuck at a certain stage) but also helps operations personnel optimize performance and security.
🖥️ 1. BIOS/UEFI Initialization
-
BIOS (Basic Input/Output System) or UEFI (Unified Extensible Firmware Interface) is the first code executed after the computer is powered on.
-
Functions:
-
POST (Power-On Self Test): Checks if hardware such as CPU, memory, hard disk, and graphics card are functioning properly.
-
Load boot device information: Determines where to load the operating system (hard disk/CD/USB/network) based on the boot order.
-
Hand over to the boot loader: Such as MBR (Master Boot Record) or the boot program in the EFI partition.
👉 If an error occurs here, you will typically see “No bootable device” or “Operating System not found”.
💽 2. MBR / EFI Stage
The process varies slightly depending on the boot mode used by the system:
-
MBR (Traditional BIOS Boot)
-
First stage of the boot loader.
-
Disk partition table.
-
The first 512 bytes of the hard disk store the Master Boot Record (MBR).
-
MBR contains:
-
Common Boot Loaders: GRUB, LILO.
-
UEFI Boot
-
<span><span>EFI/BOOT/BOOTX64.EFI</span></span> -
<span><span>EFI/GRUB/grubx64.efi</span></span> -
There is an EFI System Partition (ESP) on the hard disk, formatted as FAT32.
-
ESP stores the boot files for various operating systems, such as:
👉 Most modern Linux systems use the UEFI + GRUB2 method.
🌀 3. Boot Loader Stage (Using GRUB2 as an Example)
GRUB (GRand Unified Bootloader) is the most common boot loader for Linux.
Its main functions are:
-
Provide a boot menu: Users can select different kernel versions or operating systems.
-
Load the kernel: Loads the Linux kernel image file (
<span><span>vmlinuz</span></span>) into memory. -
Pass initrd/initramfs: Provides a temporary root filesystem to facilitate mounting the real root filesystem during kernel startup.
👉 The GRUB2 configuration file is usually located at:
-
<span><span>/boot/grub2/grub.cfg</span></span>(BIOS mode) -
<span><span>/boot/efi/EFI/centos/grub.cfg</span></span>(UEFI mode)
🐧 4. Kernel Loading Stage
Once GRUB loads the kernel into memory, the Linux kernel begins execution.
The main steps of kernel startup are:
-
Decompress the kernel image (vmlinuz).
-
Mount initramfs (temporary root filesystem).
-
Driver initialization (e.g., disk controllers, USB, network, etc.).
-
Mount the real root filesystem (e.g.,
<span><span>/dev/sda2</span></span>). -
Execute the first user space process:
<span><span>/sbin/init</span></span>.
👉 If the kernel cannot find the root filesystem, it will report an error <span><span>Kernel panic – not syncing: VFS: Unable to mount root fs</span></span>.
⚙️ 5. init/systemd Stage
After the Linux kernel starts, it runs the first user space process:
-
Traditional systems use SysV init, with configuration file
<span><span>/etc/inittab</span></span>. -
Modern Linux distributions use systemd (PID = 1), which is faster and more flexible than init.
The responsibilities of systemd are:
-
Mount filesystems.
-
Start necessary system services (e.g., network, logging, SSH).
-
Enter the default run level (Target):
-
<span><span>graphical.target</span></span>→ Graphical interface -
<span><span>multi-user.target</span></span>→ Command line
👉 systemd configuration directories:
-
<span><span>/etc/systemd/system/</span></span> -
<span><span>/usr/lib/systemd/system/</span></span>
👤 6. User Login Stage
Once all system services are started, Linux enters the login interface:
-
Command line mode: Provides TTY login through
<span><span>getty</span></span>or<span><span>systemd-logind</span></span>. -
Graphical interface: Provided by display managers such as GDM, LightDM.
Upon successful login, the system will:
-
Read user environment configuration files (e.g.,
<span><span>.bashrc</span></span>,<span><span>.profile</span></span>). -
Start the user Shell (e.g., bash, zsh).
At this point, the Linux boot process is officially complete ✅.
🔎 Summary (6 Major Stages of Linux Boot)
-
BIOS/UEFI: Hardware initialization, selecting the boot device.
-
MBR/EFI: Load Boot Loader (e.g., GRUB2).
-
Boot Loader: Load kernel and initramfs.
-
Kernel Stage: Driver initialization, mount root filesystem.
-
init/systemd: Start system services, enter run level.
-
User Login: Load user environment, enter Shell or desktop.
📌 Boot process diagram:
BIOS/UEFI → MBR/EFI → Boot Loader (GRUB) → Kernel → systemd/init → User Login