Content Summary

Author’s Note: With the increasing production of YCT automotive MCU chip models, more and more customers are beginning to use YCT’s automotive MCU application software development toolchain. Among them, the VSCode IDE based on CMake + ninja + GNU gcc toolchain is particularly popular. However, for many engineers accustomed to traditional IDEs, using the VSCode IDE may inevitably encounter problems. Therefore, I hope to write a series of related usage guides, introducing solutions to the problems I encountered during actual use, hoping to help everyone get started quickly.
-
How to Use Segger Ozone to Debug GCC/Keil/IAR Compiled Projects?
Compile the YCT automotive MCU application project locally on your computer using the VSCode IDE (GCC/KEIL/IAR + CMake + Ninja) or Keil IDE and IAR IDE to generate binary executable files:
-
VSCode IDE (GCC + CMake + Ninja) Application Project: <project_name>.elf
-
VSCode IDE (KEIL + CMake + Ninja) or Keil IDE Application Project: <project_name>.axf
-
VSCode IDE (IAR + CMake + Ninja) or IAR IDE Application Project: <project_name>.out
The method to configure and generate the VSCode IDE application project in YCT is as follows:
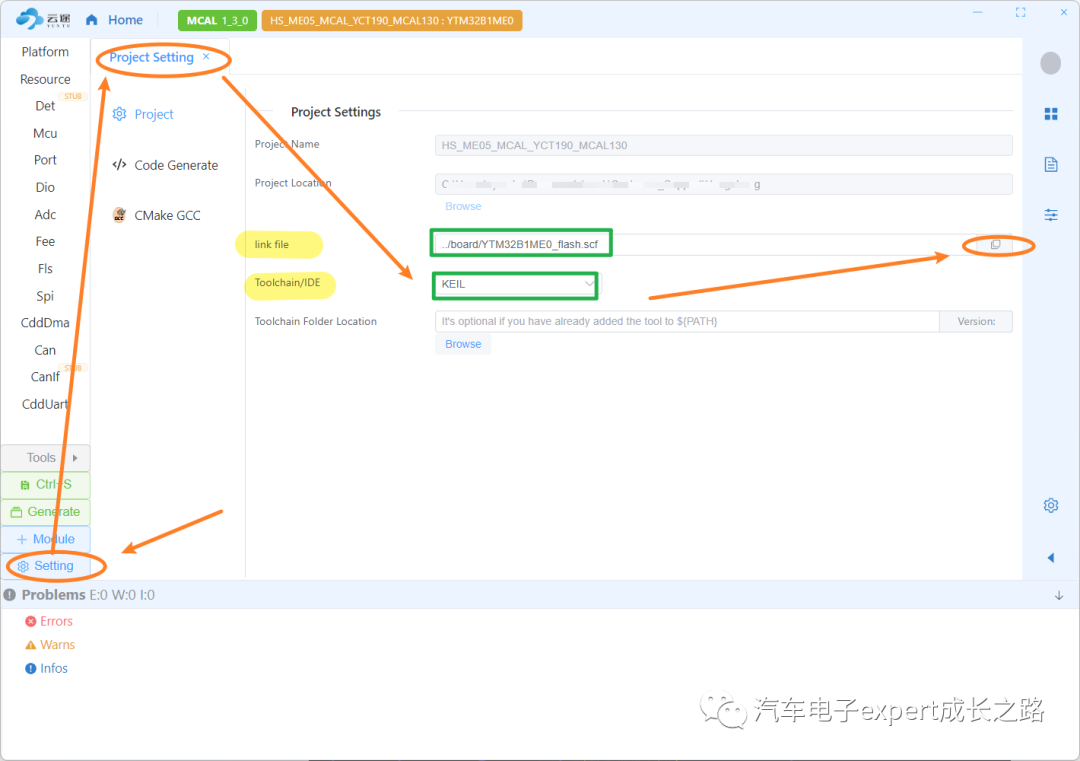
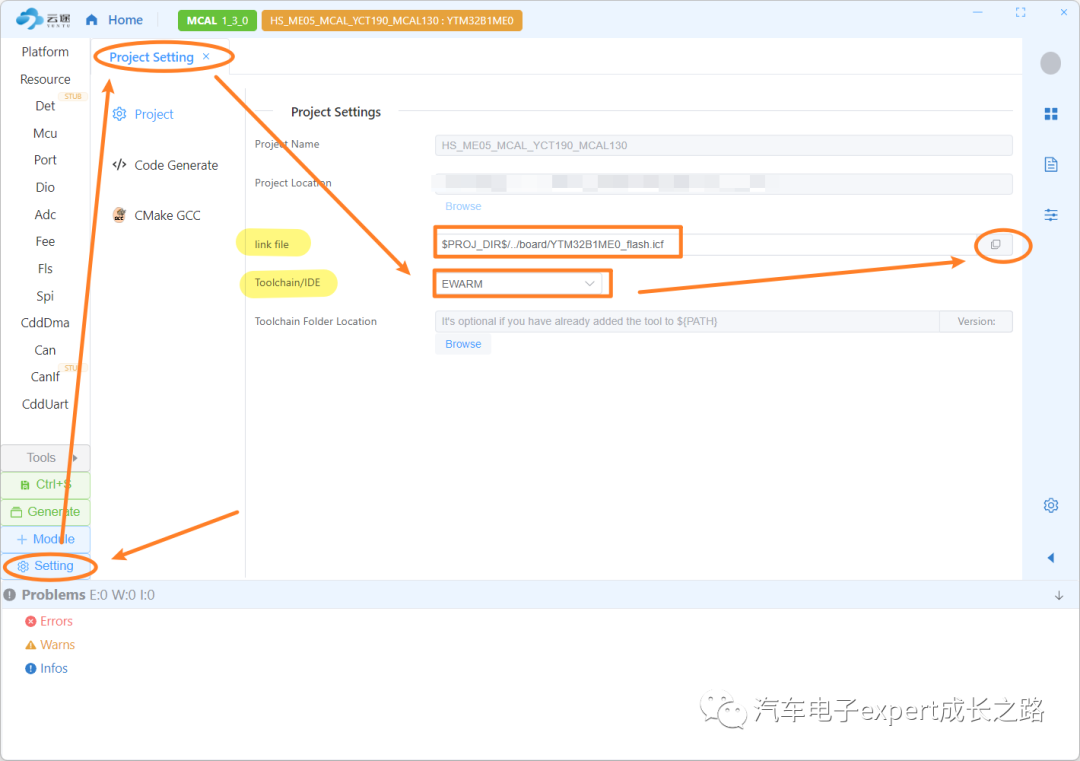
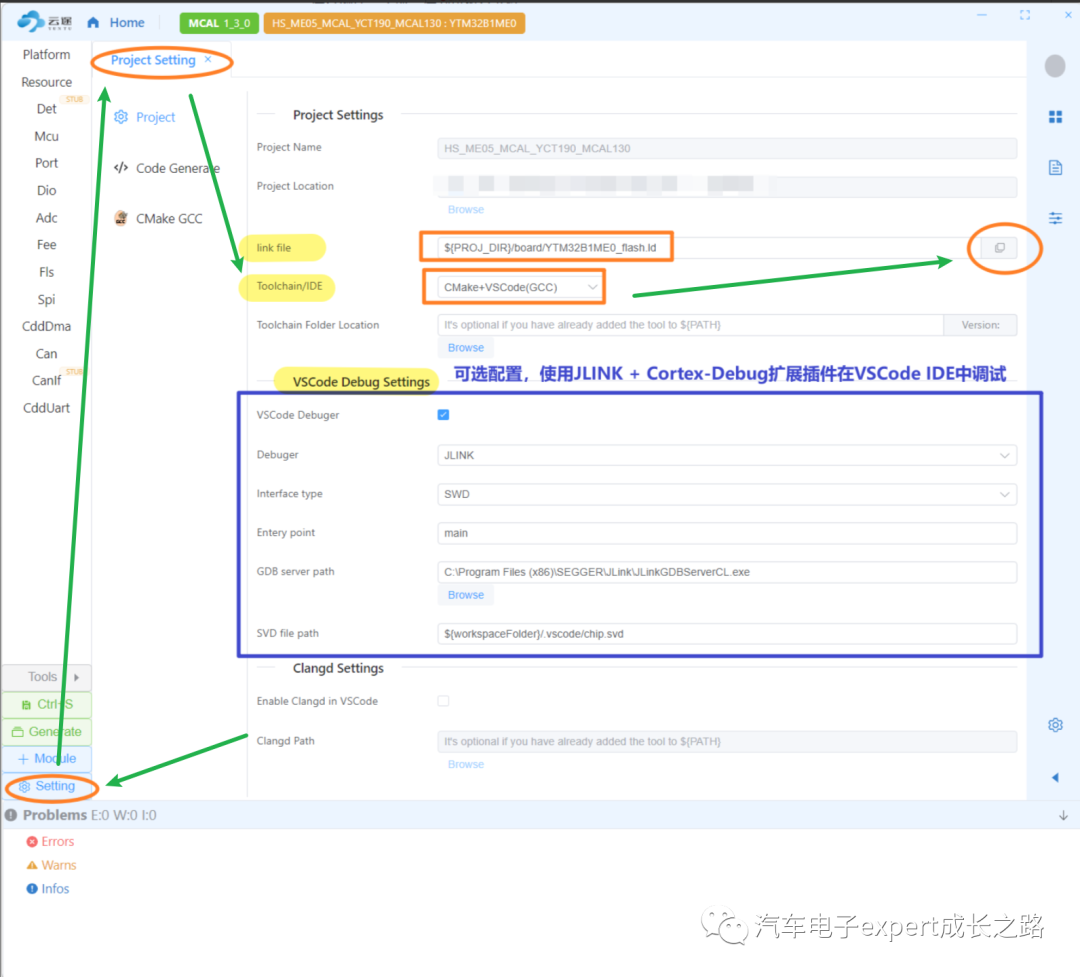
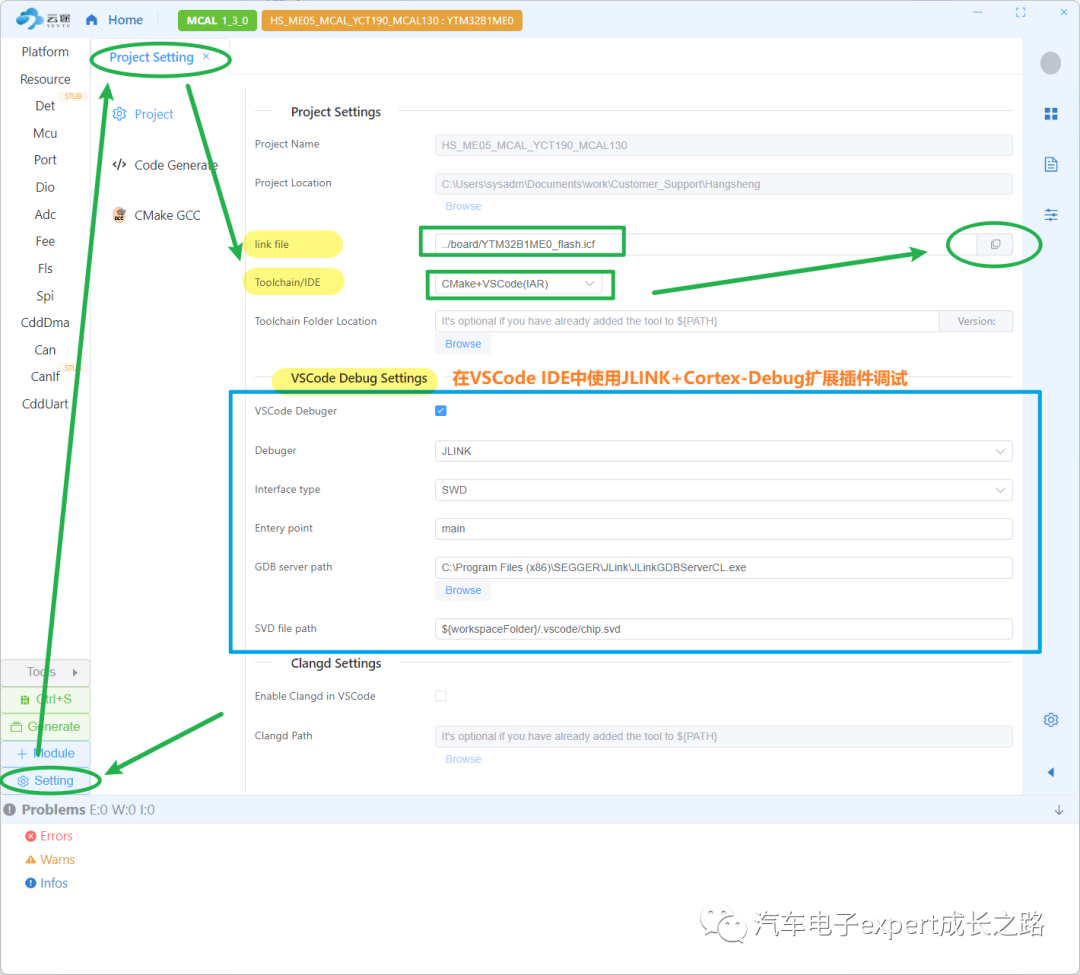
① Download and Install SEGGER Ozone Debugging Software
https://www.segger.com/products/development-tools/ozone-j-link-debugger/Simply choose a stable version that matches your computer’s operating system for download:
https://www.segger.com/downloads/jlink/#Ozone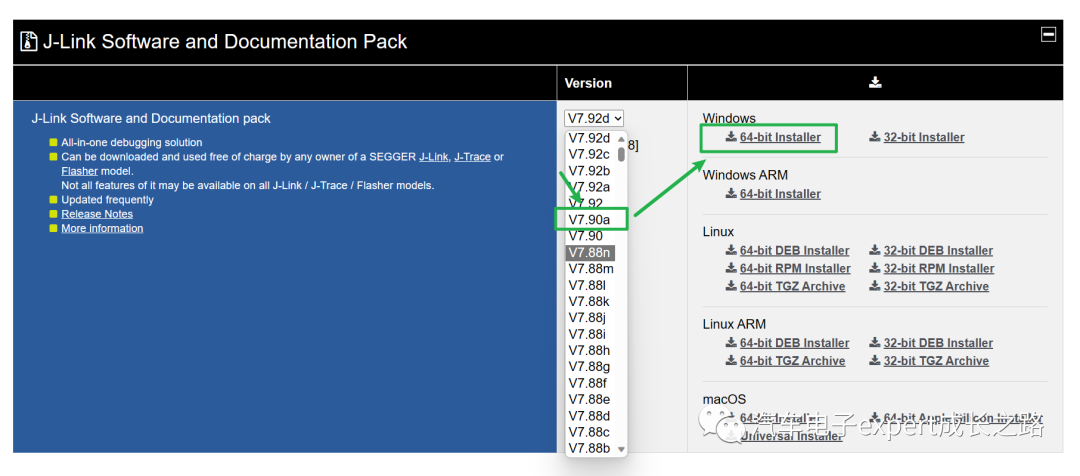
After downloading locally, simply double-click the executable exe for a foolproof installation, which will not be elaborated here.
Tips: If the JLINK driver has been installed before Ozone, you need to use the JLINK DLL updater to update the JLINK driver:
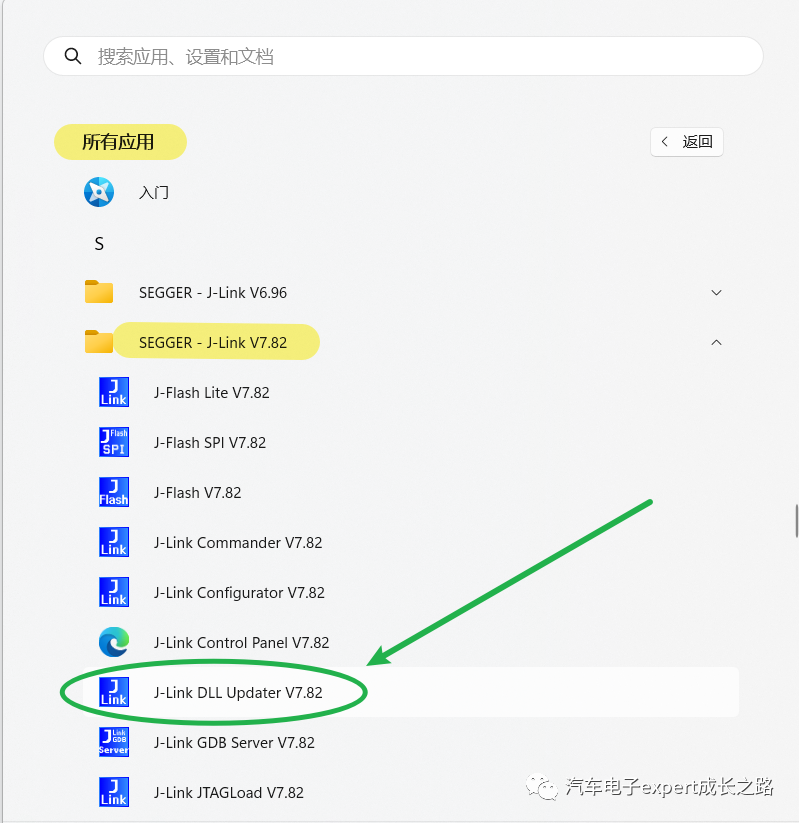
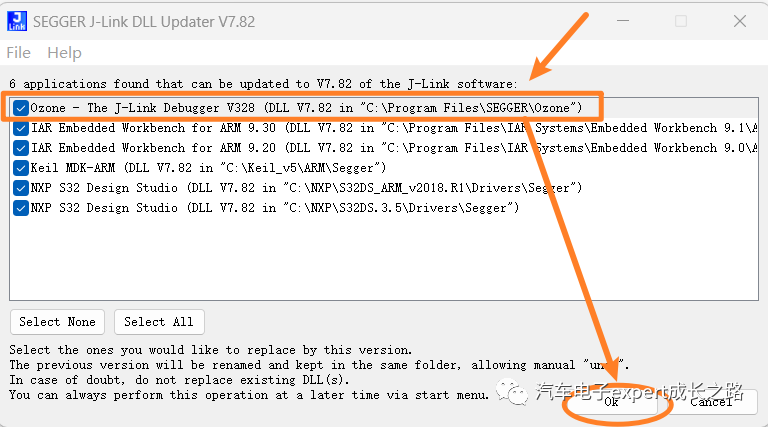
② Open Ozone, Select ‘Create New Project’ to Open New Project Wizard:
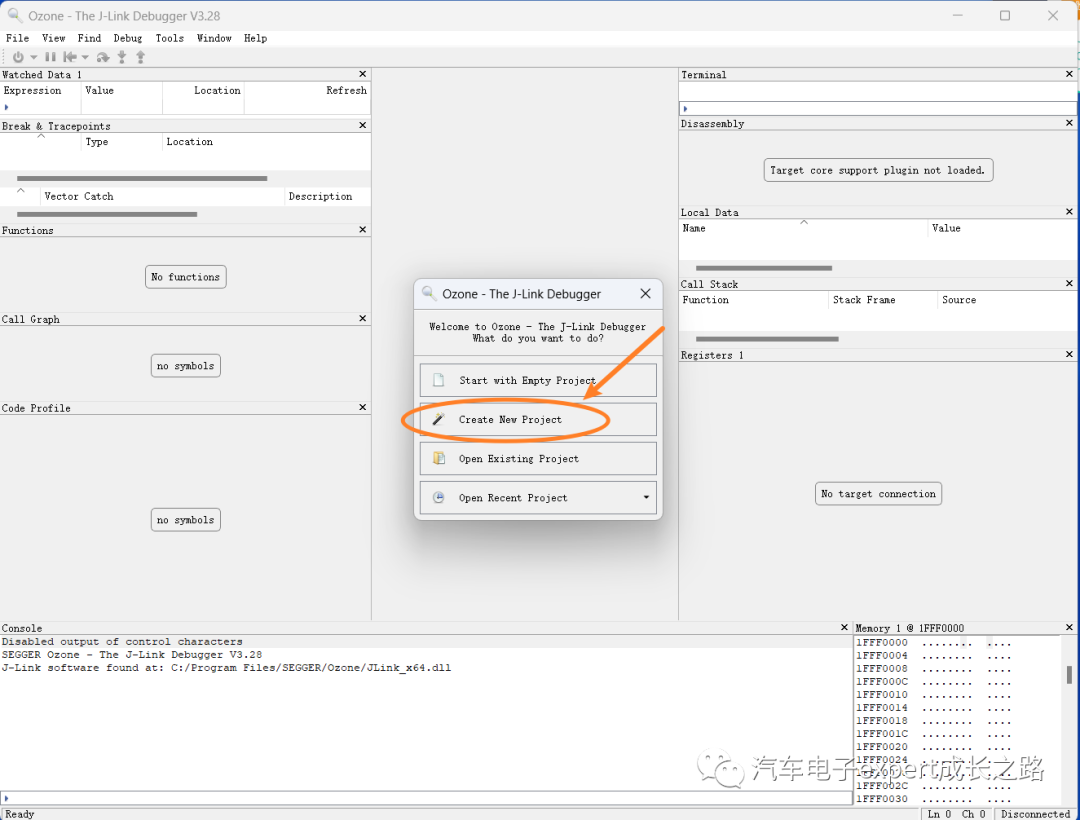
Select TargetMCUModel (Device), Core Register Set (Register Set), and Peripheral Register Mapping File (Peripherals (Optional)), -> “Next“:
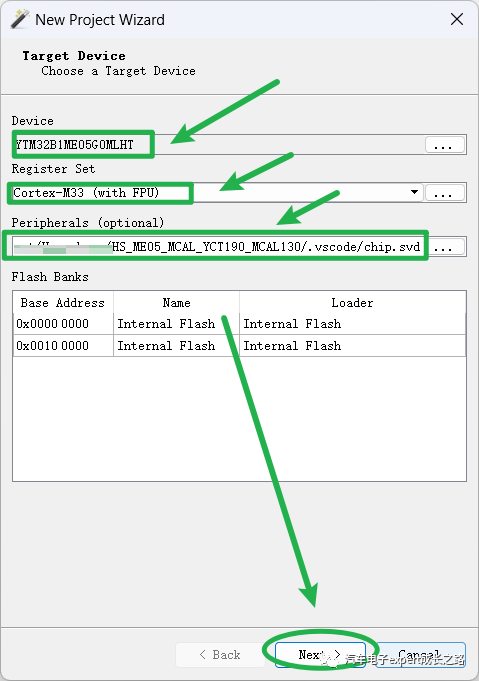
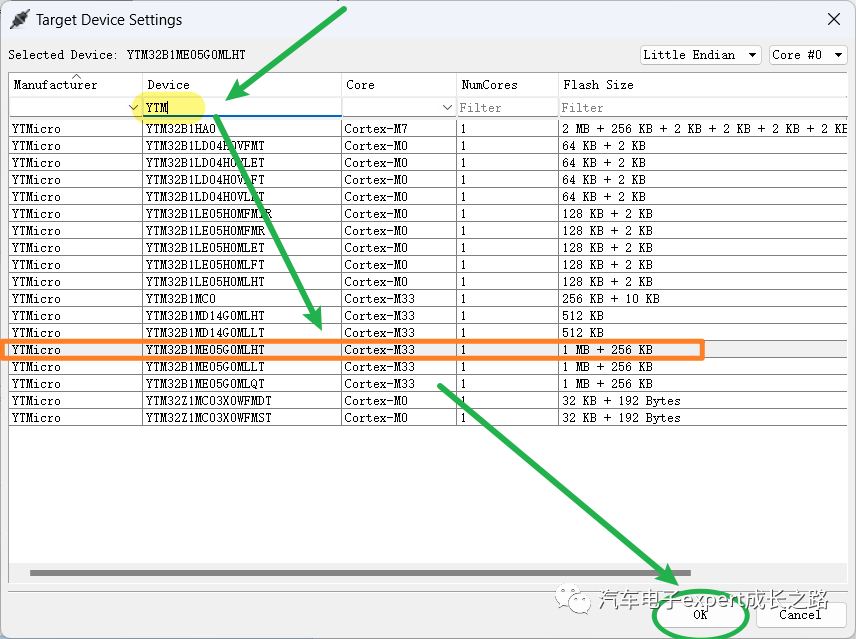
When selecting the target device, you can filter quickly by entering “YTM” in the “Device” column to find the YCT automotive MCU model, but others must have the YCT automotive MCU JLINK patch installed in advance:
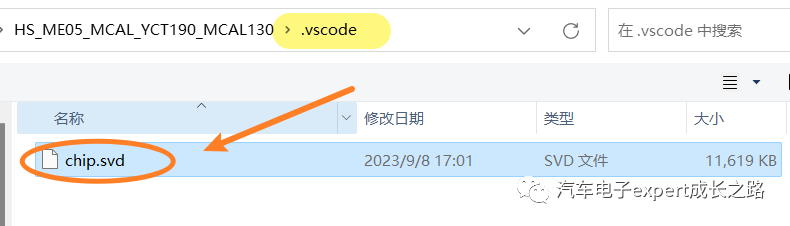
Select the “.vscode” directory under the project as the “chip.svd” file (Note: This file is generated by YCT in the “.vscode” directory only when VSCode is selected as the IDE) for debugging the MCU peripheral register mapping file:
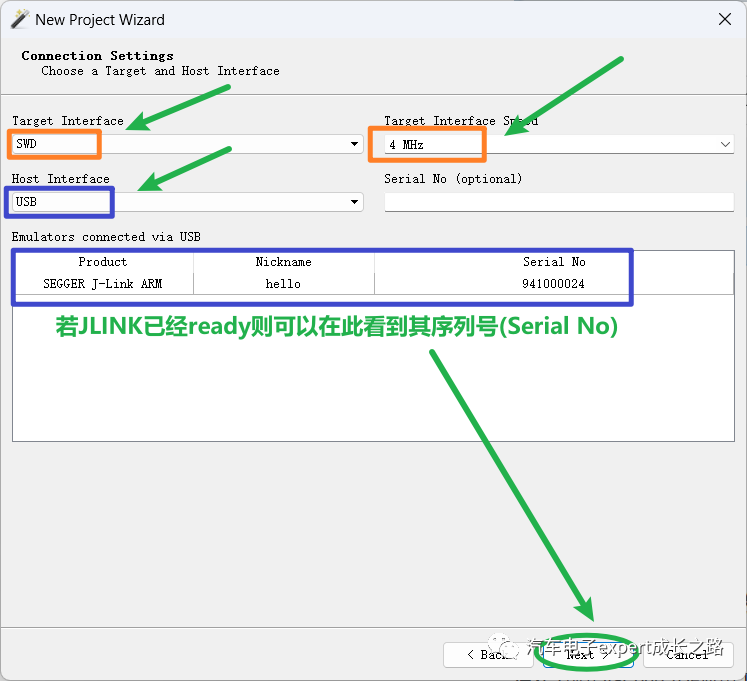
Select the JLINK debugger connection method as using the “SWD” interface, “4MHz” communication speed, “USB” interface -> “Next“:
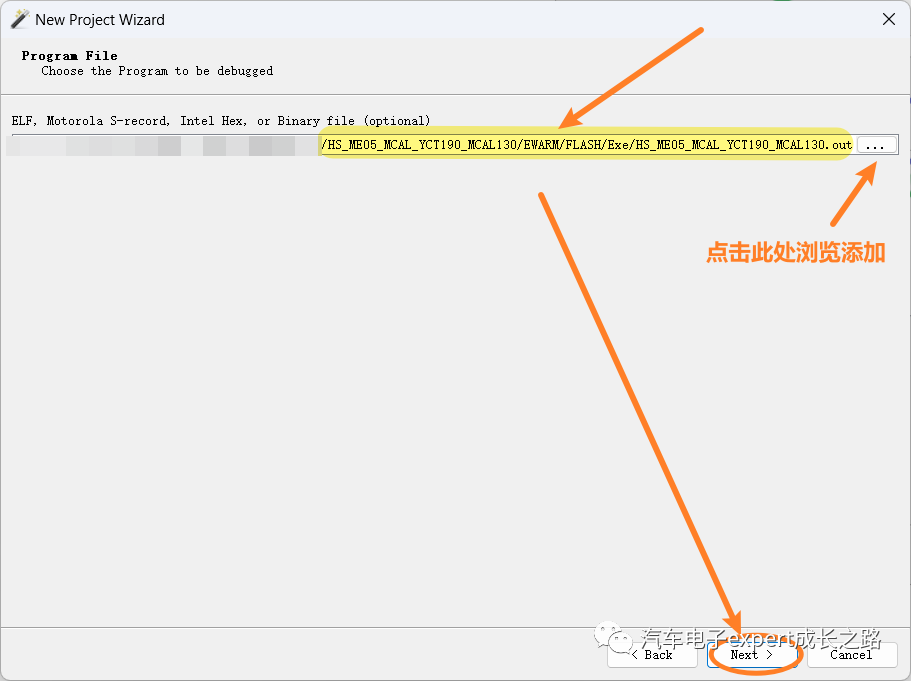
Select the optional elf file to debug the project, IAR has the suffix .out -> “Next“:
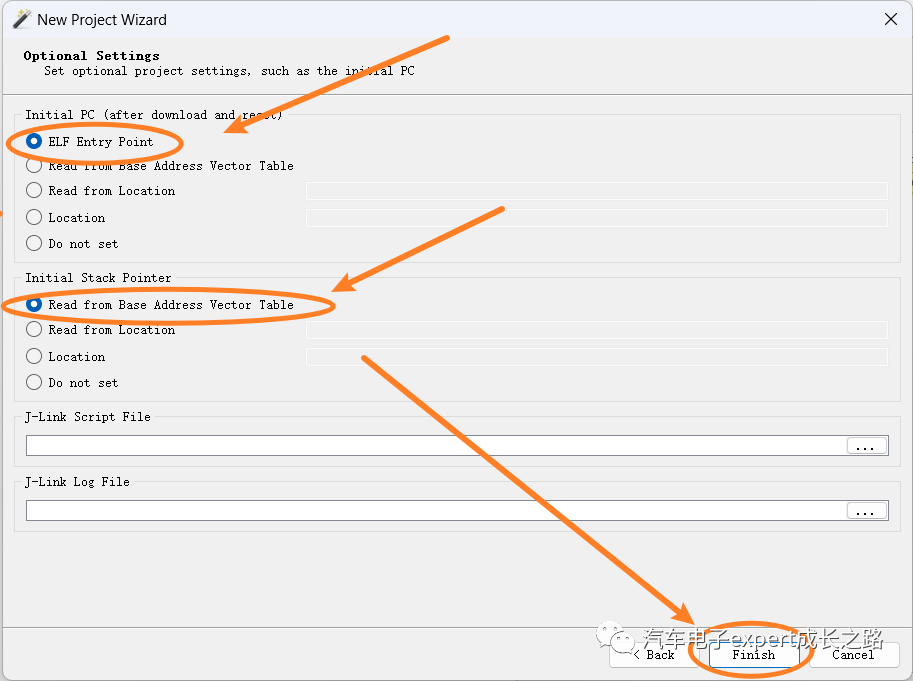
Keep the default configuration -> “Finish” to complete the Ozone debugging project creation:
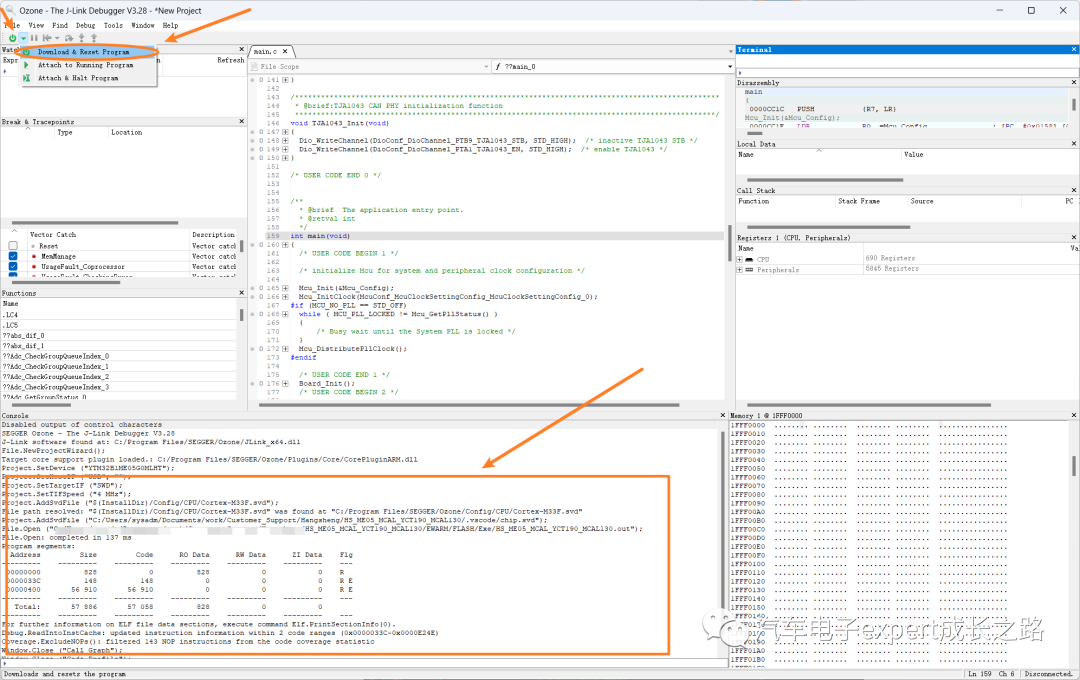
Select “Download & Reset Program” in the upper right corner to download the program connection:
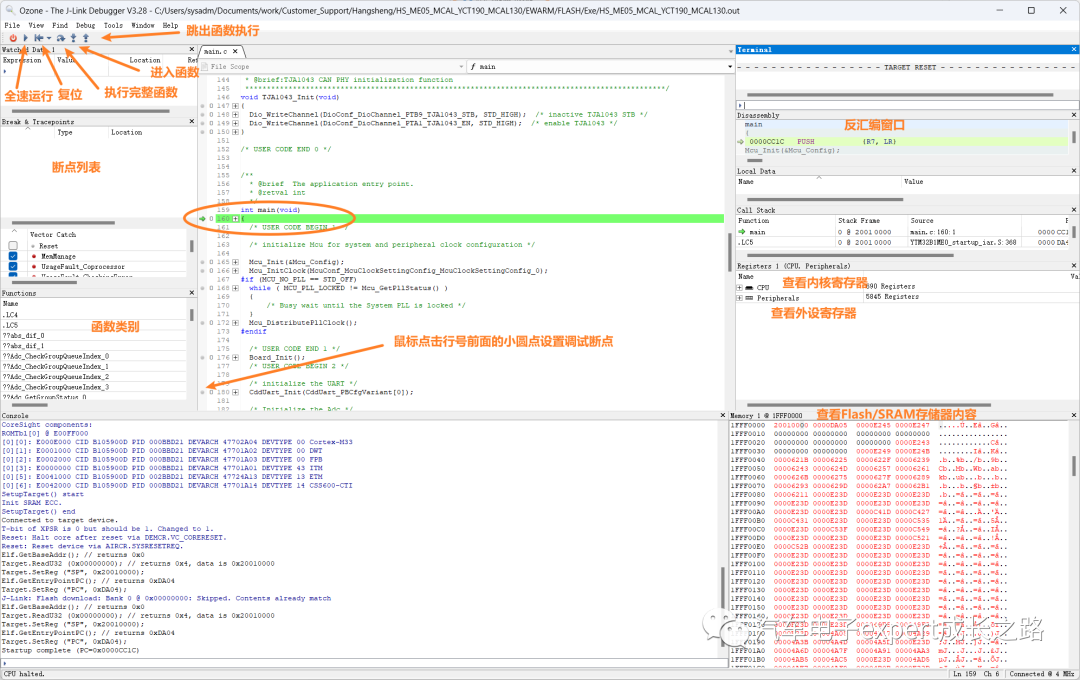
The overview of Ozone debugging is as follows. For more details, please refer to its user manual or help documentation:
-
How to Add Your Own Code to the CMake Compilation Directory?
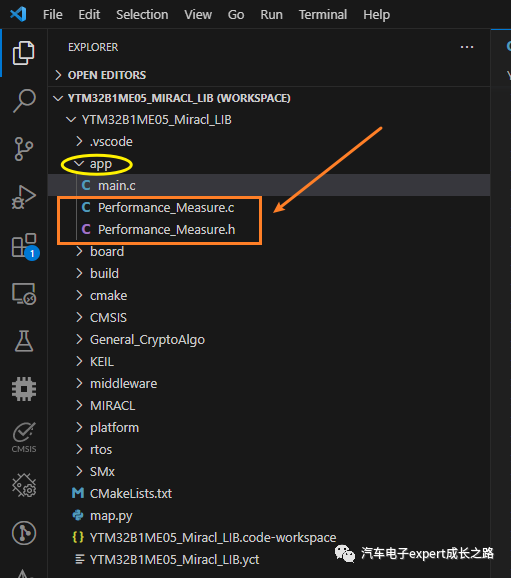
Case 1: If the User’s Application Code Files are Few, Add Them Directly to the ‘app’ Directory
In these cases, simply add the .c and .h files to the “app” folder directory generated by YCT for the VSCode IDE application project:
Case 2: If the User’s Application Code Files are Many and Multiple Folders Need to be Added, Modify CMakeLists.txt
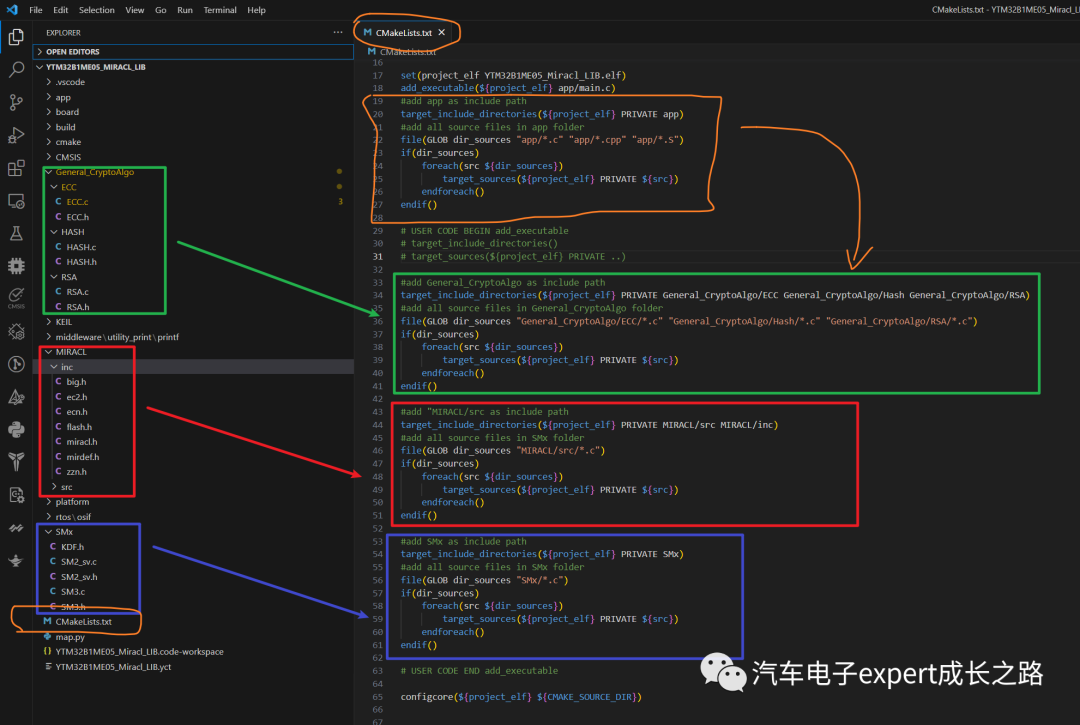
In the root directory of the YCT created VSCode IDE application project, there is a CMakeLists.txt file, which contains the CMake compilation rules. Find the keywords “# USER CODE BEGIN add_executable” and “# USER CODE END add_executable“, copy and paste the default CMake script that adds the app directory in between, to prevent it from being overwritten when regenerating the project. Then modify the added compilation directory, for example, in the application project shown below, add three user code directories and their subdirectories: General_CryptoAlgo, MIRACL, and SMx to the CMake elf compilation directory:
-
In the target_include_directories(${project_elf} <path1> <path2>) line, add the user directories, multiple can be added, separated by spaces;
-
In the file(GLOB dir_sources “<path1>/*.c” “<path2>/*.c”) line, add the source code files you want to compile, where *.c is any C source code, *.cpp is any C++ source code, *.S/*.s is any assembly source code (Note: CMake distinguishes file name suffixes by case, must match the actual source code file names)
-
Next, the if statement checks whether the source file “dir_sources” is empty. If not empty, indicating that there are source codes to compile, the subsequent foreach statement is called to traverse all source files for compilation.
-
How to Compile and Generate a Static Library?
Taking the following project as an example, compile all C source codes in the MIRACL directory (add them to the YCT generated SDK/MCAL VSCode IDE application project) into a static library (for example, libYTM32B1M_MIRACL.a) for other application projects to call:
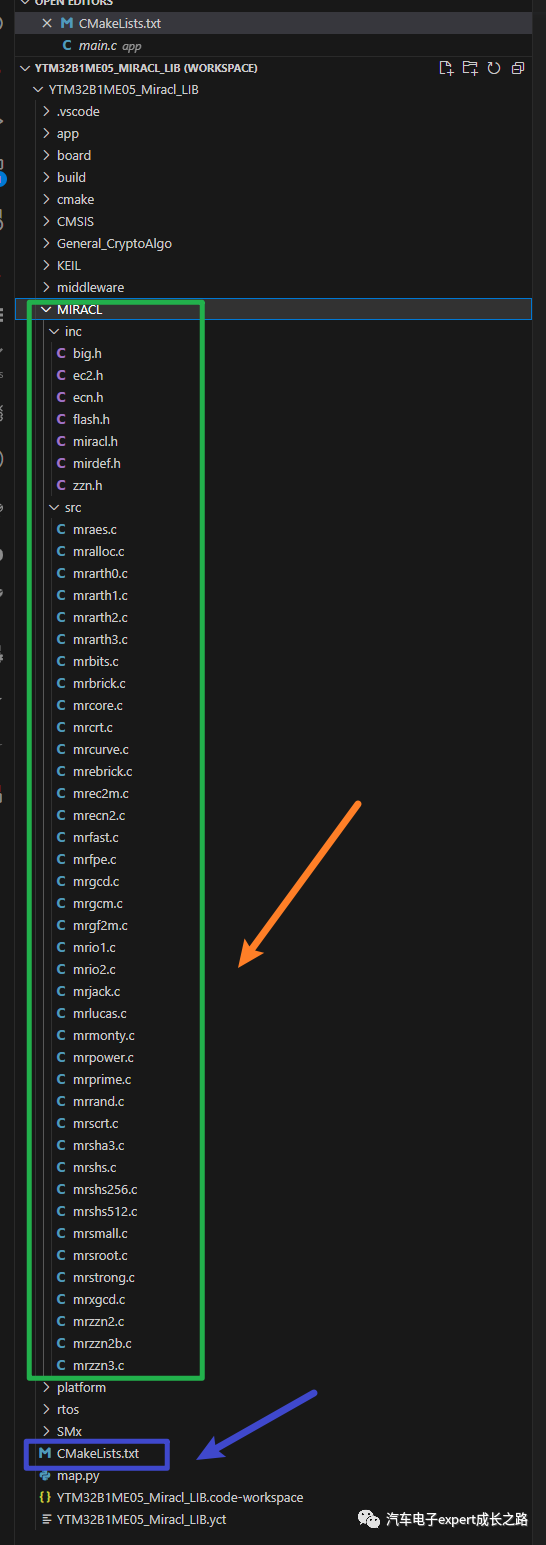
The specific steps are as follows:
-
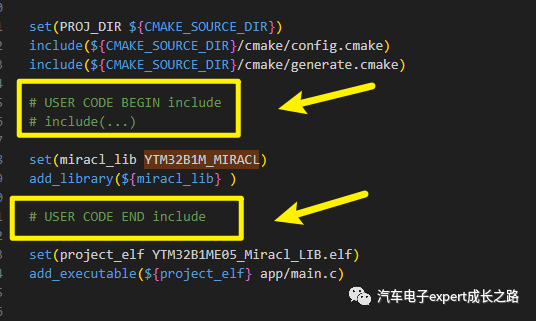
In the CMakeLists.txt in the root directory of the application project, use the set() function to create a CMake compilation target miracl_lib, and use the add_library() function to add it as a static library:
set(miracl_lib YTM32B1M_MIRACL)add_library(${miracl_lib})Tips: It is recommended to place it between “# USER CODE BEGIN include” and “# USER CODE END include” to prevent it from being overwritten when YCT regenerates the SDK/MCAL driver configuration:
-
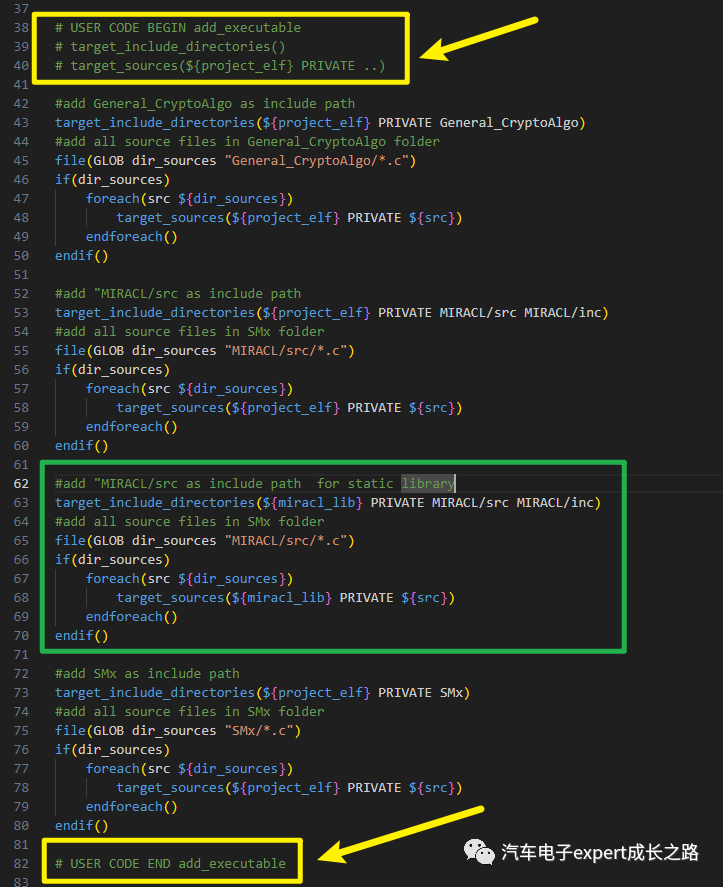
Add the C source files and header file directories that need to be linked to the static library to the above-created compilation target miracl_lib, the specific script is as follows:
#add "MIRACL/src as include path for static librarytarget_include_directories(${miracl_lib} PRIVATE MIRACL/src MIRACL/inc)#add all source files in SMx folder file(GLOB dir_sources "MIRACL/src/*.c")if(dir_sources) foreach(src ${dir_sources}) target_sources(${miracl_lib} PRIVATE ${src}) endforeach()endif()Tips: It is recommended to place it between “# USER CODE BEGIN add_executable” and “# USER CODE END add_executable” to prevent it from being overwritten when YCT regenerates the SDK/MCAL driver configuration:
-
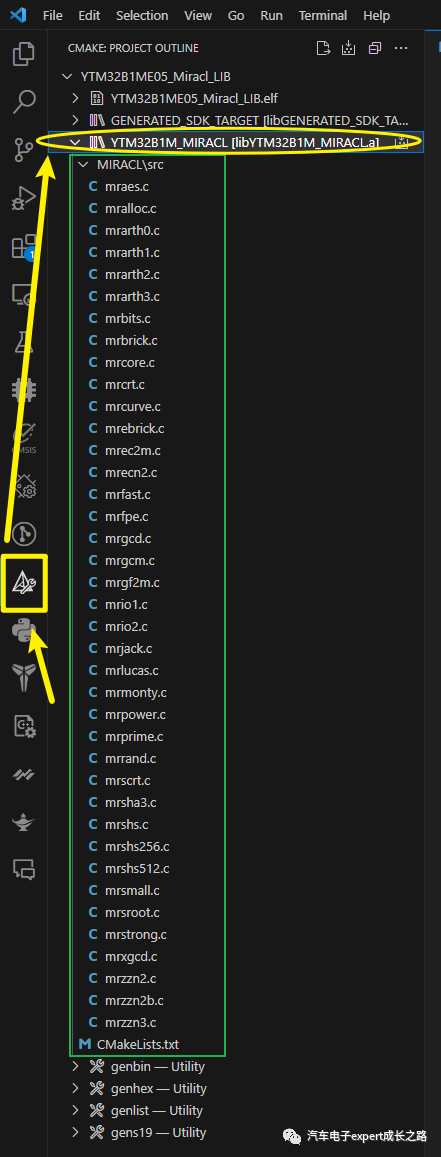
Save the modified CMakeLists.txt, then open the CMake Tools extension in VSCode, and you will find the created static library compilation target. The final generated static library will be libYTM32B1M_MIRACL.a, automatically adding the prefix “lib” and suffix “.a”:
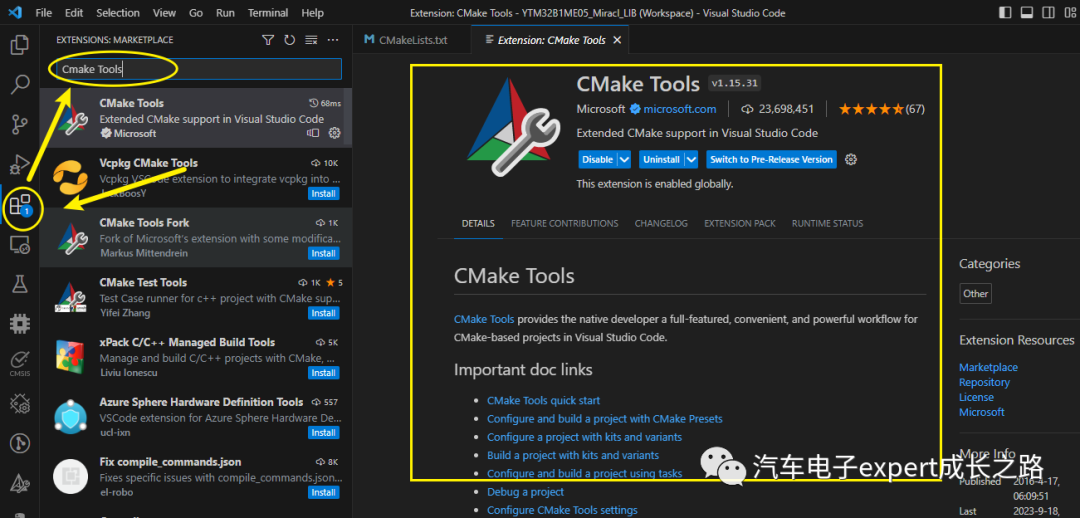
Tips: If you have not installed the CMake Tools extension, you can search for “CMake Tools” in VSCode’s Extension (Ctrl + Shift + X) for online installation:
-
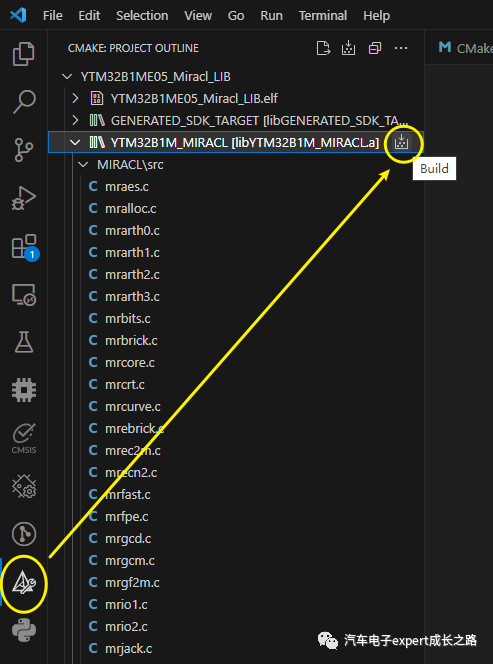
Select the static library compilation target in CMake Tool, click the compile (Build) icon on the right to start compiling the static library.
The output log information of the static library compilation process in the “OUTPUT” window of VSCode IDE is as follows:
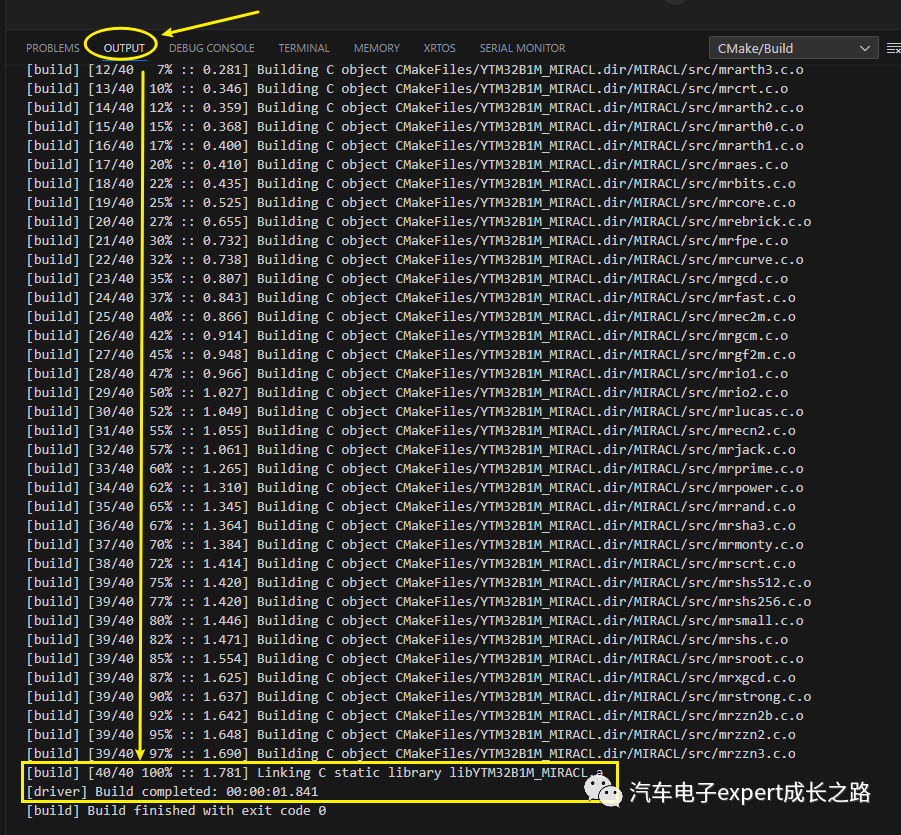
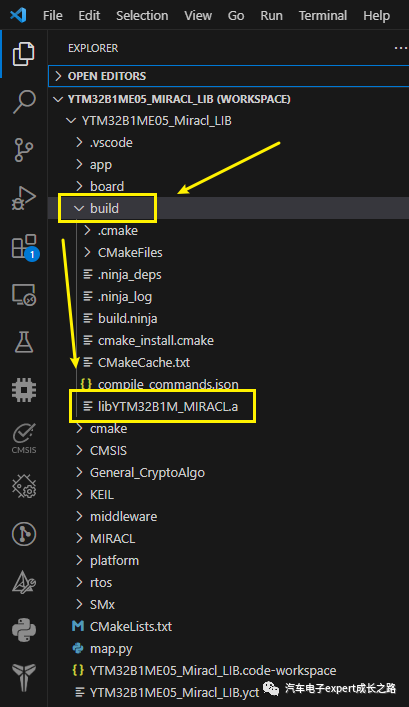
The final generated static library is located in the “build” folder under the project directory:
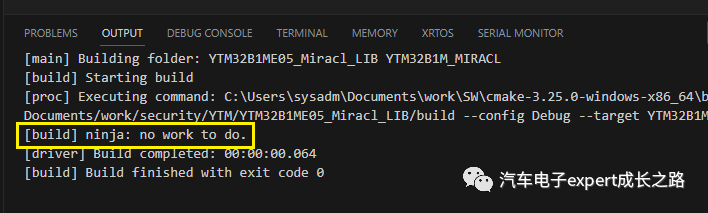
Tips: If the source code of the static library has been modified and needs to be recompiled, manually delete the “build” directory, otherwise ninja will output “no work to do“:
-
How to Use the Static Library?
Next, I will introduce how to call the above-generated static library in the YCT generated SDK/MCAL VSCode IDE application project, the specific steps are as follows:
-
Create a YCT automotive MCU SDK/MCAL VSCode IDE application project with the same core as the above static library compilation target (for example, the YTM32B1Mx series uses the CM33 core, so the compiled static library can be used universally);
-
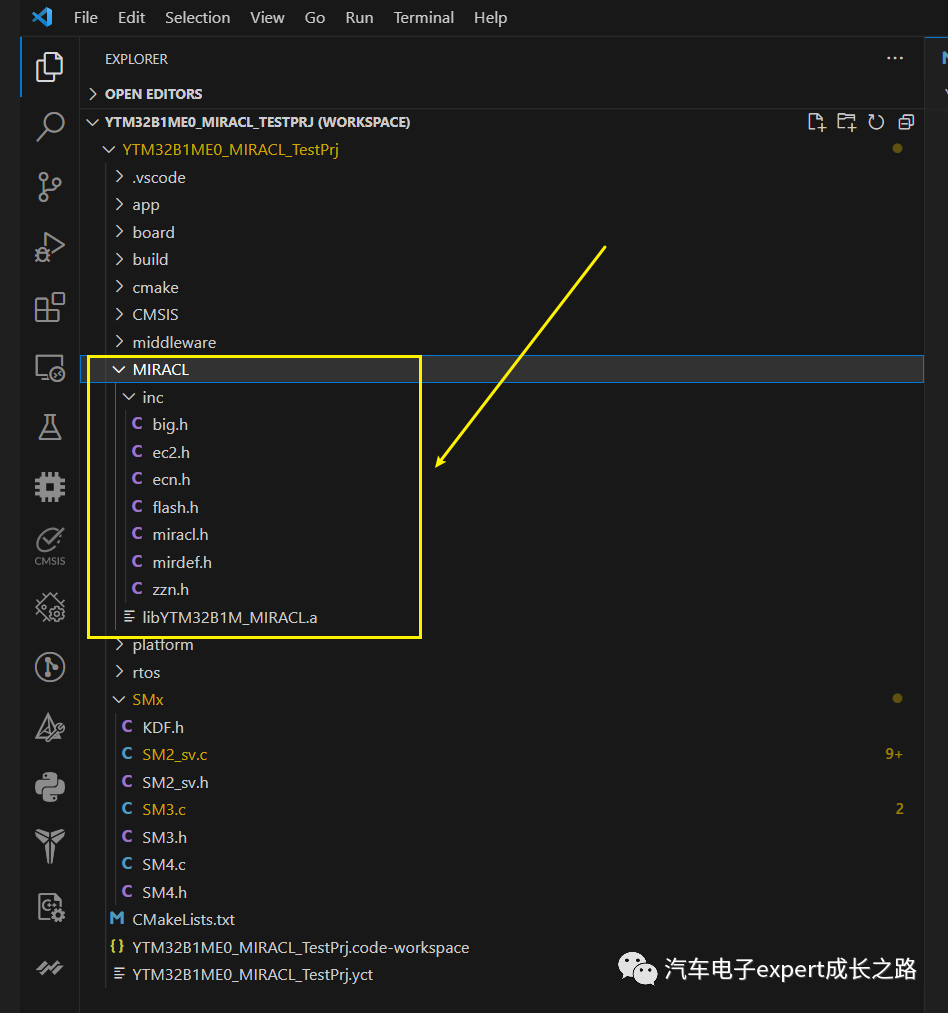
Add the static library files and corresponding header files needed to the VSCode IDE application project:
-
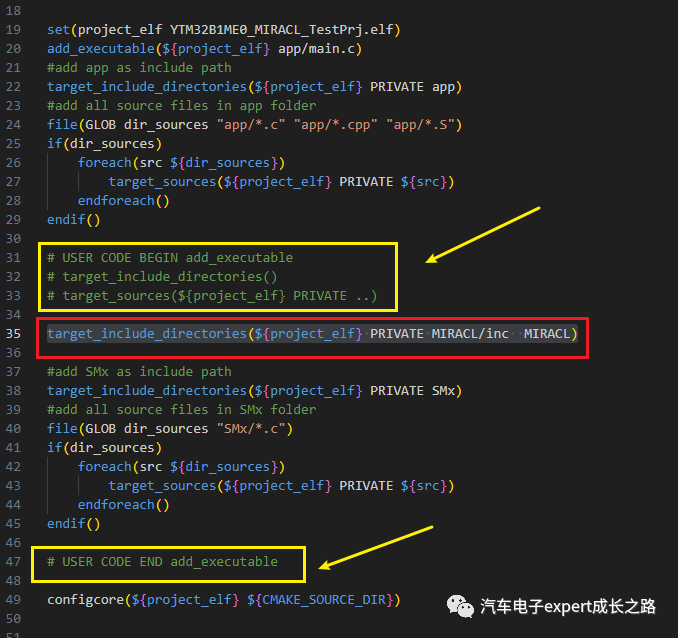
In the project CMakeLists.txt file, use the target_include_directories() function to add the header file paths used by the static library to the application project elf compilation target:
target_include_directories(${project_elf} PRIVATE MIRACL/inc MIRACL)Tips: It is recommended to place it between “USER CODE BEGIN add_executable” and “# USER CODE END add_executable” to prevent it from being overwritten when YCT regenerates the SDK/MCAL driver configuration:
-
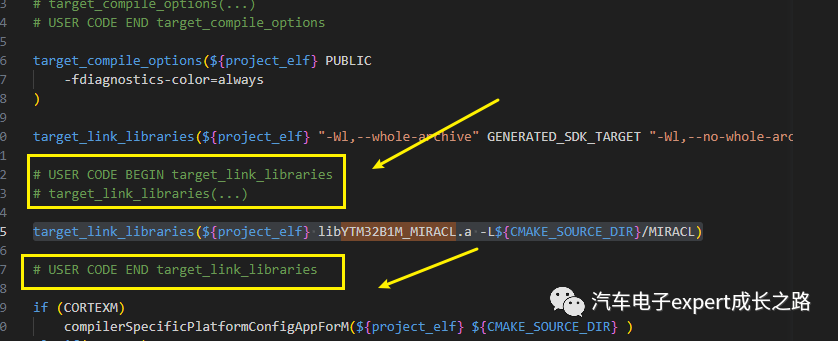
In the project CMakeLists.txt file, use the target_link_libraries() function to add the user static library to the application project elf link library:
target_link_libraries(${project_elf} libYTM32B1M_MIRACL.a -L${CMAKE_SOURCE_DIR}/MIRACL)Tips: In the above function, you need to use the full static library file name “libYTM32B1M_MIRACL.a“, and specify the correct search path through “-L${CMAKE_SOURCE_DIR}/MIRACL“, otherwise an error will occur when linking the generated project elf stating that the added static library file cannot be found;
Tips: It is recommended to place it between “USER CODE BEGIN target_link_libraries” and “# USER CODE END target_link_libraries” to prevent it from being overwritten when YCT regenerates the SDK/MCAL driver configuration:
-
In the application project, include the header files of the required static library interface functions, and then call the library functions.
This is the content I would like to share with you today. I hope it helps and inspires you.
If you encounter any issues related to the use and configuration of the YCT automotive MCU VSCode IDE project in your actual work, please feel free to leave a message, and I will answer them in the next article of this series.
Enwei Hu (胡恩伟)September 22, 2023, in Chongqing