Objective of This Article
This article will detail how to configure the RKNN Docker environment on an Android development board equipped with the RK3588 chip in a Windows 11 system environment, and how to run the YOLOv5 object detection model accelerated by NPU on the development board using the adb tool.
Development Environment Description
- Host System: Windows 11
- Target Device: Android development board equipped with the RK3588 chip
- Core Tools: Docker image containing rknn-toolkit2, rknn_model_zoo, and other tools, ADB debugging tools
Introduction to rknn-toolkit2
The NPU toolset from Rockchip has been adjusted and placed in a new repository called rknn-toolkit2, which includes toolkit2, toolkit-lite2, and rknpu2. Below is a brief introduction to what these three libraries do.
1. RKNN-Toolkit2:
- 1. Model Conversion: Supports converting models from mainstream deep learning frameworks (such as TensorFlow, PyTorch, ONNX, etc.) into Rockchip’s proprietary RKNN format, compatible with its NPU hardware.
- 2. Quantization and Optimization: Provides model quantization (such as asymmetric 8-bit quantization) and mixed quantization functions to improve inference efficiency and reduce memory usage.
- 3. PC-side Inference Simulation: Can simulate NPU running RKNN models on a PC for performance evaluation and memory analysis.
- 4. Encryption and Deployment: Supports model encryption to ensure deployment security and can distribute models to the development board over the network. Applicable Scenarios: Mainly used for model conversion, debugging, and performance optimization during the development phase, with a running environment of PC (x86/arm64).
2. RKNN-Toolkit-Lite2
- 1. Embedded Deployment: Designed specifically for development boards, providing a Python interface to simplify the loading and inference of RKNN models without complex compilation.
- 2. Lightweight Operation: Compared to RKNN-Toolkit2, it removes model conversion and performance evaluation functions, retaining only the inference interface, suitable for resource-constrained embedded environments.
- 3. Multi-core Scheduling: Supports configuring the scheduling mode of NPU cores (such as single-core or multi-core parallel) through the core_mask parameter. Applicable Scenarios: Directly running Python scripts for model inference on Rockchip development boards (such as RK3588), suitable for terminal application deployment.
3. RKNPU2
- 1. Hardware Acceleration: The core software stack of the Rockchip NPU (Neural Processing Unit), including drivers and runtime libraries, directly calls NPU hardware for accelerated inference.
- 2. Low-level API Support: Provides C/C++ interfaces (RKNN Runtime) to interface with models generated by RKNN-Toolkit2 for efficient inference.
- 3. Cross-platform Compatibility: Supports RK356x, RK3588, and other series chips, adaptable to various AI application scenarios (such as computer vision, natural language processing). Applicable Scenarios: Embedded systems requiring high-performance inference, typically used in conjunction with RKNN-Toolkit2 or Lite2.
Typical Development Process:
On PC: Use RKNN-Toolkit2 to convert and optimize models. On the board: Load models and invoke NPU acceleration using RKNN-Toolkit-Lite2 (Python) or RKNPU2’s C API.
Installing rknn-toolkit2
1. Clone the rknn-toolkit2 Source Repository
# Download RKNN-Toolkit2 repository
git clone https://github.com/airockchip/rknn-toolkit2.git --depth 1
# Note:
# 1. The parameter --depth 1 means only clone the most recent commit.
# 2. If you encounter a failure in git clone, you can also directly download the compressed package from GitHub to your local machine and then extract it to this directory.
I took about two hours to complete the clone. Be prepared for that. The directory structure is as follows:
├── rknn-toolkit2
│   ├── doc # All documents are here, please read them carefully.
│   ├── rknn-toolkit2
│   │   ├── packages
│   │   ├── docker
│   │   └── ...
│   ├── rknn-toolkit-lite2
│   │   ├── packages
│   │   ├── docker
│   │   └── ...
│   ├── rknpu2
│   │   ├── runtime
│   │   └── ...
│   └── ...
2. Install RKNN-Toolkit2 Environment
rknn-toolkit2 currently only supports use on Ubuntu systems, and the recommended Python version is 3.8. The requirements are quite strict. In terms of operating systems, we have the following options: 1. Development computer with Ubuntu: completed, see above; 2. Docker: this is most recommended, as the environment is already set up in the image, and our goal today is this; 3. WSL: can be installed in Windows, and I will also try this later; 4. Virtual machine: please refer to the first option.
2.1 Download Docker Image File
The official image has been packaged, and the download address is: https://console.zbox.filez.com/l/I00fc3 (extraction code: rknn). It took me a long time to download. As for installing Docker on Windows, please search for it yourself. Execute the following command to load the image:
# Note: x.x.x represents the version number of RKNN-Toolkit2, cpxx represents the Python version
# docker load --input rknn-toolkit2-x.x.x-cpxx-docker.tar.gz
docker load --input rknn-toolkit2-v2.3.0-cp38-docker.tar.gz
The loading process maxed out the CPU, and after a moment, it completed:
PS D:\software\docker> docker load --input rknn-toolkit2-v2.3.0-cp38-docker.tar.gz
ec66d8cea54a: Loading layer [==================================================>]  75.17MB/75.17MB
bdf67dd9f283: Loading layer [==================================================>]   3.29GB/3.29GB
Loaded image: rknn-toolkit2:2.3.0-cp38
2.2 Query Image Information
Use the following command to view the Docker image information:
docker images
The following result is normal:
PS D:\software\docker> docker images
REPOSITORY                 TAG          IMAGE ID       CREATED         SIZE
rknn-toolkit2              2.3.0-cp38   40ca8bd2889c   4 months ago    3.33GB
And it will also load in the Images section of the Docker Desktop visual interface.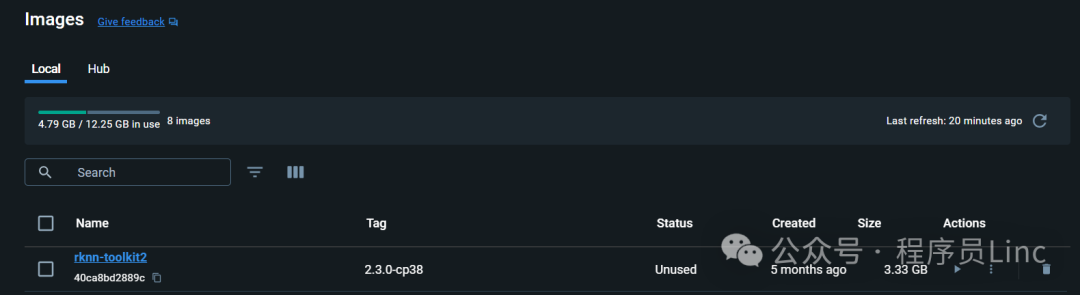
3. Confirm the RKNPU2 Environment on the Development Board
Generally speaking, after purchasing the development board, the RKNPU2 environment is already configured. We just need to confirm it. The RKNN-Toolkit2’s board debugging function requires that the RKNPU2 environment is installed on the board and that the rknn_server service is started. Here are two basic concepts in the RKNPU2 environment:
RKNN Server: A background proxy service running on the development board. The main function of this service is to call the corresponding interface of the board’s Runtime to process data transmitted from the computer via USB and return the processing results to the computer.RKNPU2 Runtime Library (librknnrt.so): Its main responsibility is to load RKNN models in the system and execute RKNN model inference operations by calling the dedicated Neural Processing Unit (NPU). If the RKNN Server and Runtime library are not installed on the board, or if the versions of RKNN Server and Runtime library are inconsistent, the RKNPU2 environment needs to be reinstalled. (Note: 1. If using RKNN models with dynamic dimension inputs, the RKNN Server and Runtime library versions must be >= 1.5.0. 2. Ensure that the versions of RKNN Server, Runtime library, and RKNN-Toolkit2 are consistent; it is recommended to install the latest versions.) If the rknn_server service can be started, it indicates that the RKNPU2 environment is already installed on the board.
# Connect the development board to the PC via wired connection
# Or wireless connection is also possible
# Enter the board
adb shell
# Start rknn_server
su
setenforce 0
/vendor/bin/rknn_server &
If the following output appears, it indicates that the rknn_server service has started successfully, meaning the RKNPU2 environment is installed.
Running Example Program for YOLOv5 Object Recognition
1. Introduction to RKNN Model Zoo
The RKNN Model Zoo provides example code aimed at helping users quickly run various commonly used models on Rockchip’s development boards. The directory structure of the project is as follows:
rknn_model_zoo
├── 3rdparty # Third-party libraries
├── datasets # Datasets
├── examples # Example code
├── utils # Common methods, such as file operations, drawing, etc.
├── build-android.sh # Compilation script for Android system development boards
├── build-linux.sh # Compilation script for Linux system development boards
└── ...
The examples directory includes examples of some commonly used models, such as MobileNet and YOLO. Each model example provides both Python and C/C++ versions of the example code. Taking the YOLOv5 model as an example, its directory structure is as follows:
rknn_model_zoo
├── examples
│   └── yolov5
│       ├── cpp # C/C++ version of the example code
│       ├── model # Model, test images, and other files
│       ├── python # Model conversion script and Python version of the example code
│       └── README.md
└── ...
2. RKNN Python Demo Running YOLOv5 Object Recognition
2.1 Mapping Files and Running the Container
Map the RKNN Model Zoo project into the container and run the container using the docker run command. After running, you will enter the bash environment of the container. The reference command is as follows:
# Use the docker run command to create and run the RKNN Toolkit2 container
# And use the -v <host src folder>:<image dst folder> parameter to map local files into the container
docker run -t -i --privileged -v /dev/bus/usb:/dev/bus/usb -v D:\workplace\workplace\github\ai\rknn_model_zoo-v2.3.0:/rknn_model_zoo rknn-toolkit2:2.3.0-cp38 /bin/bash
2.2 Preparing the Model
Enter the rknn_model_zoo/examples/yolov5/model directory and run the download_model.sh script, which will download a usable YOLOv5 ONNX model and store it in the current model directory. The reference command is as follows:
# Enter the rknn_model_zoo/examples/yolov5/model directory
cd rknn_model_zoo/examples/yolov5/model
# Run the download_model.sh script to download the yolov5 onnx model
# For example, the downloaded onnx model is stored at model/yolov5s_relu.onnx
./download_model.sh
2.3 Model Conversion
Enter the rknn_model_zoo/examples/yolov5/python directory and run the convert.py script, which will convert the original ONNX model into an RKNN model. The reference command is as follows:
# Enter the rknn_model_zoo/examples/yolov5/python directory
cd rknn_model_zoo/examples/yolov5/python
# Run the convert.py script to convert the original ONNX model into an RKNN model
# Usage: python convert.py model_path [rk3566|rk3588|rk3562] [i8/fp] [output_path]
python convert.py ../model/yolov5s_relu.onnx rk3588 i8 ../model/yolov5s_relu.rknn
The running result is as follows:
root@d63752fd0a0d:/rknn_model_zoo/examples/yolov5/python# python convert.py ../model/yolov5s_relu.onnx rk3588 i8 ../model/yolov5s_relu.rknn
I rknn-toolkit2 version: 2.3.0
--> Config model
done
--> Loading model
I Loading : 100%|██████████████████████████████████████████████| 121/121 [00:00<00:00, 19745.20it/s]
done
--> Building model
I OpFusing 0: 100%|█████████████████████████████████████████████| 100/100 [00:00<00:00, 3327.91it/s]
I OpFusing 1 : 100%|████████████████████████████████████████████| 100/100 [00:00<00:00, 1926.24it/s]
I OpFusing 2 : 100%|████████████████████████████████████████████| 100/100 [00:00<00:00, 1898.53it/s]
I GraphPreparing : 100%|███████████████████████████████████████| 149/149 [00:00<00:00, 18829.51it/s]
I Quantizating : 100%|████████████████████████████████████████████| 149/149 [00:04<00:00, 31.51it/s]
I rknn building ...
I rknn building done.
done
--> Export rknn model
done
2.4 Running RKNN Python Demo
Enter the rknn_model_zoo/examples/yolov5/python directory and run the yolov5.py script to run the YOLOv5 model on the board through board debugging. The reference command is as follows:
# Enter the rknn_model_zoo/examples/yolov5/python directory
cd rknn_model_zoo/examples/yolov5/python
# Run the yolov5.py script to run the yolov5 model on the board
# Usage: python yolov5.py --model_path {rknn_model} --target {target_platform}
# Note: Here, taking the rk3588 platform as an example, if it is another development board, you need to modify the platform type in the command.
python yolov5.py --model_path ../model/yolov5s_relu.rknn --target rk3588
To be continued: The docker environment directly adb connect encountered a device offline issue after connecting. This has not been resolved, and I plan to use a wired connection later.
3. RKNN C Demo Running YOLOv5 Object Recognition
Different chips have corresponding methods, and you need to follow the steps in the README.md in the directory to run. The model and conversion refer to the previous section, and below we will directly enter the C language compilation stage. For building a new image using Dockerfile, please refer to the appendix.
3.0 Download NDK
I plan to download the NDK to the rknn_model_zoo directory, running the following command in Docker:
 cd rknn_model_zoo/
wget -c https://dl.google.com/android/repository/android-ndk-r19c-linux-x86_64.zip
3.1 Compilation
For the RK3588 Android platform, use the build-android.sh script in the rknn_model_zoo directory for compilation. Before running the build-android.sh script, you need to specify the compiler’s path for ANDROID_NDK_PATH to the local NDK compiler path. In the build-android.sh script, you need to add the following command (edit in Docker, use vim):
# Add to the beginning of the build-android.sh script
ANDROID_NDK_PATH=YOUR_PATH/android-ndk-r19c
In the rknn_model_zoo directory, run the build-android.sh script. The reference command is as follows:
# Run the build-android.sh script
# Usage: ./build-android.sh -t <target> -a <arch> -d <build_demo_name> [-b <build_type>] [-m]
# -t : target (rk356x/rk3588) # Platform type
# -a : arch (arm64-v8a/armeabi-v7a) # Board system architecture
# -d : demo name # Corresponding to the name of the subfolder in the examples directory, such as yolov5, mobilenet
# -b : build_type (Debug/Release)
# -m : enable address sanitizer, build_type needs to be set to Debug
./build-android.sh -t rk3588 -a arm64-v8a -d yolov5
The result is as follows:
root@fc455afb93ec:/rknn_model_zoo# ./build-android.sh -t rk3588 -a arm64-v8a -d yolov5
./build-android.sh -t rk3588 -a arm64-v8a -d yolov5
===================================
BUILD_DEMO_NAME=yolov5
BUILD_DEMO_PATH=examples/yolov5/cpp
TARGET_SOC=rk3588
TARGET_ARCH=arm64-v8a
BUILD_TYPE=Release
ENABLE_ASAN=OFF
DISABLE_RGA=
INSTALL_DIR=/rknn_model_zoo/install/rk3588_android_arm64-v8a/rknn_yolov5_demo
BUILD_DIR=/rknn_model_zoo/build/build_rknn_yolov5_demo_rk3588_android_arm64-v8a_Release
ANDROID_NDK_PATH=/rknn_model_zoo/android-ndk-r19c
===================================
Install the project...
-- Install configuration: "Release"
-- Installing: /rknn_model_zoo/install/rk3588_android_arm64-v8a/rknn_yolov5_demo/./rknn_yolov5_demo
-- Installing: /rknn_model_zoo/install/rk3588_android_arm64-v8a/rknn_yolov5_demo/./model/bus.jpg
-- Installing: /rknn_model_zoo/install/rk3588_android_arm64-v8a/rknn_yolov5_demo/./model/coco_80_labels_list.txt
-- Installing: /rknn_model_zoo/install/rk3588_android_arm64-v8a/rknn_yolov5_demo/model/yolov5s_relu.rknn
-- Installing: /rknn_model_zoo/install/rk3588_android_arm64-v8a/rknn_yolov5_demo/lib/librknnrt.so
-- Installing: /rknn_model_zoo/install/rk3588_android_arm64-v8a/rknn_yolov5_demo/lib/librga.so
root@fc455afb93ec:/rknn_model_zoo#
2.4 Pushing Files to the Development Board
After compilation, an install folder will be generated in the rknn_model_zoo directory, which contains the compiled executable files and related files such as test images. The reference directory structure is as follows:
install/
└── rk3588_android_arm64-v8a
    └── rknn_yolov5_demo
        ├── lib
        │   ├── librga.so
        │   └── librknnrt.so
        ├── model
        │   ├── bus.jpg
        │   ├── coco_80_labels_list.txt
        │   └── yolov5s_relu.rknn
        └── rknn_yolov5_demo
In the rknn_model_zoo directory, perform the following operations: As mentioned above, there is a problem with remote connection via Docker, I will try to push from the host using adb. The following adb commands are executed on the host Windows 11, please note the distinction. First, I connect to the development board and create a new directory:
$ adb connect 192.168.1.4:43225
connected to 192.168.1.4:43225

rk3588_s:/data # mkdir rknn-test
rk3588_s:/data #
Push again:
# Switch to root user permissions
adb root
# Push the entire rknn_yolov5_demo folder to the board
# Note: The rknn_yolov5_demo folder contains an executable file with the same name rknn_yolov5_demo
# Note: When using different models and platforms, it is recommended to directly find the corresponding path under install
adb push install/rk3588_android_arm64-v8a/rknn_yolov5_demo /data/rknn-test
Result:
$ adb push install/rk3588_android_arm64-v8a/rknn_yolov5_demo /data/rknn-test
install/rk3588_android_arm64-v8a/rknn_yolov5_demo/: 6 files pushed, 0 skipped. 6.1 MB/s (19310163 bytes in 3.011s)
2.5 Running the Demo on the Development Board
Execute the following commands:
adb shell
# Enter the rknn_yolov5_demo directory on the development board
cd /data/rknn-test/rknn_yolov5_demo/
# Set the environment for the dependent libraries
export LD_LIBRARY_PATH=./lib
# Run the executable file
# Usage: ./rknn_yolov5_demo <model_path> <input_path>, if there is no running permission, please chmod +x
./rknn_yolov5_demo model/yolov5s_relu.rknn model/bus.jpg
The execution result is as follows, and the speed is very fast:
rk3588_s:/data/rknn-test/rknn_yolov5_demo # ls
lib model rknn_yolov5_demo
rk3588_s:/data/rknn-test/rknn_yolov5_demo # ./rknn_yolov5_demo model/yolov5s_relu.rknn model/bus.jpg
load lable ./model/coco_80_labels_list.txt
model input num: 1, output num: 3
input tensors:
index=0, name=images, n_dims=4, dims=[1, 640, 640, 3], n_elems=1228800, size=1228800, fmt=NHWC, type=INT8, qnt_type=AFFINE, zp=-128, scale=0.003922
output tensors:
index=0, name=output0, n_dims=4, dims=[1, 255, 80, 80], n_elems=1632000, size=1632000, fmt=NCHW, type=INT8, qnt_type=AFFINE, zp=-128, scale=0.003922
index=1, name=286, n_dims=4, dims=[1, 255, 40, 40], n_elems=408000, size=408000, fmt=NCHW, type=INT8, qnt_type=AFFINE, zp=-128, scale=0.003922
index=2, name=288, n_dims=4, dims=[1, 255, 20, 20], n_elems=102000, size=102000, fmt=NCHW, type=INT8, qnt_type=AFFINE, zp=-128, scale=0.003922
model is NHWC input fmt
model input height=640, width=640, channel=3
origin size=640x640 crop size=640x640
input image: 640 x 640, subsampling: 4:2:0, colorspace: YCbCr, orientation: 1
scale=1.000000 dst_box=(0 0 639 639) allow_slight_change=1 _left_offset=0 _top_offset=0 padding_w=0 padding_h=0
rga_api version 1.10.1_[0]
rknn_run
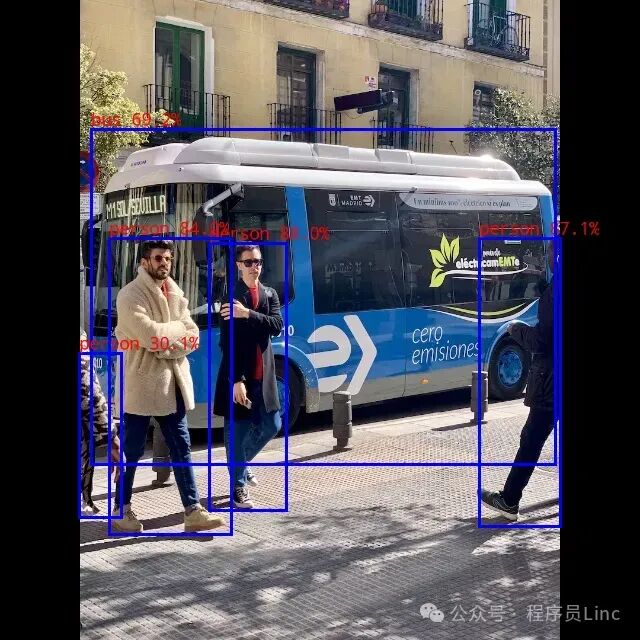
person @ (209 243 286 510) 0.880
person @ (479 238 560 526) 0.871
person @ (109 238 231 534) 0.840
bus @ (91 129 555 464) 0.692
person @ (79 353 121 517) 0.301
write_image path: out.png width=640 height=640 channel=3 data=0xb40000787775e000
2.6 Viewing Results
The output image is saved at rknn_yolov5_demo/out.png. This time I copied the image to the DCIM target and directly connected the development board to the display to view it, executing the following command:
rk3588_s:/data/rknn-test/rknn_yolov5_demo # cp out.png /mnt/sdcard/DCIM/
Summary
This article provides a detailed introduction to the complete process of setting up the RKNN SDK V2.3.0 development environment under Windows 11 Docker and successfully running the YOLOv5 object detection model on the RK3588 development board (Android system) using NPU acceleration (I spent a long time getting the C DEMO working, which is not even covered in the official documentation).
Applicable Scenarios
- Edge Computing: Efficiently running AI models on embedded devices (such as RK3588 development boards).
- Computer Vision: AI inference tasks such as object detection and image classification.
- Low Power High Performance Requirements: Utilizing NPU acceleration to reduce CPU load and improve energy efficiency.
Through this tutorial, everyone can quickly master the development process of the RK3588 NPU on Windows Docker, laying the foundation for subsequent AI application development.
Appendix
1. Rebuilding Custom Images via Dockerfile
The official downloaded image does not include C language-related compilation tools, wget, etc., so we need to create a new image ourselves. Below is my attempt.
Function of Dockerfile
A Dockerfile is a text file used to define the image build process, generating the final image by executing instructions layer by layer. Modifying the Dockerfile and rebuilding the image can permanently solidify software packages (such as cross-compilation toolchains) into the image, avoiding the need to reinstall them every time the container starts.
Creating a Dockerfile
Step description: Create a new directory: On the host machine (such as Windows), create a dedicated directory to store the Dockerfile, for example, D:\docker\rknn-custom. Create a new file: In this directory, create a file named Dockerfile (without an extension). Edit the content: Write the following content into the file:
# Use the base image
FROM rknn-toolkit2:2.3.0-cp38

# Install cross-compilation toolchain
RUN apt-get update && apt-get install -y \
    gcc-aarch64-linux-gnu \
    g++-aarch64-linux-gnu \
    cmake \
    wget \
    && rm -rf /var/lib/apt/lists/*
Key parameter explanation: FROM: Specifies the name and version of the base image, which must match the loaded image. RUN: Commands executed during the image build process, used here to install the toolchain. apt-get update: Updates the software source list. apt-get install -y: Silently installs the software package (-y means automatic confirmation). rm -rf /var/lib/apt/lists/*: Cleans up the apt cache to reduce the image size.
Building a Custom Image
Command execution: Open a terminal (PowerShell or CMD) in the directory where the Dockerfile is located and execute the following command:
docker build -t rknn-toolkit2:2.3.0-cp38-custom .
Parameter explanation: -t rknn-toolkit2:2.3.0-cp38-custom: Specifies the tag (name + version) of the new image. .: Indicates that the Dockerfile in the current directory is used.
Build Process Output
PS D:\software\docker\rknn-custom> docker build -t rknn-toolkit2:2.3.0-cp38-custom .
[+] Building 22.2s (6/6) FINISHED                                                                        docker:default
 => [internal] load build definition from Dockerfile                                                               0.0s
 => => transferring dockerfile: 286B                                                                               0.0s
 => [internal] load metadata for docker.io/library/rknn-toolkit2:2.3.0-cp38                                        0.0s
 => [internal] load .dockerignore                                                                                  0.0s
 => => transferring context: 2B                                                                                    0.0s
 => [1/2] FROM docker.io/library/rknn-toolkit2:2.3.0-cp38                                                          0.0s
 => [2/2] RUN apt-get update && apt-get install -y     gcc-aarch64-linux-gnu     g++-aarch64-linux-gnu     cmake  21.6s
 => exporting to image                                                                                             0.5s
 => => exporting layers                                                                                            0.5s
 => => writing image sha256:0d02eb78802a5d20058a423a8bd9a142fa600a8bcd6320a80de0454400325c67                       0.0s
 => => naming to docker.io/library/rknn-toolkit2:2.3.0-cp38-custom                                                 0.0s
Verifying the Effectiveness of the Image
Start the container and check the toolchain:
docker run -it rknn-toolkit2:2.3.0-cp38-custom /bin/bash

# After entering the container, execute
aarch64-linux-gnu-gcc --version
Expected output:
 aarch64-linux-gnu-gcc (Ubuntu 9.4.0-1ubuntu1~20.04) 9.4.0
Copyright (C) 2019 Free Software Foundation, Inc.
This is free software...