How to set up the RK3588 NPU development environment on an Ubuntu system (PC)? This involves running the Ubuntu system on the computer while the RK3588 board runs the Buildroot Linux system, establishing the RK3588 NPU development environment.The following are the corresponding deployment steps:0. Dependency Files
- RKNPU2 project download link: https://github.com/airockchip/rknn-toolkit2/tree/master/rknpu2
- RKNN-Toolkit2 project download link: https://github.com/airockchip/rknn-toolkit2
1. Environment Configuration
The computer’s operating system needs to be Ubuntu 18.04/20.04/22.04, and an RK3588 development board (using a filesystem generated by Buildroot or Ubuntu, we will use Buildroot below).
There are two installation methods for the RKNN-Toolkit2 provided by RK: direct installation of the development environment; or through a Docker environment. Below, we will operate directly in the Ubuntu 18.04 environment:
1). Synchronize the RK repository
mkdir ~/rknpu
cd ~/rknpu
# Download RKNN-Toolkit2 repository
git clone https://github.com/airockchip/rknn-toolkit2.git
# Download RKNN Model Zoo repository (example)
git clone https://github.com/airockchip/rknn_model_zoo.git
2). Install the RKNN-Toolkit2 environment
a. Install Python
RK recommends using Python 3.8 and creating the corresponding environment using Conda.
First, install Conda with the following commands (default installation in ~/miniconda3 directory):
wget -c https://mirrors.bfsu.edu.cn/anaconda/miniconda/Miniconda3-latest-Linux-x86_64.sh
chmod 777 Miniconda3-latest-Linux-x86_64.sh
bash Miniconda3-latest-Linux-x86_64.sh
Next, use Conda to create the Python environment:
Execute the following command in the computer terminal to enter the Conda base environment:
source ~/miniconda3/bin/activate # Directory where miniconda3 is installed
# After successful execution, the command line prompt will change to something like:
# (base) xxx@xxx:~$
Under the above prompt, execute the following command to create a Python 3.8 environment named toolkit2:
conda create -n toolkit2 python=3.8After executing the command, it will automatically synchronize and download the relevant packages and install them. Next, use the following command to activate the toolkit2 environment, and RKNN-Toolkit2 will be installed in this environment:
conda activate toolkit2
# After successful execution, the command line prompt will change to:
# (toolkit2) xxx@xxx:~$
# You can execute the following command to deactivate an active environment (exit the current active environment):
# conda deactivate
b. Install dependencies and RKNN-Toolkit2
Execute the following command in the activated toolkit2 environment:
# Enter the rknn-toolkit2 directory
cd ~/rknpu/rknn-toolkit2/rknn-toolkit2/
# Install dependencies according to different Python versions by selecting different requirements files (requirements_cpxx.txt), e.g., for python3.8, use requirements_cp38.txt
pip install -r packages/requirements_cp38-2.0.0b0.txt
# Depending on the Python version and processor architecture, choose different wheels to install the RKNN-Toolkit2 package
# where x.x.x is the RKNN-Toolkit2 version number, xxxxxxxx is the commit number, cpxx is the python version number
pip install packages/rknn_toolkit2-2.0.0b0+9bab5682-cp38-cp38-linux_x86_64.whl
c. Verify if the installation was successful
After the above steps, execute the following command:
# Enter Python interactive mode
python
# Import RKNN class
from rknn.api import RKNN
If installed successfully, the following output will be printed:
(toolkit2) guochongxin@guochongxin-virtual-machine:~/rknpu/rknn-toolkit2/rknn-toolkit2$ python
Python 3.8.19 (default, Mar 20 2024, 19:58:24) [GCC 11.2.0] :: Anaconda, Inc. on linux
Type "help", "copyright", "credits" or "license" for more information.
>>> from rknn.api import RKNN
>>>>>
3). Install compilation tools
a. Install CMake
sudo apt update
sudo apt install cmake
b. Install the compiler
Use the following command to confirm the CPU architecture of the SOC (running on the board):
uname -a
Our RK3588 board returns the following value:
Linux RK3588 5.10.66 #1 SMP Sun May 5 17:27:55 CST 2024 aarch64 GNU/LinuxIt is aarch64, ARM64 architecture.
Use the following command to download the corresponding GCC cross-compilation toolchain and extract it to the ~/rknpu directory (this will be used later when compiling the RKNN C Demo):
cd ~/rknpu
wget -c https://releases.linaro.org/components/toolchain/binaries/6.3-2017.05/aarch64-linux-gnu/gcc-linaro-6.3.1-2017.05-x86_64_aarch64-linux-gnu.tar.xz
tar xvf gcc-linaro-6.3.1-2017.05-x86_64_aarch64-linux-gnu.tar.xz
4). Install the RKNPU2 environment on the board
a. Confirm the RKNPU2 driver version
Execute the following command on the development board:
dmesg | grep -i rknpuThe return value is as follows:
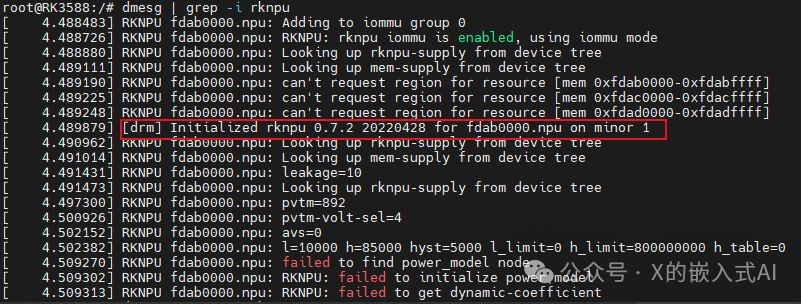
As shown, we can see that the RKNPU2 driver version used in our board code is 0.7.2. (RK recommends >=0.9.2)
b. Check if the RKNPU2 environment is installed
The RKNN-Toolkit2’s board debugging function requires the board to have the RKNPU2 environment installed and the rknn_server service started. The RKNPU2 environment involves the following two basic concepts:
- RKNN Server: A background proxy service running on the development board. Its main function is to call the corresponding interface of the board’s Runtime to process data transmitted from the computer via USB and return the processing results to the computer.
- RKNPU2 Runtime library (librknnrt.so): Responsible for loading the RKNN model in the system and executing inference operations of the RKNN model through the dedicated Neural Processing Unit (NPU).
If the board does not have the RKNN Server and Runtime library installed, or if the versions are inconsistent, the RKNPU2 environment needs to be reinstalled. Note: 1. If using an RKNN model with dynamic dimension input, the RKNN Server and Runtime library versions must be >=1.5.0; 2. Ensure that the versions of RKNN Server, Runtime library, and RKNN-Toolkit2 are consistent, and it is recommended to use the latest versions.
You can confirm whether the RKNPU2 environment is installed with the following command (if the rknn_server service can start, it indicates that the RKNPU2 environment is installed on the board):
# Enter the board's adb shell
# Restart rknn_server
restart_rknn.sh
If the following output appears, it indicates that the rknn_server service has started successfully, meaning the RKNPU2 environment is installed:

Next, use the following command to check if the versions are consistent:
# Query rknn_server version
strings /usr/bin/rknn_server | grep -i "rknn_server version"
# Query librknnrt.so library version
strings /usr/lib/librknnrt.so | grep -i "librknnrt version"
The first command above returns empty; if you change “rknn_server version” to “version”, the return value is as follows:
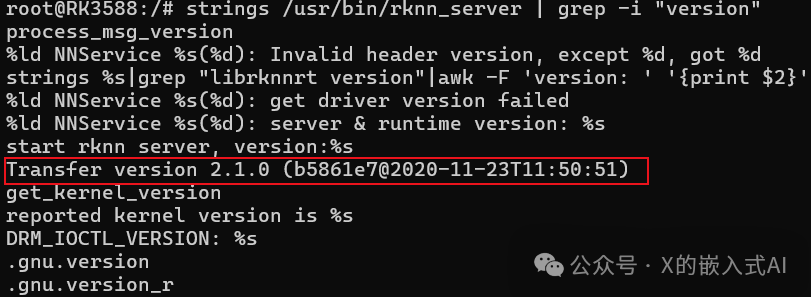
The return value of the second command is as follows:

According to RK’s documentation, it should return similar information as follows:

If there are issues with the RKNPU2 environment, or if you want to use the latest environment, you can use the following command to update and replace it (you can also replace the source-related files and repackage the filesystem):
cd ~/rknpu/rknn-toolkit2/rknpu2
adb push runtime/Linux/rknn_server/aarch64/usr/bin/* /usr/bin
adb push runtime/Linux/librknn_api/aarch64/librknnrt.so /usr/lib
adb shell
chmod +x /usr/bin/rknn_server
chmod +x /usr/bin/start_rknn.sh
chmod +x /usr/bin/restart_rknn.sh
# You can set the log level as needed
# export RKNN_SERVER_LOGLEVEL=5
restart_rknn.sh
2. Running Examples
Above, we downloaded the RKNN Model Zoo repository code, which is the example code suggested by RK. The entire project directory structure is as follows:
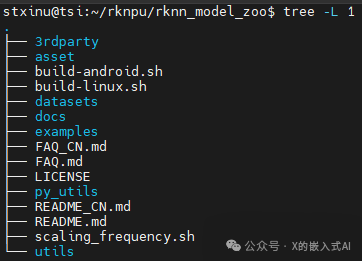
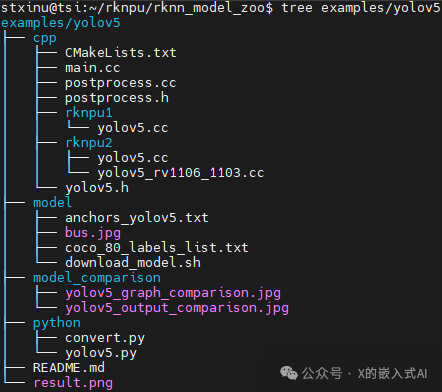
Among them, 3rdparty is the third-party library, datasets is the dataset, examples is the example code, utils contains common methods (such as file operations, plotting, etc.), build-android.sh is the compilation script for Android system development boards, and build-linux.sh is for Linux system development boards. The examples directory includes some common model examples, providing both Python and C/C++ versions of example code. Below, we take the YOLOv5 model as an example, and its directory structure is as follows:
1). RKNN Python Demo
a. Prepare the model
Enter the rknn_model_zoo/examples/yolov5/model directory and run the download_model.sh script to download a usable YOLOv5 ONNX model, which will be stored in the current model directory. The command is as follows:
cd ~/rknpu/rknn_model_zoo/examples/yolov5/model
chmod +x download_model.sh
./download_model.sh
After downloading, the yolov5s_relu.onnx file will be added.
b. Model conversion
Enter the rknn_model_zoo/examples/yolov5/python directory and run the convert.py script to convert the ONNX model into an RKNN model. The command is as follows:
cd ~/rknpu/rknn_model_zoo/examples/yolov5/python
# Run convert.py script to convert ONNX model to RKNN model
# Usage: python convert.py model_path [rk3566|rk3588|rk3562] [i8/fp] [output path]
python convert.py ../model/yolov5s_relu.onnx rk3588 i8 ../model/yolov5s_relu.rknn
After execution, the following output will be printed:
(toolkit2) guochongxin@guochongxin-virtual-machine:~/rknpu/rknn_model_zoo/examples/yolov5/python$ python convert.py ../model/yolov5s_relu.onnx rk3588 i8 ../model/yolov5s_relu.rknn
I rknn-toolkit2 version: 2.0.0b0+9bab5682
--> Config model
done--> Loading model
I It is recommended onnx opset 19, but your onnx model opset is 12!
I Model converted from pytorch, 'opset_version' should be set 19 in torch.onnx.export for successful convert!
I Loading : 100%|███████████████████████████████████████████████| 125/125 [00:00<00:00, 7527.25it/s]
done--> Building model
I GraphPreparing : 100%|████████████████████████████████████████| 149/149 [00:00<00:00, 2011.07it/s]
I Quantizating : 100%|████████████████████████████████████████████| 149/149 [00:23<00:00,  6.25it/s]
W build: The default input dtype of 'images' is changed from 'float32' to 'int8' in rknn model for performance!                       Please take care of this change when deploying rknn model with Runtime API!
W build: The default output dtype of 'output0' is changed from 'float32' to 'int8' in rknn model for performance!                       Please take care of this change when deploying rknn model with Runtime API!
W build: The default output dtype of '286' is changed from 'float32' to 'int8' in rknn model for performance!                       Please take care of this change when deploying rknn model with Runtime API!
W build: The default output dtype of '288' is changed from 'float32' to 'int8' in rknn model for performance!                       Please take care of this change when deploying rknn model with Runtime API!
I rknn building ...
I rknn building done.
done--> Export rknn model
done
c. Run RKNN Python Demo
Enter the rknn_model_zoo/examples/yolov5/python directory and run the yolov5.py script to run the YOLOv5 model on the board through board debugging (the model format is RKNN). The command is as follows:
cd ~/rknpu/rknn_model_zoo/examples/yolov5/python
# Run yolov5.py script to run yolov5 model on the board
# Usage: python yolov5.py --model_path {rknn_model} --target {target_platform} --img_show
#    If you include the --img_show parameter, the result image will be displayed
# Note: We are using the RK3588 development board; if it is another platform, modify accordingly
python yolov5.py --model_path ../model/yolov5s_relu.rknn --target rk3588 --img_show
When executing the above command, the following prompt will appear:
(toolkit2) guochongxin@guochongxin-virtual-machine:~/rknpu/rknn_model_zoo/examples/yolov5/python$ python yolov5.py --model_path ../model/yolov5s_relu.rknn --target rk3588 --img_show
use anchors from '../model/anchors_yolov5.txt', which is [[[10.0, 13.0], [16.0, 30.0], [33.0, 23.0]], [[30.0, 61.0], [62.0, 45.0], [59.0, 119.0]], [[116.0, 90.0], [156.0, 198.0], [373.0, 326.0]]]
I rknn-toolkit2 version: 2.0.0b0+9bab5682
--> Init runtime environment
adb: unable to connect for root: closed
I target set by user is: rk3588
I Get hardware info: target_platform = rk3588, os = Linux, aarch = aarch32
I Check RK3588 board npu runtime version
I Starting ntp or adb, target is RK3588
I Start adb...
I Connect to Device success!
I NPUTransfer: Starting NPU Transfer Client, Transfer version 2.1.0 (b5861e7@2020-11-23T11:50:36)
D RKNNAPI: ==============================================
D RKNNAPI: RKNN VERSION:
D RKNNAPI:   API: 2.0.0b0 (18eacd0 build@2024-03-22T06:07:59)
D RKNNAPI:   DRV: rknn_server: 1.3.0 (121b661 build: 2022-04-29 11:12:02)
D RKNNAPI:   DRV: rknnrt: 1.3.0 (c193be371@2022-05-04T20:16:33)
D RKNNAPI: ==============================================
E RKNNAPI: rknn_init,  msg_load_ack fail, ack = 1(ACK_FAIL), expect 0(ACK_SUCC)!
E init_runtime: Catch exception when init runtime!
E init_runtime: Traceback (most recent call last):
E init_runtime:   File "rknn/api/rknn_base.py", line 2511, in rknn.api.rknn_base.RKNNBase.init_runtime
E init_runtime:   File "rknn/api/rknn_runtime.py", line 406, in rknn.api.rknn_runtime.RKNNRuntime.build_graph
E init_runtime: Exception: RKNN init failed. error code: RKNN_ERR_MODEL_INVALID
W If you can't handle this error, please try updating to the latest version of the toolkit2 and runtime from:  https://console.zbox.filez.com/l/I00fc3 (Pwd: rknn)  Path: RKNPU2_SDK / 2.X.X / develop /    If the error still exists in the latest version, please collect the corresponding error logs and the model,      convert script, and input data that can reproduce the problem, and then submit an issue on:        https://redmine.rock-chips.com (Please consult our sales or FAE for the redmine account)        Init runtime environment failed
Therefore, we followed the content in section “1-4)-b” above to push the latest RKNPU2 related files to the board and restart the RKNPU2 related services, resulting in the following printout, and the relevant version information has been updated:
root@RK3588:/# restart_rknn.sh
root@RK3588:/# start rknn server, version:2.0.0b0 (18eacd0 build@2024-03-22T14:07:19)
I NPUTransfer: Starting NPU Transfer Server, Transfer version 2.1.0 (b5861e7@2020-11-23T11:50:51)
After executing the command to check the version information, the return value will be as follows:
 Then executing the above command will yield the following output:
(toolkit2) guochongxin@guochongxin-virtual-machine:~/rknpu/rknn_model_zoo/examples/yolov5/python$ python yolov5.py --model_path ../model/yolov5s_relu.rknn --target rk3588 --img_show
use anchors from '../model/anchors_yolov5.txt', which is [[[10.0, 13.0], [16.0, 30.0], [33.0, 23.0]], [[30.0, 61.0], [62.0, 45.0], [59.0, 119.0]], [[116.0, 90.0], [156.0, 198.0], [373.0, 326.0]]]
I rknn-toolkit2 version: 2.0.0b0+9bab5682
--> Init runtime environment
adb: unable to connect for root: closed
I target set by user is: rk3588
I Get hardware info: target_platform = rk3588, os = Linux, aarch = aarch32
I Check RK3588 board npu runtime version
I Starting ntp or adb, target is RK3588
I Start adb...
I Connect to Device success!
I NPUTransfer: Starting NPU Transfer Client, Transfer version 2.1.0 (b5861e7@2020-11-23T11:50:36)
D RKNNAPI: ==============================================
D RKNNAPI: RKNN VERSION:
D RKNNAPI:   API: 2.0.0b0 (18eacd0 build@2024-03-22T06:07:59)
D RKNNAPI:   DRV: rknn_server: 2.0.0b0 (18eacd0 build@2024-03-22T14:07:19)
D RKNNAPI:   DRV: rknnrt: 2.0.0b0 (35a6907d79@2024-03-24T10:31:14)
D RKNNAPI: ==============================================
D RKNNAPI: Input tensors:
D RKNNAPI:   index=0, name=images, n_dims=4, dims=[1, 640, 640, 3], n_elems=1228800, size=1228800, w_stride = 0, size_with_stride = 0, fmt=NHWC, type=INT8, qnt_type=AFFINE, zp=-128, scale=0.003922
D RKNNAPI: Output tensors:
D RKNNAPI:   index=0, name=output0, n_dims=4, dims=[1, 255, 80, 80], n_elems=1632000, size=1632000, w_stride = 0, size_with_stride = 0, fmt=NCHW, type=INT8, qnt_type=AFFINE, zp=-128, scale=0.003922
D RKNNAPI:   index=1, name=286, n_dims=4, dims=[1, 255, 40, 40], n_elems=408000, size=408000, w_stride = 0, size_with_stride = 0, fmt=NCHW, type=INT8, qnt_type=AFFINE, zp=-128, scale=0.003922
D RKNNAPI:   index=2, name=288, n_dims=4, dims=[1, 255, 20, 20], n_elems=102000, size=102000, w_stride = 0, size_with_stride = 0, fmt=NCHW, type=INT8, qnt_type=AFFINE, zp=-128, scale=0.003922
done
Model-../model/yolov5s_relu.rknn is rknn model, starting val
W inference: The 'data_format' is not set, and its default value is 'nhwc'!

IMG: bus.jpg
person @ (209 243 286 510) 0.880
person @ (479 238 560 526) 0.871
person @ (109 238 231 534) 0.840
person @ (79 353 121 517) 0.301
bus  @ (91 129 555 464) 0.692
At this point, the following image will be displayed (~/rknpu/rknn_model_zoo/examples/yolov5/result.png):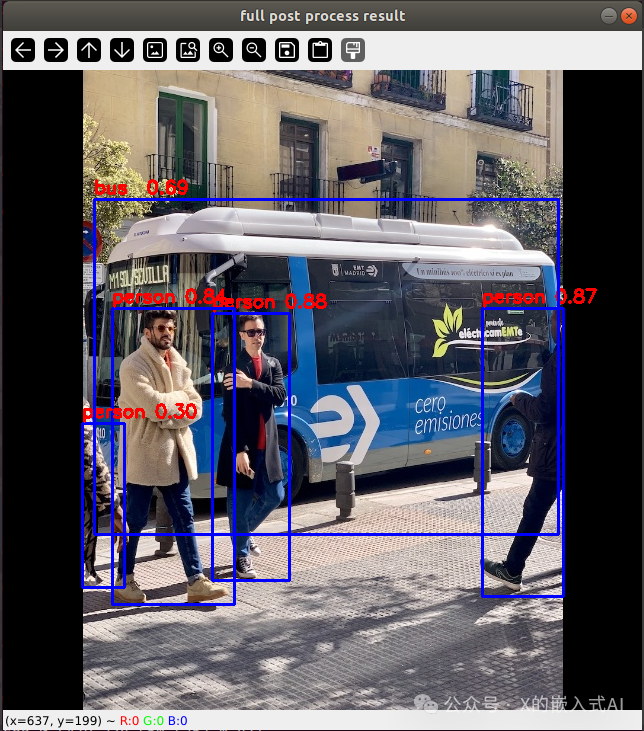
(Based on the printed information above, the result image shows 4 people and a bus detected)
The original image is (~/rknpu/rknn_model_zoo/examples/yolov5/model/bus.jpg):
 The above operation is to connect to the board via ADB from the PC Ubuntu command line and run the RKNN format model on the board. If we do not want to connect to the board and run the ONNX format model directly on the Ubuntu computer, we can use the following command:
cd ~/rknpu/rknn_model_zoo/examples/yolov5/python  # Run the original onnx model on the computer, usage: python yolov5.py --model_path {onnx_model} --img_show
python yolov5.py --model_path ../model/yolov5s_relu.onnx --img_show
After execution, the following print information will appear:
(toolkit2) guochongxin@guochongxin-virtual-machine:~/rknpu/rknn_model_zoo/examples/yolov5/python$ python yolov5.py --model_path ../model/yolov5s_relu.onnx --img_show
use anchors from '../model/anchors_yolov5.txt', which is [[[10.0, 13.0], [16.0, 30.0], [33.0, 23.0]], [[30.0, 61.0], [62.0, 45.0], [59.0, 119.0]], [[116.0, 90.0], [156.0, 198.0], [373.0, 326.0]]]
/home/guochongxin/rknpu/rknn_model_zoo/py_utils/onnx_executor.py:12: FutureWarning: In the future `np.bool` will be defined as the corresponding NumPy scalar.  if getattr(np, 'bool', False):  Model-../model/yolov5s_relu.onnx is onnx model, starting val  infer 1/1    IMG: bus.jpg  person @ (208 242 286 508) 0.881  person @ (478 238 560 525) 0.859  person @ (109 237 232 534) 0.842  person @ (79 355 121 515) 0.318  bus  @ (91 129 555 465) 0.702
At the same time, the above recognition image will be displayed, and from the printed information, it can be seen that using the RK3588 NPU and the VM virtual machine Ubuntu 18.04 to run the same yolov5 model, the recognition results are the same, but the processing speed of the RKNPU is slightly faster.
Below is RK’s optional content for “using dataset accuracy evaluation” to verify:
In the datasets directory under the root of the rknn_model_zoo project, there is a dataset for accuracy evaluation. For the YOLO model, the COCO dataset needs to be downloaded with the following command:
cd ~/rknpu/rknn_model_zoo/datasets/COCO
python download_eval_dataset.py
After the command execution is complete, the val2017 dataset will be downloaded to the COCO directory. When performing dataset accuracy evaluation, you need to specify the –coco_map_test parameter and the evaluation dataset path –img_folder, as follows (requires connection to the RK3588 development board):
pip install pycocotools
cd ~/rknpu/rknn_model_zoo/examples/yolov5/python
python yolov5.py --model_path ../model/yolov5s_relu.rknn --target rk3588 --img_folder ../../../datasets/COCO/val2017 --coco_map_test
After running, the following print information will appear:
(toolkit2) guochongxin@guochongxin-virtual-machine:~/rknpu/rknn_model_zoo/examples/yolov5/python$ python yolov5.py --model_path ../model/yolov5s_relu.rknn --target rk3588 --img_folder ../../../datasets/COCO/val2017 --coco_map_test
use anchors from '../model/anchors_yolov5.txt', which is [[[10.0, 13.0], [16.0, 30.0], [33.0, 23.0]], [[30.0, 61.0], [62.0, 45.0], [59.0, 119.0]], [[116.0, 90.0], [156.0, 198.0], [373.0, 326.0]]]
I rknn-toolkit2 version: 2.0.0b0+9bab5682
--> Init runtime environment
adb: unable to connect for root: closed
I target set by user is: rk3588
I Get hardware info: target_platform = rk3588, os = Linux, aarch = aarch32
I Check RK3588 board npu runtime version
I Starting ntp or adb, target is RK3588
I Start adb...
I Connect to Device success!
I NPUTransfer: Starting NPU Transfer Client, Transfer version 2.1.0 (b5861e7@2020-11-23T11:50:36)
D RKNNAPI: ==============================================
D RKNNAPI: RKNN VERSION:
D RKNNAPI:   API: 2.0.0b0 (18eacd0 build@2024-03-22T06:07:59)
D RKNNAPI:   DRV: rknn_server: 2.0.0b0 (18eacd0 build@2024-03-22T14:07:19)
D RKNNAPI:   DRV: rknnrt: 2.0.0b0 (35a6907d79@2024-03-24T10:31:14)
D RKNNAPI: ==============================================
D RKNNAPI: Input tensors:
D RKNNAPI:   index=0, name=images, n_dims=4, dims=[1, 640, 640, 3], n_elems=1228800, size=1228800, w_stride = 0, size_with_stride = 0, fmt=NHWC, type=INT8, qnt_type=AFFINE, zp=-128, scale=0.003922
D RKNNAPI: Output tensors:
D RKNNAPI:   index=0, name=output0, n_dims=4, dims=[1, 255, 80, 80], n_elems=1632000, size=1632000, w_stride = 0, size_with_stride = 0, fmt=NCHW, type=INT8, qnt_type=AFFINE, zp=-128, scale=0.003922
D RKNNAPI:   index=1, name=286, n_dims=4, dims=[1, 255, 40, 40], n_elems=408000, size=408000, w_stride = 0, size_with_stride = 0, fmt=NCHW, type=INT8, qnt_type=AFFINE, zp=-128, scale=0.003922
D RKNNAPI:   index=2, name=288, n_dims=4, dims=[1, 255, 20, 20], n_elems=102000, size=102000, w_stride = 0, size_with_stride = 0, fmt=NCHW, type=INT8, qnt_type=AFFINE, zp=-128, scale=0.003922
done
Model-../model/yolov5s_relu.rknn is rknn model, starting val
W inference: The 'data_format' is not set, and its default value is 'nhwc'!
Traceback (most recent call last):  File "yolov5.py", line 289, in <module>      score = round(scores[i], 5).astype(np.float)  File "/home/guochongxin/miniconda3/envs/toolkit2/lib/python3.8/site-packages/numpy/__init__.py", line 305, in __getattr__      raise AttributeError(__former_attrs__[attr])AttributeError: module 'numpy' has no attribute 'float'.`np.float` was a deprecated alias for the builtin `float`. To avoid this error in existing code, use `float` by itself. Doing this will not modify any behavior and is safe. If you specifically wanted the numpy scalar type, use `np.float64` here.
The aliases was originally deprecated in NumPy 1.20; for more details and guidance see the original release note at:   https://numpy.org/devdocs/release/1.20.0-notes.html#deprecations
Following the above prompt, we changed the np.float in the yolov5.py file to np.float64, and it ran normally with the following print information:
(toolkit2) guochongxin@guochongxin-virtual-machine:~/rknpu/rknn_model_zoo/examples/yolov5/python$ python yolov5.py --model_path ../model/yolov5s_relu.rknn --target rk3588 --img_folder ../../../datasets/COCO/val2017 --coco_map_test
use anchors from '../model/anchors_yolov5.txt', which is [[[10.0, 13.0], [16.0, 30.0], [33.0, 23.0]], [[30.0, 61.0], [62.0, 45.0], [59.0, 119.0]], [[116.0, 90.0], [156.0, 198.0], [373.0, 326.0]]]
I rknn-toolkit2 version: 2.0.0b0+9bab5682
--> Init runtime environment
adb: unable to connect for root: closed
I target set by user is: rk3588
I Get hardware info: target_platform = rk3588, os = Linux, aarch = aarch32
I Check RK3588 board npu runtime version
I Starting ntp or adb, target is RK3588
I Start adb...
I Connect to Device success!
I NPUTransfer: Starting NPU Transfer Client, Transfer version 2.1.0 (b5861e7@2020-11-23T11:50:36)
D RKNNAPI: ==============================================
D RKNNAPI: RKNN VERSION:
D RKNNAPI:   API: 2.0.0b0 (18eacd0 build@2024-03-22T06:07:59)
D RKNNAPI:   DRV: rknn_server: 2.0.0b0 (18eacd0 build@2024-03-22T14:07:19)
D RKNNAPI:   DRV: rknnrt: 2.0.0b0 (35a6907d79@2024-03-24T10:31:14)
D RKNNAPI: ==============================================
D RKNNAPI: Input tensors:
D RKNNAPI:   index=0, name=images, n_dims=4, dims=[1, 640, 640, 3], n_elems=1228800, size=1228800, w_stride = 0, size_with_stride = 0, fmt=NHWC, type=INT8, qnt_type=AFFINE, zp=-128, scale=0.003922
D RKNNAPI: Output tensors:
D RKNNAPI:   index=0, name=output0, n_dims=4, dims=[1, 255, 80, 80], n_elems=1632000, size=1632000, w_stride = 0, size_with_stride = 0, fmt=NCHW, type=INT8, qnt_type=AFFINE, zp=-128, scale=0.003922
D RKNNAPI:   index=1, name=286, n_dims=4, dims=[1, 255, 40, 40], n_elems=408000, size=408000, w_stride = 0, size_with_stride = 0, fmt=NCHW, type=INT8, qnt_type=AFFINE, zp=-128, scale=0.003922
D RKNNAPI:   index=2, name=288, n_dims=4, dims=[1, 255, 20, 20], n_elems=102000, size=102000, w_stride = 0, size_with_stride = 0, fmt=NCHW, type=INT8, qnt_type=AFFINE, zp=-128, scale=0.003922
done
Model-../model/yolov5s_relu.rknn is rknn model, starting val
W inference: The 'data_format' is not set, and its default value is 'nhwc'!

infer 84/5000
loading annotations into memory...Done (t=1.26s)
creating index...index created!
Loading and preparing results...DONE (t=0.70s)
creating index...index created!
Running per image evaluation...Evaluate annotation type *bbox*DONE (t=24.36s).
Accumulating evaluation results...DONE (t=3.87s). Average Precision  (AP) @[ IoU=0.50:0.95 | area=   all | maxDets=100 ] = 0.310 Average Precision  (AP) @[ IoU=0.50      | area=   all | maxDets=100 ] = 0.470 Average Precision  (AP) @[ IoU=0.75      | area=   all | maxDets=100 ] = 0.341 Average Precision  (AP) @[ IoU=0.50:0.95 | area= small | maxDets=100 ] = 0.158 Average Precision  (AP) @[ IoU=0.50:0.95 | area=medium | maxDets=100 ] = 0.358 Average Precision  (AP) @[ IoU=0.50:0.95 | area= large | maxDets=100 ] = 0.408 Average Recall     (AR) @[ IoU=0.50:0.95 | area=   all | maxDets=  1 ] = 0.253 Average Recall     (AR) @[ IoU=0.50:0.95 | area= 10 ] = 0.362 Average Recall     (AR) @[ IoU=0.50:0.95 | area=100 ] = 0.367 Average Recall     (AR) @[ IoU=0.50:0.95 | area= small | maxDets=100 ] = 0.180 Average Recall     (AR) @[ IoU=0.50:0.95 | area=medium | maxDets=100 ] = 0.417 Average Recall     (AR) @[ IoU=0.50:0.95 | area= large | maxDets=100 ] = 0.491
map  -->  0.3103840693475262
map50-->  0.4700350008577292
map75-->  0.34075462605442625
map85-->  0.41660348340163067
map95-->  0.4907678607067517
After the accuracy test is completed, change the np.float64 back to np.float in the yolov5.py file and proceed with other experiments.
2). RKNN C Demo
“Preparing the model” and “Model conversion” follow the same commands as the above “RKNN Python Demo”. Since Python scripts can be executed without compilation, unlike C which requires compilation, after these two steps, you need to compile the C/C++ source code into an executable file, then push the executable file, model file, test images, and other related files to the board before executing.
First, enter the ~/rknpu/rknn_model_zoo directory and modify the build-linux.sh script in this directory by adding the following content at the beginning (for the cross-compilation toolchain we downloaded and extracted above):
GCC_COMPILER=~/rknpu/gcc-linaro-6.3.1-2017.05-x86_64_aarch64-linux-gnu/bin/aarch64-linux-gnuNext, execute the following command to compile:
cd ~/rknpu/rknn_model_zoo
# Run build-linux.sh script
# Usage:
#    ./build-linux.sh -t <target> -a <arch> -d <build_demo_name> [-b <build_type>] [-m]
#      -t : target(rk356x/rk3588), platform type, rk3568/rk3566 unified as rk356x
#      -a : arch(aarch64/armhf), board system architecture
#      -d : demo name, corresponding to the name of the subfolder in the examples directory, such as yolov5, mobilenet
#      -b : build_type(Debug/Release)
#      -m : enable address sanitizer, build_type needs to be set to Debug
bash -e build-linux.sh -t rk3588 -a aarch64 -d yolov5
After execution, the following prompt will appear:
(base) guochongxin@guochongxin-virtual-machine:~/rknpu/rknn_model_zoo$ bash -e build-linux.sh -t rk3588 -a aarch64 -d yolov5
build-linux.sh -t rk3588 -a aarch64 -d yolov5
/home/guochongxin/rknpu/gcc-linaro-6.3.1-2017.05-x86_64_aarch64-linux-gnu/bin/aarch64-linux-gnu
===================================
BUILD_DEMO_NAME=yolov5
BUILD_DEMO_PATH=examples/yolov5/cpp
TARGET_SOC=rk3588
TARGET_ARCH=aarch64
BUILD_TYPE=Release
ENABLE_ASAN=OFF
INSTALL_DIR=/home/guochongxin/rknpu/rknn_model_zoo/install/rk3588_linux_aarch64/rknn_yolov5_demo
BUILD_DIR=/home/guochongxin/rknpu/rknn_model_zoo/build/build_rknn_yolov5_demo_rk3588_linux_aarch64_Release
CC=/home/guochongxin/rknpu/gcc-linaro-6.3.1-2017.05-x86_64_aarch64-linux-gnu/bin/aarch64-linux-gnu-gcc
CXX=/home/guochongxin/rknpu/gcc-linaro-6.3.1-2017.05-x86_64_aarch64-linux-gnu/bin/aarch64-linux-gnu-g++
===================================
-- The C compiler identification is GNU 6.3.1
-- The CXX compiler identification is GNU 6.3.1
-- Check for working C compiler: /home/guochongxin/rknpu/gcc-linaro-6.3.1-2017.05-x86_64_aarch64-linux-gnu/bin/aarch64-linux-gnu-gcc
-- Check for working C compiler: /home/guochongxin/rknpu/gcc-linaro-6.3.1-2017.05-x86_64_aarch64-linux-gnu/bin/aarch64-linux-gnu-gcc -- works
-- Detecting C compiler ABI info
-- Detecting C compiler ABI info - done
-- Detecting C compile features
-- Detecting C compile features - done
-- Check for working CXX compiler: /home/guochongxin/rknpu/gcc-linaro-6.3.1-2017.05-x86_64_aarch64-linux-gnu/bin/aarch64-linux-gnu-g++
-- Check for working CXX compiler: /home/guochongxin/rknpu/gcc-linaro-6.3.1-2017.05-x86_64_aarch64-linux-gnu/bin/aarch64-linux-gnu-g++ -- works
-- Detecting CXX compiler ABI info
-- Detecting CXX compiler ABI info - done
-- Detecting CXX compile features
-- Detecting CXX compile features - done
CMake Error at /home/guochongxin/rknpu/rknn_model_zoo/3rdparty/CMakeLists.txt:1 (cmake_minimum_required):  CMake 3.15 or higher is required.  You are running version 3.10.2
   -- Configuring incomplete, errors occurred!
See also "/home/guochongxin/rknpu/rknn_model_zoo/build/build_rknn_yolov5_demo_rk3588_linux_aarch64_Release/CMakeFiles/CMakeOutput.log".
Use the following command to check the machine’s cmake version:
(base) guochongxin@guochongxin-virtual-machine:~/rknpu/rknn_model_zoo$ cmake -version
cmake version 3.10.2
CMake suite maintained and supported by Kitware (kitware.com/cmake).
Update with the following command:
sudo apt-get autoremove cmake
sudo apt-get install libssl-dev
cd ~/rknpu
wget -c https://github.com/Kitware/CMake/releases/download/v3.16.0/cmake-3.16.0.tar.gz
tar xvf cmake-3.16.0.tar.gz
cd cmake-3.16.0
./configure
make
sudo make install
(Note: After executing the above commands in the miniconda environment, you need to exit and re-enter the environment for the cmake update to be successful)
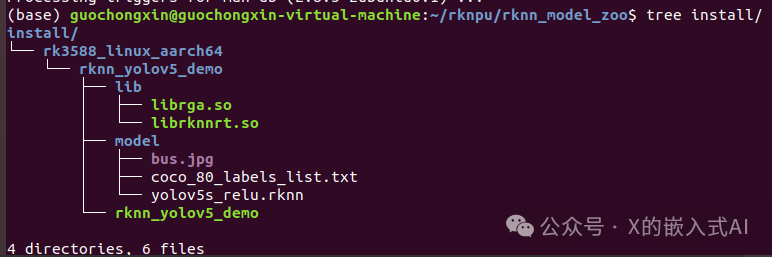
After updating cmake, recompile the yolov5 C demo, and the compilation will succeed. The generated files will be in the ~/rknpu/rknn_model_zoo/install directory, and the final output of the compilation is as follows:
[100%] Built target rknn_yolov5_demo
Install the project...
-- Install configuration: "Release"
-- Installing: /home/guochongxin/rknpu/rknn_model_zoo/install/rk3588_linux_aarch64/rknn_yolov5_demo/./rknn_yolov5_demo
-- Set runtime path of "/home/guochongxin/rknpu/rknn_model_zoo/install/rk3588_linux_aarch64/rknn_yolov5_demo/./rknn_yolov5_demo" to "$ORIGIN/lib"
-- Installing: /home/guochongxin/rknpu/rknn_model_zoo/install/rk3588_linux_aarch64/rknn_yolov5_demo/./model/bus.jpg
-- Installing: /home/guochongxin/rknpu/rknn_model_zoo/install/rk3588_linux_aarch64/rknn_yolov5_demo/./model/coco_80_labels_list.txt
-- Installing: /home/guochongxin/rknpu/rknn_model_zoo/install/rk3588_linux_aarch64/rknn_yolov5_demo/model/yolov5s_relu.rknn
-- Installing: /home/guochongxin/rknpu/rknn_model_zoo/install/rk3588_linux_aarch64/rknn_yolov5_demo/lib/librknnrt.so
-- Installing: /home/guochongxin/rknpu/rknn_model_zoo/install/rk3588_linux_aarch64/rknn_yolov5_demo/lib/librga.so
The corresponding install directory tree is as follows:
Next, push the compiled generated files directly to the board:
cd ~/rknpu/rknn_model_zoo
adb push install/rk3588_linux_aarch64/rknn_yolov5_demo /data/
Then use the following command to run on the board:
# Enter the board's adb shell
# In the adb shell command interactive environment, enter the corresponding demo directory on the board
cd /data/rknn_yolov5_demo/
# Set the library path
export LD_LIBRARY_PATH=./lib
# Run the executable file
# Usage: ./rknn_yolov5_demo <model_path> <input_path>
./rknn_yolov5_demo model/yolov5s_relu.rknn model/bus.jpg
After executing the above command, the following print output will appear, and an out.png file will be generated in the current directory:
root@RK3588:/data/rknn_yolov5_demo#  ./rknn_yolov5_demo model/yolov5s_relu.rknn model/bus.jpg
load label ./model/coco_80_labels_list.txt
model input num: 1, output num: 3
input tensors:  index=0, name=images, n_dims=4, dims=[1, 640, 640, 3], n_elems=1228800, size=1228800, fmt=NHWC, type=INT8, qnt_type=AFFINE, zp=-128, scale=0.003922
output tensors:  index=0, name=output0, n_dims=4, dims=[1, 255, 80, 80], n_elems=1632000, size=1632000, fmt=NCHW, type=INT8, qnt_type=AFFINE, zp=-128, scale=0.003922
  index=1, name=286, n_dims=4, dims=[1, 255, 40, 40], n_elems=408000, size=408000, fmt=NCHW, type=INT8, qnt_type=AFFINE, zp=-128, scale=0.003922
  index=2, name=288, n_dims=4, dims=[1, 255, 20, 20], n_elems=102000, size=102000, fmt=NCHW, type=INT8, qnt_type=AFFINE, zp=-128, scale=0.003922
model is NHWC input fmt
model input height=640, width=640, channel=3
origin size=640x640 crop size=640x640
input image: 640 x 640, subsampling: 4:2:0, colorspace: YCbCr, orientation: 1
scale=1.000000 dst_box=(0 0 639 639) allow_slight_change=1 _left_offset=0 _top_offset=0 padding_w=0 padding_h=0
src width=640 height=640 fmt=0x1 virAddr=0x0x24f3cb80 fd=0
dst width=640 height=640 fmt=0x1 virAddr=0x0x25068b90 fd=0
src_box=(0 0 639 639)
dst_box=(0 0 639 639)color=0x72
rga_api version 1.10.1_[0]rknn_run
write_image path: out.png width=640 height=640 channel=3 data=0x24f3cb80
The above C example Yolov5 generates an image that is the same as the original image. From the print information, it can be seen that no detected item information is printed. Later, I tried Yolov8, and it was the same. Therefore, I asked the board supplier for this year’s code (rk-linux5.10-20231226.tgz), which indeed solved the issue. After running, the print information is as follows:
root@rk3588-buildroot:/data/rknn_yolov5_demo# export LD_LIBRARY_PATH=./lib
./rknn_yolov5_demo model/yolov5s_relu.rknn model/bus.jpg
load label ./model/coco_80_labels_list.txt
model input num: 1, output num: 3
input tensors:  index=0, name=images, n_dims=4, dims=[1, 640, 640, 3], n_elems=1228800, size=1228800, fmt=NHWC, type=INT8, qnt_type=AFFINE, zp=-128, scale=0.003922
output tensors:  index=0, name=output0, n_dims=4, dims=[1, 255, 80, 80], n_elems=1632000, size=1632000, fmt=NCHW, type=INT8, qnt_type=AFFINE, zp=-128, scale=0.003922
  index=1, name=286, n_dims=4, dims=[1, 255, 40, 40], n_elems=408000, size=408000, fmt=NCHW, type=INT8, qnt_type=AFFINE, zp=-128, scale=0.003922
  index=2, name=288, n_dims=4, dims=[1, 255, 20, 20], n_elems=102000, size=102000, fmt=NCHW, type=INT8, qnt_type=AFFINE, zp=-128, scale=0.003922
model is NHWC input fmt
model input height=640, width=640, channel=3
origin size=640x640 crop size=640x640
input image: 640 x 640, subsampling: 4:2:0, colorspace: YCbCr, orientation: 1
scale=1.000000 dst_box=(0 0 639 639) allow_slight_change=1 _left_offset=0 _top_offset=0 padding_w=0 padding_h=0
src width=640 height=640 fmt=0x1 virAddr=0x0x1dd1ff20 fd=0
dst width=640 height=640 fmt=0x1 virAddr=0x0x1de4bf30 fd=0
src_box=(0 0 639 639)
dst_box=(0 0 639 639)color=0x72
rga_api version 1.10.1_[0]rknn_run
person @ (209 243 286 510) 0.880
person @ (479 238 560 526) 0.871
person @ (109 238 231 534) 0.840
bus @ (91 129 555 464) 0.692
person @ (79 353 121 517) 0.301
write_image path: out.png width=640 height=640 channel=3 data=0x1dd1ff20
Then, use the following command to extract out.png to the computer:
<img src=”https://mmbiz.qpic.cn/sz_mmbiz_png/Tkx1icOMic8RqqHiaHapwIYpIQxLe3osd0UmXo80ndbQfFd398wGoeTzEb882FiczMGKdH4vjwSmsWmrGwyYMCKkKw/640?wx_fmt=png”