In a production environment, the network is the “lifeline” of the server. Just think about it: a database server that handles massive transactions can collapse instantly due to a loose network cable or a malfunctioning network card—leading to user complaints and management accountability.Working overtime until dawn… This is not science fiction; it is the reality for every operations and maintenance (O&M) personnel.
Today, I will share a “killer technique”:Linux Dual NIC Bonding. It can combine two physical network cards into one logical network card, achieving automatic failover and high bandwidth assurance. This is specifically targeted at CentOS 7/8, and we will only discuss the most practical Mode 1 (Active-Backup Mode)—zero configuration barriers, no need to fiddle with switches, pure practical content ready to use!
1. What is Dual NIC Bonding, really?
In simple terms, Bonding is a built-in network card aggregation feature in the Linux kernel that can virtualize multiple physical network cards (like ens33 and ens36) into a “super network card” (bond0). It is not just a simple “parallel connection”; it intelligently manages traffic to ensure the network never goes down.
Two major killer benefits:
- High Availability Redundancy: If the primary network card fails, the backup network card takes over in seconds, ensuring zero business interruption!
- Performance Boost: Certain modes can also distribute traffic and aggregate bandwidth, making your server “throttle” more efficiently.
Mode Overview (mind map for clarity):
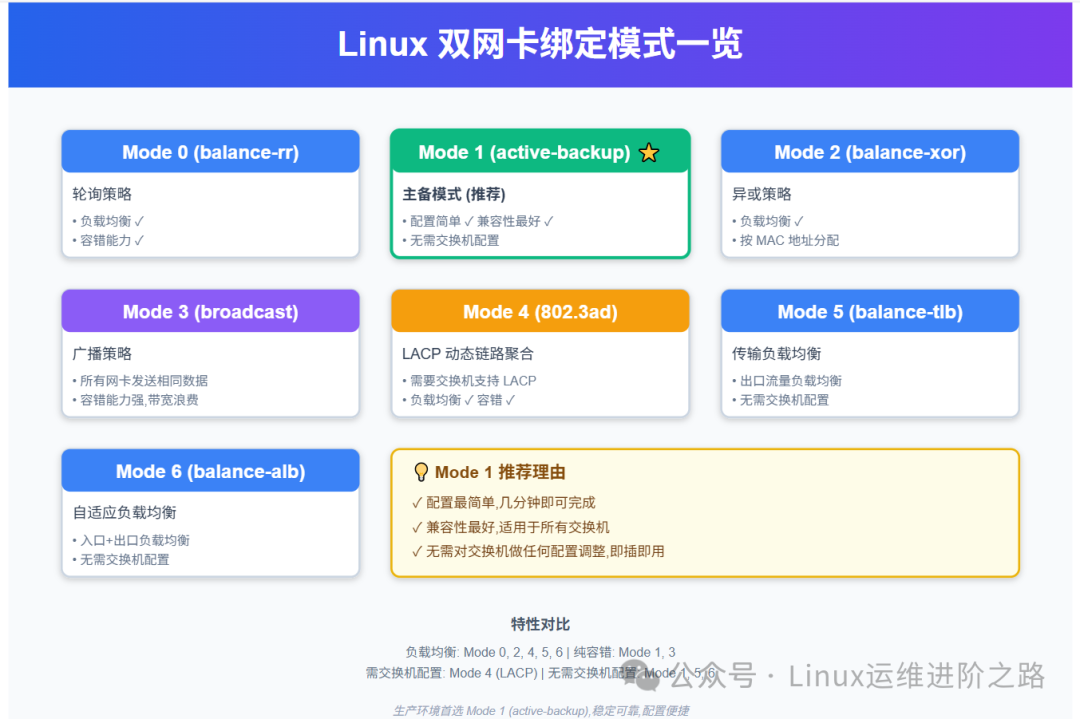
Why recommend Mode 1? Because it is as reliable as “double insurance”: usually only one card is used, while the other is on standby; switching is seamless, and there are no requirements for upstream switches. Perfect for databases, web clusters, or virtual machine hosts—friendly for beginners and worry-free for veterans.
2. Before we start, don’t overlook these “foundations”
Before configuration, lay a solid foundation to avoid mishaps. The entire process requires root privileges, and it is recommended to back up the original configuration (<span><span>cp -r /etc/sysconfig/network-scripts /tmp/backup</span></span>).

Essential Checklist:
- Network Card Hardware: At least two physical network cards, with cables plugged in. Run
<span><span>ip addr</span></span>to confirm names (common ones like eth0/eth1 or ens33/ens36).
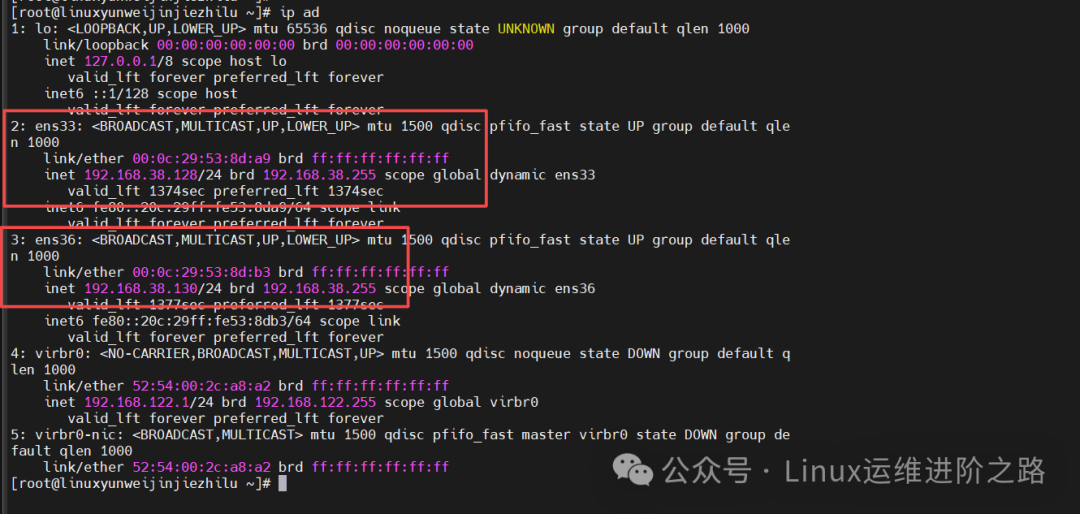
- System Environment: CentOS 7/8 with the bonding module installed (it is included by default, test with
<span><span>modprobe bonding</span></span>). - Service Switch: CentOS defaults to using NetworkManager, but Bonding configuration prefers the “traditional network service”. Therefore, turn it off first to avoid conflicts.
Quickly disable NetworkManager:
systemctl stop NetworkManager    # Stop immediately
systemctl disable NetworkManager # Disable startup
systemctl status NetworkManager  # Confirm inactive
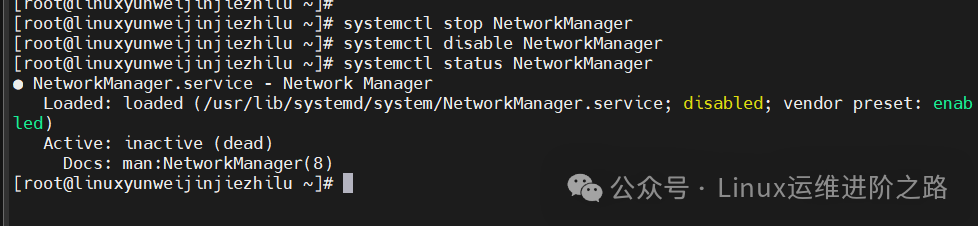
Tip: After turning it off, restart the network using <span><span>systemctl restart network</span></span>. If something goes wrong, rebooting the system can also roll back changes.

3. Core Configuration, Let’s Go in 5 Steps (Copy and Paste to Get Started)
Now we enter the climax! We will create the bond0 logical card and let the two physical cards recognize it as the master. All file paths are under <span><span>/etc/sysconfig/network-scripts/</span></span>, edited with vi or nano.
Step 1: Create the “King” bond0
Create the main configuration file:<span><span>vi ifcfg-bond0</span></span>
Paste the following template (replace IP/Gateway/DNS with your actual values, for example, internal network 192.168.38.x):
DEVICE=bond0
NAME=bond0
TYPE=Bond
BOOTPROTO=none
ONBOOT=yes
USERCTL=no

# Your network address (must change!)
IPADDR=192.168.38.100
PREFIX=24          # or NETMASK=255.255.255.0
GATEWAY=192.168.38.2
DNS1=114.114.114.114
DNS2=8.8.8.8

# Bonding soul: Mode 1 + heartbeat monitoring
BONDING_OPTS="mode=1 miimon=100 use_carrier=1 primary=ens33 fail_over_mac=active"
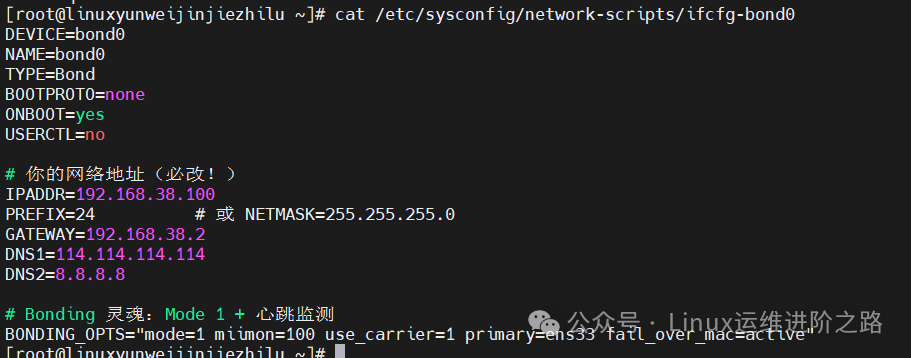
Interpretation:
-
<span><span>mode=1</span></span>: Active-Backup switching, stable! -
<span><span>miimon=100</span></span>: Checks the link every 100ms with a “heartbeat”, sensitive and thorough. -
<span><span>use_carrier=1</span></span>: Relies on hardware signals, more accurate. -
<span><span>primary=ens33</span></span>specifies the primary network card When ens33 recovers, it automatically switches back to the primary network card -
<span><span>fail_over_mac=active</span></span>MAC address policy Uses the MAC of the active network card to avoid learning a new MAC
Step 2: Tame the Physical Network Cards (ens33 & ens36)
Make them “bow down”: clear the IP, leaving only the subordinate identity.
eth0 Configuration:<span>vi ifcfg-ens33</span>
DEVICE=ens33
NAME=ens33
TYPE=Ethernet
BOOTPROTO=none
ONBOOT=yes
MASTER=bond0       # Recognize bond0 as master
SLAVE=yes          # Slave mode
USERCTL=no
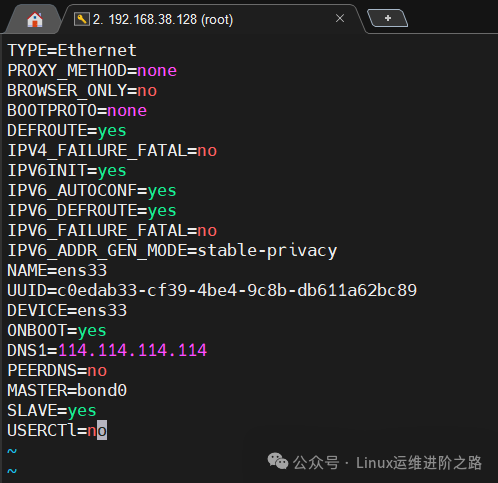
ens36 Configuration:<span>vi ifcfg-ens36</span> (same as above, change DEVICE/NAME to ens36).
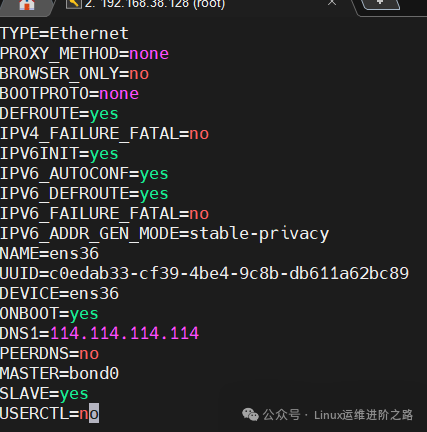
Why clear the IP? Because bond0 manages the address uniformly to avoid conflicts. The physical cards are now “invisible guardians”.
Step 3: Strengthen Module Loading (Optional, but Highly Recommended)
Ensure the Bonding module wakes up automatically on boot:<span><span>vi /etc/modprobe.d/bonding.conf</span></span>
alias bond0 bonding
This line acts like a “pre-loader”, arming the system as soon as it wakes up.
Step 4: Activate Configuration, Restart Network
systemctl restart network
Error Troubleshooting: Check spelling (especially MASTER/SLAVE), or logs <span><span>journalctl -u network</span></span>. Usually, it is a minor issue with paths or permissions.
Step 5: Boot Persistence
Edit <span><span>/etc/rc.local</span></span> (or use systemd), add a line <span><span>modprobe bonding</span></span>, then <span><span>chmod +x /etc/rc.local</span></span>. CentOS 8 uses systemd more elegantly, but this step is sufficient.


4. Solid Evidence, Verification + Stress Testing
After configuration, don’t just celebrate! Conduct a “drill” to confirm that high availability is not just theoretical.
Verification 1: Peek into Kernel Secrets
cat /proc/net/bonding/bond0
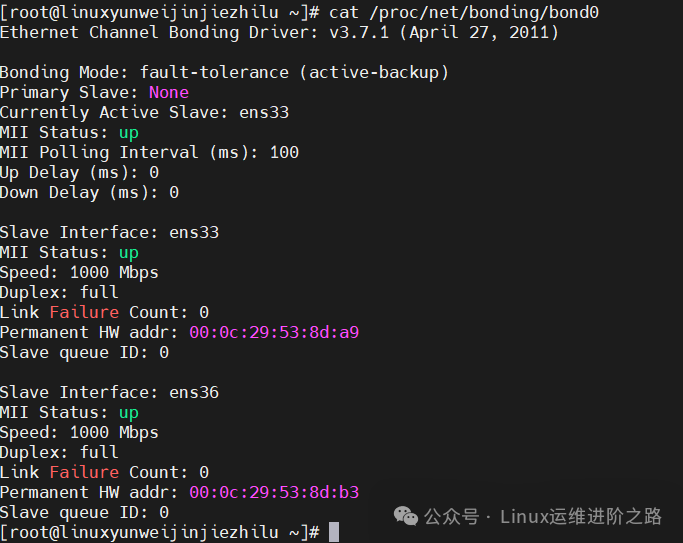
Success Indicators (look for these key phrases):
Bonding Mode: fault-tolerance (active-backup)  # Mode is correct
Currently Active Slave: ens33                  # Primary card is online
Slave Interface: ens36                        # Backup card is ready, MII Status: up
If both cards show status as up, and there is an Active/Backup division, perfect!
Verification 2: IP and Connectivity Check
ip addr show bond0  # Confirm IP binding
ping -c 4 8.8.8.8   # Is the external network smooth?
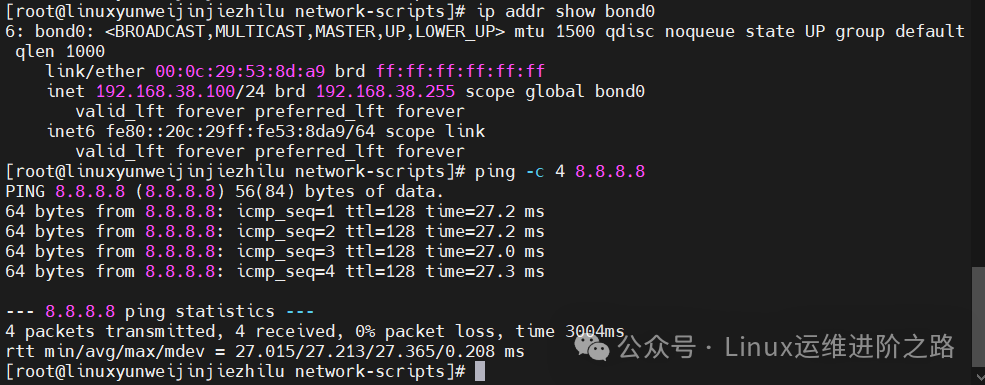
bond0 should have your IP, and ping should have no packet loss.
Verification 3: Simulate a “disaster” to see the switching magic
High Energy Warning: This step is the most exciting!
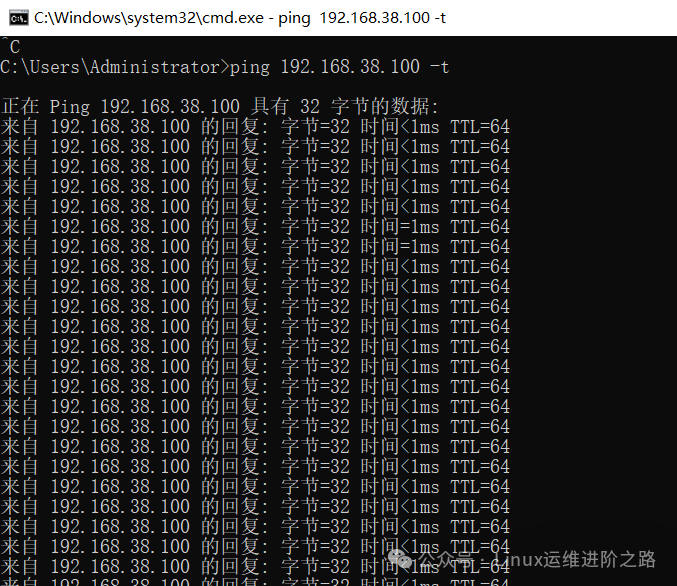
- Windows Terminal: Continuously ping the server
<span><span> ping -c 1 192.168.38.100</span></span>
- Linux Server: Take down the primary card (assume ens33)
<span>ifdown ens33</span>(or actually unplug the cable!)

- Observe: Ping may jitter (<200ms), then recover. Run
<span><span>cat /proc/net/bonding/bond0</span></span>, did Active Slave change to ens36?
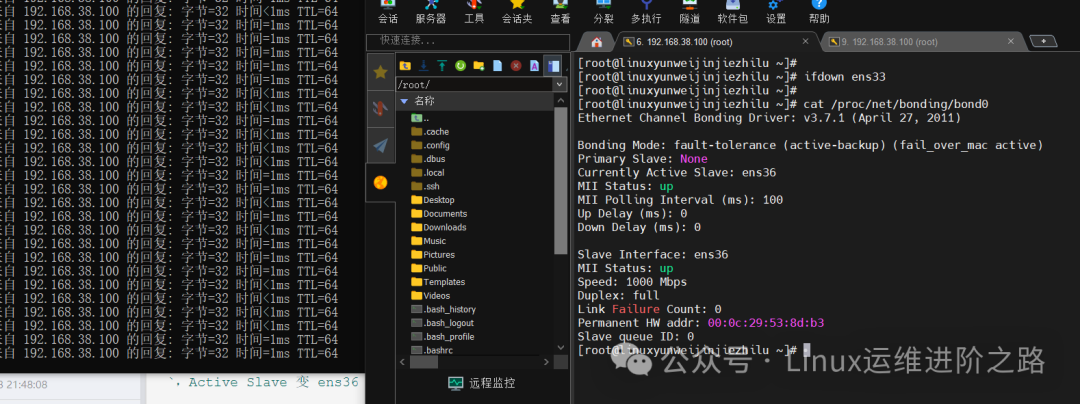
If the switch is smooth, with zero business perception—congratulations, you have built a network fortress!
Conclusion: Why is this a “must-have skill” for O&M?
In the cloud era, a single network card is a ticking time bomb. Dual NIC bonding shines particularly in core scenarios:
- Database/Cache Nodes: Zero interruption in data synchronization.
- Web/Application Servers: No crashes during traffic peaks.
- Virtualization Platforms: Smooth VM migration.
- Storage Arrays: Backup transfers never stop.
Mode 1 is the “entry-level king”, zero cost with high returns; if you want to play with bandwidth, upgrade to Mode 4 (LACP), but remember to configure switch port aggregation.
Advice from Aran: Practice makes perfect, try it on a test machine first. Configuration takes 10 minutes, bringing months of stability—worth it!
Let’s interact: Have you used Bonding for emergencies? What was the worst network failure? See you in the comments, sharing experiences!
– EOF –
Additionally, I have organized some technical materials for you to download directly if needed.


Link:https://pan.quark.cn/s/bc5c2c2700f8
Feel free to leave a message in the comments for any materials you need.
Or add the editor for consultation.
 Recommended Reading Click the title to jump
1. Build an AI Knowledge Base in 5 Minutes! This open-source tool is amazing.
2. Ancient Editing Tool—Complete Analysis of Vim Editor
3. Ansible Batch Add Crontab to 100 Servers
4. How to List USB Devices in Linux
5. Eight Recommended Linux Remote Connection Tools, very practical.
6. 35 Common Shell Scripts for Frontline O&M (Classics)
7. Linux Troubleshooting Ideas and Common Commands (Collection)
Did you gain something from this article? Please share it with more people.
Recommended to follow “Linux O&M Advanced Path” to enhance Linux skills.
 ❤️Like & View❤️, keep the server running for three years without downtime.