1. Introduction: Vulnerability Patching Should Not Be “One-Size-Fits-All”; Targeted Approaches Are More Efficient
In the previous article, we categorized vulnerabilities into risk levels using a simplified method, similar to how a doctor diagnoses a condition — distinguishing between “emergencies (high risk)”, “common illnesses (medium risk)”, and “minor issues (low risk)” to avoid blind treatment. The same logic applies to vulnerability patching: there is no need to apply patches indiscriminately without considering risk levels. The core logic is “prioritize high-risk vulnerabilities, and handle medium and low-risk vulnerabilities wisely”: high-risk vulnerabilities that allow remote execution, akin to “breaking in”, must be patched immediately; issues like weak passwords, which are akin to “too simple a key”, can be resolved by changing passwords and strengthening configurations; local minor vulnerabilities, like “a drawer that isn’t locked”, can be addressed by restricting permissions.
In life, if a window at home is unlocked (a low-risk vulnerability), you don’t need to replace the entire window; installing a latch is sufficient. However, if the front door lock is broken (a high-risk vulnerability), you must replace it with a secure lock immediately. The same logic applies to Linux system vulnerability patching: match the corresponding patching strategy based on the risk level and type of vulnerability to ensure security without wasting operational resources. This article details practical patching methods for different types of vulnerabilities, prioritized as “high risk → medium risk → low risk”, along with commands that can be directly copied and executed, making vulnerability patching efficient, precise, and error-free.
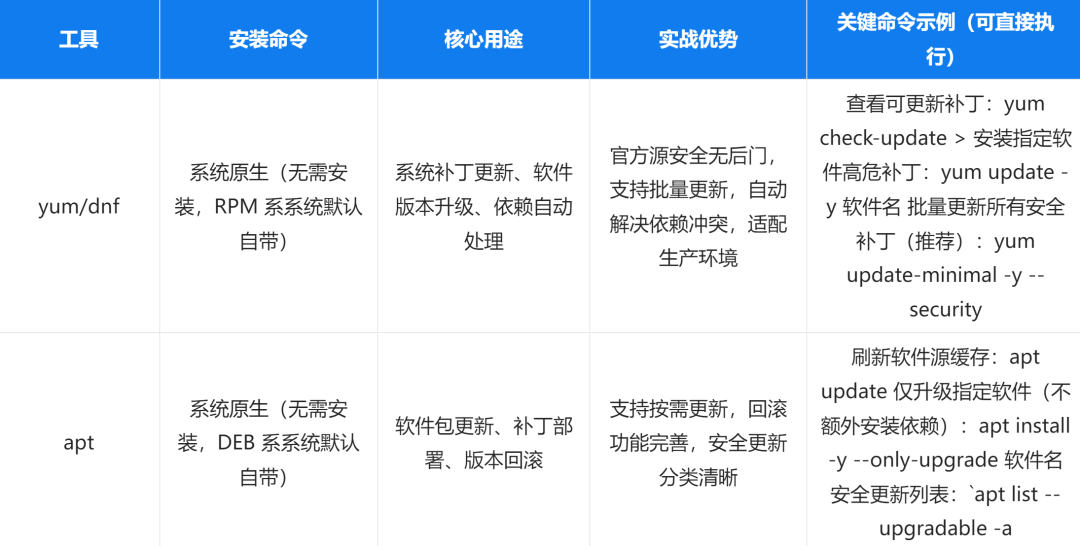
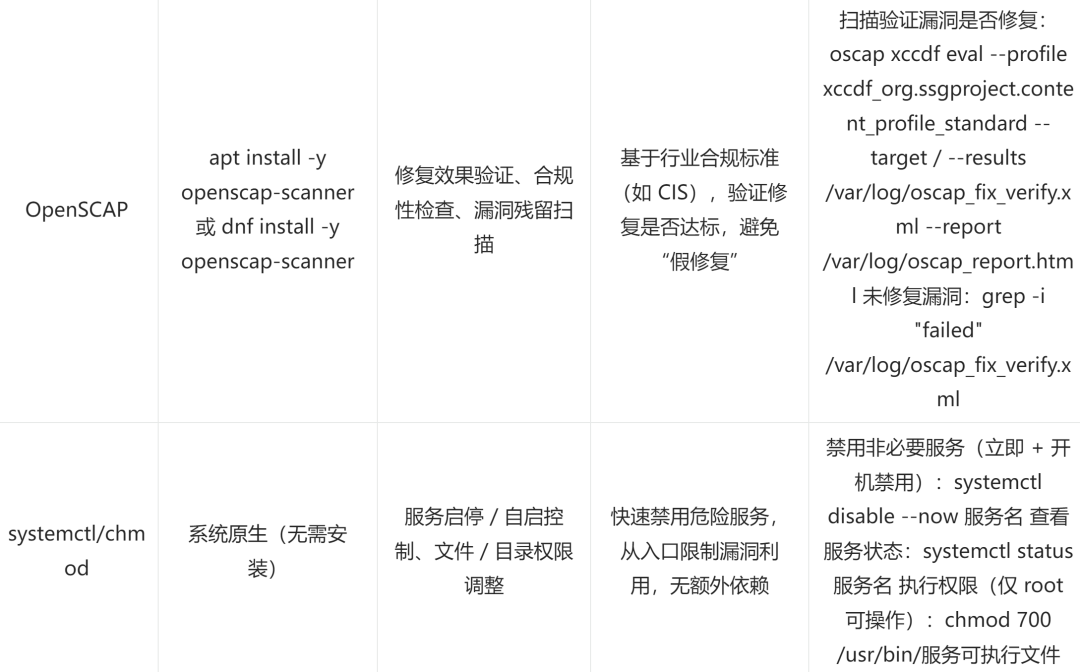
2. Tool Matrix: 4 Core Tools Covering All Types of Vulnerability Patching
No complex tools are needed; selecting 4 commonly used and continuously updated open-source tools can handle the entire process of “patching, configuration changes, permission restrictions, and effect verification”. The commands are simple and easy to use, compatible with mainstream Linux systems.
Example of Tool Collaboration (High-Risk Vulnerability Patching Loop):
Using yum check-update to discover that “openssh service has a remote code execution vulnerability” (high risk);
Execute patch installation during low business hours: yum update -y openssh;
Restart the service to make the patch effective: systemctl restart sshd (it is recommended to inform the business side before restarting);
Use OpenSCAP to verify the patching effect: oscap xccdf eval –profile standard –rule xccdf_org.ssgproject.content_rule_package_openssh_updated –target /, output “pass” indicates successful patching;
Harden service permissions: chmod 700 /usr/sbin/sshd to prevent unauthorized modifications.
Tool Selection Logic
Patching: Prefer using the system’s native yum/apt, as official source patches undergo rigorous testing, ensuring compatibility and security far exceed third-party sources;
Verification of Fixes: Must use OpenSCAP, which not only verifies whether vulnerabilities are patched but also generates compliance reports to meet audit requirements;
Configuration Hardening: The combination of systemctl and chmod allows for quick disabling of dangerous services and tightening of permissions, with no barriers to operation;
Batch Operations: yum/apt for batch patching + OpenSCAP for unified verification, suitable for scenarios with multiple servers in a data center, improving operational efficiency.
3. Scenario-Based Practice: Targeted Patching Based on Risk Levels
Each scenario corresponds to a type of high-frequency vulnerability, paired with “life analogies + step-by-step fixes + verification commands + risk alerts”, allowing beginners to follow along and avoid operational errors.
1. Scenario One: High-Risk Vulnerabilities (Remote Execution / Weak Passwords in Core Systems) — “Patch Immediately, Leave No Gaps”
Vulnerability Characteristics: Capable of remote code execution, weak passwords in core systems, privilege escalation on production machines (defined as high-risk types in the previous article), akin to “the front door is unlocked + strangers can walk in”, requiring immediate repair.
Analogy: If the front door lock at home is broken, allowing strangers to push the door open, you must immediately replace it with a secure lock + install access control, leaving no opportunity for intrusion.
Core Patching Strategy: For remote execution types → apply official patches + restart services; for weak passwords → change to strong passwords + harden login configurations, and verify immediately after patching.
(1) Remote Execution Vulnerability Fix (using OpenSSH remote code execution vulnerability as an example)
# Step 1: Confirm the current software version (to determine if a vulnerability exists)ssh -V # Example output: OpenSSH_7.4p1 (known to have a high-risk vulnerability)# Step 2: Install the official patch (choose command based on system type, execute during low business hours)# RPM-based systems (like RedHat, Fedora):yum update -y openssh# DEB-based systems (like Debian, Ubuntu):apt update && apt install -y --only-upgrade openssh-server# Step 3: Restart the service to make the patch effective (critical step, patch won't take effect without a restart)systemctl restart sshd# Risk Alert: Restarting sshd will interrupt existing SSH connections; it is recommended to inform online users in advance# Step 4: Verify that the patch was successfully installed (confirm the version has been updated to a non-vulnerable version)ssh -V # Example output: OpenSSH_8.8p1 (non-vulnerable version)# Step 5: Use OpenSCAP to verify whether the vulnerability has been completely patchedoscap xccdf eval --profile xccdf_org.ssgproject.content_profile_standard --rule xccdf_org.ssgproject.content_rule_package_openssh_updated --target /# Output "pass" indicates the vulnerability has been patched; output "fail" requires rechecking the patch installation(2) Fixing Weak Passwords in Core Systems (using root user weak password as an example)
# Step 1: Change the weak password (set a strong password to avoid simple combinations)passwd root# Follow the prompts to enter a new password (requirements: uppercase + lowercase letters + numbers + special characters, length ≥ 8, example: Db@Pass123!)# Step 2: Harden SSH login configuration to prevent weak passwords from being brute-forced (choose one: manual change/batch change)# Method 1: Manually modify the configuration filevi /etc/ssh/sshd_config# Adjust the following 3 configurations (uncomment and modify):PasswordAuthentication yes # Enable password login when needed (recommended to disable and use key login)PermitRootLogin prohibit-password # Prohibit root direct password login, only allow key loginMaxAuthTries 3 # Maximum 3 login failures to prevent brute force# Method 2: Use sed command for batch modification (suitable for multi-server operations)sed -i 's/^#PasswordAuthentication yes/PasswordAuthentication yes/' /etc/ssh/sshd_configsed -i 's/^PermitRootLogin yes/PermitRootLogin prohibit-password/' /etc/ssh/sshd_configsed -i 's/^#MaxAuthTries 6/MaxAuthTries 3/' /etc/ssh/sshd_config# Step 3: Restart the sshd service to make the configuration effective.systemctl restart sshd# Step 4: Verify that the configuration is effective (test whether weak password login fails)ssh root@TargetIP # Enter the old weak password (like 123456), if it prompts "Permission denied", it is effective2. Scenario Two: Medium-Risk Vulnerabilities (Core Data Leakage / Local Privilege Escalation on Production Machines) — “Repair + Harden, Double Protection”
Vulnerability Characteristics: Leakage of core data such as database passwords, user phone numbers, or local privilege escalation vulnerabilities on production machines, akin to “the key to the safe at home is left in plain sight”; after repair, additional hardening is required to prevent secondary leakage.
Analogy: If the key to the safe at home is left out, not only should the key be secured, but an additional password lock should be installed on the safe for double protection.
Core Patching Strategy: For data leakage types → modify leaked credentials + restrict file permissions; for local privilege escalation types → apply kernel patches + clean up dangerous SUID permissions.
(1) Fixing Core Data Leakage Vulnerabilities (using configuration file leaking database password as an example)
# Step 1: Urgently modify the leaked core credentials (password/key)vi /etc/app/config.ini# Find "db_password=123456", change it to a strong password (example: Db@Pass123!), save and exit# Step 2: Tighten configuration file permissions, readable and writable only by root (to prevent ordinary users from viewing)chmod 600 /etc/app/config.ini # Only root has read and write permissions, other users have no permissionschown root:root /etc/app/config.ini # Change file ownership/group to root# Step 3: Verify that permissions are effective (ordinary users cannot access)su - ordinary_username # Switch to an ordinary user (like test)cat /etc/app/config.ini # If it prompts "Permission denied", it is effective# Step 4: Scan the system to check for other leaked files (to avoid omissions)grep -r "password\|secret\|key" /var/www /etc /opt --include="*.ini,*.conf,*.yml" 2>/dev/null | grep -vE "600|root"# The output results need to be checked one by one to ensure no other publicly accessible credential files(2) Fixing Local Privilege Escalation Vulnerabilities on Production Machines (using SUID privilege escalation vulnerability as an example)
# Step 1: Find dangerous SUID files in the system (SUID files allow ordinary users to execute with root privileges)find / -perm -4000 -type f 2>/dev/null | grep -vE "/bin/ls|/bin/cat|/usr/bin/passwd|/usr/bin/sudo"# Note: Exclude normal SUID files (like passwd, sudo), the remaining are dangerous files# Step 2: Remove dangerous SUID permissions (for non-essential SUID files)chmod u-s /usr/bin/dangerous_file # Example: chmod u-s /usr/bin/find (if find is set SUID)# Step 3: Install kernel patches (if the privilege escalation vulnerability originates from a kernel vulnerability)# RPM-based systems: yum update -y kernel# DEB-based systems: apt update && apt install -y linux-image-$(uname -r)# Step 4: Restart the system to make the kernel patch effective (production machines need to plan downtime in advance)reboot# Step 5: Verify whether the privilege escalation vulnerability has been patchedsu - ordinary_username # Switch to an ordinary userfind / -name "test.txt" -exec /bin/sh \; # Execute privilege escalation command# If it prompts "Permission denied", it is successfully patched; if you enter the sh terminal, it indicates the vulnerability still exists3. Scenario Three: Low-Risk Vulnerabilities (Local Vulnerabilities on Test Machines / Ordinary Information Leakage) — “Simple Handling, No Effort Required”
Vulnerability Characteristics: Local privilege escalation on test machines, leakage of ordinary logs / non-critical version information, akin to “the drawer in the storage room at home is not locked, containing only unimportant items”; no complex operations are needed, simple handling is sufficient.
Analogy: If the drawer in the storage room at home is not locked, there is no need to install complex locks; just tie it with a string, which does not affect overall security.
Core Patching Strategy: Disable unnecessary services + restrict access permissions, no need to install patches, saving operational effort.
Patching Steps (using test machine web service leaking version information as an example)
# Step 1: Disable unnecessary services leaking information (like test Nginx/Apache)systemctl disable --now nginx # If it's Apache, replace with httpd# Note: Directly disable unnecessary services in the test environment to block leakage at the source# Step 2: Tighten log file permissions, readable only by rootchmod -R 600 /var/log/* # Batch modify all log file permissionschown -R root:root /var/log/* # Batch change log file ownership/group# Step 3: Delete temporary files leaking information (like test configuration samples, version descriptions)rm -f /var/www/html/sample_config.ini /var/www/html/version.txt# Note: Delete useless leaked files to avoid being scanned# Step 4: Verify the patching effectsu - ordinary_usernamecat /var/log/nginx/access.log # If it prompts "Permission denied"curl http://test_machine_IP/sample_config.ini # If it prompts "404 Not Found"curl http://test_machine_IP/version.txt # If it prompts "404 Not Found", it is effectiveConclusion: The Core of Vulnerability Patching is “Priority + Effectiveness”, Connecting Patch Management
Vulnerability patching should not pursue “fixing all vulnerabilities at once”; rather, it should follow the logic of “high-risk first, medium-risk hardening, low-risk simplification”, using native system tools + open-source verification tools to ensure security while saving operational costs. For high-risk vulnerabilities like remote execution and weak passwords in core systems, it is essential to “apply patches + verify immediately”; for core data leakage and privilege escalation on production machines, it is “repair + double hardening”; while low-risk vulnerabilities can be “handled simply, focusing on key risks”.
After patching vulnerabilities, two key issues still need to be addressed: how to manage patches in bulk (to avoid repetitive operations) and how to obtain new patches in a timely manner (to prevent new vulnerabilities from appearing). The next article, “Linux System Patch Management and Update Strategies”, will detail automated deployment of patches, version rollback plans, and security update cycle formulation, helping operational personnel establish a closed loop of “vulnerability patching – patch management – continuous protection” to keep systems secure over the long term.