OpenWrt Configuration Guide
1. Hardware and Software
Router: Xiaomi Router R3G
OS: OpenWrt 21.02.2
Chip: MT7621
SSH Client: MobaXterm Personal 12.4
Browser: Microsoft Edge
OpenWrt Theme: Luci-theme-argon 2.2.9.4 (Theme package: Releases · jerrykuku/luci-theme-argon (github.com), Configuration GUI: Releases · jerrykuku/luci-app-argon-config (github.com))
2. Network Configuration
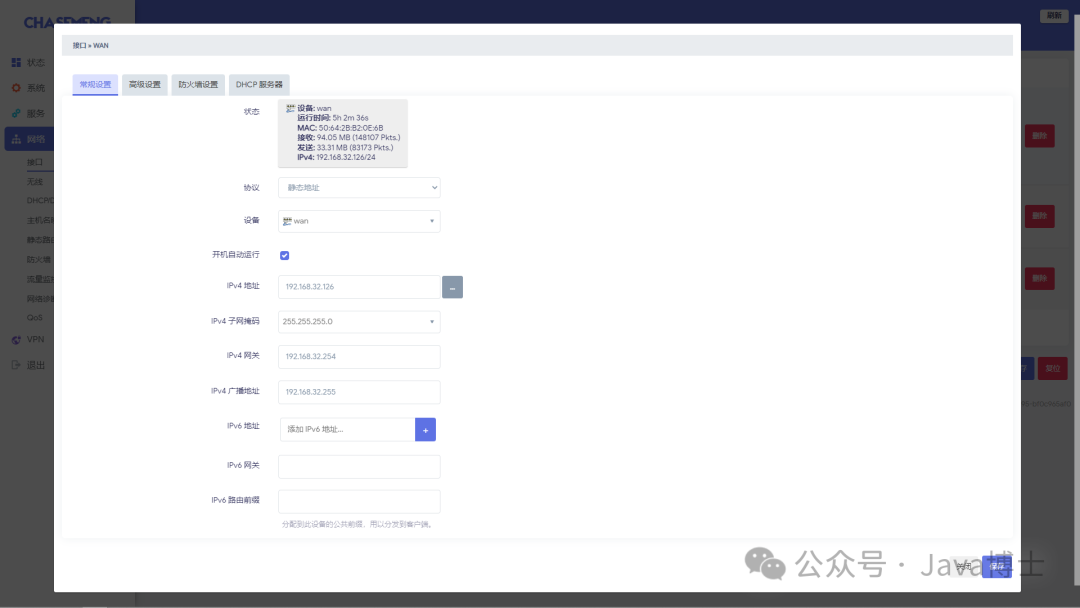
1. Static Address Configuration for Interfaces
- WAN Port: The static address protocol must manually set DNS, disable RA service and DHCPv6 service in the DHCP server (if you want to use it, search for it yourself, but enabling it will cause issues).


- LAN Port: You can leave the DNS server uncustomized, but you need to set the DHCP options in the advanced settings of the DHCP server, with the content being “6, Custom DNS Server 1, Custom DNS Server 2, Custom DNS Server 3” (the 6 indicates DNS server, the other numbers refer to where I forgot), after configuration, clients connected to the router can automatically obtain the customized DNS server. Then in the DHCP server’s IPv6 settings, also disable RA service and DHCPv6 service (enabling it will also cause issues);


2. Firewall Port Forwarding (Port Mapping)

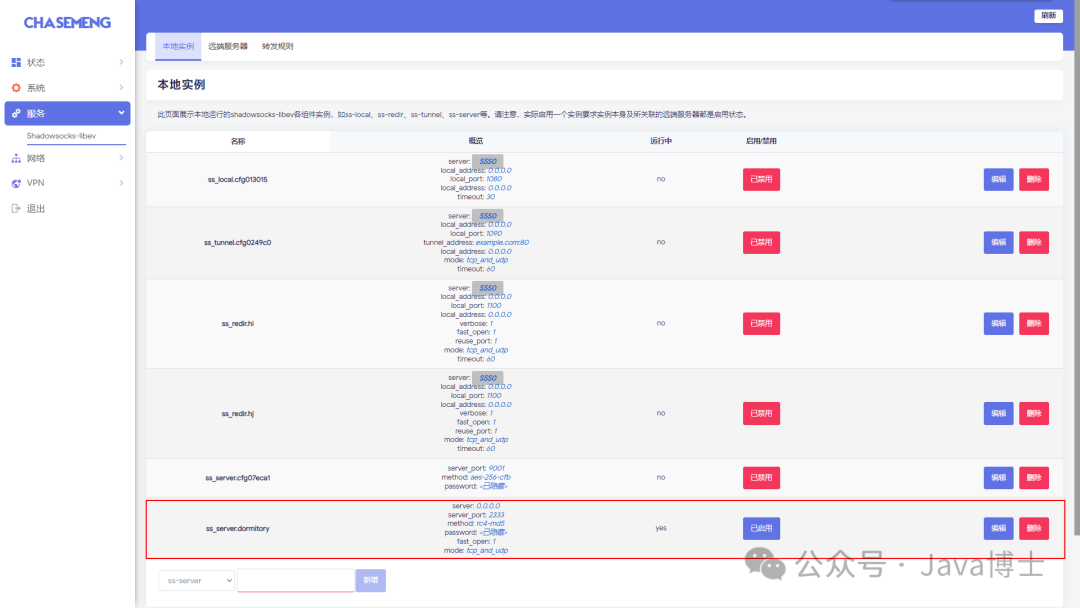
3. Install Shadow & Socks (SS) Service
(Remove the & below, as the blog does not allow sensitive words)
- Install luci-app-shadow&socks-libev plugin: SS graphical interface;
- Install shadow&socks-libev-ss-server plugin: SS server program;
- After refreshing the interface, open the Shadow & socks-libev interface in services;
- Add ss-server instance: It is recommended to use rc4-md5 for encryption (officially recommended for OpenWRT routers, I have tried it, and it is indeed the fastest, but I do not know about other architectures);

4. Open Ports
Go to the firewall in the network settings, the default ports are closed, so even if you install any service, external access cannot reach the internal port number due to the following rule.
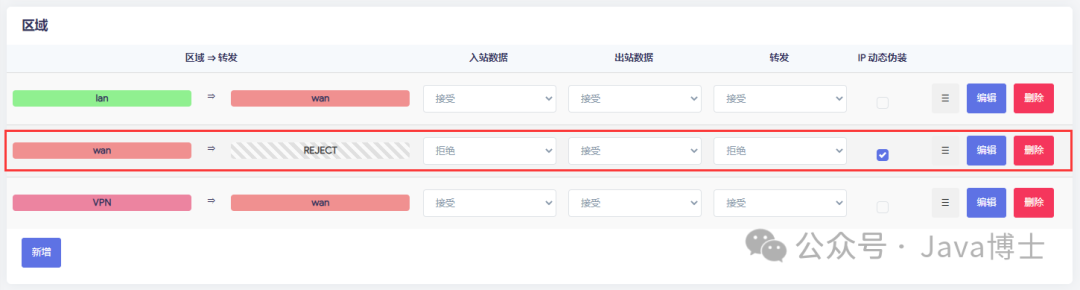
To open ports, set the above inbound data and forwarding to accept, but this will expose all ports. You can use the following communication rules to open specific ports:

5. Install Samba
The latest opkg image only contains the samba4 plugin, which has too many dependencies, and I cannot install the samba4-libs dependency, installation failed. However, you can install samba3.6, which requires two plugins: samba36-server and luci-app-samba.samba36-server can be downloaded from the opkg image’s /19.07.9/packages/mipsel_24kc/base/ directory, luci-app-samba can be downloaded from the /19.07.9/packages/mipsel_24kc/luci/ directory (of course, if you need localization, you also need to download the localization package luci-i18n-samba-zh-cn, also in the /19.07.9/packages/mipsel_24kc/luci/ directory);
It is important to note that Samba uses ports 139 and 445, and these ports should be opened before use. If you are on broadband, these two ports may be blocked by the ISP, making external access impossible.
- Install samba36-server, luci-app-samba and luci-i18n-samba-zh-cn;
- After refreshing the management interface, find network sharing and configure as shown below (note that non-root users do not have read and write permissions for system paths, so even if logged in as a non-root user, you cannot write files);


- Start the service and set it to start on boot;
/etc/init.d/

samba start
/etc/init.d/samba enable- Set the root user password (the password for the Samba shared user is configured separately, execute the command below to add root as a shared user, and set the shared password as prompted; this password cannot log into the OpenWrt system)
smbpasswd -a root【Note】Sometimes you can access but cannot open or download files; you can check whether the file system of the mounted USB drive or hard drive is supported and whether the corresponding software package is installed (for example, the FAT32 file system requires installing “kmod-fs-vfat“).
6. Campus Network Auto Login
(I am not sure about other schools, this example is for Guangxi Normal University)
Reference Link 1: openwrt campus network auto login and disconnection reconnection_in dreaming’s blog-CSDN blog_openwrt disconnection auto restart
Reference Link 2: openwrt crontab scheduled tasks implementation_Kenen.Gao’s blog-CSDN blog_crontab openwrt
Reference Link 3: [OpenWrt Wiki] Scheduling tasks with cron
- Create directory /etc/campusnetwork-autologin/;
- Create login action execution file login.sh (need to change relevant parameters), fill in the content below, and grant execute permissions (execute “chmod +x /etc/campusnetwork-autologin/login.sh“);
 login.sh
- Create auto login logic script autologin.sh, fill in the content below, and grant execute permissions;
autologin.sh
- Edit /etc/crontabs/root file, add scheduled tasks (or use the command “crontab -e” to add as well), note there is an empty line at the end;
*/1 * * * * /etc/campusnetwork-autologin/autologin.sh
- Restart the crontab service (execute “/etc/init.d/cron restart” or “/etc/init.d/cron reload“) to make the configuration file effective;
(If it is found to be ineffective, you can use the command “logread -e cron” to check the log for troubleshooting)
7. Install PPTP Service
Reference link: Build PPTP server on OpenWRT
- Install pptpd;
$ opkg update
$ opkg install pptpd kmod-mppe ppp- Modify configuration file /etc/config/pptpd;
/etc/config/pptpd
- Start pptpd and check if it started successfully (port 1723);
$ /etc/init.d/pptpd enable    # Enable startup, this is the most direct method, same effect as service pptpd enable
$ /etc/init.d/pptpd start    # Start
$ netstat -antp # Check port 1723- Configure iptables rules, add the following content in the file /etc/firewall.user, or you can also add in the custom rules interface of the firewall;
iptables -A forwarding_rule -i ppp+ -j ACCEPT
iptables -A forwarding_rule -o ppp+ -j ACCEPT
iptables -A output_rule -o ppp+ -j ACCEPT
iptables -A input_wan_rule -p tcp --dport 1723 -j ACCEPT
iptables -A input_wan_rule -p tcp --dport 47 -j ACCEPT
iptables -A input_wan_rule -p gre -j ACCEPT
iptables -A input_rule -i ppp+ -j ACCEPT     # In simple terms, this configures allowing ppp+ and wan port 1723, 47 port can only use tcp protocol
8. Port Forwarding
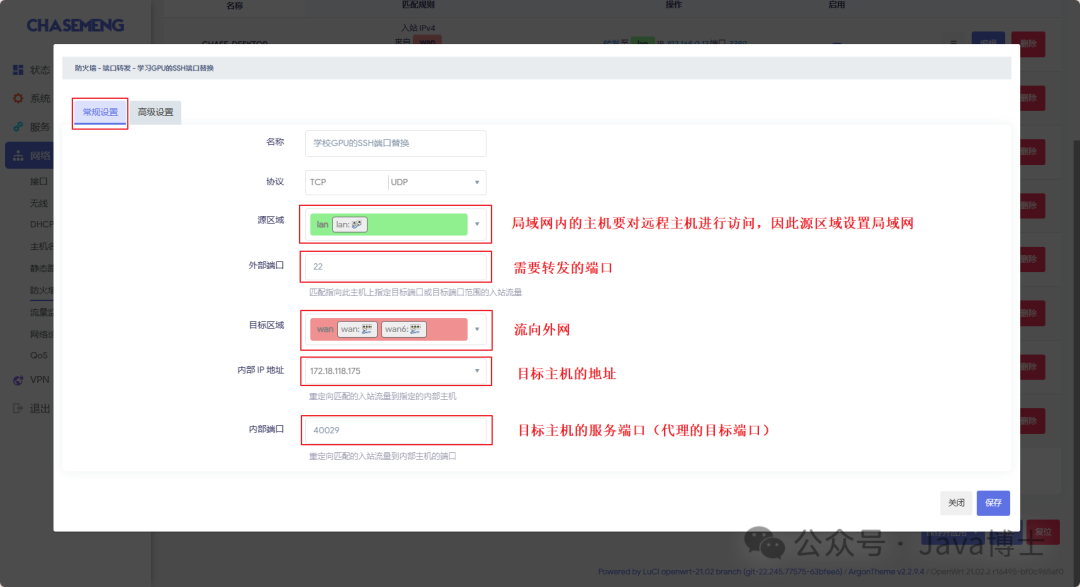
Port forwarding operation is very simple, ordinary forwarding will not be elaborated here, here is a method to proxy remote ports.
Scenario: Some local software needs to access a remote host, and cannot specify the port, for example, Windows File Explorer wants to map a remote Samba server to a local drive, it cannot specify the port, it can only use the default 445. However, if the remote host’s Samba service port is changed to a non-445 port, it will cause local Windows to be unable to access. Another case is that if VS Code wants to remotely access the server for development, it also cannot specify a non-22 port for operation.
Solution: Set up port forwarding in the local OpenWrt router to forward the default port of the target host to a specified port. For example, if the remote host (IP 172.18.118.175) has its SSH service port changed to 40029, but local VS Code can only connect using port 22, the OpenWrt router will forward port 22 of this target address to port 40029, the setup process is as follows:

The effect after setting:

【Note】Although the above image shows the label “to this device“, it does not actually affect the SSH login of the OpenWrt router.
3. Install Plugins
1. Replace Software Source
Reference: OpenWrt Image – Alibaba Open Source Mirror Site
2. Installation Method
Third-party plugin download website (many plugins are not available in the opkg image): OpenWrt Download Server (supes.top), select the mipsel_24kc directory for MT7621;
- Upload installation package: Automatically installs dependencies, if the relevant dependencies are not in the opkg image, it will report an error, but you can install manually;
- URL installation: Never succeeded~;
- Online installation from the plugin list;
3. Issues with luci-app-* plugins not opening the backend interface or corresponding pages after installation
Ensure that luci luci-base luci-compat three plugins are correctly installed, especially luci-compat which I did not install in my OpenWrt firmware, seems to solve compatibility issues. If it still does not work, there is no way, use SSH to connect to the router and uninstall the plugins that encountered errors after installation.
4. Unable to Start After Installation
If it prompts that some files or libraries are not found, it may be that the plugin version is too high, try replacing it with a lower version plugin!