Introduction
In bare-metal microcontroller development, delay is one of the most common requirements. Whether it is LED blinking, button debouncing, sensor sampling, or timing control for communication protocols, the delay function is indispensable. However, traditional blocking delays (such as <span>delay_ms()</span>) are simple to use but can leave the CPU in a “busy wait” state, wasting precious computational resources.
So, how can we design a non-blocking delay that allows the CPU to perform other tasks while waiting? This article will delve into this topic, helping you make the most of every clock cycle of your microcontroller!
1. The “Sin and Punishment” of Blocking Delays
1.1 Typical Implementation of Traditional Blocking Delays
Let’s first look at a common blocking delay function:
void delay_ms(uint32_t ms) {
    for(uint32_t i = 0; i < ms; i++) {
        for(uint32_t j = 0; j < 1000; j++) {
            __NOP();  // No operation instruction
        }
    }
}

// Usage example: LED blinking
while(1) {
    LED_ON();
    delay_ms(500);   // CPU blocks here for 500ms
    LED_OFF();
    delay_ms(500);   // Blocks again for 500ms
}
1.2 Disadvantages of Blocking Delays
What seems like simple code actually hides some intricacies. Let’s visualize it with a timing diagram:
Serial Communication  Button Detection  LED  CPU
Serial Communication  Button Detection  LED  CPU
Blocking delay mode cannot respond to other tasks!
Button pressed but not detected
Serial data arrives but not received
LED on
delay_ms(500)
CPU completely idle
LED off
delay_ms(500)
Still idle
Summary of Issues:
- • ❌ Extremely low CPU utilization: During the delay, the CPU can only wait idly, doing nothing
- • ❌ Poor responsiveness: Unable to timely handle button, serial, and other events
- • ❌ Resource wastage: Increased power consumption, decreased performance
- • ❌ Poor scalability: Difficult to achieve multi-task concurrency
2. The Design Philosophy of Non-Blocking Delays
2.1 Core Idea
The core concept of non-blocking delays is: Do not wait, but check.
- • Traditional method: “I want to wait for 500ms” → CPU waits idly for 500ms
- • Non-blocking method: “I record the start time and check if 500ms has passed during each main loop” → CPU can do other tasks
2.2 Implementation Comparison Diagram
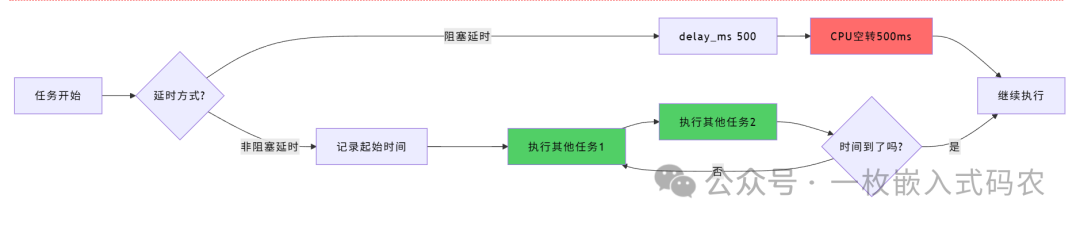
3. Implementation Methods for Non-Blocking Delays
3.1 Method 1: Based on System Tick Timer (SysTick)
This is the most commonly used and recommended method. It utilizes the SysTick timer to provide a global time base.
Implementation Code
// Global time variable (incremented in SysTick interrupt)
volatile uint32_t g_system_tick_ms = 0;

// SysTick interrupt service function (triggered every 1ms)
void SysTick_Handler(void) {
    g_system_tick_ms++;
}

// Initialize SysTick (example with 72MHz main frequency, 1ms interrupt)
void systick_init(void) {
    SysTick_Config(72000);  // 72MHz / 72000 = 1kHz = 1ms
}

// Get current system time
uint32_t millis(void) {
    return g_system_tick_ms;
}

// Non-blocking delay check
typedef struct {
    uint32_t start_time;
    uint32_t interval;
    uint8_t  is_running;
} soft_timer_t;

// Start timer
void timer_start(soft_timer_t *timer, uint32_t interval_ms) {
    timer->start_time = millis();
    timer->interval = interval_ms;
    timer->is_running = 1;
}

// Check if timer has expired
uint8_t timer_expired(soft_timer_t *timer) {
    if(!timer->is_running) return 0;

    if((millis() - timer->start_time) >= timer->interval) {
        timer->is_running = 0;
        return 1;  // Time's up!
    }
    return 0;  // Not yet
}
Usage Example: Non-Blocking LED Blinking
soft_timer_t led_timer;

int main(void) {
    systick_init();
    LED_Init();

    timer_start(&led_timer, 500);  // Start 500ms timer

    while(1) {
        // Check LED timer
        if(timer_expired(&led_timer)) {
            LED_TOGGLE();
            timer_start(&led_timer, 500);  // Restart
        }

        // CPU can now do other tasks!
        check_button();      // Check button
        process_uart();      // Process serial data
        read_sensor();       // Read sensor
        // ... More tasks
    }
}
3.2 Method 2: State Machine Design
For complex timing control, a state machine is the most elegant solution.
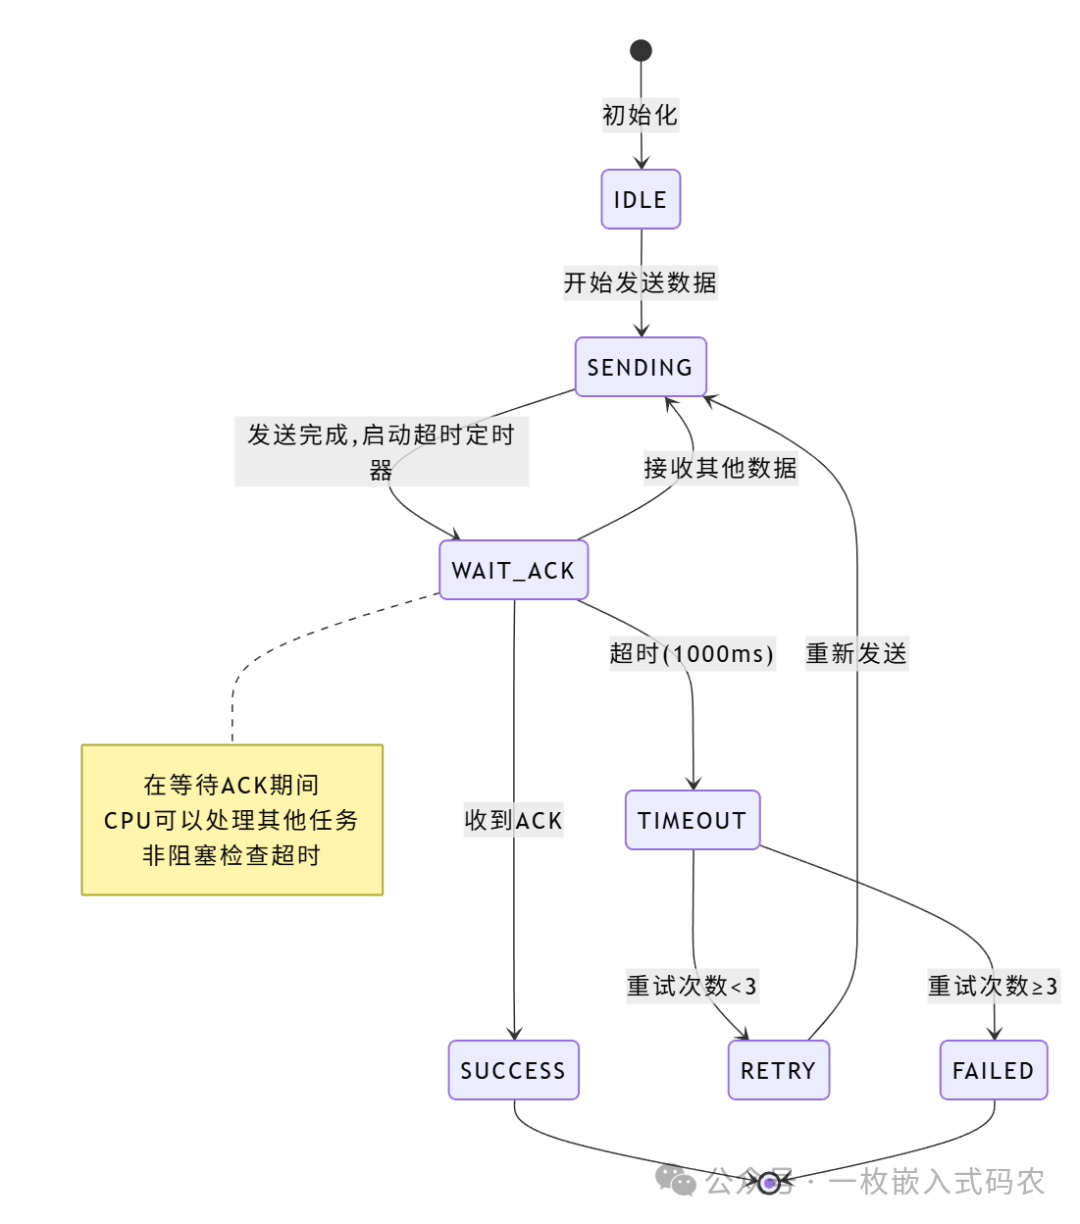
State Machine Code Example
typedef enum {
    STATE_IDLE,
    STATE_SENDING,
    STATE_WAIT_ACK,
    STATE_SUCCESS,
    STATE_FAILED
} comm_state_t;

typedef struct {
    comm_state_t state;
    soft_timer_t timeout_timer;
    uint8_t retry_count;
} comm_fsm_t;

comm_fsm_t comm_fsm = {STATE_IDLE};

void comm_process(void) {
    switch(comm_fsm.state) {
        case STATE_IDLE:
            // Idle state, waiting for trigger
            break;

        case STATE_SENDING:
            uart_send_data();
            comm_fsm.state = STATE_WAIT_ACK;
            timer_start(&comm_fsm.timeout_timer, 1000);  // 1 second timeout
            break;

        case STATE_WAIT_ACK:
            // Non-blocking check for timeout
            if(timer_expired(&comm_fsm.timeout_timer)) {
                if(comm_fsm.retry_count < 3) {
                    comm_fsm.retry_count++;
                    comm_fsm.state = STATE_SENDING;  // Retry
                } else {
                    comm_fsm.state = STATE_FAILED;   // Failed
                }
            }
            // Check if ACK received (set flag in interrupt or other main loop locations)
            if(ack_received) {
                comm_fsm.state = STATE_SUCCESS;
            }
            break;

        case STATE_SUCCESS:
            // Handle success logic
            comm_fsm.state = STATE_IDLE;
            break;

        case STATE_FAILED:
            // Handle failure logic
            comm_fsm.state = STATE_IDLE;
            break;
    }
}

// Main loop
while(1) {
    comm_process();      // Process communication state machine
    led_process();       // Process LED blinking
    key_process();       // Process button
    // All tasks are non-blocking!
}
3.3 Method 3: Software Timer Manager
When managing multiple timers, a unified timer manager can be designed.
#define MAX_TIMERS  10

typedef void (*timer_callback_t)(void);

typedef struct {
    uint32_t interval;
    uint32_t last_tick;
    timer_callback_t callback;
    uint8_t repeat;      // 1=periodic, 0=one-time
    uint8_t active;
} timer_t;

timer_t timer_pool[MAX_TIMERS];

// Create timer
int timer_create(uint32_t interval_ms, timer_callback_t callback, uint8_t repeat) {
    for(int i = 0; i < MAX_TIMERS; i++) {
        if(!timer_pool[i].active) {
            timer_pool[i].interval = interval_ms;
            timer_pool[i].callback = callback;
            timer_pool[i].repeat = repeat;
            timer_pool[i].last_tick = millis();
            timer_pool[i].active = 1;
            return i;  // Return timer ID
        }
    }
    return -1;  // No available timer
}

// Timer scheduler (called in main loop)
void timer_scheduler(void) {
    uint32_t now = millis();

    for(int i = 0; i < MAX_TIMERS; i++) {
        if(timer_pool[i].active) {
            if((now - timer_pool[i].last_tick) >= timer_pool[i].interval) {
                // Time's up, execute callback
                if(timer_pool[i].callback) {
                    timer_pool[i].callback();
                }

                if(timer_pool[i].repeat) {
                    timer_pool[i].last_tick = now;  // Restart timing
                } else {
                    timer_pool[i].active = 0;  // One-time timer, stop
                }
            }
        }
    }
}

// Usage example
void led_blink_callback(void) {
    LED_TOGGLE();
}

void sensor_read_callback(void) {
    read_temperature();
}

int main(void) {
    systick_init();

    // Create LED timer that blinks every 500ms
    timer_create(500, led_blink_callback, 1);

    // Create sensor reading timer that reads every 1000ms
    timer_create(1000, sensor_read_callback, 1);

    while(1) {
        timer_scheduler();  // Schedule all timers
        // Other tasks...
    }
}
4. Software Timer Architecture Design
The following diagram illustrates a complete software timer system architecture:
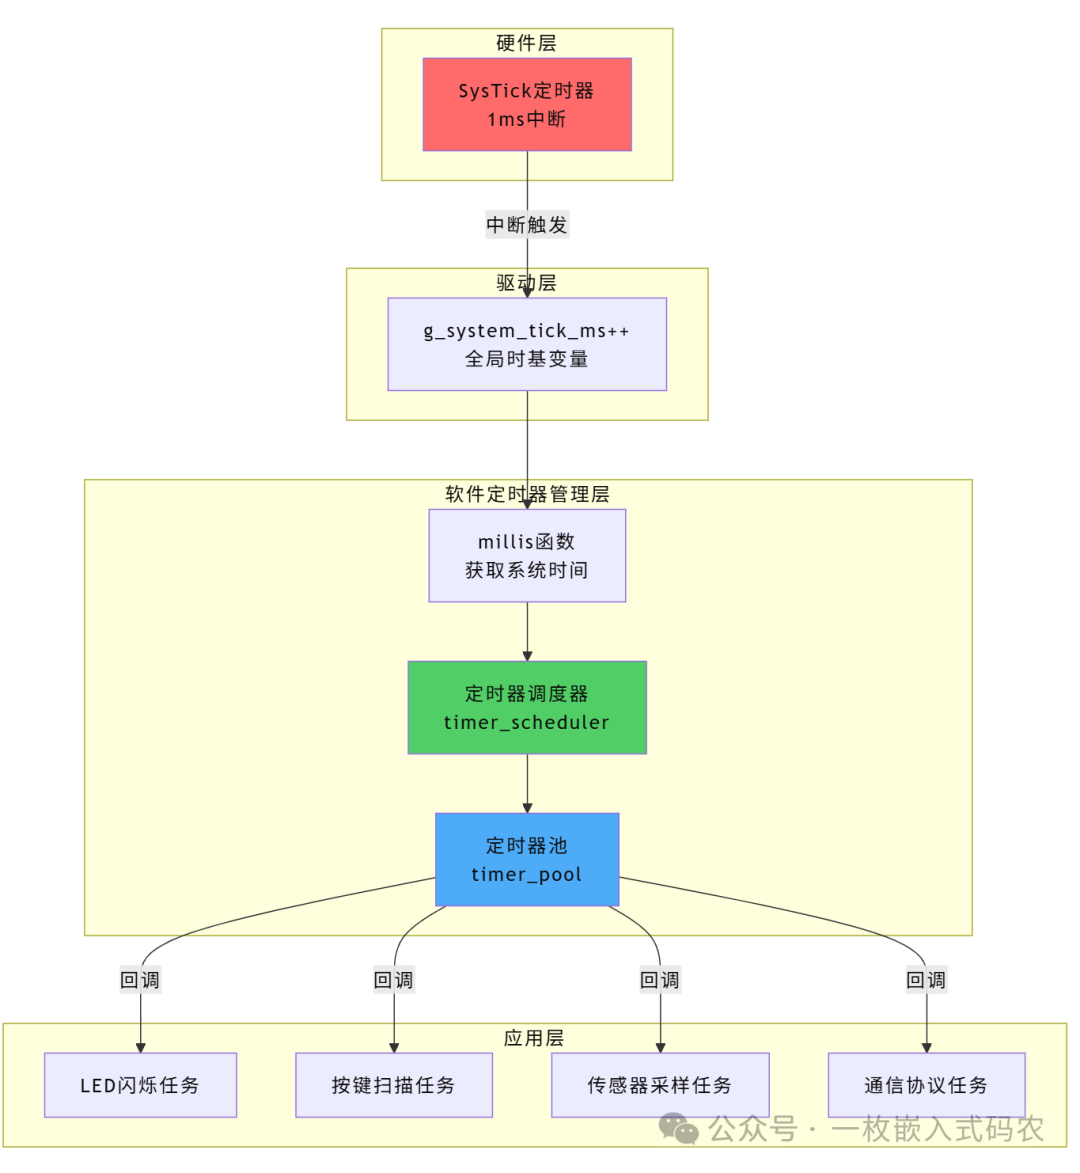
5. Considerations and Best Practices
5.1 Time Overflow Issues
<span>uint32_t</span> type millisecond counter will overflow after about 49.7 days. Handling method:
// ✅ Correct: Utilize the property of unsigned integer subtraction to automatically handle overflow
uint8_t timer_expired(soft_timer_t *timer) {
    return (millis() - timer->start_time) >= timer->interval;
}

// ❌ Incorrect: Direct comparison will cause errors after overflow
uint8_t timer_expired_wrong(soft_timer_t *timer) {
    return millis() >= (timer->start_time + timer->interval);
}
5.2 Interrupt Safety
Accessing <span>g_system_tick_ms</span><span> requires consideration of atomicity:</span>
// 32-bit microcontrollers can usually read uint32_t atomically without extra protection
uint32_t millis(void) {
    return g_system_tick_ms;
}

// 8-bit/16-bit microcontrollers need interrupt protection
uint32_t millis_safe(void) {
    uint32_t tick;
    __disable_irq();
    tick = g_system_tick_ms;
    __enable_irq();
    return tick;
}
5.3 Timing Precision
- • SysTick Precision: Depends on interrupt cycle (recommended 1ms)
- • Task Scheduling Delay: A complex main loop can affect timer check frequency
- • Solution: Keep the main loop lightweight or use RTOS
5.4 Power Consumption Optimization
Non-blocking does not mean you cannot sleep:
while(1) {
    timer_scheduler();
    process_tasks();

    // If there are no urgent tasks, enter low power mode
    if(no_urgent_tasks) {
        __WFI();  // Wait For Interrupt
    }
}
6. Performance Comparison Summary
| Comparison Dimension | Blocking Delay | Non-Blocking Delay |
|---|---|---|
| CPU Utilization | ❌ Close to 0% | ✅ Can reach 90%+ |
| Response Speed | ❌ Poor (ms level) | ✅ Good (μs level) |
| Code Complexity | ✅ Simple | ⚠️ Moderate |
| Scalability | ❌ Poor | ✅ Excellent |
| Multi-Task Concurrency | ❌ Not supported | ✅ Supported |
| Power Consumption Optimization | ❌ Difficult | ✅ Easy (can be combined with WFI) |
7. Conclusion
Non-blocking delays are the cornerstone of efficient operation in embedded systems. Through the following three methods, you can make your microcontroller “multi-tasking”:
- 1. SysTick + Software Timer: The most universal and recommended solution
- 2. State Machine Design: Suitable for complex timing control
- 3. Timer Manager: Suitable for multi-task concurrency scenarios
Remember the core principle: Do not wait, but check; do not block, but poll. Making every clock cycle of the CPU valuable is the essence of bare-metal development!
Have you learned it? Next time you write microcontroller code, remember to say goodbye to <span>delay_ms()</span><span> and embrace the non-blocking world! If you find this useful, feel free to like, share, and bookmark! 💪</span>
【Previous Recommendations】Advanced Decoupling of Embedded Software Modules: Building High Cohesion, Low Coupling System ArchitectureSTM32 Startup Journey: The Wonderful Journey from Power-On to Main FunctionHow Embedded Software Engineers Can Enhance Their Skills? A Complete Roadmap from Beginner to Expert