(1) Deployment of the DeepSeek R1 Model
First, let’s take a look at the results after deployment. You can directly access Jetson on your phone, which has a web interface for use.
You can also access it directly on your computer.
This is the 8GB 128-bit LPDDR5 version with 102GB/s bandwidth and a 256GB hard drive. Let’s take a look at the basic parameters.
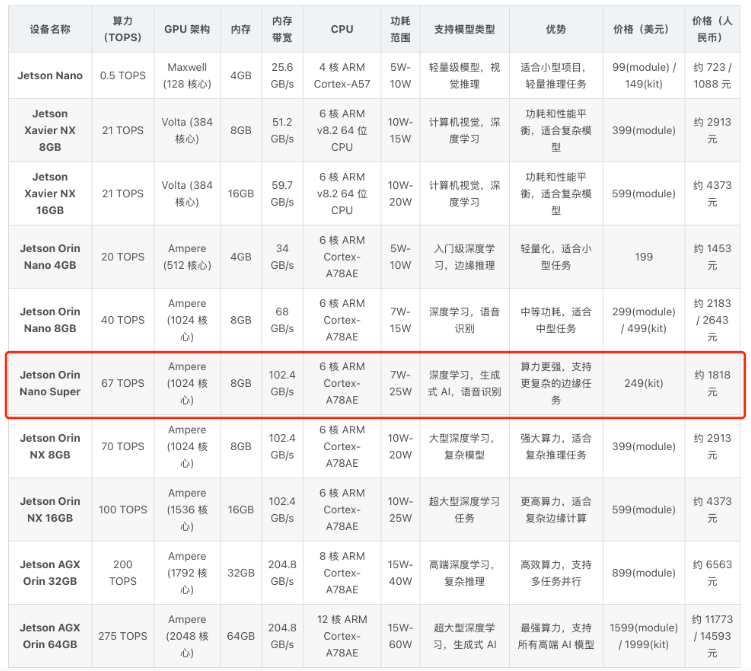
From the comparison of computing power and price, the Jetson Orin Nano Super 8GB version has a high cost-performance ratio, offering 67 TOPS (INT8) computing power at a relatively low price. It also uses the newer Ampere architecture. The CPU features a 6-core ARM Cortex-A78AE, with a frequency of up to 1.7GHz.
With this computing power, it can run more powerful AI models, suitable for more complex edge computing tasks.
One of the tools used for deploying DeepSeek is Ollama
Ollama is an open-source framework for running large language models (LLM) locally, designed to simplify the process of deploying, managing, and running various open-source large language models on local machines.
It provides simple command-line tools and APIs, allowing users to easily download, configure, and run models without relying on complex cloud services or high-performance hardware.
Ollama now supports one-click deployment and running of models such as Llama3, DeepSeek R1, Phi-4, Gemma2, and many others.
🔺 Installation
curl -fsSL https://ollama.com/install.sh | sh🔺 Running the Model
After installation, directly visit the official website ollama models link (https://ollama.com/search) to select the model you want to use.
We will use the DeepSeek-R1 7B model here. The 7B model occupies over 7GB of VRAM.
Then run the following code in the terminal.
ollama run deepseek-r1Currently, DeepSeek can only be used in the terminal, which is inconvenient for viewing, and the generated code is not easy to copy. Therefore, having a web interface similar to ChatGPT or the DeepSeek official website would be more user-friendly.
Next, we will configure a web interface similar to the DeepSeek web version, but the model inference will be on our local Jetson device.
🔺 Environment Configuration
If you want to use Ollama in the terminal, the above operations will suffice.
If you want to call Ollama’s model through other tools or code in a Linux environment, some environment configuration is required.
The main task is to expose port 11434, as Ollama receives input through this port.
sudo vi /etc/systemd/system/ollama.serviceAdd the following under the [Service] tag:
Environment=”OLLAMA_HOST=0.0.0.0:11434″
[Service]Environment="OLLAMA_HOST=0.0.0.0:11434"Then restart Ollama:
sudo systemctl daemon-reloadsudo systemctl restart ollama.serviceIf you want to immediately stop Ollama to free up VRAM, you can also manually start or stop Ollama.
sudo systemctl start ollama.servicesudo systemctl stop ollama.service🔺 Test if the Ollama service is running in the background
Other services call Ollama through port 11434. Execute the following in the terminal:
curl http://localhost:11434If it returns “Ollama is running,” it means the Ollama service is running normally, and other services can call Ollama’s models.
Configure Open-WebUI to Use the Web Interface
🔺 Configure Conda Environment
Now Jetson can directly use Miniconda or Anaconda. We will take installing Miniconda as an example.
mkdir -p ~/miniconda3wget https://repo.anaconda.com/miniconda/Miniconda3-latest-Linux-aarch64.sh -O ~/miniconda3/miniconda.shbash ~/miniconda3/miniconda.sh -b -u -p ~/miniconda3rm ~/miniconda3/miniconda.shStart Conda:
source ~/miniconda3/bin/activateIt is recommended to add the contents of ~/miniconda3/bin/activate to the ~/.bashrc file for automatic activation of Conda.
Next, we will create a Conda environment, noting that Open-WebUI requires Python version 3.11 or higher.
conda create -n openwebui python=3.11After creation, activate the Conda environment.
🔺 Install Open WebUI
pip install open-webui🔺 Start Open-WebUI
As long as the Ollama port is set up correctly, you can directly start Open-WebUI. It will automatically check the installed Ollama models by accessing Ollama’s service. To install a new model, just visit ollama models (https://ollama.com/search) and execute ollama run xxx to automatically install it.
open-webui serve🔺 After running Open-WebUI through the web, you can access it via port 8080. You can access the LLM model deployed on Jetson from another device on the same local network by visiting http://jetson-ip:8080. It provides a user-friendly web interface for use.
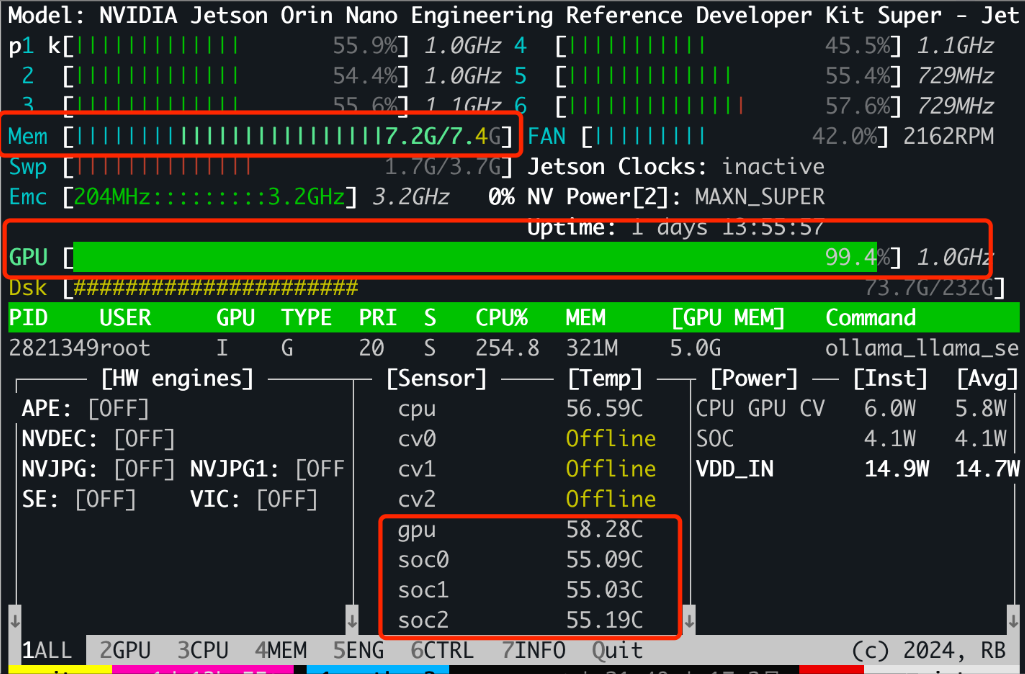
During inference, the system’s 8GB VRAM is almost fully utilized, the GPU runs at full frequency, and the Jetson temperature can rise to around 60 degrees.
(2) The Best AI Environment Configuration for Beginners
For product releases, the most suitable environment configuration method is to use Docker, allowing the product and environment to be released together, providing users with the best experience. The AI Docker environment configuration for Jetson Orin Nano Super has two challenges:
1) The CPU is ARM architecture.
2) Super must use JetPack 6.2 [L4T 36.4.3] version. Due to the new version, many open-source projects have not yet released corresponding Docker images, and most Docker images are built on JetPack 5.x.
Below is an introduction to the Docker image I use, which includes common components like PyTorch and TensorRT (C++, Python).
System Setup
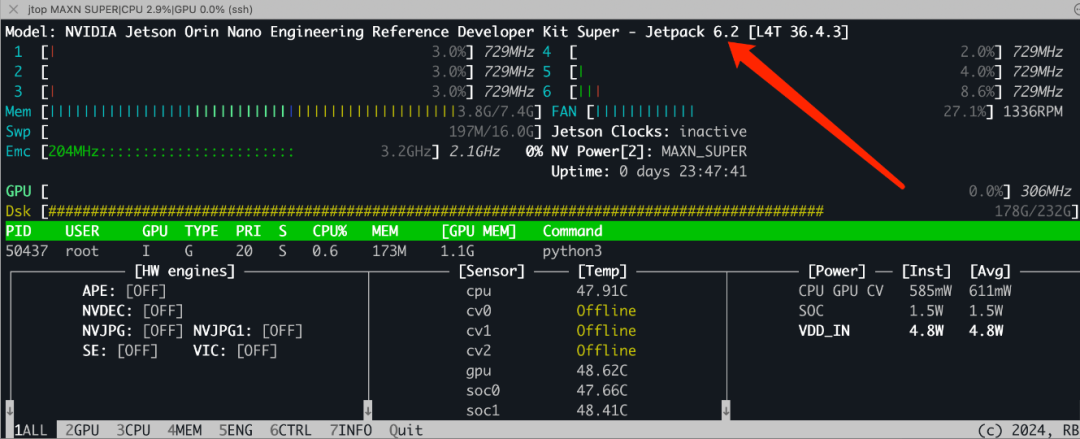
Check that JetPack 6 is installed on the Jetson Orin Nano Super. You can check your installed JetPack version using the jtop tool.
Download Jetson-Containers Tool
Jetson-containers can automatically build images in a modular way, but it also has pre-built images that include all the components we use, and we use their pre-built images.
git clone https://github.com/dusty-nv/jetson-containersbash jetson-containers/install.shThe installation script will prompt you for your sudo password and will install some Python dependencies, adding tools like autotag to the $PATH by creating links in /usr/local/bin (if you moved the Jetson-containers repository, please run this step again).
Change Docker Default Runtime to NVIDIA
This step is recommended; otherwise, you will need to add –runtime=nvidia every time you start a container. For example, the following startup command would require –runtime.
sudo docker run --runtime nvidia --gpus all --net host --ipc host -it --name pytorch_ngc_v2 -v /home:/home nvcr.io/nvidia/pytorch:25.01-py3-igpuModify the /etc/docker/daemon.json file to add “default-runtime”: “nvidia” to the /etc/docker/daemon.json configuration file:
{ "runtimes": { "nvidia": { "path": "nvidia-container-runtime", "runtimeArgs": [] } }, "default-runtime": "nvidia"}Then restart the Docker service:
$ sudo systemctl restart dockerYou can confirm the changes by checking:
$ sudo docker info | grep 'Default Runtime'Default Runtime: nvidiaRelocate Docker Data Root Directory
This step is generally unnecessary if the Jetson device has an additional hard drive installed. Or if your Docker installation location partition is sufficient, it is also unnecessary.
Containers can take up a lot of disk space. If you have available external storage, it is recommended to relocate the Docker container cache to a larger drive (NVME is preferred if possible).
If not formatted, format the drive to ext4 and ensure it mounts at startup (i.e., it should be in /etc/fstab). If the drive does not automatically mount at startup before the Docker daemon starts, Docker will not be able to use that directory.
Copy the existing Docker cache from /var/lib/docker to the directory on your chosen drive (in this case, /mnt/docker):
$ sudo cp -r /var/lib/docker /mnt/dockerThen add your directory as “data-root” in /etc/docker/daemon.json:
{ "runtimes": { "nvidia": { "path": "nvidia-container-runtime", "runtimeArgs": [] } }, "default-runtime": "nvidia", "data-root": "/mnt/docker"}Then restart the Docker service:
$ sudo systemctl restart dockerYou can confirm the changes by checking:
$ sudo docker info | grep 'Docker Root Dir'Docker Root Dir: /mnt/docker...Default Runtime: nvidiaIncrease Swap Partition
This step is recommended. Since the Jetson Orin Nano Super only has 8GB of VRAM, having a sufficiently large swap partition can allow it to run larger models, albeit slower.
If you are building containers or handling large models, it is advisable to mount a swap partition (usually related to the amount of memory on the development board). Run the following commands to disable ZRAM and create a swap file:
sudo systemctl disable nvzramconfigsudo fallocate -l 16G /mnt/16GB.swapsudo mkswap /mnt/16GB.swapsudo swapon /mnt/16GB.swapIf you have available NVME storage, it is best to allocate the swap file on NVME.
Then add the following line at the end of /etc/fstab to make the change permanent:
/mnt/16GB.swap none swap sw 0 0Disable Desktop Graphical User Interface
If memory is insufficient, you may want to try disabling the Ubuntu desktop graphical user interface (GUI). This will free up additional memory occupied by the window manager and desktop (about 800MB for Unity/GNOME, about 250MB for LXDE).
On my machine, the graphical user interface occupies about 450MB of memory. Turning it off can save a lot of memory. Generally, I turn it off when not using the GUI and turn it on when needed.
You can temporarily disable the desktop by running the command in the console and then restart the desktop when needed:
$ sudo init 3 # Stop the desktop# Use Ctrl+Alt+F1, F2, etc. to log back into the console$ sudo init 5 # Restart the desktopIf you want this setting to persist after reboot, you can change the startup behavior with the following commands:
$ sudo systemctl set-default multi-user.target # Disable desktop at startup$ sudo systemctl set-default graphical.target # Enable desktop at startupAdd User to Docker Group
Since Ubuntu users are not in the docker group by default, they need to use sudo to run Docker commands (build tools will automatically execute this when needed). Therefore, you may be prompted to enter the sudo password regularly during the build process.
Instead, you can add the user to the Docker group as follows:
sudo usermod -aG docker $USERThen close/restart the terminal (or log out), and you should be able to run Docker commands without using sudo (e.g., docker info ).
Set Power Mode
Depending on the power source available to the Jetson device (i.e., wall power or battery), you may want to set the Jetson to maximum power mode (MAX-N) for the highest performance of the Jetson device.
You can achieve this using the nvpmodel command-line tool
or through the Ubuntu desktop using the nvpmodel graphical user interface widget (https://docs.nvidia.com/jetson/archives/r36.2/DeveloperGuide/SD/PlatformPowerAndPerformance/JetsonOrinNanoSeriesJetsonOrinNxSeriesAndJetsonAgxOrinSeries.html#nvpmodel-gui)
Or use jtop from jetson-stats.
# Check current power mode$ sudo nvpmodel -qNV Power Mode: MODE_30W2# Set it to mode 0 (usually the highest mode)$ sudo nvpmodel -m 0# If necessary, reboot and confirm the change$ sudo nvpmodel -qNV Power Mode: MAXN0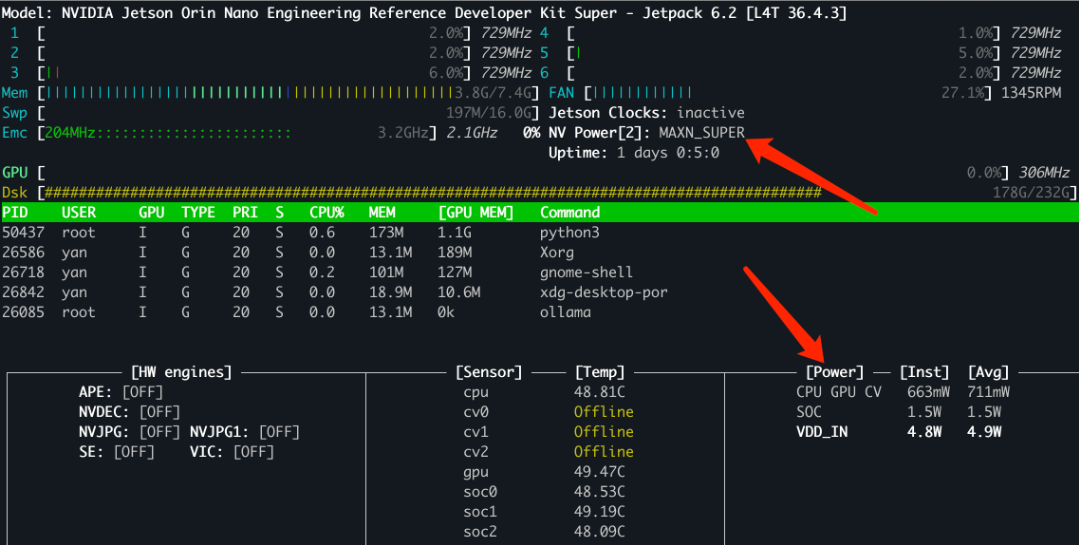
My current power mode is set to the highest power setting, and real-time power information can be seen in the lower right corner of jtop.
For a table of available power modes for different Jetson devices and documentation for the nvpmodel tool, please refer to this link.
(https://docs.nvidia.com/jetson/archives/r36.2/DeveloperGuide/SD/PlatformPowerAndPerformance/JetsonOrinNanoSeriesJetsonOrinNxSeriesAndJetsonAgxOrinSeries.html#supported-modes-and-power-efficiency)
Pull Docker Image
We use the Jetson-containers tool to automatically match our machine. This command will check the current JetPack version of the Jetson and the versions of other components on the host to automatically select the appropriate Docker image.
# automatically pull or build a compatible container imagejetson-containers run $(autotag nanoowl)This command directly pulls the dustynv/nanoowl:r36.4.0 image on my machine.
After pulling, the image will run automatically, and we can directly exit using ctrl+D and reopen with our custom command.
sudo docker run --runtime nvidia --gpus all --net host --ipc host -it --name ai_all_in_one -v /home:/home dustynv/nanoowl:r36.4.0Now we can start the delightful journey of AI model training and deployment.