The NVIDIA Jetson platform provides extensive access to edge AI and robotics application development through the world’s most comprehensive AI software stack and ecosystem. It integrates scalable platform software, modern AI stacks, flexible microservices and APIs, ROS packages, and AI workflows tailored for specific applications. In this talk, you will learn the skills to accelerate the development of visual AI and industrial robotics applications using the newly upgraded NVIDIA Jetson software stack.
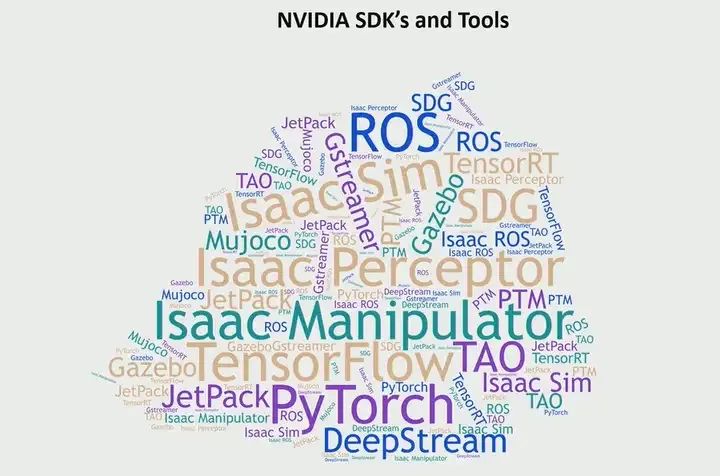
You may have heard of many SDKs and tools from NVIDIA’s free training models, such as the SDG synthetic data generator, ISAAC perception, and JetPack manipulator. I believe some may feel they have mastered all the SDKs and tools, not just those from NVIDIA, but covering all aspects of edge AI and robotics technology. I anticipated this. Therefore, my talk today is actually an attempt to be a navigator, trying to guide everyone through this maze, showing you the tools we have, and providing a framework for how to think about these tools.
I will wear two hats: the first hat will be that of a visual AI developer, possibly developing applications for visual tasks. Perhaps he is working on use cases such as people detection, traffic analysis, retail analysis, etc. The second hat is that of a robotics developer. He is still a visual developer trying to introduce perception into robotic use cases, but more specifically for robotics use cases. These are the two roles I will take, and I will guide everyone through the developer journey, understanding the various tools and how to choose between them.


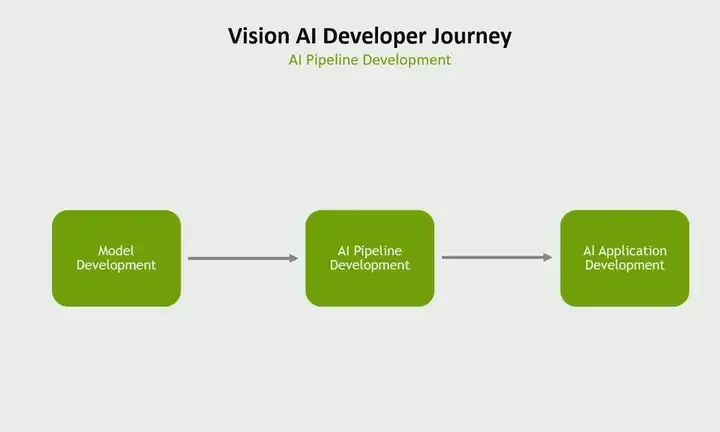
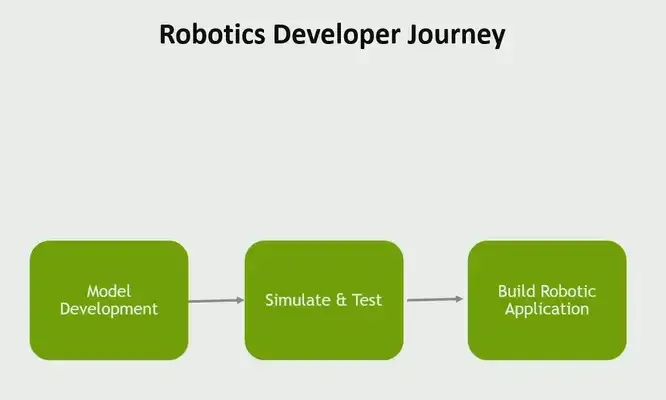
First, let’s start from the perspective of a visual AI developer. If I wanted to divide the development journey of a visual AI developer into three main parts, I might do it this way. They must develop a model to be used in their pipeline. They must develop an AI pipeline, but that is not the final goal. They must develop the entire AI application around that pipeline. So let’s start with model development.

Model Development
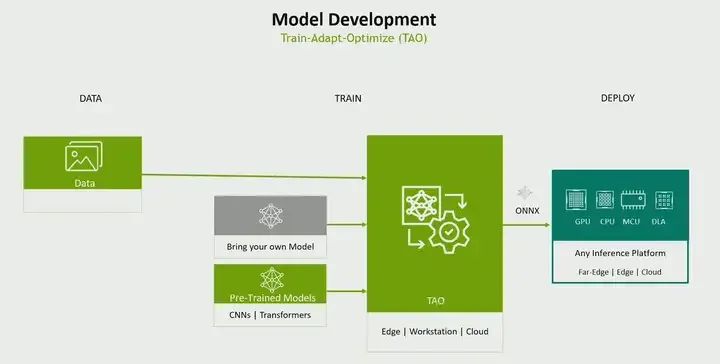
In model development, there are two basic approaches. One is that you can create a model from scratch. You collect training data, then train and optimize the model. But there is another way: you can start with a pre-trained model instead of creating a model from scratch. These models have already been trained on a large amount of data, so you may need to collect a smaller amount of data to adapt to your specific use case and perform transfer learning, followed by model training and optimization. Now, which of the two basic methods should you choose? That is what I pondered when researching these issues.

When you create a custom model, if you have a unique use case, specific needs, and no pre-trained model available for your use case, then creating a custom model becomes necessary. Alternatively, if your data for your use case looks significantly different from the data used to train the pre-trained model, then again, developing a custom model becomes necessary. Another situation is if you want complete control over the architecture, hyperparameters, and training process, then of course you may need to choose a custom model.
But if your use case is a very common task, such as people detection, object detection, and other common tasks, and there are many existing pre-trained models, then using a pre-trained model could be a great starting point. Or if your use case has a limited amount of data, with only a small amount of labeled data. Then, you can also start with a pre-trained model, and then use transfer learning to adapt to your use case. Finally, one of the main reasons for using a pre-trained model is actually the lack of expertise. We may not have the expertise to create a custom model, or you want to quickly proceed with your project, quickly create APIs, and lack computational resources for training, etc. So this is how I would decide between a custom model and a pre-trained model.
You can obtain various models from Hugging Face, GitHub, and even NVIDIA GPU Cloud.

How many people know about the pre-trained models available from NVIDIA GPU Cloud? We primarily offer hundreds of pre-trained models on NVIDIA GPU Cloud. The ones I listed here are all vision-based, for visual developers, we have CNNs and transfer models for people detection, as well as CNNs and transfer models for people segmentation and object segmentation. If you are doing traffic analysis or similar work, we have models for vehicle detection, pedestrian detection, even road sign detection, license plate recognition, human pose estimation, and face detection. There are many models available, so this gives you a very good starting point to begin adapting to your use case. But we see a clear trend. One is that we see transformers and foundational models replacing CNNs because they can achieve greater robustness and foundational models have zero-shot learning capabilities, so you don’t have to retrain for new objects repeatedly.

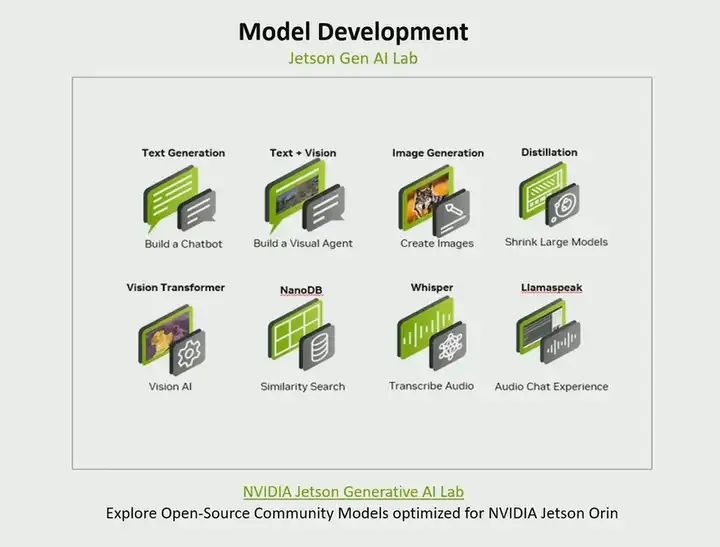
NVIDIA has amazed everyone. We want to give our developers the ability to run edge AI completely locally on Jetson. So we created the Jetson Generative AI Lab. In this Generative AI Lab, we gathered many open-source community models and optimized them for our platform. If you are building a chatbot, there are various large language models available. If you are building a visual agent, for instance, we are combining text and vision, there are models like LIama available. If you want to generate images from text, then models similar to stable diffusion are there. If you want to use large models and then perform knowledge distillation and convert them into smaller models, we have methods on how to do that. If you are interested in generative AI, then you should check out the various offerings there. So I am talking not just about NVIDIA GPU Cloud, we have pre-trained models, and if you are interested in generative AI, I recommend you check out this lab we created.
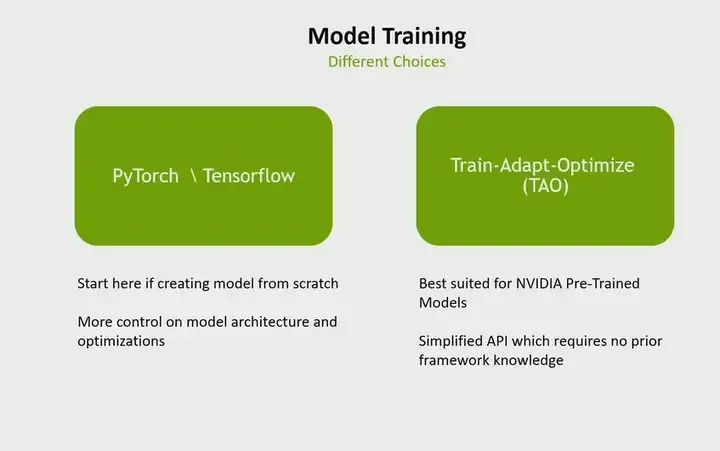
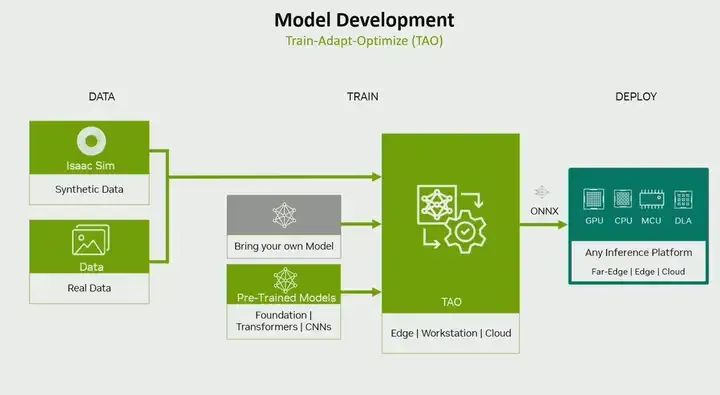
But anyhow, now you have a model, so far we have discussed that you can choose a custom model or a pre-trained model. Now it’s time to train. Again, you face two choices. One is to use popular methods like I would choose popular frameworks such as PyTorch or TensorFlow, or we have the NVIDIA Training and Optimization Method (TAO). So when should you choose which? If you are creating a model from scratch, of course choose PyTorch or TensorFlow; if you want more control over training, model architecture, and optimization, then choose TensorFlow and PyTorch; but if you start with a pre-trained model from us, then it will provide you with a very simple workflow for training and optimization; if you do not have experience with PyTorch and TensorFlow but want to work at an abstract level with a simple API, you do not have to understand TensorFlow or PyTorch. Then TAO will provide you with a simple way to create models and then train them.
This is an example. You can use your own data, your own models or pre-trained models for training, tuning, and optimization, and you can also optimize, for example, by performing AutoML, actually figuring out which hyperparameters work well for your use case, or performing mixed-precision training, etc. Therefore, it provides you with various optimization techniques, such as quantization, allowing you to train and optimize in a single workflow, and its output. Interestingly, you can actually continue to deploy anywhere. It can be on NVIDIA platforms or non-NVIDIA platforms. Last year, we actually included non-NVIDIA platforms as well. Model selection using custom models or pre-trained models, followed by training.
Pipeline Development
We talk about pipeline development; what I mean by a pipeline is that—model inference is just one part of the pipeline, you need to do video acquisition. You need to preprocess the data so that inference can be performed. Then perform post-inference tasks.
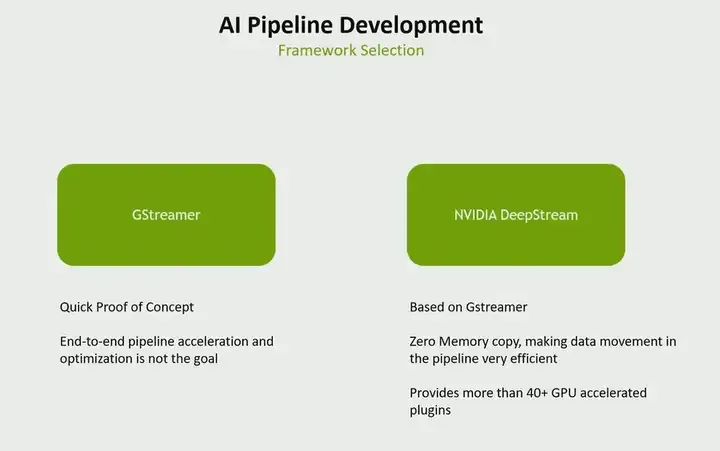
As a visual developer, you have two choices before you. One is Gstreamer, and the other is NVIDIA DeepStream. When to use which? In fact, our DeepStream is also based on Gstreamer. However, there are some differences. If you are doing a quick proof of concept and are not concerned about performance issues, then choose Gstreamer. But if you want to create an end-to-end accelerated pipeline, what do I mean? That is, every part of your pipeline does not run on the CPU but runs on the accelerator on Jetson. Secondly, if you do not want to copy memory between your pipeline. Therefore, if you want memory to stay in one place and not copy memory throughout the pipeline process, making the entire pipeline efficient, then you choose DeepStream. It provides more than 40 GPU-accelerated plugins. Therefore, you can use various plugins to accelerate the entire AI pipeline.
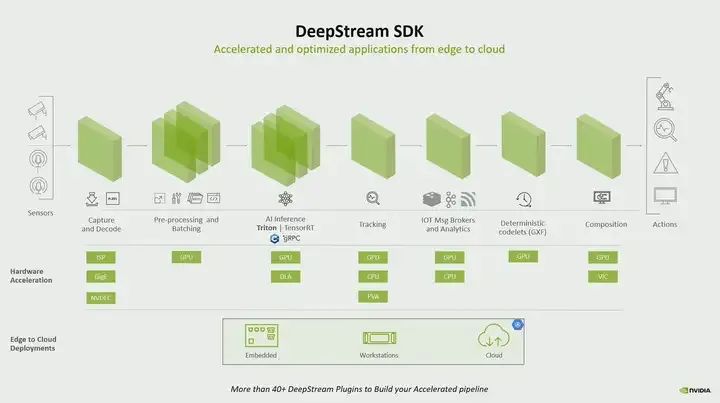
A typical pipeline starts with video capture, followed by preprocessing, inference, and if possible, performing people tracking, as well as other post-processing tasks, all of which are. DeepStream provides various acceleration blocks that can run on Jetson. For example, capture can run on ISP, preprocessing can run on GPU, inference can run on GPU or on our deep learning accelerator, similarly for other tasks. However, if you see a pipeline that does not even touch the CPU, it can be fully accelerated, and the best part is from start to finish with zero memory copy, this gives you an efficient pipeline. So, as I said, if you are pursuing performance, choose DeepStream, but if you want it quick and simple, choose Gstreamer.
Now, what we are doing is bringing new features to DeepStream, called Service Maker. Look at how we make it so simple for someone to write a DeepStream pipeline. Just use these points to add different parts of the pipeline. We made it so easy that even high school developers can now write a pipeline. They do not have to fully understand GStreamer. If they know C++, they can write it. Not only that, but you can package the pipeline as a container and deploy and manage it via REST API. Even dynamically, for example, if you want to add a stream, if you connect another camera’s stream, or if you want to remove a stream, all of this can be done via REST API. So now you can not only create an AI pipeline, but actually create it as a service.

AI Application Development
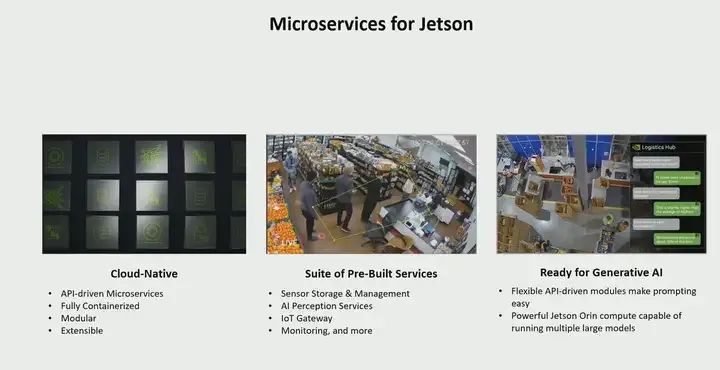
You start with the model and create an AI pipeline. But that is not the end of the game. You must write an application around it. What does that mean? Here, I will show you a typical visual AI application. The inference part is just at the center. There are many things you need to worry about. For example, how to discover sensors? How to manage sensors? How to analyze the perception happening? How to monitor events of interest? If you want to, how do you log it, if you want to see some utilization, what is happening in my system, how do you control it from the cloud, gateways, etc. So, some things that every visual AI application developer must pay attention to. Now what is happening is that we see everyone trying to solve the same problems. So what we did was create microservices for Jetson.
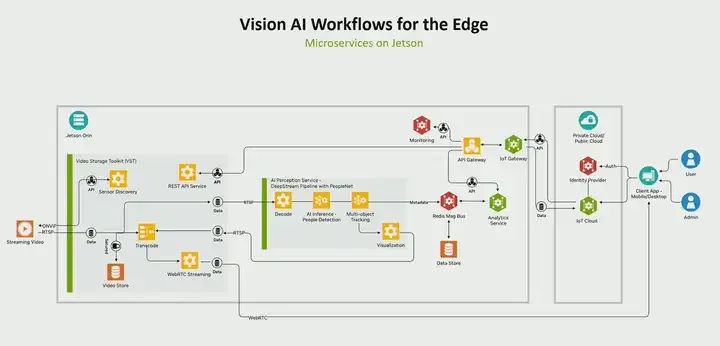
The microservices on Jetson are the fundamental building blocks needed by every visual AI application developer, and you do not have to create them from scratch; we provide them for you. These are cloud-native, API-driven microservices, such as firewall microservices, which can be analysis microservices, or inference microservices, etc. So these are pre-built microservices. We have also integrated generative AI, meaning you can also bring in AI models through one of these services, such as inference services, and create a complete visual application based on generative AI. So ultimately, the reason we created microservices for Jetson is that we see everyone trying to solve the exact same problems, and you do not need to do so, so we created these services so that you can use them right away.

If I were to divide the robotics developer’s journey into three building blocks, I would do it this way. First, you need to bring perception into the robotic application. Therefore, you will have to perform some model development. Of course, the whole world is moving towards simulation. Before physically interacting with robots, you first complete all work in a simulated environment. In the end, you will actually build a real robot and run real code on the robot. You will call it runtime.
Model Development
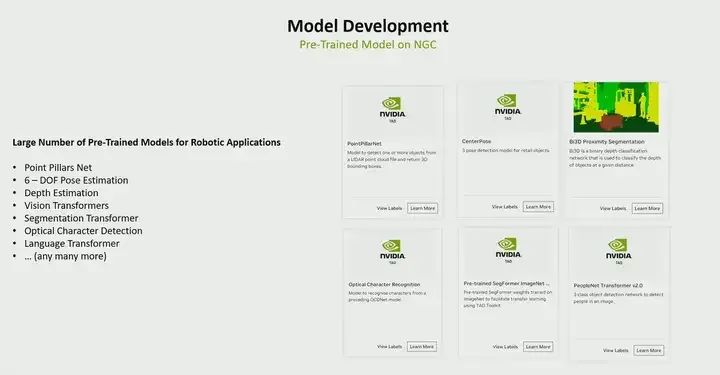
For robotics developers, the journey of model development looks almost the same as the journey I presented for visual developers. Therefore, I will not discuss many of the things I have already covered, but when it comes to pre-trained models again on NVIDIA GPU Cloud, we have a variety of pre-trained models mainly for robotic use cases. For example, if you are working with LiDAR point clouds and performing object detection based on LiDAR point clouds, then there is the PointPillar network. If you are performing pose estimation in many robotic use cases, you need to determine the pose of an object, whether for grasping or other purposes, you need the center point, you need pose estimation. Currently, there are various pose estimation models; there is a Depth model on NGC that has become very important in robotic use cases. On NGC, there is Vision Transformer; if your robot is doing something like Optical Character Recognition (OCR), this OCR is what you need… All these things can be found on NGC.
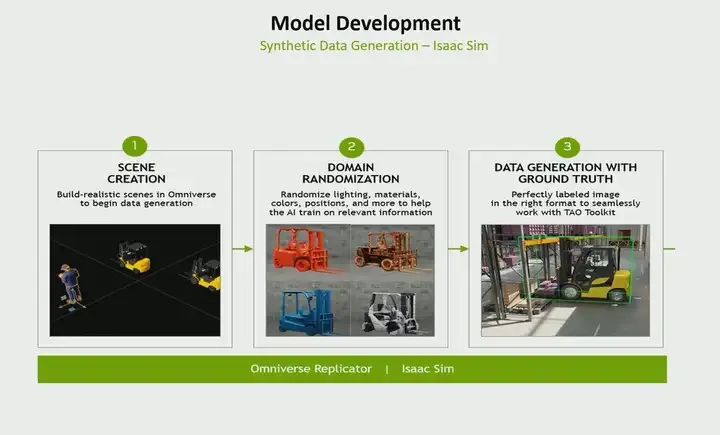
However, when it comes to model development for robotics here, I would say it is more challenging compared to what I previously discussed for visual developers, because training models in robotic use cases lacks data, absolutely lacks data, especially on the ground. For example, let me give you an example. Suppose you want to create a LiDAR-based point detection model for ISAAC SIM, right? Object detection, how do you collect such data? It is very difficult. So at this point, simulation is needed. Now with simulation, you can create realistic data. This data follows the physical laws of ISAAC SIM. You can perform domain randomization so that you can change textures, different lighting conditions, etc., and different reflective characteristics. And the best part of the generated data is that it is already labeled. You do not have to label it again because it is synthetically generated. So in many use cases, for example, even if you are creating a stereo depth model, collecting a suitable training dataset is extremely difficult. This is why we see many robotics developers using simulation for data generation and training. ISAAC SIM has synthetic data generation capabilities, and you can use this feature.
I have already shown TAO, so I won’t elaborate further, just need to emphasize: you can use real data or synthetic data. It does not matter for TAO. Therefore, it can use real data or synthetic data, and train using your custom model or pre-trained model.
Simulation
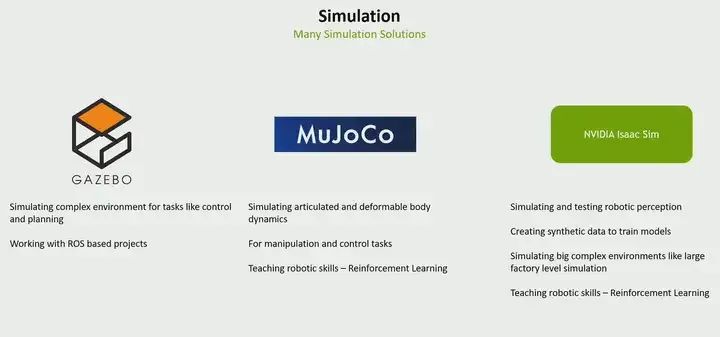
Now it’s the simulation part. Here, you face various choices. The choice of using Gazebo, MuJOCO, or ISAAC SIM, you may wonder when to choose ISAAC SIM and when to continue using Gazebo. I am trying to answer this question for you.
If you are working on ROS-based projects, because Gazebo is a very good choice, especially if you want to simulate complex environments, if you are dealing with simulation tasks and control, then choose Gazebo.
If you are dealing with use cases like robotic arms that require simulating joints and deformable body parts, then MuJOCO is definitely an answer. If you are teaching some skills to reinforcement learning, MuJOCO provides very good support for that.
So when to use NVIDIA ISAAC SIM? Especially when you bring perception into robotics, it becomes very important. For example, as I said, whether it is based on LiDAR or cameras or other types of sensors, if you want to simulate it in a simulator, then the simulation must follow physical laws. For example, the LiDAR beam should reflect objects in simulation just like it behaves in the real world. Otherwise, the simulation is meaningless. Therefore, if you introduce robotic perception, ISAAC SIM becomes very important because it can generate synthetic data. But another highlight of ISAAC SIM is that if you are not just simulating a robot but simulating a factory-level simulation, doing Digital Twin, then ISAAC SIM will play a very important role. We have also added the capability of training robots through reinforcement learning in ISAAC Labs. If you want to teach robots via tasks and reinforcement learning, we have also added this feature. So I would say if you are doing robotic perception or large-scale simulation, then definitely check out ISAAC SIM.
You can bring robots or 3D models into ISAAC SIM in various ways, through your URDF, CAD, or any supported format. There are various sensor models available to simulate sensors such as stereo sensors, RGBD, LiDAR, ultrasonic sensors, etc. You can perform replication to generate synthetic data, and then if you want, you can perform software-in-the-loop or hardware-in-the-loop. In this case, you want to use robot interfaces like the ones we support ROS2 to Python, or even if you can create a custom interface.

Robot Application Development
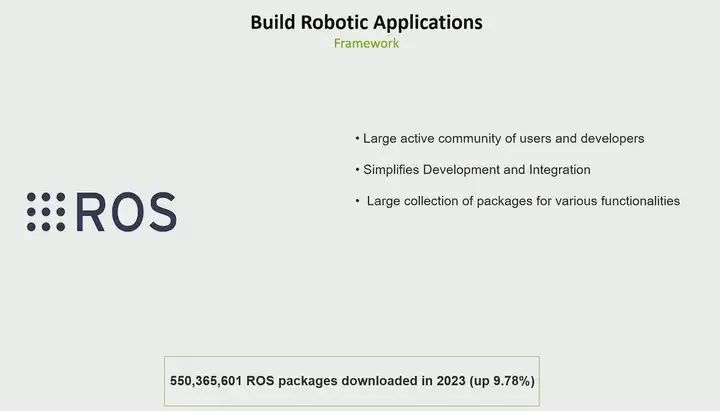
Now you are ready to write programs that run on the robot. And what is the framework? I am not even trying to provide alternatives. ROS is one of the most well-known frameworks, with a very large, active, and beloved community. They had 50 million ROS package downloads in 2023, which is a 10% growth. It is very, very popular and is becoming increasingly popular.
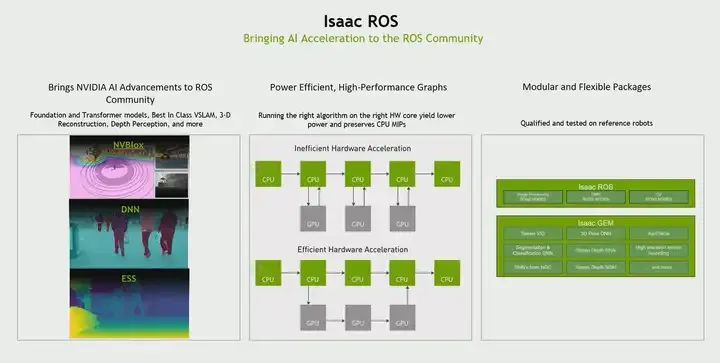
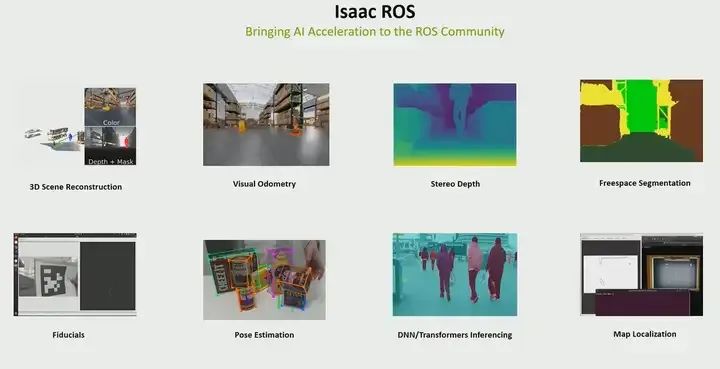
Recognizing that most existing ROS packages are CPU-based. However, nowadays in robotics, the level of perception is increasing. As the level of perception increases, the number and diversity of sensors brought to robots are also increasing. Therefore, you have to perform sensor processing, sensor fusion, and then perform tasks such as localization and navigation. And CPU obviously does not work. Therefore, we realized that, hey, all existing ROS packages are CPU-based. How does NVIDIA bring hardware acceleration to the ROS community? This is the purpose of Isaac ROS. Therefore, we brought AI acceleration to the ROS community and actually have three ways.
The first way is that we have a series of ROS packages for various robotic tasks, such as vision, object recognition, 3D reconstruction, people detection, stereo depth, etc. Secondly, this is the first work we did. This means we created hardware-accelerated packages. We are not trying to invent a new ROS. We still use the same ROS middleware. All our packages are based on ROS2.
The second work we are doing is collaborating with OSRF to introduce some optimizations in the middleware itself. What do I mean by that? If you look at it, ROS was not built for hardware acceleration. The way it communicates between two nodes is to send data from the GPU back to the CPU and then back to the next node, and the data is sent back to the GPU. So there is a lot of memory copying. So we realized this and said, ‘Well, this is not the way to do things.’ So we worked with them. I had to introduce two features called type adaptation and type negotiation. What does that mean? If there are two nodes that are GPU-accelerated, these two nodes can say, ‘Well, I know GPU, you know GPU too. In this case, I just need to point to the GPU location, tell you where the object is and what it looks like. That’s it. I don’t have to send you the labeled data for the entire data itself. This way, it eliminates all copies and speeds up the entire graph. Therefore, we have contributed to the ROS community.
Additionally, the third focus of the packages we developed is that their nature is modular. If you use ROS1, we can also work with ROS1, that’s fine. We provide accelerated ROS bridging so that you can actually bring these ROS packages into the ROS1 graph. If you use any custom framework, we can also work with you. This is the three main focuses of ISAAC ROS.
As I said, there are many ROS packages that are GPU-accelerated, so you can use them directly. For example, 3D reconstruction, which is very important for obstacle detection during navigation. Visual odometry, which is actually visual-inertial odometry. You can perform odometry based on camera and IMU. Stereo depth, free-space segmentation, pose estimation, and so on; there are many, the PPT cannot accommodate them all, you can check them out in Isaac ROS.
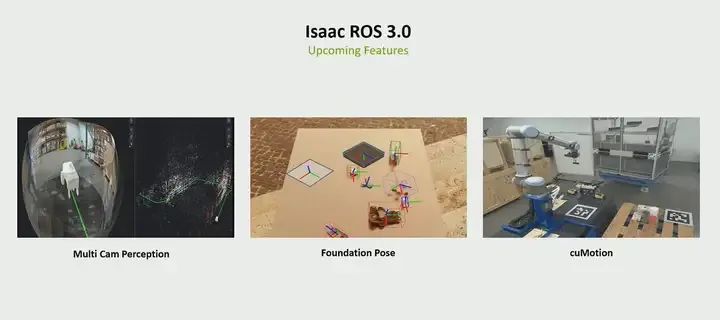
This video is about the new features of our ROS3 project, which will bring many new features, but I will focus on three of them here. The first is multi-camera perception, visual odometry, and three-dimensional scene reconstruction. What we provided in the past was based on a single camera. Now we are expanding to multi-camera. Therefore, you can actually introduce multiple cameras, fuse them, and then perform visual odometry and three-dimensional reconstruction. The second is that we are also expanding our operational use cases. The first is basic pose. This is a foundational model for pose estimation, six-degree-of-freedom pose estimation. Finally, cuMotion, which is accelerated trajectory planning and optimization. These three features will be launched with ROS3, and of course, there will be other features.
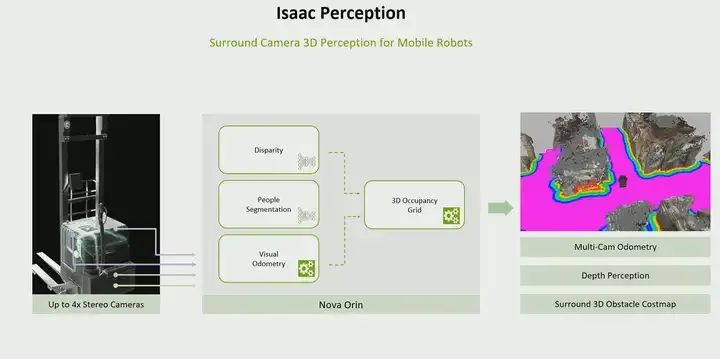
You may have heard of Isaac Perception. You may be wondering what Isaac Perception is, but in reality, Isaac Perception is a ROS-based graph. Ultimately, it is a fully spatial graph that provides three-dimensional surround perception, multi-camera depth perception, and generation of surrounding three-dimensional obstacle maps. Therefore, this entire graph is validated on our next-generation sensor suite, Nova Orin Sensor Suite, but you can also adjust it to fit your own. If you are using your own sensors, you can also adjust the same graph to fit yours. However, Isaac Perception provides you with a very simple way to introduce perception into mobile robots. You can use the ROS packages I showed you and use them, but you will have to handle the integration yourself. Isaac Perception provides you with a very simple way to bring perception into mobile rewards because we provide ROS graphs validated by sensor suites.
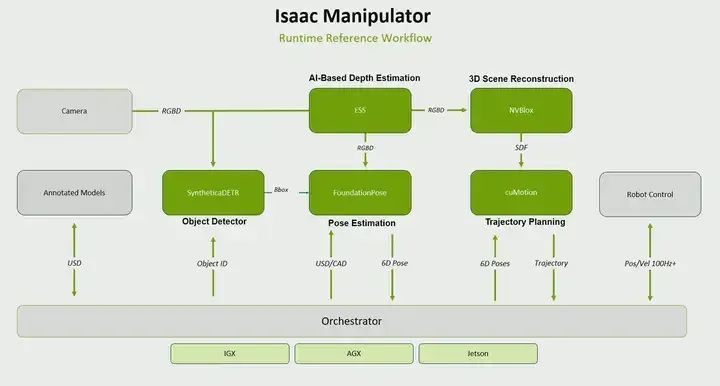
For Isaac Manipulator, it involves multiple tasks. First is object detection. What object are you picking up? Where is the object placed? You must perform pose estimation. Find out how far the object is. How is it placed? Then, you must perform trajectory planning to go pick up the object. All these tasks are provided as ROS packages for manipulation tasks.
These two workflows, like Isaac Perception and the Isaac Manipulator mentioned above, are workflows we generated for mobile robots and manipulation use cases, making it easy to integrate them into your workflow.

Finally, for those visionary developers or robotics developers, you will ultimately use Jetpack for development. The Jetpack SDK is a horizontal SDK we have on Jetson. It is the SDK for Jetson modules. It has two parts. One is the BSP, and the other is a series of libraries for AI acceleration, such as CUDA and Triton.
For developers using the Jetpack SDK, Jetpack 6 is coming soon, and there is already a developer preview version, the official version will be released in the second week of April.
We are doing three important things, which is why we call it the biggest upgrade ever.
The first thing is the ability to customize the kernel. Until now, the way we built kernels was by taking the upstream kernel and making a lot of modifications to make it completely unrecognizable. Now, you can customize the kernel without having to use our kernel; we solved this problem, and we contributed a lot of patches to the upstream Linux kernel, and now the way we build is an upstream Linux kernel, plus three clearly identifiable patches. We can provide you with a recipe if you want to use a different kernel. For example, you want kernel six, that’s fine. The reason you might want to do a different kernel could be that some drivers you are using are in the new kernel, and you do not want to backtrack to the old kernel. Or you can build your own kernel and always use the latest kernel.
Secondly, due to all the upstream work we are doing, various Linux distributions want to provide distributions on Jetson. Therefore, we see the list of distributions supported on Jetson is expanding. Canonical Ubuntu, Wind River, Red Hat Clinics, and various Yocto-based distributions are being enabled on Jetson, and this list will continue to grow.
Another thing, if you understand Jetpack and one of the pain points is Jetpack upgrades, I believe you definitely know. If your development team wants to use a newer TensorRT, the only answer is to get a new Jetpack. This means the system team also has to adapt to carrying the new BSP with Jetpack. We are trying to solve this problem with Jetpack 6 by deconstructing the computing stack on the BSP, allowing your AI development team to get the latest Jetpack stack without upgrading the BSP, and without creating dependencies for the system team. This is what we are doing with the third thing. In fact, over the past two months, we have seen a lot of excitement. Jetpack 6 happens to be one of the most downloaded Jetpack versions since its release.

Jetpack, as you previously knew, is a combination of BSP and AI stack AJ Linux, but we have expanded to now also include platform services. These are the same microservices I showed you when talking about visual development. For example, API gateways, message buses, monitoring, firewalls, AI analytics services, etc. These are the essential components that everyone needs. So we have brought them into Jetpack itself. Now Jetpack is not just Linux and AI stack, but also includes Linux stack and Jetpack platform services.

We try to release two versions a year, if no new modules are launched. Therefore, we try to release two versions a year. The Jetpack developer preview was released last December. We plan to release the official version in the second week of April, and there will be a sixth version released in the third quarter. However, Jetpack 5, which supports Xavier and Orin, will continue to exist. We will regularly release Jetpack 5 versions that include security fixes or critical bug fixes. This will continue until the end of Jetpack 5. That’s the last thing I want to say. So the purpose of this meeting is actually to give you a developer journey, introduce some developer SDKs and tools from NVIDIA, and ultimately showcase the roadmap.
