This article introduces how to integrate OpenAI’s real-time voice chat interface with a Linux development board to achieve voice recognition and generation. This approach allows you to implement voice interaction features on a Linux development board, such as voice assistants and voice control. The content covers .NET knowledge, Linux audio processing, WebSocket communication, LCD display, and other technologies, making it suitable for readers interested in .NET embedded audio development.
1. Background
Previously, we discussed how to use pure front-end technology to access OpenAI’s real-time voice chat interface and learned how to implement basic voice recording and playback functions using .NET on Linux, as well as driving an LCD screen display. Now that everything is ready, we can combine these elements to achieve real-time voice chat functionality on a Linux development board.
It is recommended to review the previous articles to better understand the content of this article:
•Building a Voice Assistant Using Azure OpenAI Realtime API with Pure Front-End•Implementing Audio Development with .NET on Linux Development Boards•Animating the Screen: Using .NET to Control the NV3030B Driver
We will use the Luckfox development board as an example, as it is priced at just over a hundred and comes with an onboard microphone and speaker, making it very suitable for this application scenario.
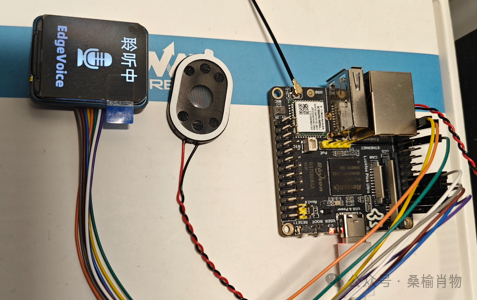
Through the previous articles, I believe you have gained some understanding of the Luckfox development board and have completed the necessary preparations. Next, we will implement the integration of OpenAI’s real-time voice chat functionality on the Linux development board step by step.
2. Project Architecture
This project utilizes .NET’s dependency injection and configuration system, primarily using <span>IHostBuilder</span> to build and configure the application. We need to register three main services: <span>AudioService</span>, <span>WebSocketService</span>, and <span>LcdService</span>.
2.1 IHostBuilder
<span>IHostBuilder</span> is an interface in .NET used to build a generic host, providing the foundation for configuration and dependency injection. In this project, we use the <span>Host.CreateDefaultBuilder</span> method to create a default host builder and configure it through method chaining.
First, we perform basic application configuration:
.ConfigureAppConfiguration((hostingContext, config) =>{ var env = hostingContext.HostingEnvironment; config.AddJsonFile("appsettings.json", optional: true, reloadOnChange: true) .AddJsonFile($"appsettings.{env.EnvironmentName}.json", optional: true, reloadOnChange: true); config.AddEnvironmentVariables();})•<span>hostingContext.HostingEnvironment</span>: Retrieves the current host environment (e.g., development, production, etc.).•<span>config.AddJsonFile</span>: Loads the application configuration file <span>appsettings.json</span> and the environment-specific configuration file <span>appsettings.{env.EnvironmentName}.json</span>, allowing for configuration reload on file changes.•<span>config.AddEnvironmentVariables</span>: Loads configuration from environment variables.
Next, we register services and configure options:
.ConfigureServices((context, services) =>{ services.Configure<RealtimeAPIOptions>(context.Configuration.GetSection("RealtimeAPI")); services.Configure<SessionUpdateOptions>(context.Configuration.GetSection("SessionUpdate")); services.Configure<AudioSettings>(context.Configuration.GetSection("AudioSettings")); services.Configure<LcdSettings>(context.Configuration.GetSection("LcdSettings")); services.AddSingleton<AudioService>(); services.AddSingleton<WebSocketService>(); services.AddSingleton<LcdService>(); services.AddHostedService<Worker>();})•<span>services.Configure<TOptions></span>: Binds specific sections from the configuration to option classes, such as <span>RealtimeAPIOptions</span>, <span>SessionUpdateOptions</span>, <span>AudioSettings</span>, and <span>LcdSettings</span>.•<span>services.AddSingleton<TService></span>: Registers singleton services that are created only once during the application lifecycle, such as <span>AudioService</span>, <span>WebSocketService</span>, and <span>LcdService</span>.•<span>services.AddHostedService<Worker></span>: Registers a hosted service <span>Worker</span> that implements the <span>IHostedService</span> interface to perform background tasks during application startup and shutdown.
2.2 Main Services
<span>WebSocketService</span> is responsible for handling WebSocket connections and communication. It includes the following functionalities:
•Establishing and managing WebSocket connections.•Sending and receiving messages.•Handling WebSocket events.
<span>AudioService</span> is responsible for handling audio-related operations. It includes the following functionalities:
•Recording and playing audio.•Managing audio files.•Interacting with audio devices.
<span>LcdService</span> is responsible for interacting with the LCD display. It includes the following functionalities:
•Displaying text or images.•Updating display content.•Managing display status.
3. Implementation
Next, we will implement this project step by step. Among these three services, <span>WebSocketService</span> is the core service responsible for communicating with OpenAI’s real-time voice chat interface. First, we will implement <span>WebSocketService</span>, then implement <span>AudioService</span> and <span>LcdService</span>, and finally call these services in <span>Worker</span>. If the display is not integrated, you can skip implementing <span>LcdService</span>, as this service is optional.
3.1 WebSocketService
<span>WebSocketService</span> is a service used to manage WebSocket connections, with main functionalities including:
•Establishing and managing WebSocket connections.•Sending and receiving messages.•Handling connection, disconnection, and message reception events.
This service obtains configuration options and a logger through dependency injection and provides several events for external subscriptions to handle connection state changes and message receptions.
•OnMessageReceived: Triggered when a message is received, passing the message content.•OnConnected: Triggered when the connection is successful.•OnDisconnected: Triggered when the connection is disconnected.
It is important to note that since the audio data returned by OpenAI’s real-time voice chat interface is Base64 encoded PCM data, which has a large data size, we need to consider data processing to receive the complete audio data. Below is the core code of <span>WebSocketService</span> in the <span>ReceiveLoopAsync</span> method, which continuously receives messages when the <span>WebSocket</span> connection is open. It reads data from the <span>WebSocket</span> in a loop and triggers the <span>OnMessageReceived</span> event when a complete message is received:
private async Task ReceiveLoopAsync(CancellationToken cancellationToken){ var buffer = new byte[1024 * 4]; var messageBuffer = new List<byte>(); while (_client.State == WebSocketState.Open && !cancellationToken.IsCancellationRequested) { var result = await _client.ReceiveAsync(new ArraySegment<byte>(buffer), cancellationToken); if (result.MessageType == WebSocketMessageType.Close) { await _client.CloseAsync(WebSocketCloseStatus.NormalClosure, "Closing", cancellationToken); _logger.LogInformation("WebSocket closed!"); await OnDisconnected.Invoke(); } else { messageBuffer.AddRange(buffer.Take(result.Count)); if (result.EndOfMessage) { var message = Encoding.UTF8.GetString(messageBuffer.ToArray()); await OnMessageReceived.Invoke(message); _logger.LogDebug($"Received: {message}"); messageBuffer.Clear(); } } }}3.2 AudioService
<span>AudioService</span> is a service used to handle audio operations. Here, we use the <span>Alsa.Net</span> driver, which provides audio recording and playback functionality through the <span>libasound2-dev</span> package. Due to the lack of maintenance of this package, there may be some issues when using it, but it can still meet the basic audio operation needs.
To implement streaming audio recording, we need to implement the <span>StartRecordingAsync</span>, <span>SendPackets</span>, and <span>StopRecording</span> methods in <span>AudioService</span>. The <span>StartRecordingAsync</span> method is used to start audio recording, processing the audio data received during recording and adding data packets to the queue; the <span>SendPackets</span> method is used to extract audio data packets from the queue, merge them into a larger packet, and trigger the <span>OnAudioDataAvailable</span> event; the <span>StopRecording</span> method is used to stop audio recording and trigger the <span>OnRecordingStopped</span> event.
public async Task StartRecordingAsync(){ if (_isRecording) { return; } _cancellationTokenSourceRecording = new CancellationTokenSource(); _isRecording = true; await Task.Run(() => _alsaDevice.Record(async (data) => { if (OnAudioDataAvailable != null) { if (!hasDiscardedWavHeader) { hasDiscardedWavHeader = true; return; } if (!_isRecording) { return; } data = ConvertStereoToMono(data); // Convert data to mono _packetQueue.Enqueue(data); // Add data packet to the queue if (_packetQueue.Count >= PacketThreshold) { await SendPackets(); // Send data packets when the queue reaches the threshold } } }, _cancellationTokenSourceRecording.Token), _cancellationTokenSourceRecording.Token);}It is important to note that the audio recorded by the <span>Alsa.Net</span> library will include WAV header data, which needs to be discarded when processing audio data, and the audio data must be converted to mono before being added to the queue. When the number of packets in the queue reaches the threshold, the <span>SendPackets</span> method is called to send the packets:
private async Task SendPackets(){ if (!_isRecording) { return; } int totalSize = PacketThreshold * PacketSize; byte[] combinedPacket = new byte[totalSize]; int offset = 0; while (_packetQueue.Count > 0 && offset + PacketSize <= totalSize) { byte[] packet = _packetQueue.Dequeue(); if (packet.Length == PacketSize) { Buffer.BlockCopy(packet, 0, combinedPacket, offset, PacketSize); offset += PacketSize; } } if (OnAudioDataAvailable != null && offset > 0) { await OnAudioDataAvailable(combinedPacket); }}In addition to recording, <span>AudioService</span> also provides audio playback functionality through the <span>PlayAudioAsync(byte[] pcmData)</span> method. Since there are many pitfalls in audio processing, we will elaborate on this later.
3.3 LcdService
This service is not the main focus; it is used to display some information, primarily to show the recording status and the text information returned from the server. For specifics, please refer to previous articles and check the source code of this project.
4. Audio Processing
Overall, this section is the main focus. When I started this project with a relaxed mindset, I did not expect audio preprocessing to become a “technical swamp” consuming hundreds of hours. After all, sufficient preparation had been made beforehand. But who would have thought that this seemingly simple sound wave data would reveal its ugly face during the debugging process: DC offset, high-pass filters (HPF), noise reduction, echo cancellation (AEC), startup noise, etc., left me exhausted.
In contrast, the top-level project seemed much simpler. Although I encountered some setbacks in the web version, it was relatively easier overall. There was no need to consider these complex issues; I could simply call the interface directly, and all those complex configurations and processing were handled by the hardware by default. However, on embedded devices, we need to solve these problems ourselves. Of course, if the ecosystem is good, we can also find a bunch of ready-made solutions that are plug-and-play.
4.1 Audio Format Issues
When integrating with OpenAI’s real-time voice chat interface, we need to convert audio data into a specific format for processing by the server. OpenAI’s real-time voice chat interface requires audio data to be in 16-bit depth, mono PCM format, with a sampling rate of 24kHz. According to the documentation, audio can also be compressed G.711 audio.
Here, we choose to use uncompressed PCM audio format directly. It must not contain audio header information and must be mono; otherwise, the server will not be able to parse the audio data correctly. Since the device I tested reported errors when recording in mono using the <span>Alsa.Net</span> library, and it defaults to including audio header information during recording, we implemented the removal of audio headers and conversion from stereo to mono in the previous code. If there are issues with the audio format, the server will return the following error:
{ "type":"error", "event_id":"event_BDv6vl8eCfBloxsnlJ74U", "error":{ "type":"invalid_request_error", "code":"invalid_value", "message":"Invalid 'audio'. Expected base64-encoded audio bytes (mono PCM16 at 24kHz) but got an invalid value.", "param":"audio.audio", "event_id":null }}At this point, debugging becomes crucial. We can use Python to directly write a service that simulates OpenAI’s service to receive audio data and save it locally for debugging. Here, we can use the <span>websockets</span> library to implement the WebSocket service:
import asyncioimport websocketsimport jsonimport base64import waveimport numpy as np
buffer = []save_count = 0async def process_audio_data():    global buffer    global save_count    if len(buffer) >= 50:        print("Processing audio data...")        # Combine data in the buffer        audio_data = b''.join(buffer)
        # Save a buffer test        with open(f'data/output{save_count}.pcm', 'wb') as f:            f.write(audio_data)
        buffer = []  # Clear the buffer        # Write PCM data to WAV file        with wave.open(f'data/output{save_count}.wav', 'wb') as wf:            wf.setnchannels(1)  # Mono            wf.setsampwidth(2)  # 16-bit            wf.setframerate(24000)  # 24000 Hz            wf.writeframes(audio_data)            save_count += 1        print("Audio data saved to output.wav")
async def handler(websocket):    global buffer    print("Client connected")
    async def ping():        while True:            try:                await websocket.send(json.dumps({"type": "ping"}))                await asyncio.sleep(10)  # Send ping every 10 seconds            except websockets.ConnectionClosed:                break
    asyncio.create_task(ping())
    async for message in websocket:        # Record received data to file        with open('data/received_data.txt', 'a') as f:            f.write(message + '\n')        data = json.loads(message)        if data['type'] == 'input_audio_buffer.append':            print("Received audio buffer data")            pcm_data = base64.b64decode(data['audio'])            buffer.append(pcm_data)            await process_audio_data()    print("Client disconnected")
async def main():    print("Starting server...")    async with websockets.serve(handler, "0.0.0.0", 8765):        print("Server started on ws://0.0.0.0:8765")        await asyncio.Future()  # run forever
if __name__ == "__main__":    asyncio.run(main())
During testing, we can also record PCM audio files that meet the criteria and send them directly through the interface to rule out other issues. This is also a method I used during debugging, as I encountered many problems along the way.
4.2 DC Offset
After resolving the format issues, things did not go smoothly; instead, they became more perplexing, as the server did not respond after sending audio data, which left me scratching my head and abandoning it for a while. It wasn’t until I compared the PCM audio recorded on the computer with the audio data sent to the server that I discovered the problem:
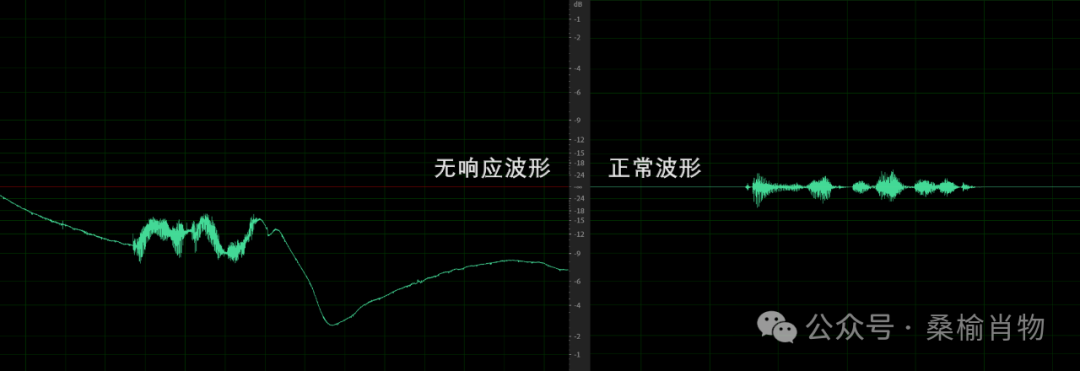
By comparing the waveforms of the two audio recordings, it is clear that there is a difference; the left shows the audio waveform recorded by the development board sent to the server, while the right shows the audio waveform recorded by the computer. After several verifications, I learned a new term: DC offset. DC offset refers to the presence of a constant DC component in the audio signal, causing the waveform to shift up or down. This DC offset can lead to the audio data having a non-zero mean, affecting audio quality and processing. Although I did not hear any obvious issues, the server’s processing could not correctly parse this audio data. It is also possible that the server’s voice detection could not correctly identify silence, failing to trigger a response automatically, but this is just a guess.
However, this problem is manageable. When configuring audio using <span>alsamixer</span>, I found a related HPF (High Pass Filter) option that can be used to remove the DC offset from the audio signal.
In the <span>alsamixer</span> UI, you can enable the <span>HPF</span> option to remove low-frequency components from the audio signal, thus eliminating the DC offset. We can also directly set the HPF option using the <span>amixer</span> command:
amixer cset name='ADC HPF Cut-off' 'On'Different devices may have variations, so you can try it out yourself. After processing this, re-record the audio and send it to the server, and the server should be able to parse the audio data correctly.
4.3 Echo Cancellation
In real-time voice chat, echo cancellation is an important technology used to eliminate the echo generated by the audio signal output from the speaker in the microphone. Echo cancellation can improve the quality of voice calls, reduce echo and noise, and make calls clearer and more stable. Of course, this is also a complex technology; if you want to learn more, you can refer to related materials, “Understanding Echo Cancellation (AEC) in One Article”[1].
In this project, the echo problem mainly arises from the audio signal output from the speaker generating echo in the microphone. This leads to a situation where after asking a question, the server continuously self-questions and interrupts its reasoning, which is clearly not what we want. Therefore, we need to perform echo cancellation processing on the audio data during recording.
However, in this project, I did not implement echo cancellation; instead, I adjusted the logic to mute the microphone while playing audio, thus avoiding the echo problem. Of course, the position of the microphone and speaker can also be adjusted to reduce echo generation. In the future, I may try to implement echo cancellation processing.
4.4 Startup Noise
After all, the <span>Alsa.Net</span> library has not been updated for a long time, and there have been many issues during use, especially with the channel problems; recording and playing mono audio both report errors. This requires us to occupy more resources to process the audio data. Both streaming recording and streaming playback of audio need to be implemented ourselves, which is also a complex issue.
In the initial version of audio playback, I also implemented streaming playback:
/// <summary>/// Playback queue/// </summary>private readonly ConcurrentQueue<byte[]> _playbackQueue = new ConcurrentQueue<byte[]>();private bool _isPlaying = false;
public async Task PlayAudioAsync(byte[] pcmData){    var monoData = ConvertMonoToStereo(pcmData);    _playbackQueue.Enqueue(monoData);
    if (!_isPlaying)    {        _isPlaying = true;        await Task.Run(() => ProcessPlaybackQueue());    }}
private void ProcessPlaybackQueue(){    while (_playbackQueue.TryDequeue(out var pcmData))    {        Play(pcmData);    }    _isPlaying = false;    OnPlaybackStopped?.Invoke();}
private void Play(byte[] pcmData){    var wavData = CreateWavHeader(24000, 16, 2).Concat(pcmData).ToArray();    //using var alsaDevice = AlsaDeviceBuilder.Create(_settings);    _alsaDevice.Play(new MemoryStream(wavData), _cancellationTokenSourcePlayback.Token);}
private void StopPlayback(){    _cancellationTokenSourcePlayback?.Cancel();    _cancellationTokenSourcePlayback = new CancellationTokenSource();    _isPlaying = false;    _playbackQueue.Clear();}
However, during audio playback, there was a piercing high-pitched noise at the beginning of playback, caused by noise from the speaker when audio starts playing. This noise is usually brief but negatively impacts the audio playback experience. This noise is commonly referred to as “startup noise” or “power-on noise.” This noise may be caused by unstable voltage during circuit startup, transient current changes, or the initialization process of the speaker driver circuit.
Since the server’s audio is streamed in segments, streaming playback can lead to this startup noise occurring continuously. Therefore, to solve this problem, I saved the audio data to a file and then played it:
public async Task SaveAudio(string audioId, byte[] pcmData){    string filePath = $"audio/{audioId}.wav";    var monoData = ConvertMonoToStereo(pcmData);    byte[] wavData;    if (!File.Exists(filePath))    {        byte[] wavHeader = CreateWavHeader(24000, 16, 2);        wavData = wavHeader.Concat(monoData).ToArray();        await File.WriteAllBytesAsync(filePath, wavData);    }    else    {        using (var fileStream = new FileStream(filePath, FileMode.Append, FileAccess.Write))        {            await fileStream.WriteAsync(monoData, 0, monoData.Length);        }    }}
public async Task PlayAudio(string audioId){    string filePath = $"audio/{audioId}.wav";    if (!File.Exists(filePath))    {        return;    }    await Task.Run(() =>{        //using var alsaDevice = AlsaDeviceBuilder.Create(_settings);        _alsaDevice.Play(filePath, _cancellationTokenSourcePlayback.Token);        OnPlaybackStopped?.Invoke();    }, _cancellationTokenSourcePlayback.Token); }
This way, the problem is resolved. Of course, this will also introduce some latency, but for this project, the latency is acceptable. It can be considered a compromise solution.
5. Conclusion
In this project, the main difficulty lies in audio processing. Coupled with hardware limitations, the entire project becomes complex. I have yet to find a reliable audio library for use on Linux, which has led to many issues. However, this is the charm of technology; constantly solving problems and learning is how we progress. In the future, I may try other audio libraries, such as PortAudioSharp2[2], or optimize this audio library to resolve streaming playback issues.
The project is open-source at: https://github.com/sangyuxiaowu/EdgeVoice?wt.mc_id=DT-MVP-5005195, and everyone is welcome to help improve this project. For example, integrating XiaoZhi, adding a .NET server to implement local voice large models, adding cameras, voice wake-up, and other features; this board has high playability.
Looking back on this experience, those seemingly tricky problems were merely the trials we must go through on the path of technical exploration. In this project, I learned a lot about audio processing and deeply appreciated the infinite charm of technology. Reflecting on the journey, although it was tortuous, every step was worthwhile. Just a bit of hardship.
References
<span>[1]</span> “Understanding Echo Cancellation (AEC) in One Article”: https://zhuanlan.zhihu.com/p/632443142<span>[2]</span> PortAudioSharp2: https://github.com/csukuangfj/PortAudioSharp2?wt.mc_id=DT-MVP-5005195
Recommended Reading:8 Recommended Free and Practical .NET Open Source Windows Productivity SoftwareGetting Started with .NET Source Code Generator AnalyzersFrom Novice to Expert—Understanding the Scope Concept of Dependency Injection in .NETA Powerful Open Source Remote Connection Management Tool in .NET, Supporting RDP, VNC, SSH, and Other Mainstream Protocols!New on Geek Time: .NET + AI System Course10 Key Lessons on .NET Performance Optimization: Practical Experience from Senior Engineers
Click the card below to follow DotNet NB
Let’s communicate and learn together

▲Click the card above to follow DotNet NB and learn together
Please check the background of the public account
Reply【Roadmap】 to get the .NET 2024 Developer RoadmapReply【Original Content】 to get original content from the public accountReply【Summit Video】 to get .NET Conf conference videosReply【Personal Profile】 to get the author’s personal profileReply【Year-End Summary】 to get the author’s year-end reviewReply【Join Group】Join the DotNet NB communication and learning group
Long press to recognize the QR code below, or click to read the original text. Join me in communication, learning, and sharing insights.