J1939 to CANopen-ADFweb Gateway Converter–Guangzhou Xinyu IoT
Author: Zou Wuyi Mobile185-020-77899 Email: [email protected]
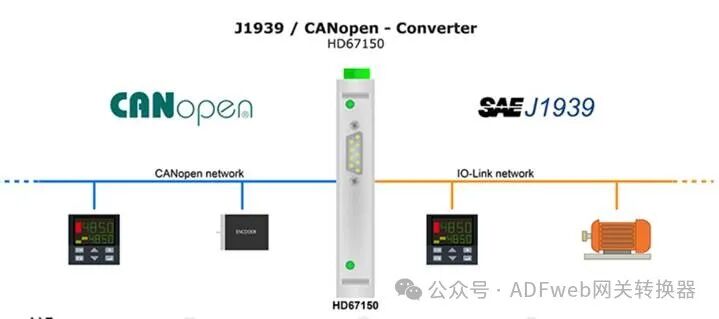
1、Configuration Description: The “J1939 to CANopen Gateway” enables communication between the J1939 network and the CANopen network. You need to install the Compositor SW67150 software on your computer to perform the following operations:
- Define J1939 parameters;
- Define CANopen parameters;
- Define Service Data Objects (SDO);
- Define Transmission Process Data Objects (TPDO);
- Define Reception Process Data Objects (RPDO);
- Define J1939 frames that can be read from CANopen;
- Define J1939 frames that can be written to CANopen.
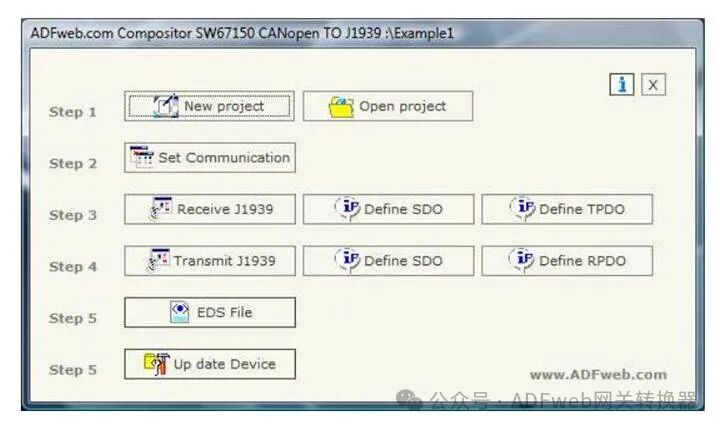
2、New Project / Open Project: Click the “New Project” button to create a folder that contains the configuration information for the entire device. Device configuration information can also be imported and exported:
- To clone the configuration of the programmable J1939 to CANopen gateway for configuring another device in the same way, you must keep this folder and all its contents.
- To clone a project for a different version of that project, simply copy the project folder and give it a new name, then click the “Open Project” button to open the new folder. When creating a new project or opening an existing project, you will have access to various configuration sections of the software:
- Set communication;
- Receive J1939;
- Send J1939;
- Define SDO (Service Data Object);
- Define TPDO (Transmission Process Data Object);
- Define RPDO (Reception Process Data Object);
- Set SDO client;
- Set node guarding;
- EDS file.
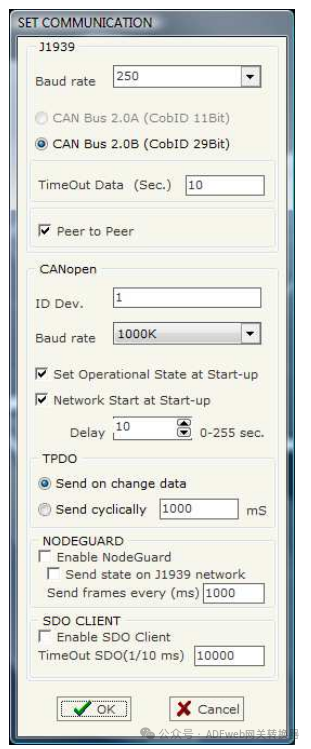
3、Communication Settings
This section defines the basic communication parameters for the two buses (J1939 and CANopen).
After pressing the “Set Communication” button in the SW67150 main window (Figure 2), the “Set Communication” window (Figure 3) will pop up:
• In the “Baud Rate” field, define the rates for both buses;
• Enter a time value in the “Data Timeout” field, after which the data will be unreliable, and “FFFF” will be displayed in the CANopen register;
• If the “Point-to-Point” field is checked, only the PGN field will be considered, ignoring the ID device field;
• If the “Set to Run State on Startup” field is checked, the device will enter run mode when powered on; otherwise, it will enter pre-run mode;
• If the “Start Network on Startup” field is checked, the device will put all nodes on the network into run mode when powered on;
• Enter a time value in the “Delay” field, which indicates the number of seconds the gateway waits before sending the startup message;
• In the “ID Device” field, define the CANopen address;
• In the “TPDO” field, select how to send the PDO. You can choose to send the PDO only when the data bytes change (“Send on Data Change”), or you can choose to send the PDO periodically at intervals in milliseconds (“Periodic Send”);
• In the “Node Guarding” field, you can enable the node guarding feature to check the status of CANopen devices (“Enable Node Guarding”). The status of these CANopen devices can be periodically sent directly to the J1939 network (“Send Status to J1939 Network” and “Send Frame Every How Many Milliseconds”). For more information, see page 16;
• In the “SDO Client” field, you can activate the function to send SDO client requests from J1939 commands (“Enable SDO Client”). You can set the maximum timeout for this SDO request in tenths of milliseconds (“SDO Timeout (Tenths of Milliseconds)”). For more information, see page 14.
4、ReceivingJ1939 Data:
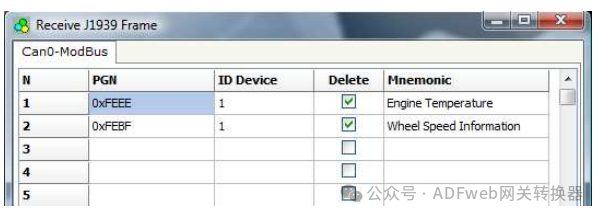
From the SW67212 main window (Figure 2), click the “Receive J1939” button to pop up the “Receive J1939 Frame” window (Figure 4).
In the correct case:
• Enter the PGN you want to read from CANopen in the “PGN” field (in the J1939 protocol, PGN is an identifier);
• Enter the ID of the J1939 device transmitting the frame in the “Device ID” field;
• If the “Delete” field is checked, when the “Timeout Data” on the CANopen side expires, you can read “0xFF”. This indicates that the register is unreliable;
• Define the description of the frame in the “Mnemonic” field.
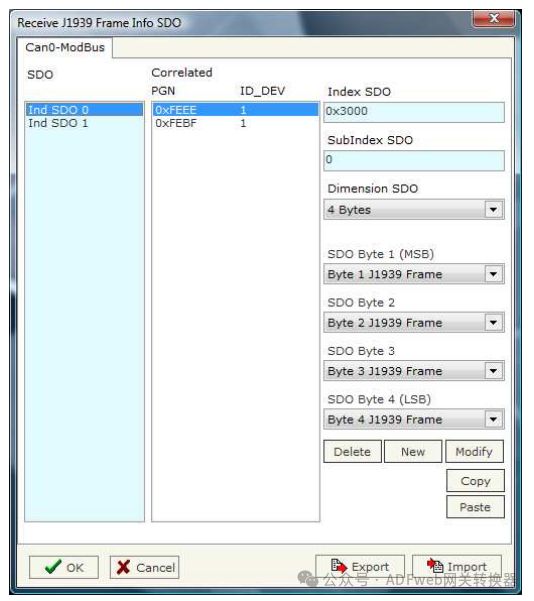
5、DefiningSDO (Step 3):
In the “Step 3” of the SW67150 main window, press the “Define SDO” button (Figure 2), which will pop up the “Receive J1939 Frame Information SDO” window (Figure 5):
• In the “Association” field, there are PGN and ID_DEV, which you need to insert into the list (Receive J1939);
• In the “SDO” field, include the SDO frame;
• In the “SDO Index” field, this is the address of the SDO;
• In the “SDO Subindex” field, this is the subindex of the SDO;
• In the “SDO Dimension” field, you can select the dimension of the SDO;
• Depending on the dimension of the SDO, you can input one to four bytes of data from the J1939 frame, and then map the J1939 bytes to the SDO bytes;
• Using the “Delete, New, Modify, Copy, Paste” buttons, you can delete, add, modify, copy, and paste SDO;
• Using the “Export or Import” button, you can export or import existing projects.
For example:
Click on PGN, insert valid index, subindex, and dimension for SDO, then select which bytes in the J1939 frame map to the SDO bytes, and finally click the “New” button to create a new SDO. At this point, the name of the SDO will be displayed in the “SDO” field (the first SDO is named IND SDO 0, the second is named IND SDO 1, the third is named IND SDO 2, and so on).