CANopen is a communication protocol based on CAN that has been widely used in the industrial field.
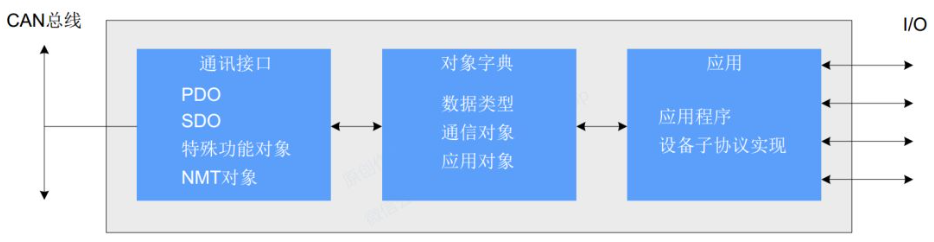
CAN provides reliable low-level data transmission, while CANopen offers a standardized application layer protocol. In the CANopen protocol, each CANopen device has an object dictionary. The CANopen device model is shown in the figure below. The object dictionary describes all behaviors and parameters of the CANopen device.
CanFestival is an open-source and free CANopen protocol stack. It is powerful and provides a graphical object dictionary editing tool. RT-Thread has packaged CanFestival, so you only need to complete the corresponding driver to implement CANopen.
This article will introduce the method of implementing a CANopen slave on the ES32 platform based on the RT-Thread BSP.
Before starting this experiment, readers need to first understand:
☞This experiment is based on RT-Thread version 4.0.4, which can be obtained from GitHub or Gitee:
☆ Download RT-Thread 4.0.4 from GitHub: https://github.com/RT-Thread/rt-thread/tree/v4.0.4
☆ Download RT-Thread 4.0.4 from Gitee: https://gitee.com/rtthread/rt-thread/tree/v4.0.4
☞ Basic software and hardware environment configuration and usage of ES-CodeMaker. For details, please refer to (click to open directly): Engineer’s Notes | ES-CodeMaker for RT-Thread (1) Quick Start
☞ The method to obtain the ES-CodeMaker for RT-Thread software will be provided at the end of the text.
1. Hardware Configuration
This experiment uses ZLG’s USBCAN-E-P as the master station, and the ES-PDS-ES32F3696LX development board and ES-PDS-CAN module as the slave.
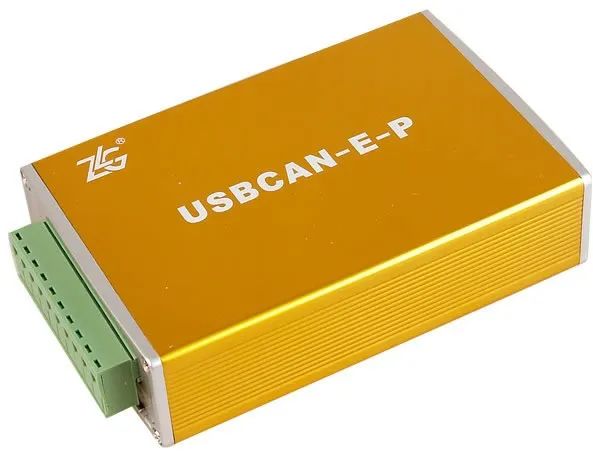
▲CANopen Master Station Card
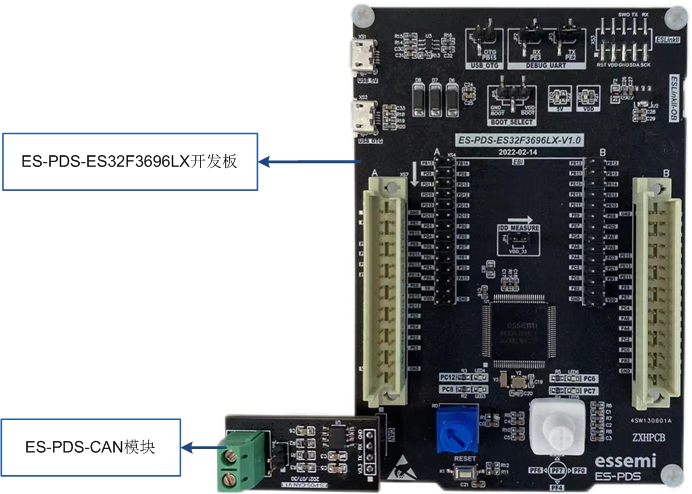
Insert the ES-PDS-CAN module into the CAN interface of the development board. The connection between the CAN module and the development board is as follows:
| ES-PDS-CAN Module Interface | ES-PDS-ES32F3696LX Development Board Pin Function |
|---|---|
| VCC | Power VDD |
| GND | Power Ground GND |
| RX | CAN0_RX (PB8) |
| TX | CAN0_TX (PB9) |
Connection between the USBCAN-E-P CANopen master station card and the ES-PDS-CAN module:
| CANopen Master Station Card Interface | ES-PDS-CAN Module Interface |
|---|---|
| CAN_H | CAN_H |
| CAN_L | CAN_L |
Jumper interface on the ES-PDS-ES32F3696LX development board:
1. Close JP4: Power the chip on the development board.
2. Close JP2, JP3: Convert UART2 to serial port via the onboard debugger for program debugging.
2. Driver Configuration
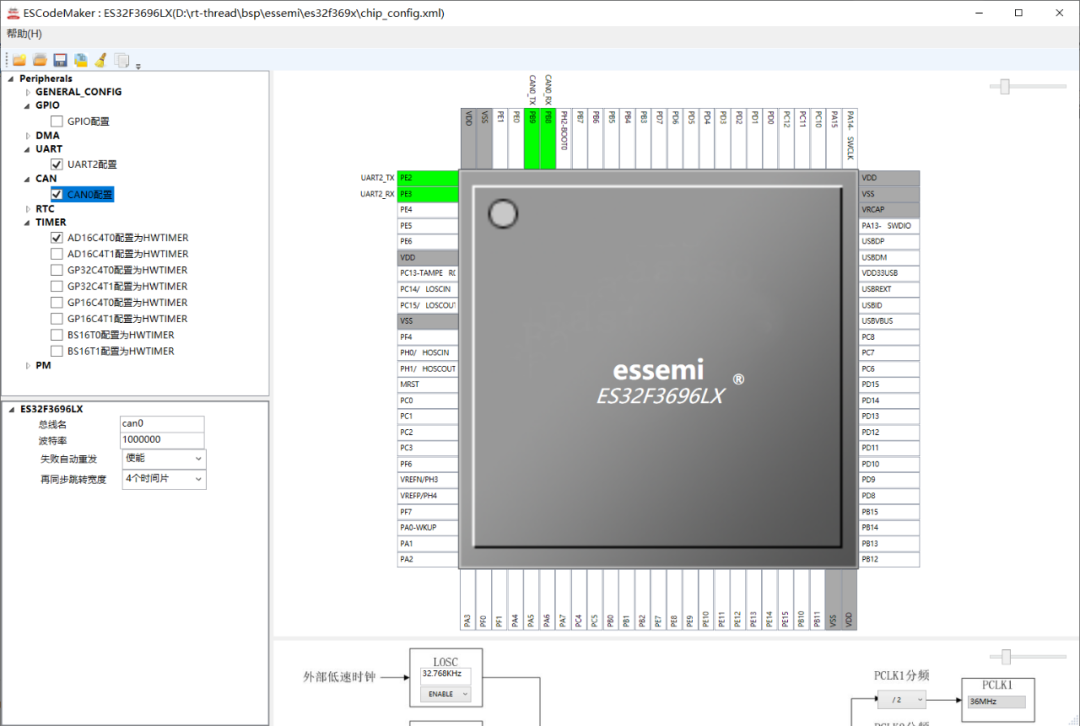
Pin function configuration can be visualized through ES-CodeMaker.
-
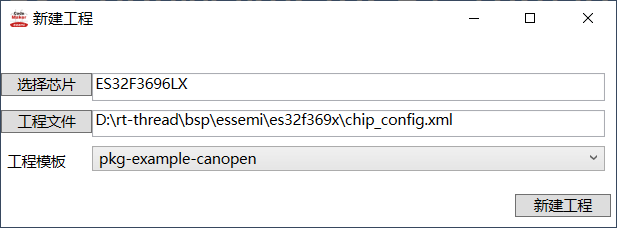
Create a new project
Select chip ES32F3696LX, fill in the project name and path, and select the template pkg-example-canopen:
-
Enable UART2 function and corresponding pins as RT-Thread console functionality.
-
Enable CAN0 pins: PB8, PB9, and select the corresponding CAN function. You can set the name of the CAN device. The device is configured for: baud rate 1000000, enable automatic retransmission on failure, and synchronization jump width of 4 time slots.
-
Enable AD16C4T0 as HWTIMER, and select the corresponding function. You can set the name of the hwtimer device. The device is configured for: increment counting mode.
3. RT-Thread Configuration
Use the RT-Thread env tool to configure the RT-Thread kernel, components, packages, and drivers.
1. In the path <span><span>rt-thread-v4.0.4\bsp\essemi\es32f369x</span></span>, open the ENV tool.
2. Enter <span>menuconfig</span> to configure the project.
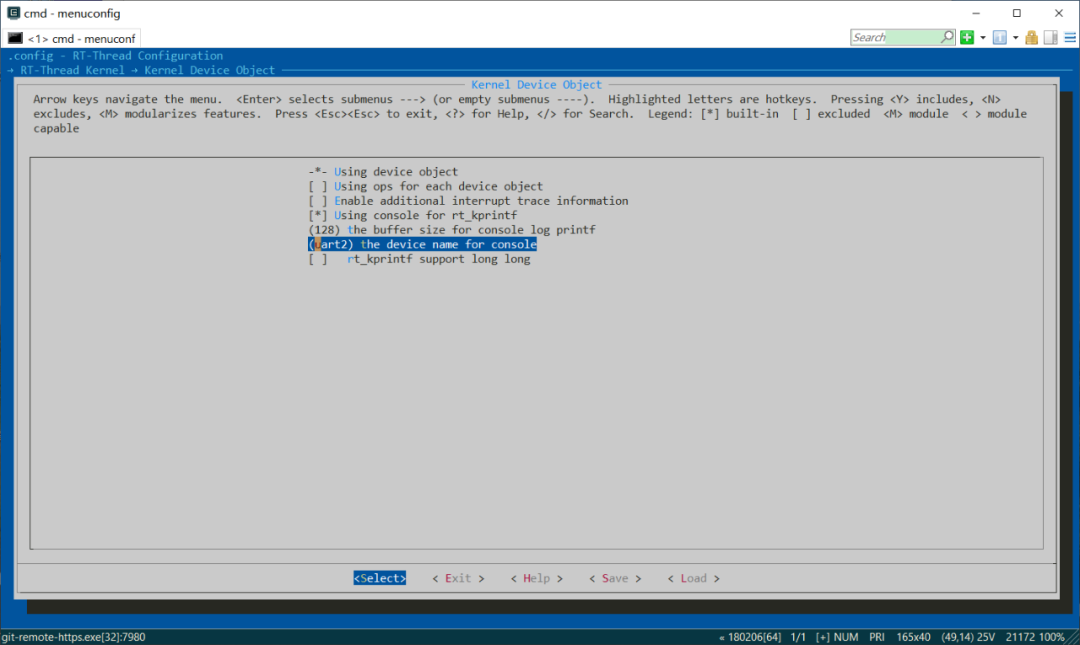
- RT-Thread kernel configuration
<span>RT-Thread Kernal -> Kernel Device Object</span> to set the kernel device object. Change the console device name to “uart2”.
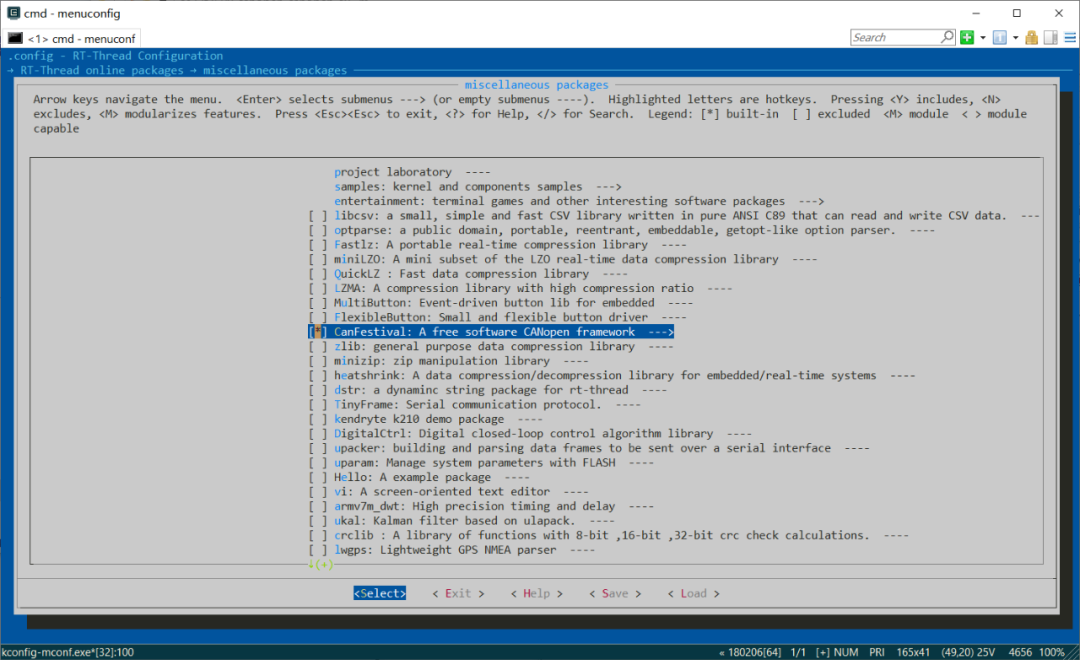
- RT-Thread package CanFestival configuration
<span>RT-Thread online packages -> miscellaneous packages</span> to enable the CanFestival package, select version: v1.0.0. CanFestival is an open-source and free CANopen protocol stack.
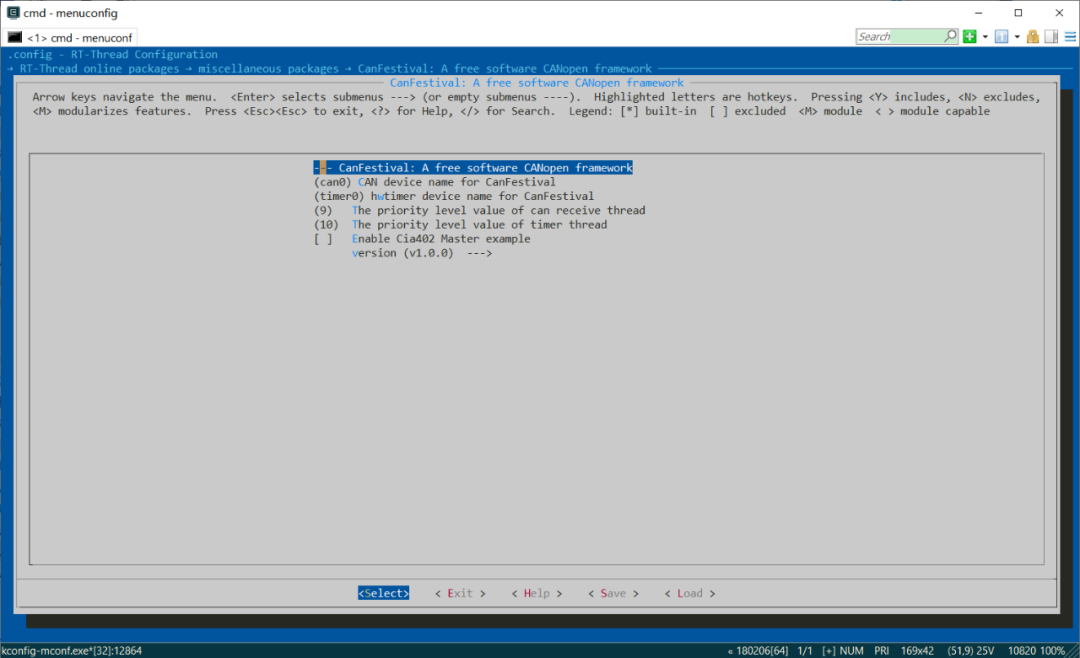
<span>RT-Thread online packages -> miscellaneous packages -> CanFestival: A free software CANopen framework</span> to open the configuration interface. Select the device names for can and hwtimer, and the thread priority.
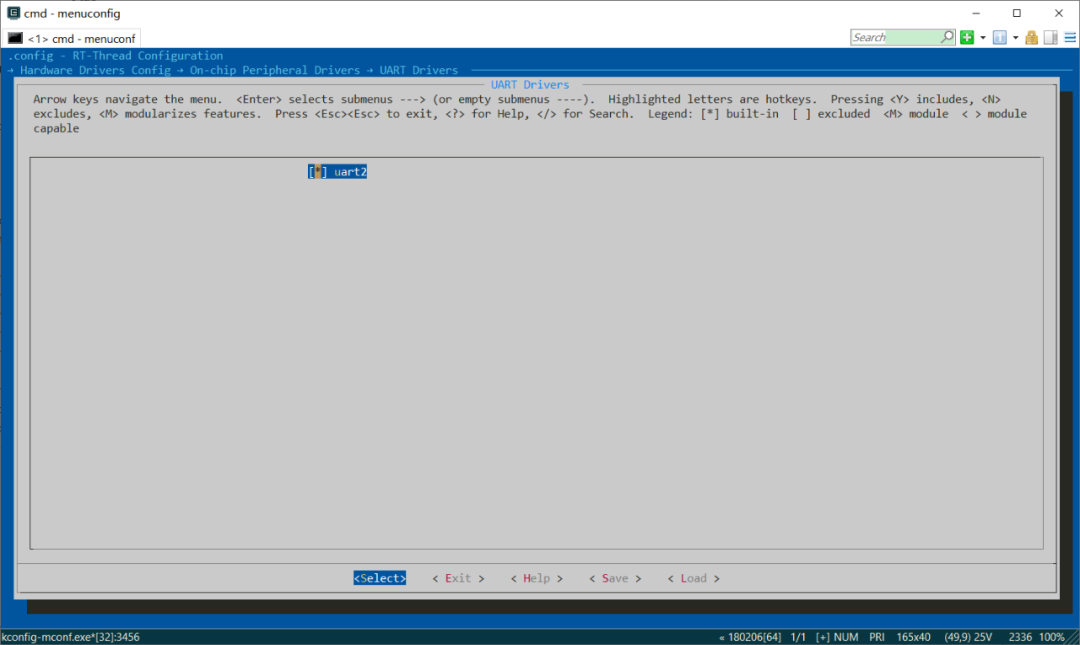
- UART configuration
<span>Hardware Drivers Config -> On-chip Peripheral Drivers -> UART Drivers</span> to enable uart2 for communication with the RT-Thread console.
- CAN configuration
<span>Hardware Drivers Config -> On-chip Peripheral Drivers -> CAN Drivers</span> to enable can0, providing CAN drivers for CanFestival.

- TIMER configuration
<span>Hardware Drivers Config -> On-chip Peripheral Drivers -> HWTIMER Drivers</span> to enable timer0, providing timer drivers for CanFestival.

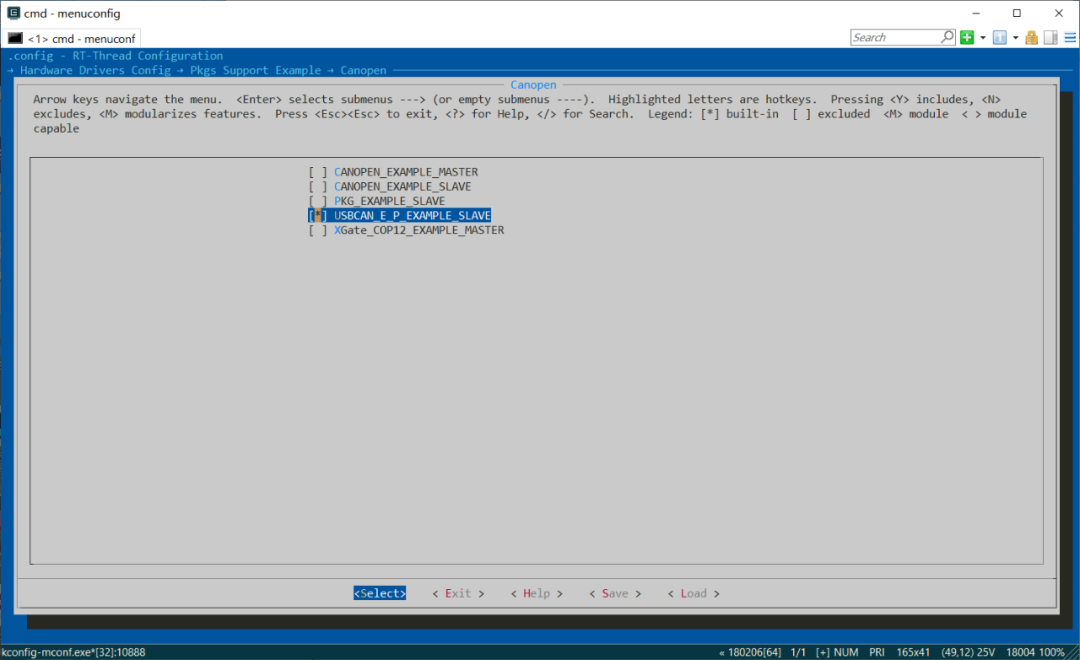
- Enable CANopen example
<span>Hardware Drivers Config -> Pkgs Support Example -> Canopen -> USBCAN_E_P_EXAMPLE_SLAVE</span> to enable the CANopen slave example.
After configuration, save and exit.
3. Enter <span>pkgs --update</span> command to update the packages. Then, according to 6. Software Package Modification Instructions, optimize some interfaces of the package.
4. Enter <span>scons --target=mdk5</span> command to generate the Keil5 project. (For other platforms like IAR, specify –target=xxx accordingly.)
5. Open the project in Keil5, compile, and download.
4. Experiment Description
1. Install the CANopen object dictionary editing tool.
The core of the CANopen protocol is the object dictionary. Due to the complexity of the CANopen object dictionary, it is not recommended to write the object dictionary by hand. The installation method for the CANopen object dictionary editing tool is as follows:
☞ First, obtain the resources:
☆ Obtain Python 2.7 from the official site: https://www.python.org/downloads/release/python-2715/
☆ Obtain wxPython 2.8 from the official site: https://sourceforge.net/projects/wxpython/files/wxPython/2.8.12.1/
☆ Two ways to obtain the CANopen source code:
- a. Obtain the CANopen source code from the official site: https://bitbucket.org/Mongo/canfestival-3-asc
☆ b. Obtain the CANopen source code from Baidu Cloud: https://pan.baidu.com/s/1b9K0vIzu_EVWK1BLURJEPQ Extraction code: j2w2
After successfully obtaining the resources:
a. Install Python 2.7.
b. Install wxPython 2.8.
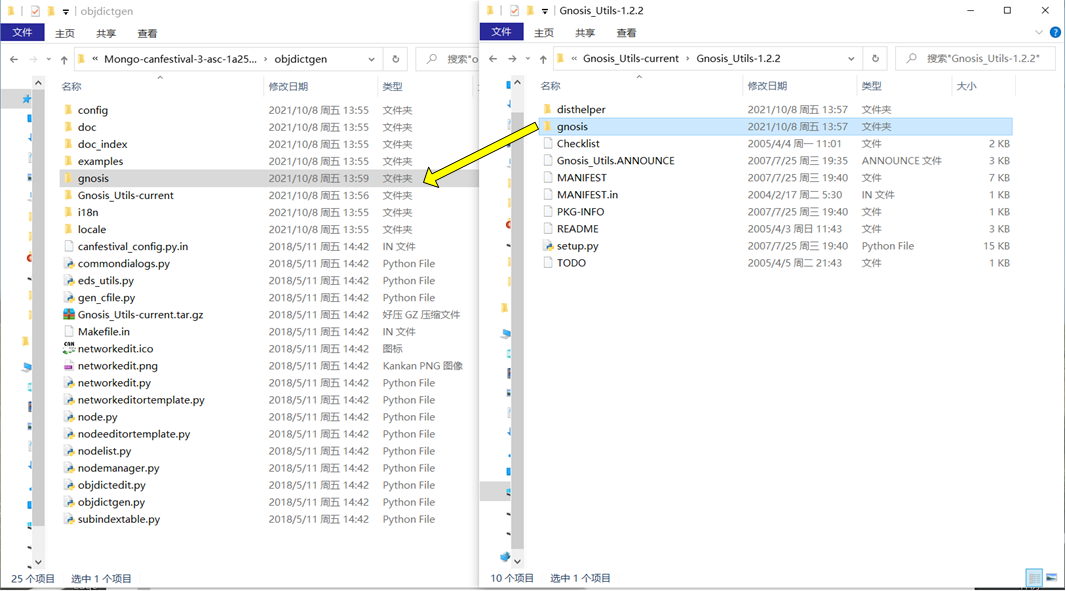
c. Unzip the CANopen source code to obtain the <span>Mongo-canfestival-3-asc-1a25f5151a8d</span> folder.
d. Unzip <span>Mongo-canfestival-3-asc-1a25f5151a8d\objdictgen\Gnosis_Utils-current.tar.gz</span> to obtain <span>Gnosis_Utils-1.2.2.tar</span>.
After unzipping <span>Gnosis_Utils-1.2.2.tar</span>, obtain the <span>Gnosis_Utils-1.2.2</span> folder.
e. Copy the <span>Gnosis_Utils-1.2.2\gnosis</span> folder to the <span>Mongo-canfestival-3-asc-1a25f5151a8d\objdictgen</span> path. As shown in the figure below:
-
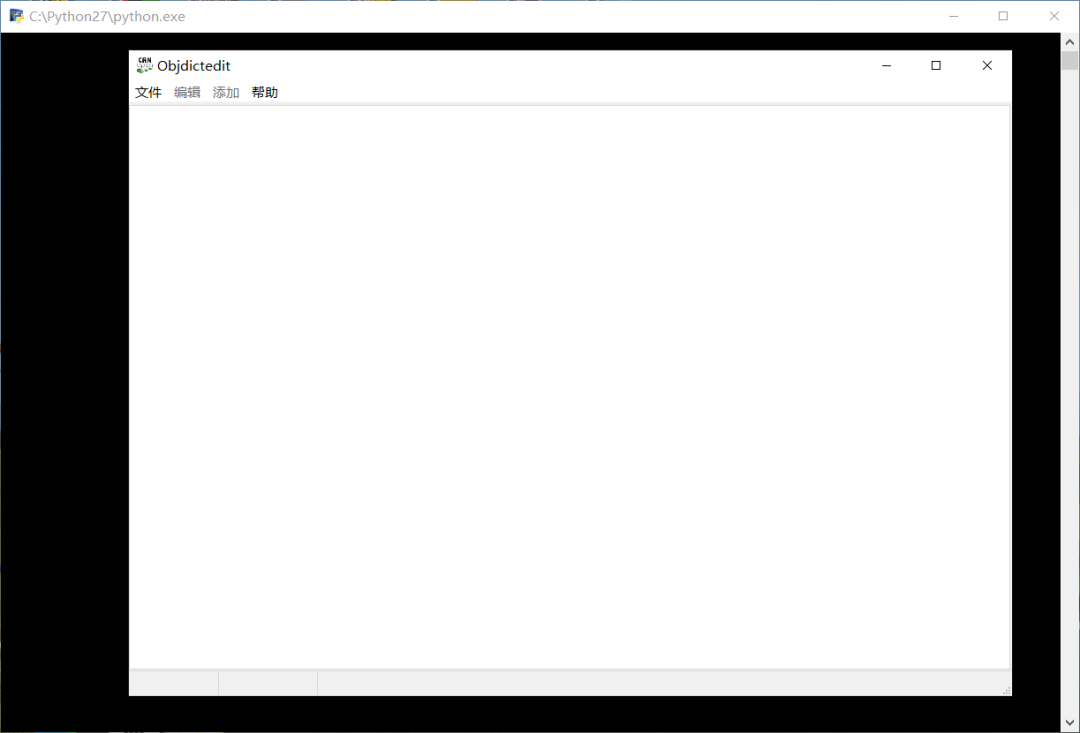
f. Double-click
<span>Mongo-canfestival-...\objdictgen\objdictedit.py</span>.
If the installation is successful, the following interface will appear:
2. The usage method of the CANopen object dictionary editing tool is as follows:
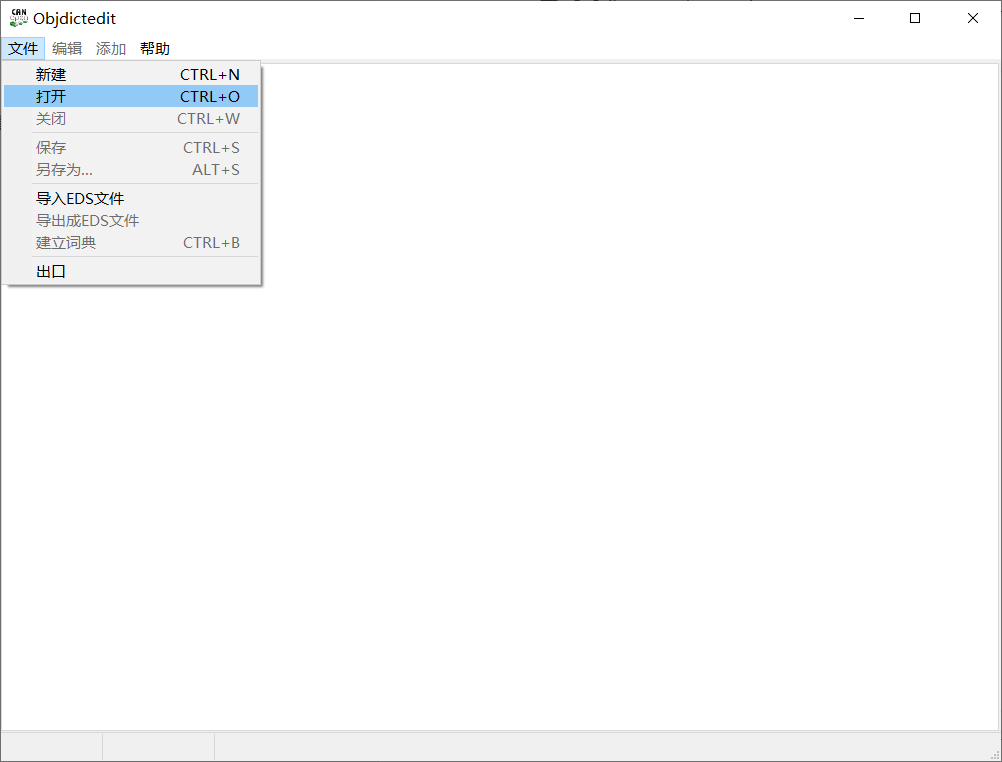
- a. Click the “File” button in the upper left corner to create or open an object dictionary.
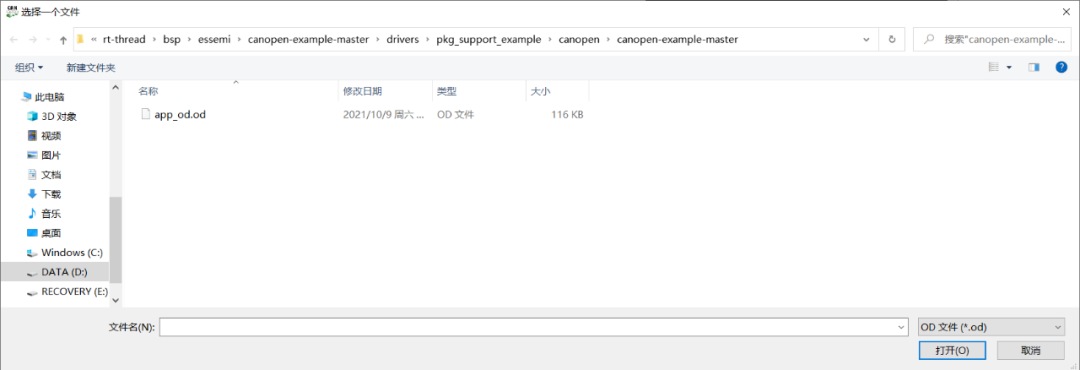
Open the object dictionary in the BSP.
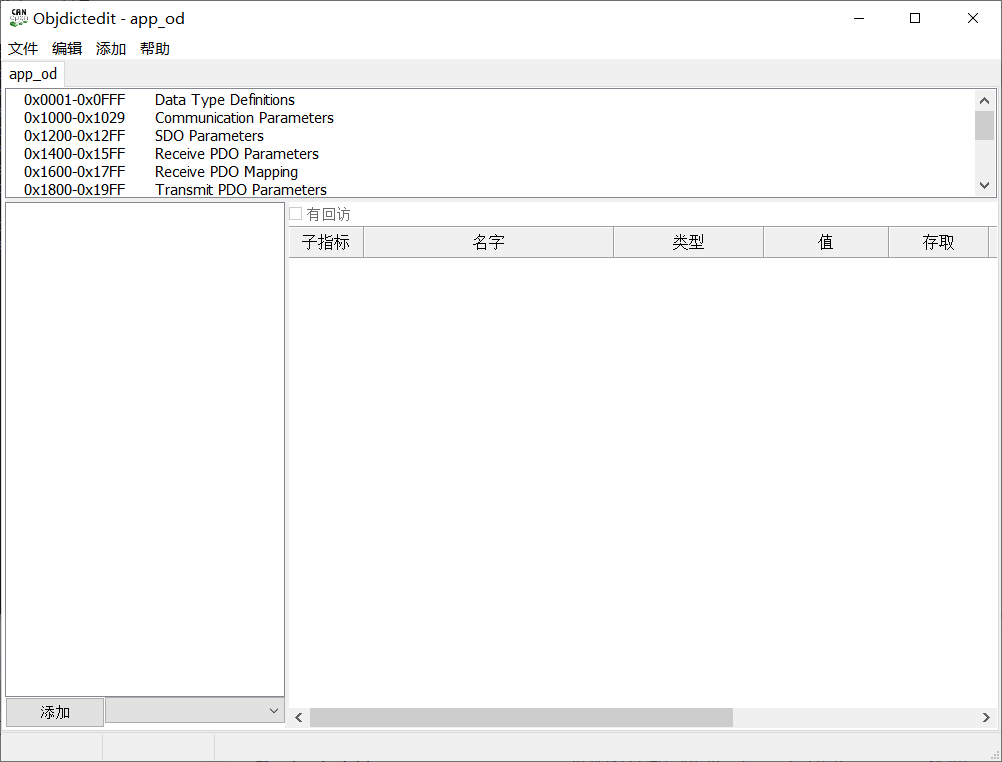
After successfully opening the object dictionary, it will look like the figure below:
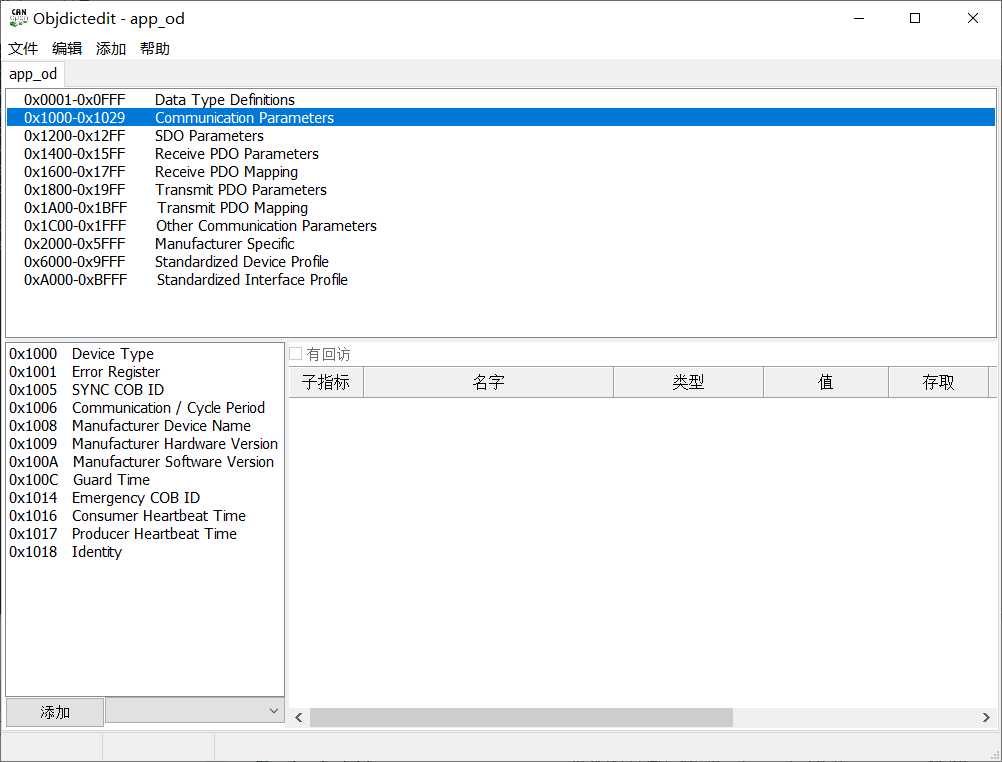
- b. After clicking the option, you can edit the dictionary, as shown in the figure below:
The description of the index range of the CANopen object dictionary is shown in the figure below.
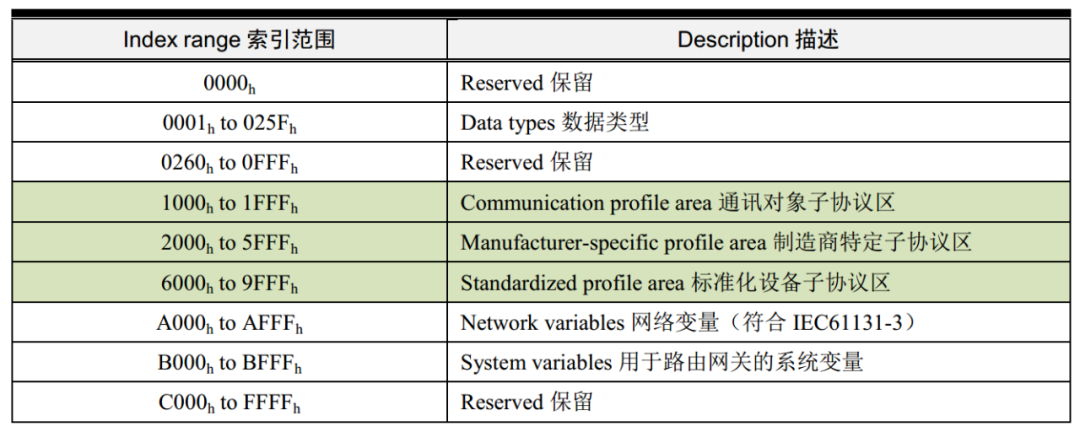
The manufacturer-specific sub-protocol area of the object dictionary index 0x2000~0x5FFF is often used to store application data.
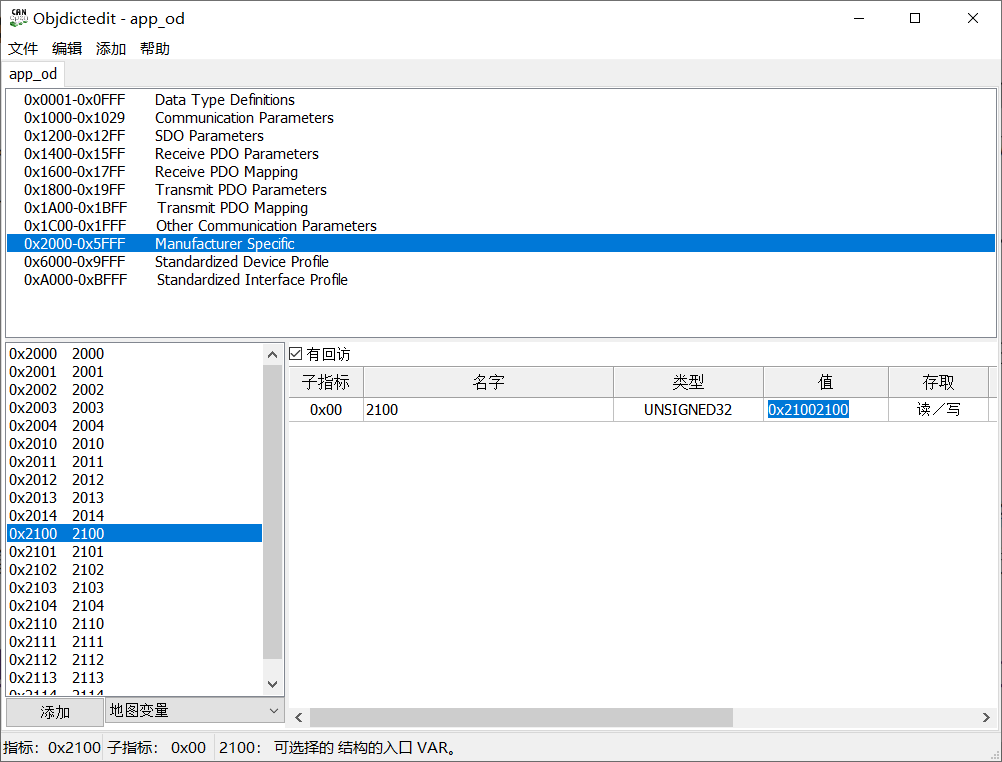
As shown in the figure below: you can directly modify the data of the object dictionary index 0x2100 using the editing tool.
- c. The method to output the CANopen object dictionary is as follows:
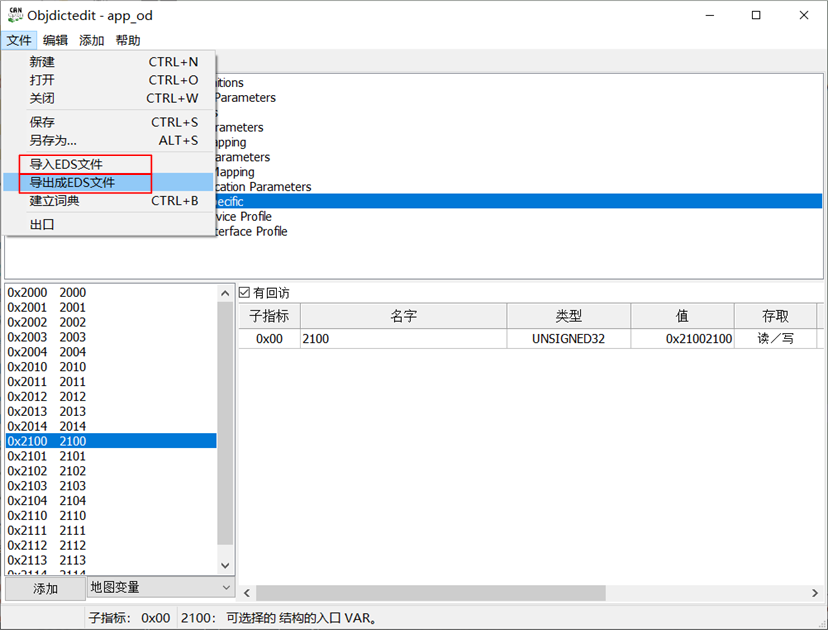
After clicking [Create Dictionary], .c and .h object dictionary files will be generated. If the currently opened .od file is within the project, the object dictionary will be updated in the project.
After clicking [Export to EDS file], an eds file will be generated. The CANopen master needs to parse the slave using the eds file.
4. CANopen Slave Program Flow.
In CANopen, PDO stands for Process Data Object protocol, which can be used to exchange instantaneous data between multiple nodes. PDO is divided into RPDO and TPDO. RPDO is for the slave to receive data. TPDO is for the slave to send data.
In the use case slave object dictionary, there are 4 RPDOs and 4 TPDOs. In the figure below, the value of N ranges from 1 to 4.
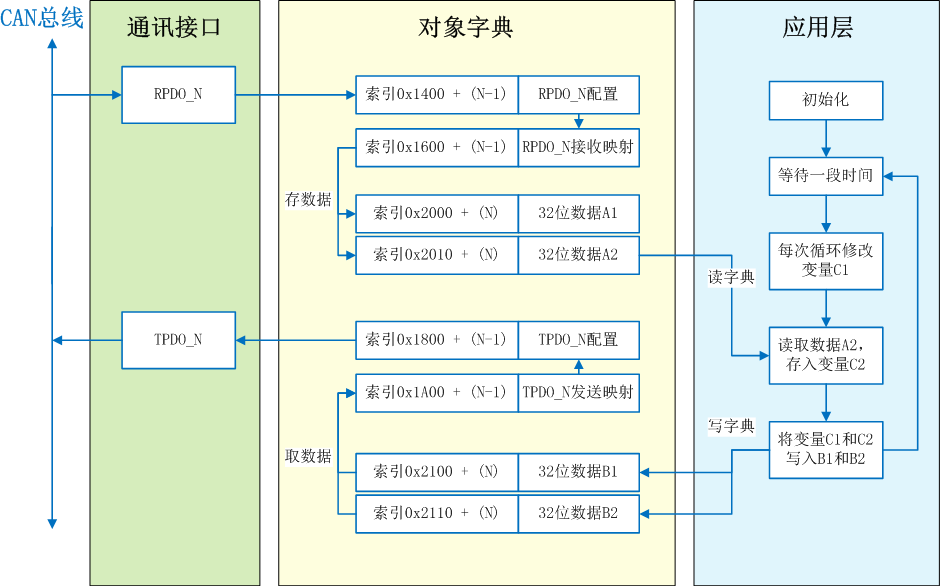
As shown in the figure above, the application layer CANopen slave program flow is as follows:
- a. Initialize the underlying drivers. Initialize CANopen and import the object dictionary.
- b. After the slave enters the pre-operational state, continuously read and write the object dictionary.
Note: Because the clocks of both sides are independent and there is an error, the currently used hardware timer is accelerated to allow the slave to respond to the master in a timely manner.
5. Installation of CANopen Master Station Card Environment.
This experiment uses the USBCAN-E-P CANopen master station card as the CANopen master, and the development board as the CANopen slave.
☞ Obtain USBCAN-E-P information from the official website:
☆ Obtain the PC-side upper computer software installation package for USBCAN-E-P: https://www.zlg.cn/data/upload/software/Can/CANopen_Setup.rar
☆ Obtain the USBCAN-E-P user manual: https://www.zlg.cn/data/upload/software/Can/USBCAN_E_P_CANOpen_um.pdf
☆ Obtain the USBCAN-E-P driver: https://www.zlg.cn/data/upload/software/Can/USBCAN_E_P_drive.zip
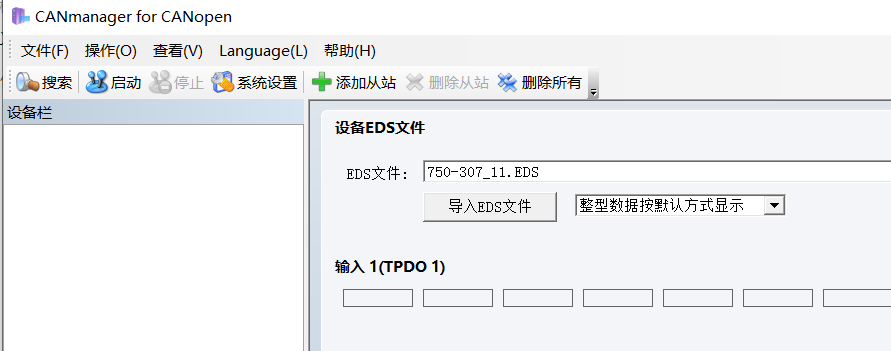
After completing the installation of the PC-side upper computer software, obtain the software CANManager for CANopen:
Then, install the USBCAN-E-P driver according to the user manual.
5. Experiment Phenomena
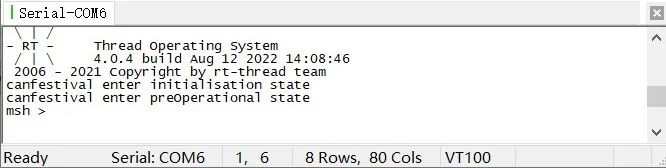
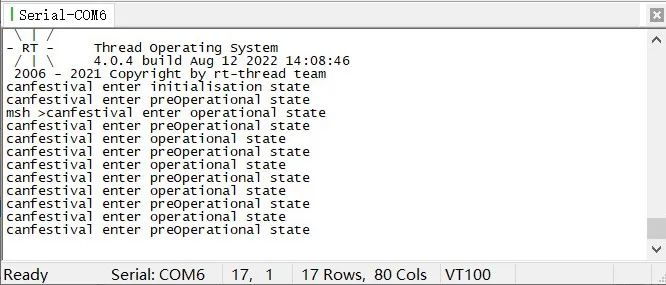
1. After downloading the CANopen slave program, the RT-Thread console outputs the following information:
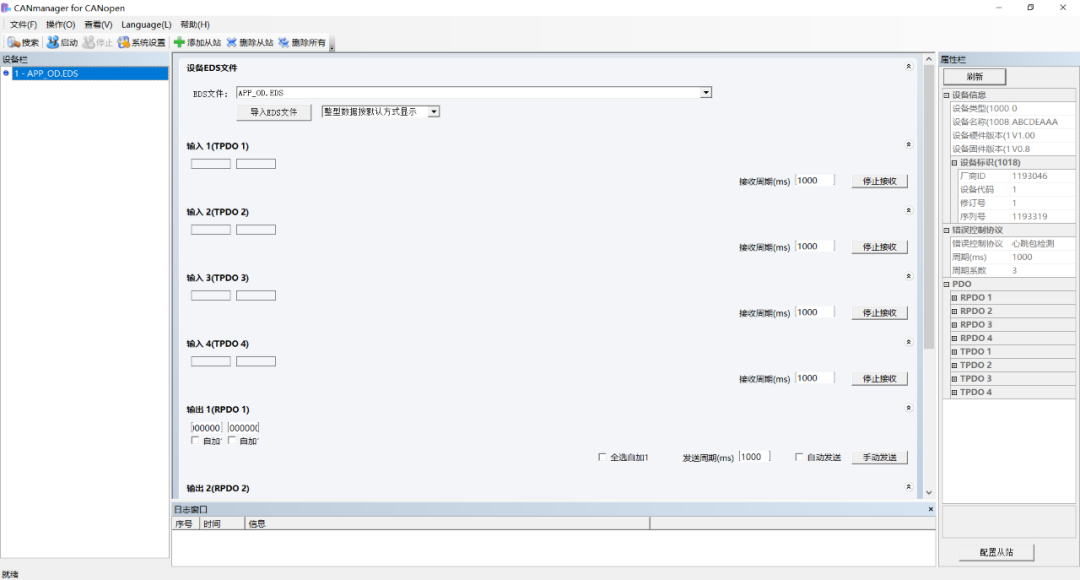
2. Then open CANManager for CANopen.
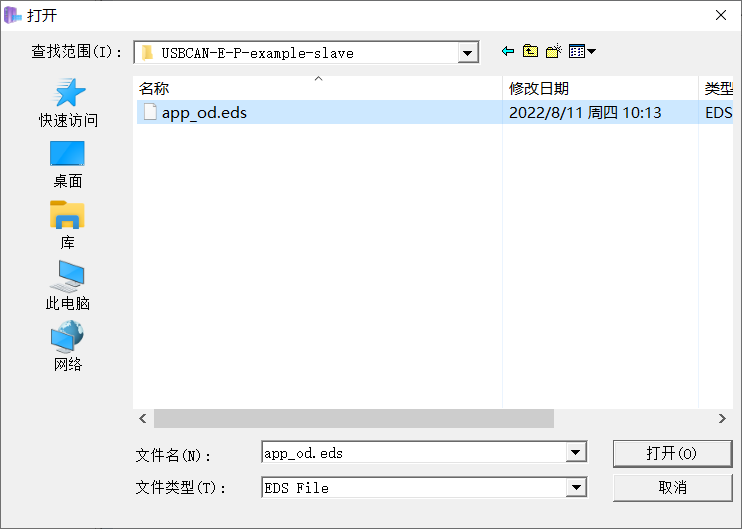
Import the eds of the CANopen slave.
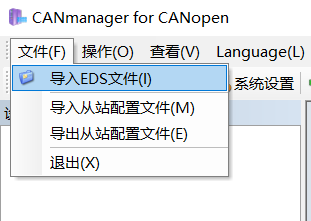
Select the eds file for the slave use case. The file path is: <span>drivers\pkg_support_example\canopen\USBCAN-E-P-example-slave\app_od.eds</span>
Click search to start searching for the slave, as shown in the figure below:

After finding the slave, click the close button in the lower right corner, as shown in the figure below:
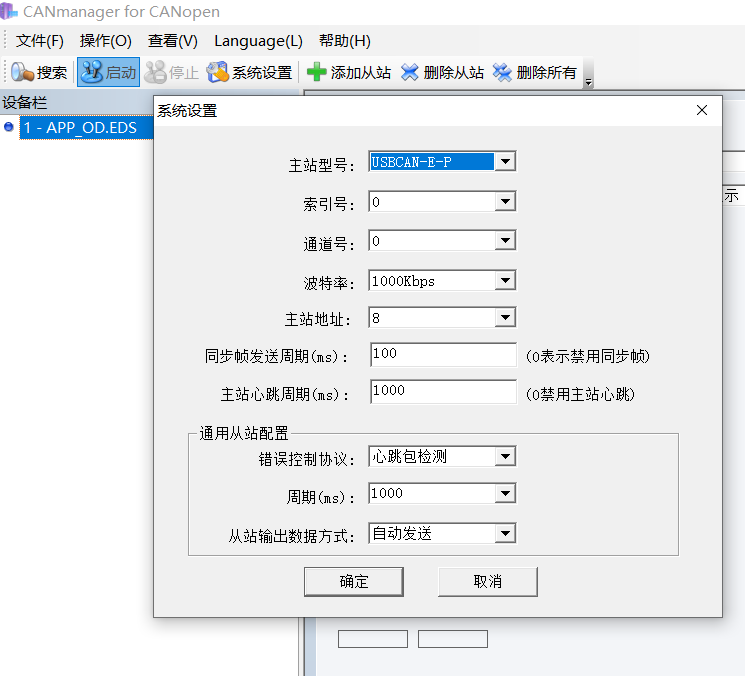
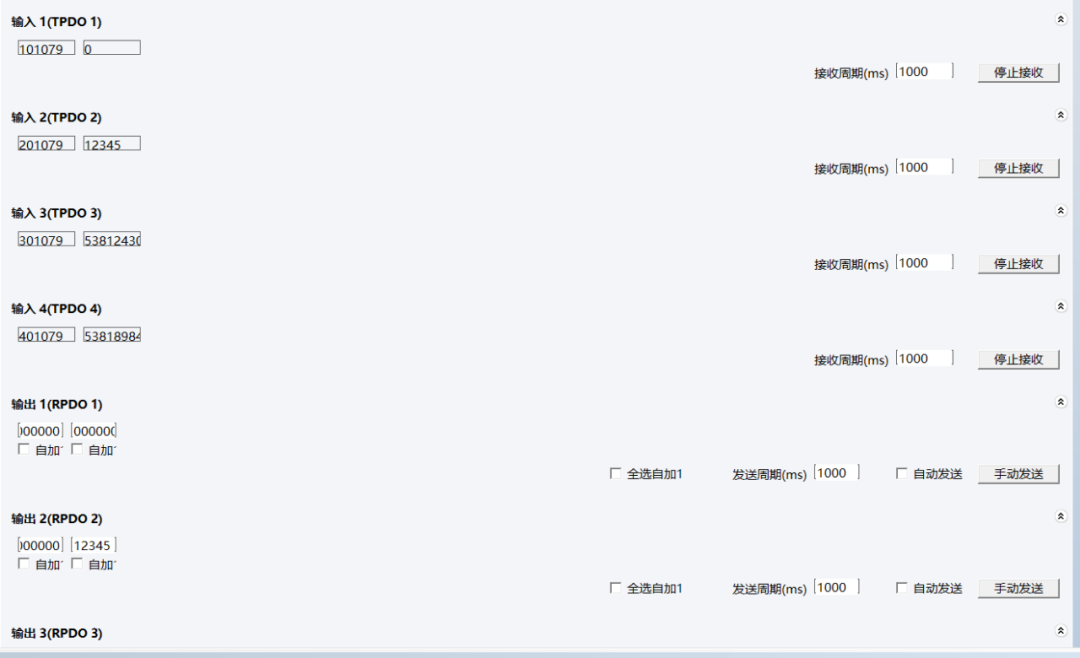
3. Click start in the upper left corner, and set as shown in the figure:
After starting, the phenomenon can be observed: the master receives data from the slave’s TPDO, and the data in the red box is continuously looping. The data in the blue box remains unchanged, which is the initial value in the dictionary. This is consistent with the program flowchart logic.

After manually sending RPDO1, the last 4 bytes of TPDO1 data are consistent with the last 4 bytes of RPDO1 data.
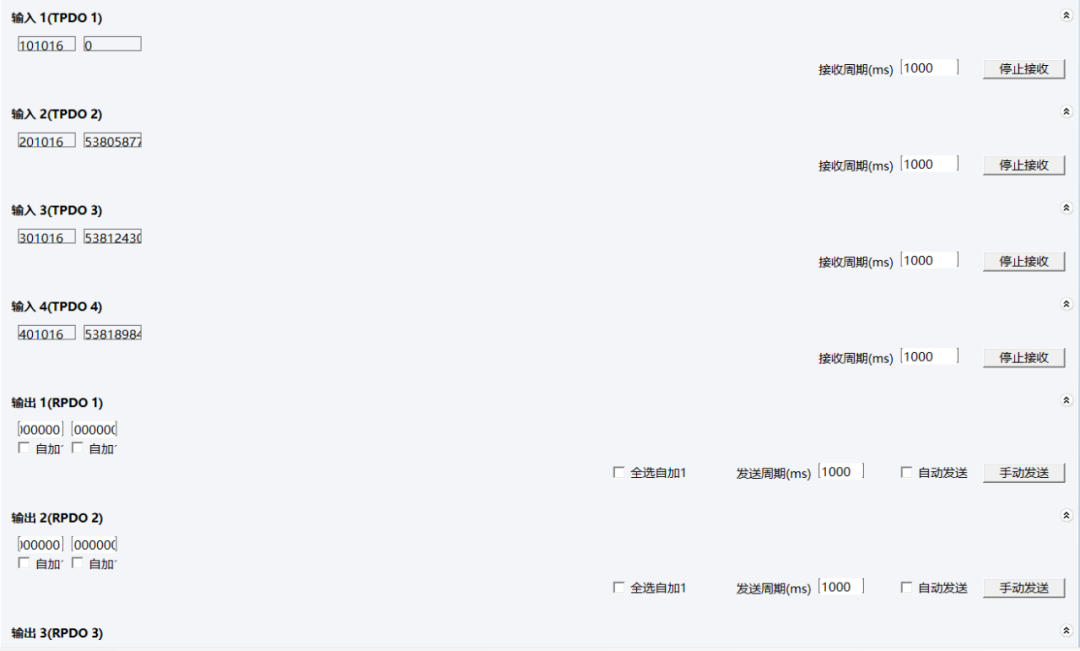
After modifying the last 4 bytes of RPDO2 data, clicking on manual send for RPDO2 results in the last 4 bytes of TPDO2 data being consistent with the last 4 bytes of RPDO2 data.
4. After completing the experiment, the RT-Thread console outputs the following information:
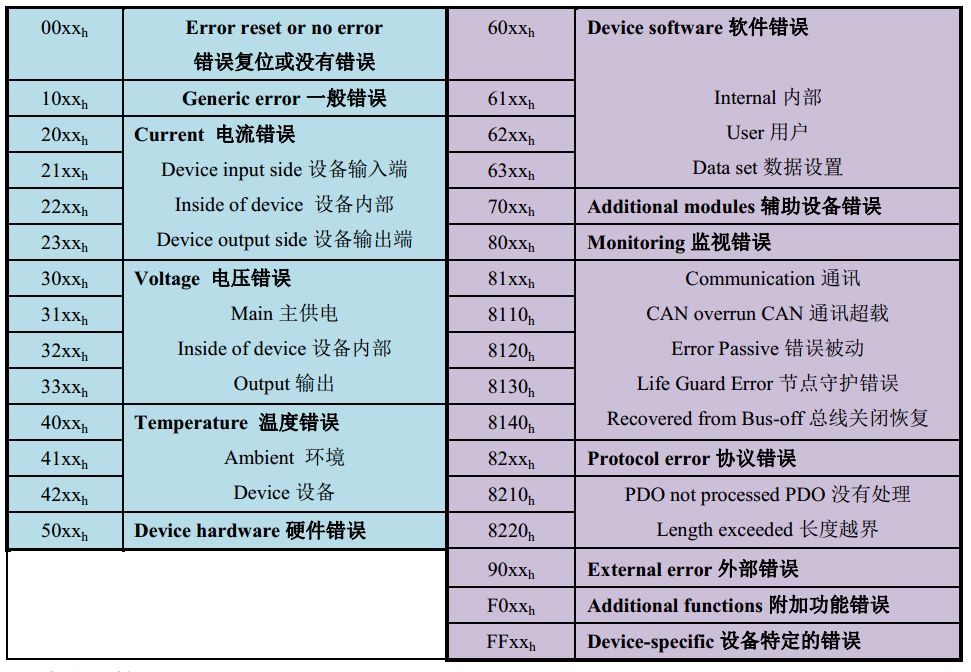
If the master and slave send data to the CAN bus almost simultaneously, there will be an emergency message for CAN communication overload.
received EMCY message. Node: 08 ErrorCode: 8110 ErrorRegister: 11
The error code explanation for the CANopen emergency message is as follows:
6. Software Package Modification Instructions
1. CanFestival software package modification (version: v1.0.0)
This package requires three modifications:
Modification 1
Reason for modification: The CAN filter control block configuration is incorrect.
a. The macro <span>RT_CAN_FILTER_ITEM_INIT</span> sets the filter table number to -1. If the filter table number is -1, it indicates that the filter table number is not specified, and this filter control block will not be initialized. This will cause the callback function to be invalid. Therefore, the filter table number needs to be modified: change the filter table number to 0.
b. Adapt the RT-Thread driver framework. Change the filter table mode to 0.
The specific modifications are as follows: (Code before modification + Code after modification)
Change <span>packages\CanFestival-v1.0.0\src\can_rtthread.c</span>. The content of can_rtthread.c is as follows:
Before modification:
struct rt_can_filter_item filter1item[1] =
{
 RT_CAN_FILTER_ITEM_INIT(0x180, 0, 0, 1, 0, can1ind, &can_data.event)
};
After modification:
struct rt_can_filter_item filter1item[1] =
{
 {
 .id = 0x180,
 .ide = 0,
 .rtr = 0,
 .mode = 0,/*filter table mode*/
 .mask = 0,
 .hdr = 0, /*filter table number*/
 .ind = can1ind,
 .args = &can_data.event
 }
};
Modification 2
Reason for modification: Some symbol definitions conflict. In the ES32 underlying library, TRUE and FALSE are defined as enumerations. In the package, TRUE and FALSE are defined as macros.
The specific modification is as follows:
In <span>packages\CanFestival-v1.0.0\inc\def.h</span>, add the header file below <span>#define __def_h__</span>:
#include "type.h"
Modification 3
Reason for modification: Remove unnecessary files.
The specific modification is as follows:
<span>packages\CanFestival-v1.0.0\src\timer_rtthread.c</span>
#include <stm32f10x.h>
Understanding CANopen

——————End——————

 👇 Click to read the original text and enter the official website