Original article: https://owo.cab/216/, also published on WeChat public account
You can jump to the original webpage from the “Read the original” link at the end of this article
Finally, the holiday is approaching~ I finally have some time to review and record some of the things I’ve been working on recently. Hehe! It’s the joy of hands-on workヾ(≧▽≦*)o
When I first entered school last year, I applied for a campus network card (package 39 yuan including broadband) at the service center, but I did not register it in the school system and could not find the management personnel. As a result, I had to pay an extra 20 yuan every month during my freshman year (crying), until recently when the new students enrolled and I finally completed the binding of the campus network.
I asked my roommate, and it seems that I was the only one who applied for the card. Since I had already become a victim, I decided to share it with my roommates, and it would also allow IoT devices that could not log in to the campus network to connect.
Campus Network Authentication
My school uses the authentication and billing system from Wuhan Yudi Technology Co., Ltd., which is said to be adopted by many universities in Wuhan. However, the authentication logic from different vendors is generally similar, so this article is applicable to most schools.
The wireless and wired connections of the campus network are generally open networks without passwords. When connecting to the network, the router assigns an internal IP address to the device and records the device’s MAC address. Due to the large number of devices on the campus network, it generally uses Class A reserved addresses (<span>10.0.0.0/8</span>).
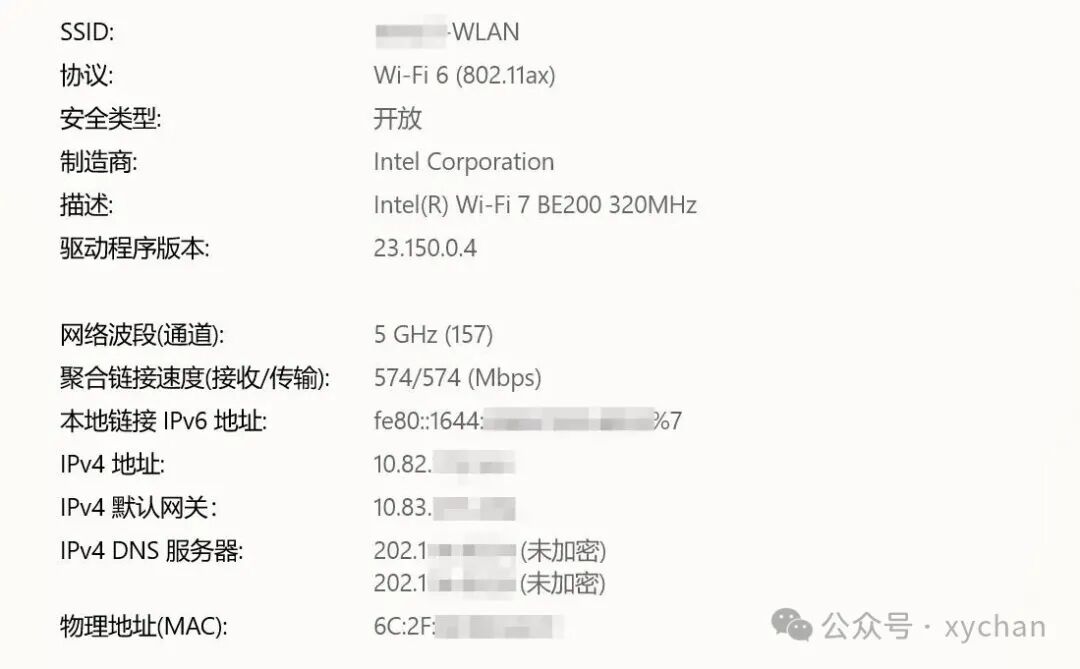
The campus network login uses captive portal technology, so after connecting to the network, you cannot directly access the internet. Some operating systems will prompt that there is no internet connection. You can click a button or enter any address in the browser to be redirected to the login page.
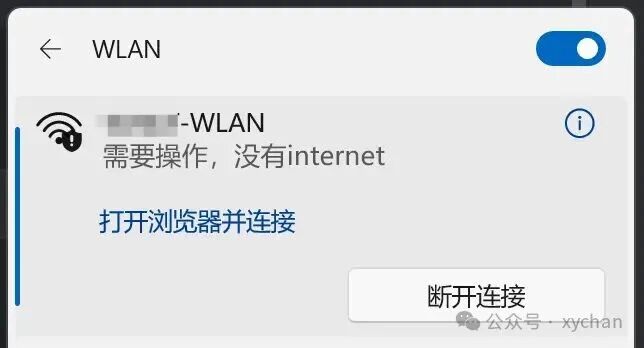
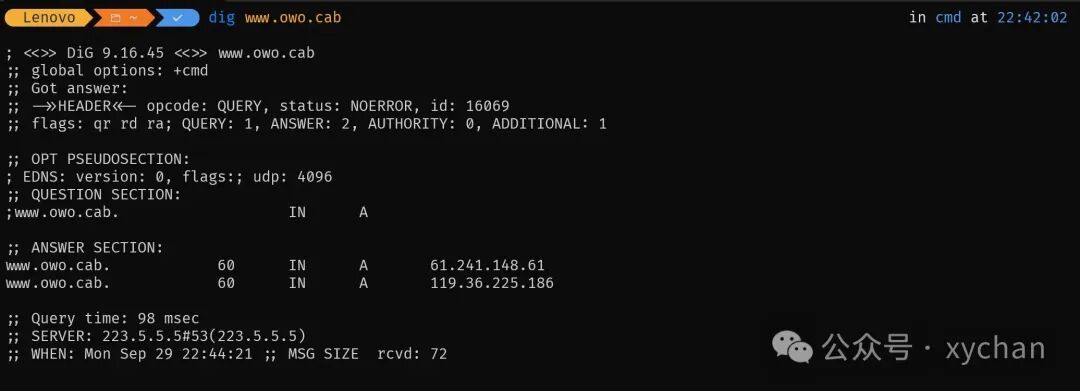
At this point, I tried using the <span>dig</span> command for DNS queries and found that the DNS server could return the IP address of the domain normally.
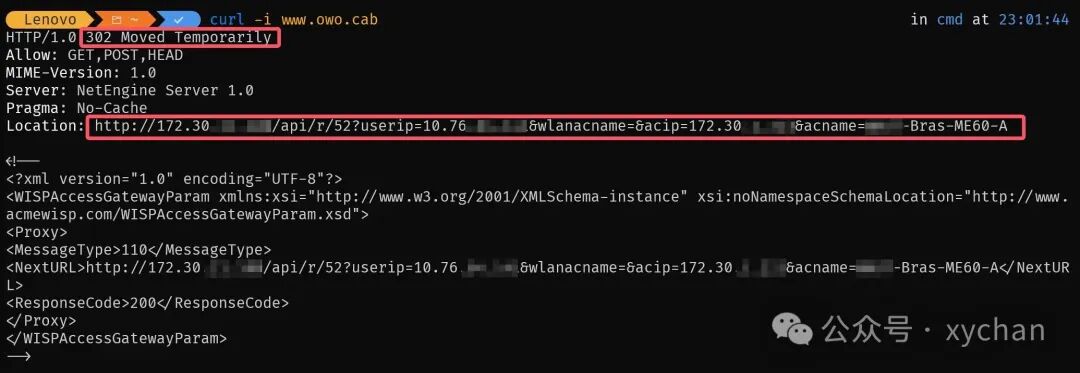
This indicates that the redirection to the authentication page is not achieved through DNS hijacking, but by intercepting HTTP requests to the gateway, which discards the original data packets and returns a redirection response. We can use <span>curl -i</span> to verify.
Open the login page, use the browser’s developer tools to record network requests, and then complete the login. It is not difficult to see that the login operation is completed through a POST request. Analyzing the request headers and form data reveals that, in addition to the username and password, two parameters <span>nasId</span> and <span>csrf-token</span> are also required. The <span>nasId</span> can be obtained from the redirected URL, while the <span>csrf-token</span> is obtained from the previous request.
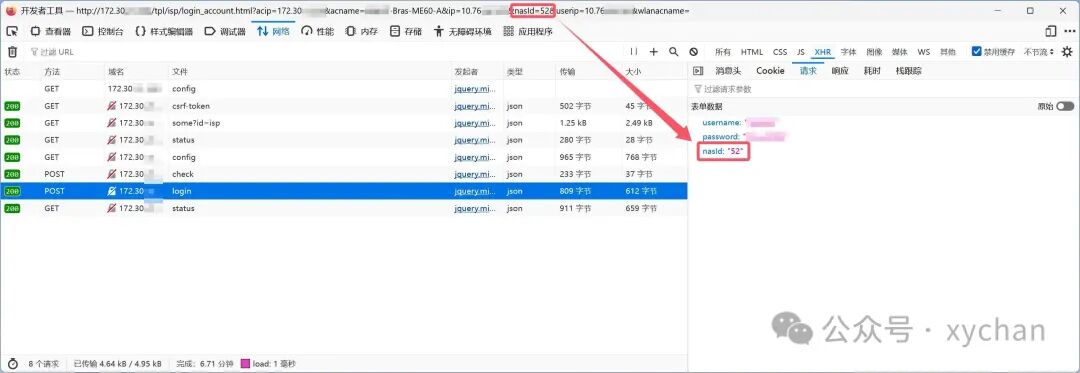
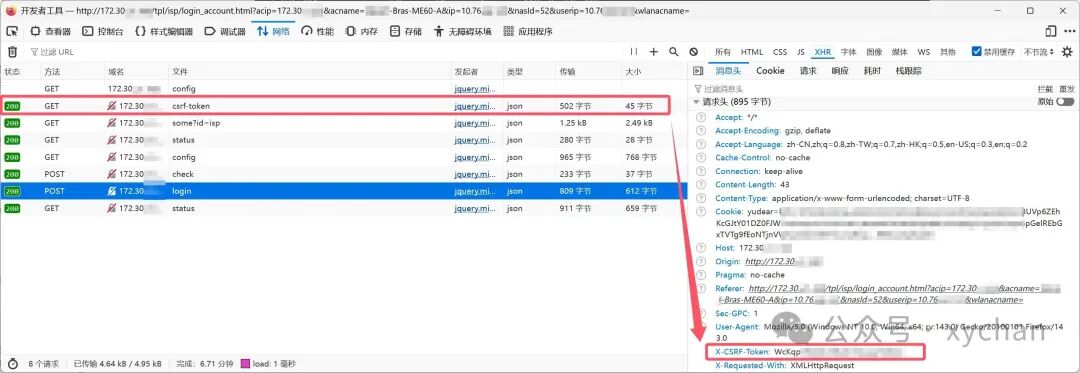
Theoretically, we only need to obtain these two parameters and complete the POST request to achieve campus network login. We can write a simple Python script to verify this.
import requests
from urllib.parse import urlparse, parse_qs

username = ""
password = ""

# Get nasId from the redirected URL
resp = requests.get("http://www.msftconnecttest.com/redirect", allow_redirects=True)
parsed_url = urlparse(resp.url)
nasid = ""
nasid_list = parse_qs(parsed_url.query).get("nasId")
if nasid_list:
    nasid = nasid_list[0]
    print(nasid)

# Get csrf-token
resp = requests.get("http://172.30.21.100/api/csrf-token")
csrf = resp.json().get("csrf_token")
print(csrf)

# Login
headers = {
    "content-type": "application/x-www-form-urlencoded",
    "x-csrf-token": csrf,
}
data = (
    f"username={username}&password={password}"
    f"&switchip=&nasId={nasid}&userIpv4=&userMac=&captcha=&captchaId="
)
resp = requests.post(
    "http://172.30.21.100/api/account/login",
    headers=headers,
    data=data
)
print(resp.text)
Here, <span>http://www.msftconnecttest.com/redirect</span> is a Microsoft address used to test network conditions and generate redirection. You can also use other similar addresses.

It can be seen that both <span>nasId</span> and <span>csrf-token</span> can be correctly obtained, but why does the gateway still return a token mismatch error?
We know that when accessing a webpage, a session is created between the client and server. In the previous code, all three requests were made directly using <span>requests</span>, which creates a new session each time. This means that the sessions for obtaining <span>csrf-token</span> and logging in are inconsistent.
Fortunately, we can use the <span>requests.Session()</span> class to create a session.
session = requests.Session()Then, replace the <span>requests.get</span> / <span>requests.post</span> methods with <span>session.get</span> / <span>session.post</span>.

Done! If you don’t want to use Python, we can also rewrite it using <span>curl</span> to adapt to Linux systems.
#!/bin/bash

USERNAME=""
PASSWORD=""

SESSION=$(mktemp)

LOGIN_URL=$(curl -Ls -c "$SESSION" -b "$SESSION" -o /dev/null -w "%{url_effective}" "http://www.msftconnecttest.com/redirect")
NASID=$(printf '%s\n' "$LOGIN_URL" | sed -n 's/.*[?&]nasId=\([^&]*\).*/\1/p')

CSRF_TOKEN=$(curl -s -c "$SESSION" -b "$SESSION" "http://172.30.21.100/api/csrf-token" | sed -n 's/.*"csrf_token"[[:space:]]*:[[:space:]]*"\([^\"]*\)".*/\1/p')

RESPONSE=$(curl -s -X POST "http://172.30.21.100/api/account/login" \
    -c "$SESSION" -b "$SESSION" \
    -H "content-type: application/x-www-form-urlencoded" \
    -H "x-csrf-token: $CSRF_TOKEN" \
    --data "username=$USERNAME&password=$PASSWORD&switchip=&nasId=$NASID&userIpv4=&userMac=&captcha=&captchaId=")

echo "$RESPONSE"

rm -f "$SESSION"
The related code has been open-sourced on GitHub, and you can adapt the above process to your school’s campus network authentication system. When you cannot access the internet, just run the script to complete the login. Isn’t it much more convenient than opening a browser and entering the username and password?
GitHub: https://github.com/zhxycn/WHUT-WLAN
Device Limitations
During the login process, some attentive friends may have noticed that the MAC address of your device has been recorded. This will be used for seamless login. When a device that has already been authenticated reconnects, the gateway will automatically complete the authentication for that device and associate it with the IP address, allowing the device’s traffic to pass.
Therefore, the principle of device limitations is very simple: limit the number of MAC addresses that can be authenticated for each account. Once the limit is exceeded, the earliest records are automatically deleted, and the corresponding devices are taken offline.
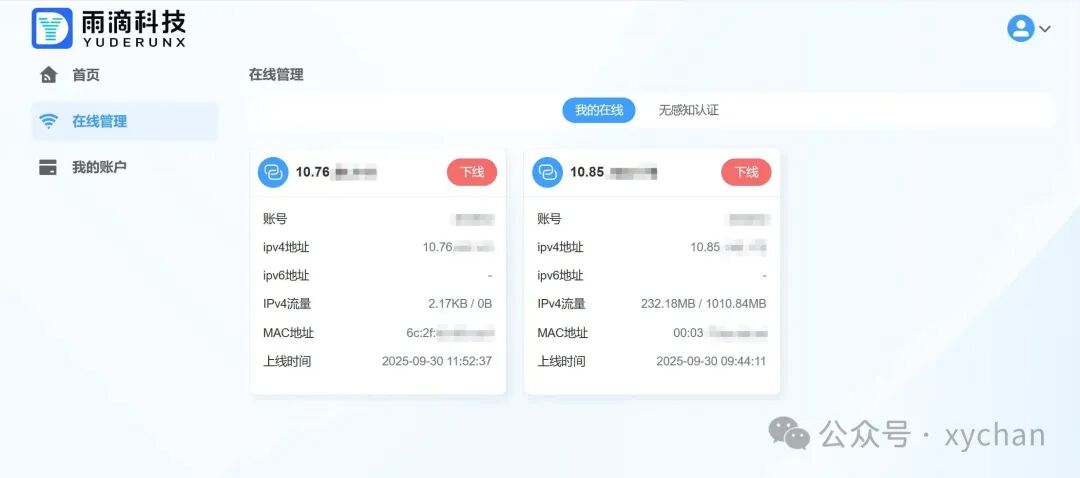
Bypassing the limitation is also very easy. Connect devices that are fewer than the limit to the campus network, and then connect other devices to that device. The simplest method is to turn on a hotspot.
So, what is a stable and effective solution? Let’s welcome the router to the stage.
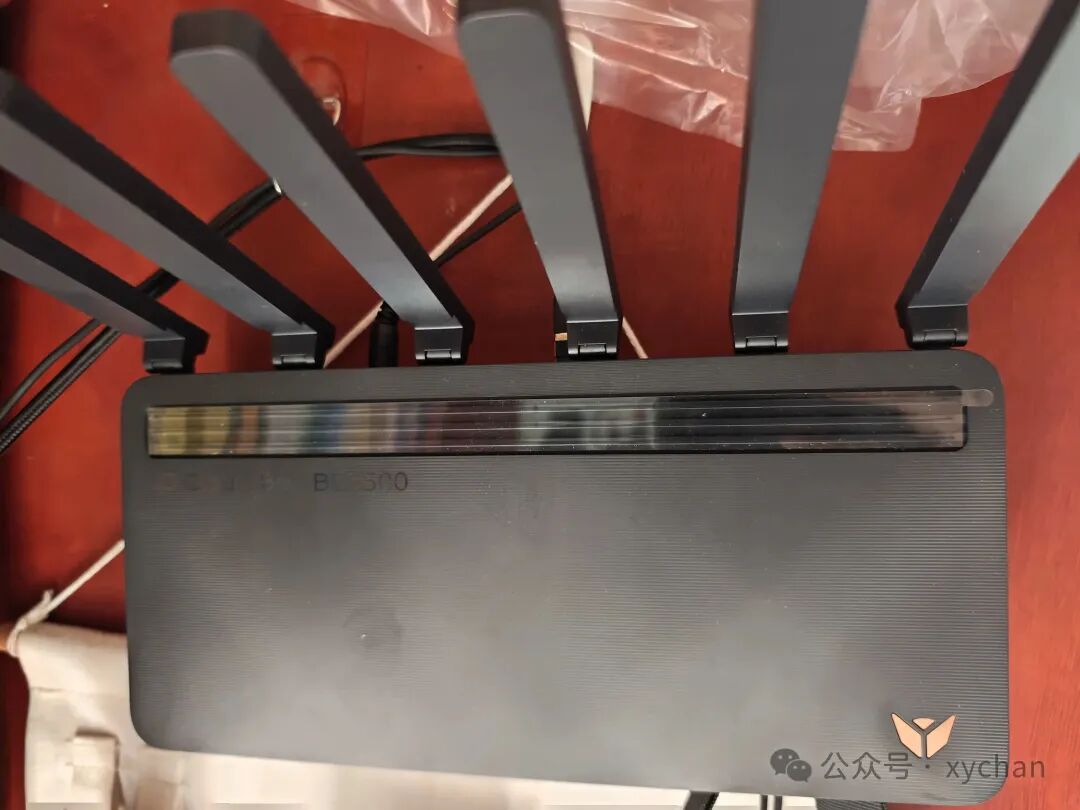
This is the JD Cloud Zhao Yun (JDC-BE6500) that I use in my dormitory, and it is one of the few WiFi 7 routers that support flashing. However, it is still too early to talk about flashing here.
The network cable interfaces on the back of the router are generally divided into WAN and LAN interfaces. The WAN interface is used to connect to the ISP network or connect to upstream modems, switches, etc., while the LAN interface is used to connect devices within the local area network.
If your campus network supports seamless authentication and your router supports MAC address cloning, you can modify the MAC address of the router to match that of your computer or phone, then connect the WAN interface to the campus network, and set the router to DHCP mode. However, do not provide DHCP service on the WAN interface, otherwise, it may cause a network outage for the entire school due to IP address conflicts. This way, after authenticating through the computer or phone, connecting to the router will allow the router to automatically complete the seamless authentication. This is the simplest method, but it is not the solution I adopted.
Some schools may use PPPoE protocol for broadband access, which generally does not have device number limitations, so it is not discussed in this article.
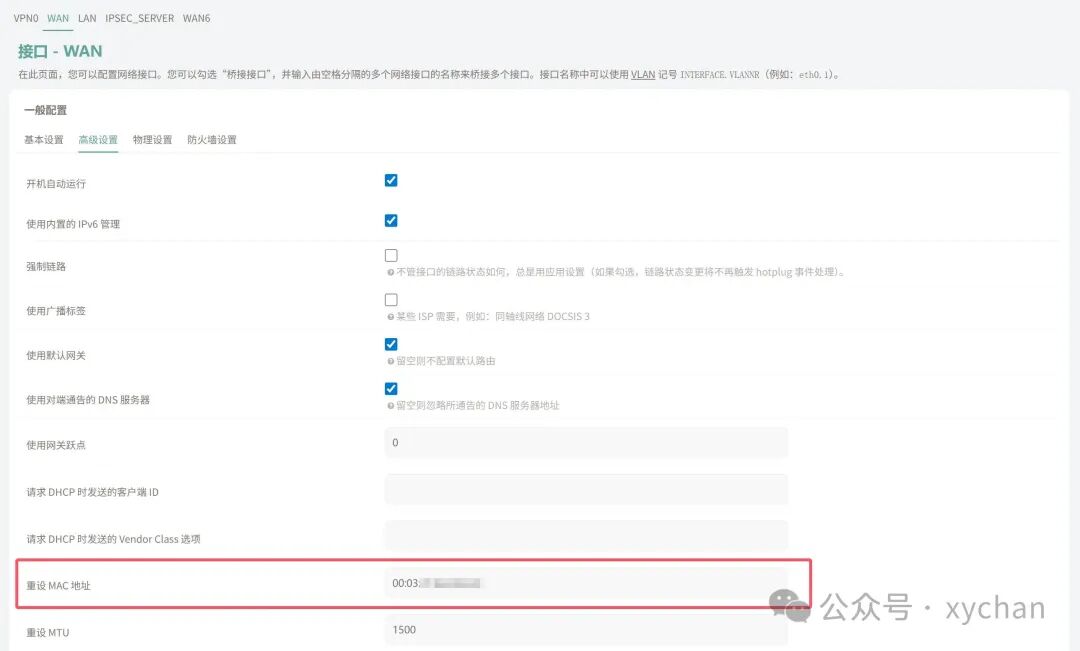
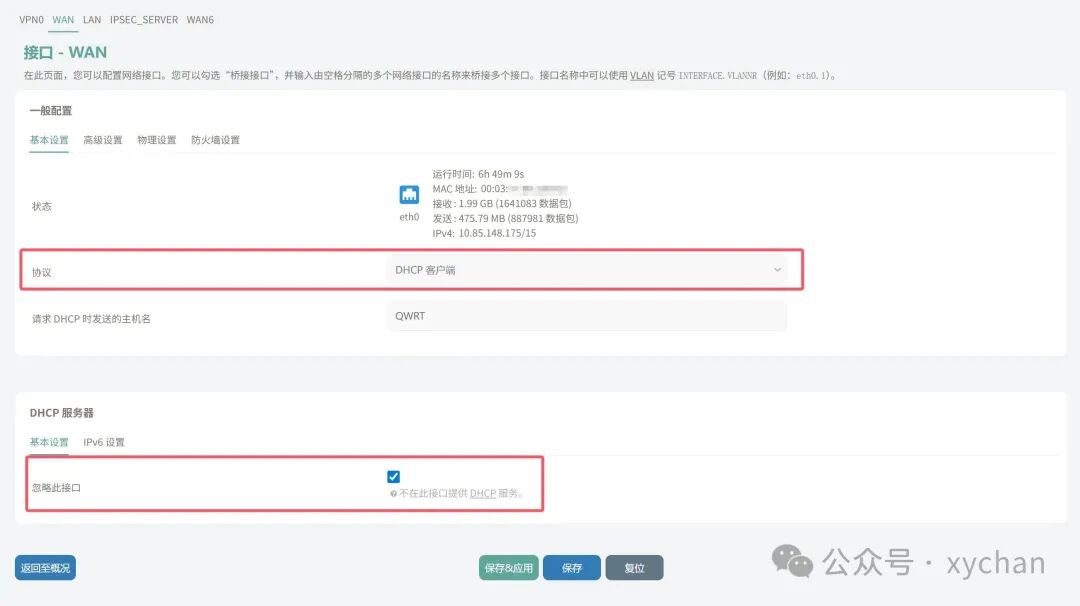
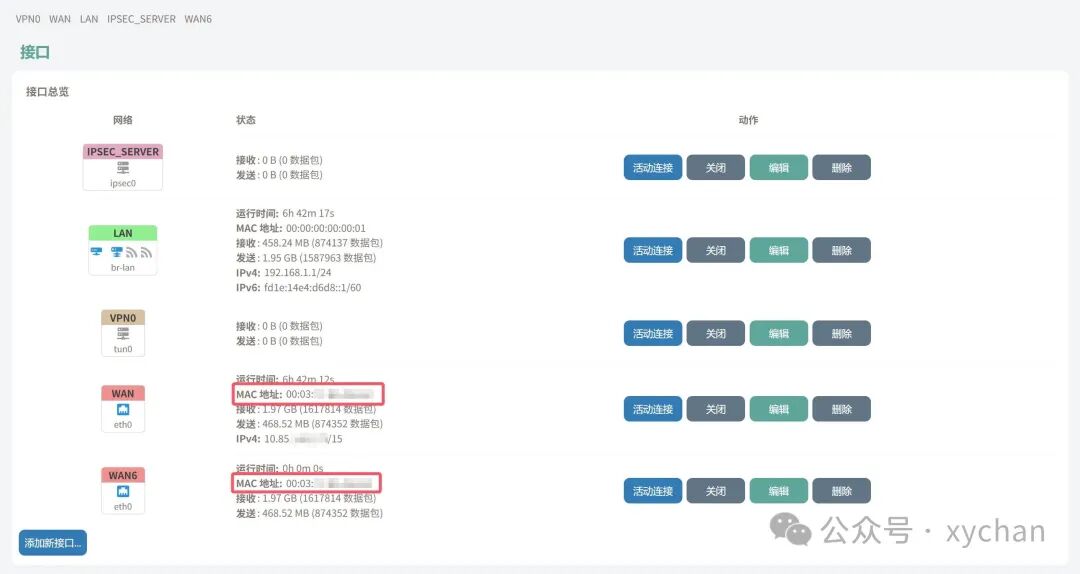
Of course, you can also check the MAC address of the router first, then modify the MAC address of your computer to match that of the router, and then complete the login. This also utilizes the campus network’s seamless authentication to achieve internet access for the router. Modifying the MAC address of the computer’s network card is not discussed in this article.
Soft Router
Selecting a Suitable Router
Not all routers can be flashed, so before getting started, check whether your router supports OpenWrt.
In addition, you should also pay attention to the performance of the router’s SoC, the size of the memory, and the storage capacity of the eMMC. Otherwise, even if you successfully flash the system, poor expandability will make you lose the joy of flashing.
Considering factors such as WiFi 7, configuration, and price, I chose to use the JD Cloud Zhao Yun (JDC-BE6500) with the <span>ipq-53xx</span> solution, which has 1G RAM and 128G ROM. Unfortunately, this router does not support flashing without disassembly.
Flashing
First, find the corresponding firmware and flashing tutorial. I referred to a post by HugoYan on the Enshan Forum.
Find a partner to borrow tools, and let’s get started!
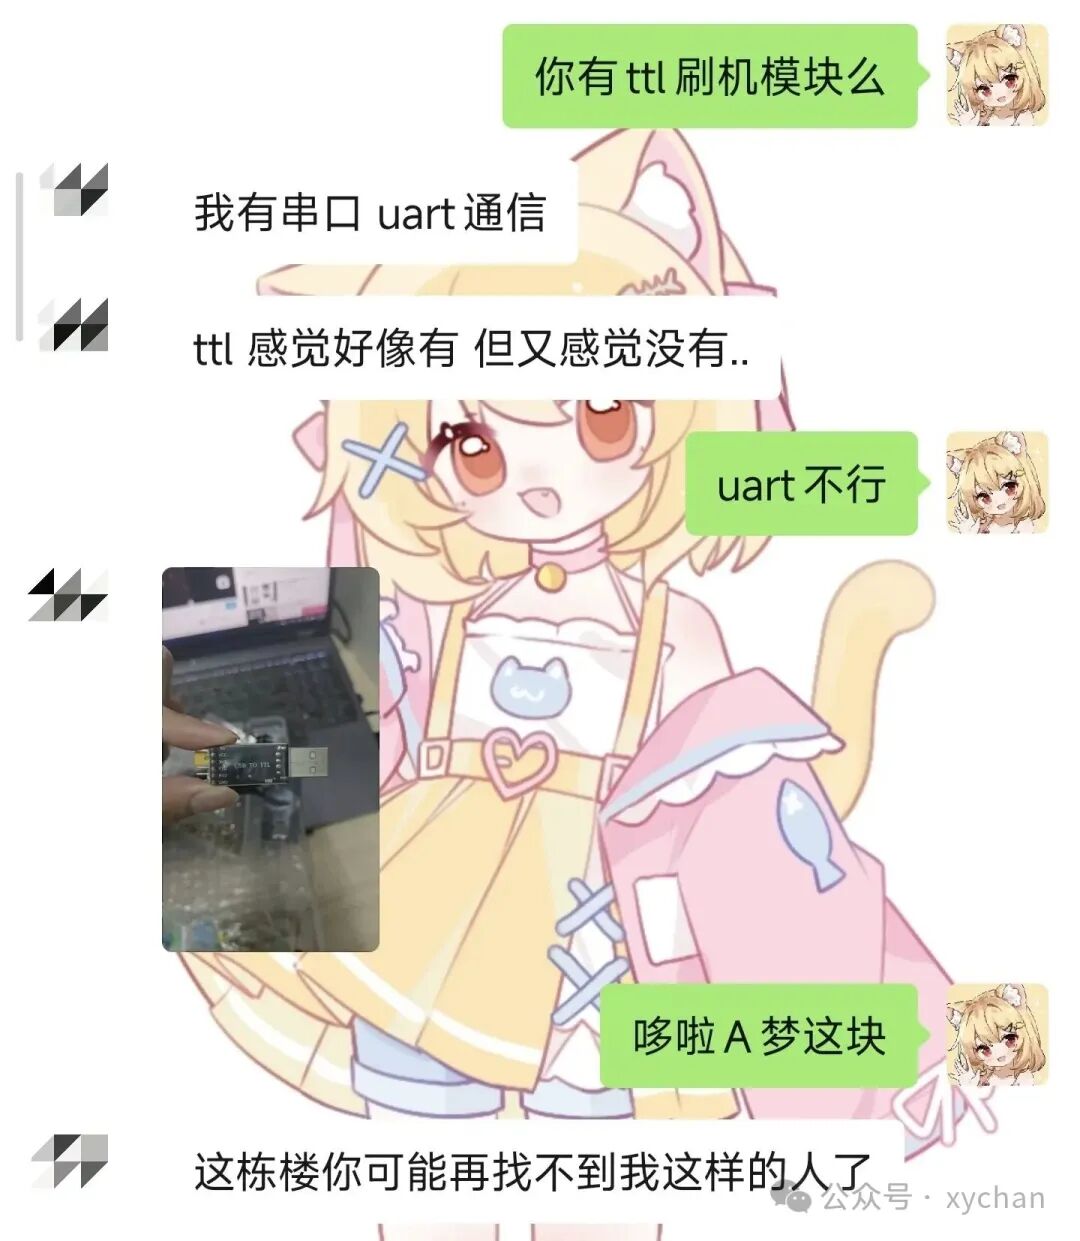
First, solder the TTL (I accidentally soldered VCC as well).
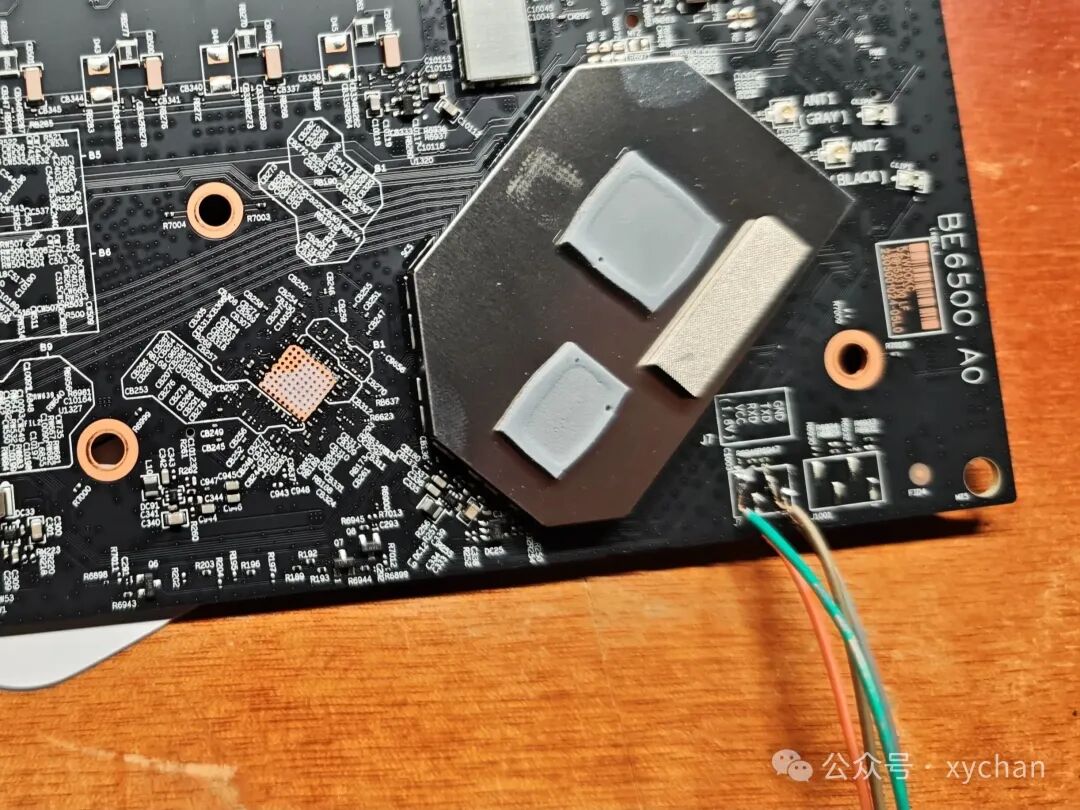
Without tweezers to short-circuit the eMMC, I used a multimeter in current mode to successfully interrupt U-Boot and enter the command line.
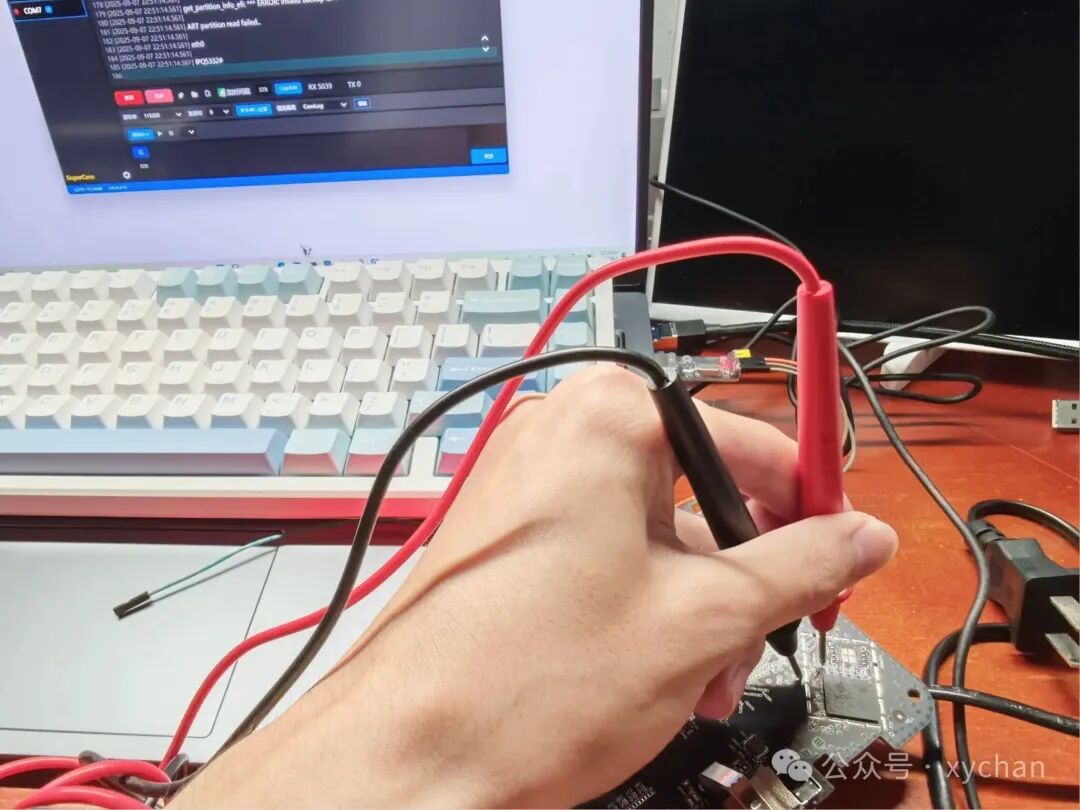
Then flash U-Boot and the firmware. After rebooting, you can enter the management page by typing <span>192.168.1.1</span> in the browser.
I encountered an infinite reboot issue when flashing the firmware. I searched for a lot of information online but couldn’t solve it. I suspected that I had damaged the partition table, and unexpectedly, when restoring the partition table, I really lost the partition table. So I used 9008 to rescue the brick and sought remote assistance, but it couldn’t solve the reboot issue. Eventually, I accidentally unplugged the TTL module and found that it successfully booted. If any experts know the principle behind this, please share in the comments section.
Router Configuration
I am using the QWRT firmware, and the initial admin password is <span>root</span> and <span>password</span>. Upon first login, a guided configuration will appear, and you need to change the admin password and set the SSID and password according to the prompts.
As mentioned above, connect the WAN interface to the campus network, and set the router to DHCP mode, but do not provide DHCP service on the WAN interface. However, there is no need to modify the router’s MAC address here.
(I forgot to take a screenshot, so there is no image here)
If your router is configured correctly, you can connect to the router via WiFi or Ethernet, and when you access any address in the browser, you will be redirected to the campus network authentication page.
Automatic Authentication
Upload your login script to the router. If you use the file upload feature provided by the web page, it will be saved to the <span>/tmp/upload/</span> directory. At this point, you need to open a terminal and copy your script to a path outside of <span>/tmp/</span>, for example, <span>/root/</span>.
cp /tmp/upload/main.sh /root/main.shNote that if you are using Windows, you need to modify the file’s line endings before uploading, otherwise, errors may occur.
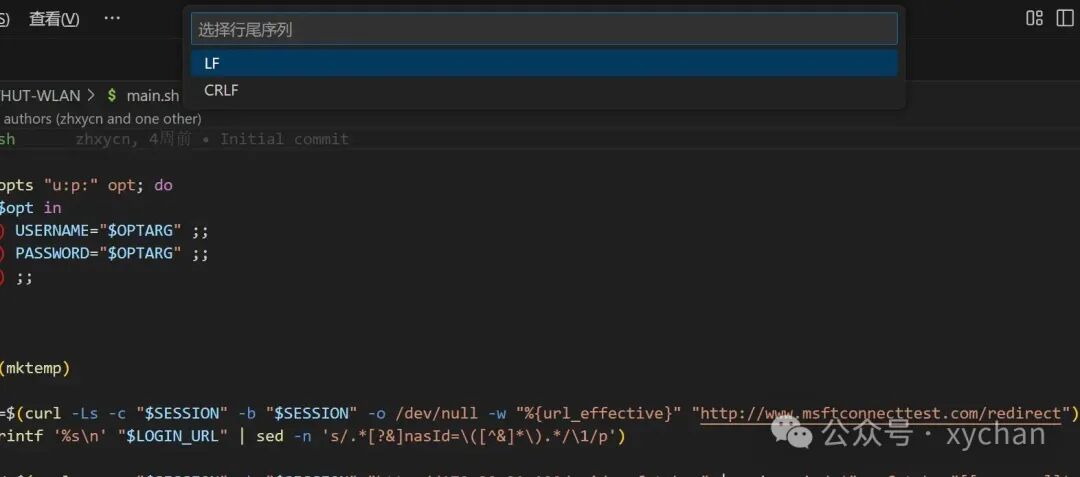
Then you can use cron expressions in the scheduled tasks to configure the script to run at regular intervals.
# Execute the script every 2 minutes
*/2 * * * * (sleep 10; bash /root/main.sh -u 123456 -p 'password')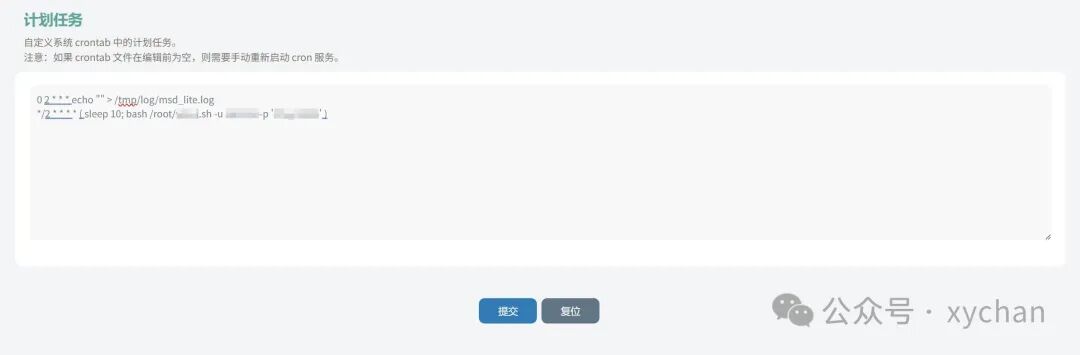
Note that if you have a need for scheduled reboots, be sure to add a <span>sleep</span> command before the <span>reboot</span> command to delay execution. Since the OpenWrt system time is still the reboot time before synchronizing with the NTP server, not adding the <span>sleep</span> command will cause an infinite reboot.
# eg. Reboot once every day at 3:00 AM after a 60-second delay
* 3 * * * sleep 60 && touch /etc/banner && reboot
At this point, you can share the internet costs with your roommates or connect various IoT devices to the internet, enjoy~