To become a qualified interface testing engineer, the study of HTTP/HTTPS protocols must combine “theory + practical application”, which means understanding the essence of the protocol and applying it to real interface testing scenarios (such as request validation, response assertions, and troubleshooting). At the same time, the OSI seven-layer network model is the foundation for understanding the positioning of HTTP/HTTPS, and it is necessary to clarify its development logic and layered significance. The following sections will explain in detail:
1. The “Step-by-Step Method + Practical Examples” for Learning HTTP/HTTPS Protocols as an Interface Testing Engineer
HTTP/HTTPS is the “core carrier” of interface testing (over 90% of interfaces are based on this), and learning should progress from “basic concepts → practical analysis → advanced principles → implementation in testing scenarios,” with examples related to the actual needs of interface testing at each stage.
Stage 1: Solidifying Basic Concepts of HTTP (Understand “What it is” before Testing “If it is Correct”)
Core Objective: Master the “request/response structure, method semantics, status codes, and header fields” of HTTP, and be able to understand the “data interaction logic” of the interface.
1.1 First Learn the “Complete Structure of HTTP Requests/Responses” (Verify the Correctness of Each Part During Testing)
The essence of HTTP is the “text-based interaction protocol between client and server,” where each interface call includes a “request (Request)” and a “response (Response),” with a fixed structure that needs to be understood field by field and verified during testing.
| Structure Part | Core Content | Practical Example in Interface Testing |
|---|---|---|
| HTTP Request | 1. Request Line: <span>Method + URL + Protocol Version</span> (e.g., <span>POST /api/login HTTP/1.1</span>) 2. Request Header: Key-Value Pairs (e.g., <span>Content-Type: application/json</span>) 3. Request Body: Submitted Data (e.g., JSON/Form) |
Example 1: When testing the “login interface,” verify that the request line’s Method is POST (not GET, as GET is not suitable for transmitting passwords). Example 2: Verify that the request header <span>Content-Type</span> matches the backend requirements (if the backend only accepts JSON and the frontend sends <span>application/x-www-form-urlencoded</span>, the interface should return a 415 error). Example 3: Check if the “password” field in the request body is encrypted (test security requirements, as transmitting passwords in plaintext should be flagged). |
| HTTP Response | 1. Response Line: <span>Protocol Version + Status Code + Status Description</span> (e.g., <span>HTTP/1.1 200 OK</span>) 2. Response Header: e.g., <span>Set-Cookie: token=xxx</span> 3. Response Body: Returned Data (e.g., <span>{"code":0,"data":{"token":"xxx"}}</span>) |
Example 1: When testing “invalid password login,” the expected response status code should be 401 (Unauthorized), not 200. Example 2: Check if the response header <span>Access-Control-Allow-Origin</span> includes the frontend domain (test for cross-origin requirements, otherwise the frontend will report a CORS error). Example 3: Verify if the “token” field exists in the response body (subsequent interfaces need to use this Token; if missing, subsequent interfaces cannot be called). |
Practical Tools: Use Postman to construct requests and view the “Headers” and “Body” tabs; use Charles to capture packets and compare whether the “request sent by the client” matches the “expected request by the backend.”
1.2 Thoroughly Understand the “Semantics of HTTP Methods” (Avoid Logical Errors in Interface Design/Testing)
HTTP methods are not “chosen arbitrarily”; they must conform to semantics. During interface testing, it is necessary to verify whether “methods match functionality.” Common methods and testing examples are as follows:
| HTTP Method | Core Semantics | Applicable Scenarios | Practical Example in Interface Testing |
|---|---|---|---|
| GET | Query Resource (Idempotent, Safe) | Query user information, product list | Example: Test the “query user information interface” (<span>GET /api/user/1</span>), calling it three times should return consistent results (idempotency verification); if using GET to transmit a password (<span>GET /api/login?username=test&password=123</span>), a defect should be flagged (unsafe, as the password will be exposed in the URL). |
| POST | Submit Resource (Non-idempotent) | Login, create orders, upload files | Example: Test the “create order interface” (<span>POST /api/order</span>), submitting the same parameters repeatedly should return “order already exists” (non-idempotent, to avoid duplicate creation); if the backend mistakenly designs POST as idempotent (repeated submissions create multiple orders), a defect should be flagged. |
| PUT | Full Update Resource (Idempotent) | Update all user information | Example: Test the “update user interface” (<span>PUT /api/user/1</span>), sending <span>{"name":"new","age":20}</span>, if the user’s original age was 18, it should be updated to 20 (full update, not partial); repeated calls should yield consistent results (idempotent). |
| DELETE | Delete Resource (Idempotent) | Delete orders, delete users | Example: Test the “delete order interface” (<span>DELETE /api/order/1</span>), the first call should return “delete successful,” and the second call should return “order does not exist” (but still idempotent, meaning no error should be reported, status code can be set to 404). |
Key Reminder: During interface testing, if “method semantics do not match” (e.g., using POST to query resources, using GET to create resources), timely communication with developers is necessary to avoid subsequent operational/calling issues.
1.3 Memorize the “Actual Meanings of HTTP Status Codes” (Quickly Locate Interface Issues)
Status codes are the “fault indicators” of interfaces, and during testing, it is necessary to determine the type of issue based on the status code. Common status codes and testing examples are as follows:
| Status Code Category | Typical Status Code | Meaning | Practical Example in Interface Testing |
|---|---|---|---|
| 2xx (Success) | 200 OK | Request Successful | Example: After a successful login, the response status code should be 200, and the response body should contain a token. |
| 4xx (Client Error) | 400 Bad Request | Parameter Error | Example: Test the “create user interface,” not sending the required field “username,” the response should return 400 and indicate “username cannot be empty” (if it returns 500, it indicates a lack of parameter validation on the backend, a defect should be flagged). |
| 401 Unauthorized | Unauthorized (Token Missing/Expired) | Example 1: When calling the “order interface” without sending a Token, it should return 401. Example 2: After the Token expires, calling the interface should return 401 (not 200 with empty data). | |
| 403 Forbidden | Insufficient Permissions | Example: Using a regular user Token to call the “delete all orders interface” (only administrators have permission), it should return 403 (not 401, as 401 means “not authorized,” while 403 means “authorized but no permission”). | |
| 404 Not Found | Resource Not Found | Example: Calling <span>GET /api/user/999</span> (user ID 999 does not exist) should return 404 (not 500 or 200). |
|
| 5xx (Server Error) | 500 Internal Server Error | Server Internal Error | Example: When testing the “create order interface,” sending valid parameters but returning 500, assistance is needed to check the service logs (e.g., null pointer, SQL syntax error). |
| 503 Service Unavailable | Service Unavailable (Overload/Maintenance) | Example: Using JMeter to stress test the “product interface,” returning 503 when 1000 users are concurrent, indicating insufficient service capacity, should be recorded as a performance defect. |
Practical Skills: If encountering 5xx errors during testing, do not directly flag a defect; first assist developers in locating logs (e.g., check Java Exceptions, Python Tracebacks) to confirm it is a “server bug” rather than a “client parameter issue.”
Stage 2: Practical Analysis of HTTP Traffic (Using Packet Capture Tools to Understand Real Interface Interactions)
Understanding theory alone is not enough; it is necessary to analyze “real HTTP requests in real scenarios” using packet capture tools (Charles/Fiddler) to master the actual interaction logic of interfaces, as illustrated below:
Case Study: Packet Capture Analysis of the “E-commerce Ordering Process” HTTP Requests
- Preparation: Open Charles, configure mobile proxy (mobile connects to computer WiFi, proxy IP = computer IP, port = 8888), open the e-commerce app.
- Packet Capture Steps:
- Request Line:
<span>POST /api/v1/order HTTP/1.1</span> - Request Header: Same as above (carrying Token)
- Request Body:
<span>{"cartId":5,"addressId":3,"payType":1}</span> - Response Body:
<span>{"code":0,"data":{"orderId":"20240520123456","amount":299.0}}</span>
- Request Line:
<span>POST /api/v1/cart HTTP/1.1</span> - Request Header:
<span>Authorization: Bearer eyJhbGciOiJIUzI1NiIsInR5cCI6IkpXVCJ9...</span>(carrying the Token returned from login) - Request Body:
<span>{"productId":1001,"num":2}</span>
- Request Line:
<span>POST /api/v1/login HTTP/1.1</span> - Request Header:
<span>Content-Type: application/json</span>,<span>User-Agent: Android/10 App/2.0</span> - Request Body:
<span>{"username":"test123","password":"e10adc3949ba59abbe56e057f20f883e"}</span>(password MD5 encrypted) - Response Line:
<span>HTTP/1.1 200 OK</span> - Response Body:
<span>{"code":0,"data":{"token":"eyJhbGciOiJIUzI1NiIsInR5cCI6IkpXVCJ9...","expire":3600}}</span>
- First Step: Click the “Login” button, Charles captures the login request:
- Second Step: Click “Add to Cart,” capture the cart request:
- Third Step: Click “Checkout,” capture the order request:
- Verify “Token Transmission”: The cart and order interfaces must carry the Token returned from login; if not carried, it should return 401 (can manually modify the Charles request, delete the Authorization header, and test this scenario).
- Verify “Parameter Correlation”: The order request’s
<span>cartId=5</span>should come from the cart interface’s return (can check the cart response body to confirm if cartId is 5); if a non-existent cartId is transmitted, it should return 400.
Stage 3: In-Depth Understanding of HTTPS Principles (Solving “Encryption and Packet Capture” Issues in Testing)
HTTPS is HTTP + SSL/TLS, with the core being “encrypted transmission.” During interface testing, it is necessary to address “HTTPS packet capture decryption” and “SSL-related issues,” with the learning path as follows:
- Handshake Phase: The client and server negotiate encryption algorithms (e.g., AES), exchange public keys, and verify the server certificate (to ensure it is the real server).
- Session Key Generation: The client encrypts the “pre-master key” with the server’s public key, and the server decrypts it with its private key, both parties generate a “session key” based on the pre-master key (symmetric encryption key).
- Data Transmission: Subsequent HTTP data is transmitted using the session key (symmetric encryption, fast).
Interface Testing Relevance: If the server certificate is invalid (e.g., self-signed certificate), the client will prompt “not secure.” During testing, it is necessary to confirm whether it is a “self-signed certificate allowed in the test environment” to avoid online risks.
3.2 Practical: HTTPS Packet Capture Decryption (Using Charles as an Example)
During interface testing, HTTPS is encrypted by default, and packet capture will show “garbled text.” It is necessary to configure certificate decryption, with steps and examples as follows:
- Computer Certificate Configuration:
- Open Charles, click
<span>Help > SSL Proxying > Install Charles Root Certificate</span>. - Windows: Import the certificate into “Trusted Root Certification Authorities” (otherwise the system will not recognize the certificate).
- macOS: Find “Charles Proxy Custom Root Certificate” in “Keychain Access,” double-click to set it to “Always Trust.”
- Connect the mobile to the computer’s WiFi, set the proxy to “computer IP:8888.”
- Access
<span>http://chls.pro/ssl</span>in the mobile browser, download and install the Charles certificate (iOS needs to enable trust in “Settings → General → About → Certificate Trust Settings”).
- Open the mobile app, call the “login interface” (HTTPS), and check the request body/response body in Charles. If plaintext can be seen (e.g.,
<span>{"username":"test"}</span>), decryption is successful.
Common Issues Examples:
- Issue 1: Still cannot capture HTTPS plaintext after installing the certificate on the mobile? → Reason: The app has enabled “SSL Pinning” (certificate binding, only trusts the certificate built into the app). Solution: Use the Frida tool to hook around SSL Pinning (e.g., execute
<span>frida -U -f com.xxx.app -l sslpinning-bypass.js --no-pause</span>). - Issue 2: Cannot capture HTTPS with Chrome? → Reason: Chrome’s restrictions on self-signed certificates. Solution: Access
<span>chrome://flags/#allow-insecure-localhost</span>, enable “Allow invalid certificates for resources loaded from localhost.”
3.3 Key Testing Scenarios for HTTPS
| Testing Scenario | Testing Method | Example |
|---|---|---|
| Certificate Validity | Call the interface with an expired/forged certificate to see if the connection is refused | Example: Modify the Charles certificate’s expiration date, call the interface, and it should return a “certificate expired” error (e.g., Chrome prompts “NET::ERR_CERT_DATE_INVALID”). |
| Encryption Algorithm Compatibility | Call the interface with different browsers (Chrome/Firefox) to see if the negotiated encryption algorithms are consistent | Example: Chrome negotiates AES-256-GCM, Firefox negotiates AES-128-GCM, both should communicate normally (if a certain browser cannot connect, it indicates encryption algorithm incompatibility). |
| Downgrade Attack Protection | Force the client to use HTTP connection to see if it redirects to HTTPS | Example: Call <span>http://api.xxx.com/login</span>, it should return a 301 redirect to <span>https://api.xxx.com/login</span> (if it directly returns 200, it indicates no downgrade protection, a defect should be flagged). |
Stage 4: Designing Test Cases Based on Interface Testing Scenarios (Implementing HTTP/HTTPS Knowledge)
The ultimate goal of learning is to “design effective test cases.” Below are examples of test case designs based on HTTP/HTTPS:
| Test Type | Test Case | Expected Result |
|---|---|---|
| Request Method Verification | Use GET to call the “create order interface” (should be POST) | Return 405 Method Not Allowed (method not allowed) |
| Request Header Verification | Call the “upload file interface” without sending <span>Content-Type: multipart/form-data</span> |
Return 415 Unsupported Media Type (unsupported media type) |
| Token Verification | 1. Call the “order interface” without sending Token2. Call with expired Token3. Call with forged Token | 1. Return 4012. Return 401 (indicating Token expired)3. Return 401 (indicating Token invalid) |
| HTTPS Encryption Verification | Check the “Cipher Suite” of the HTTPS request during packet capture | The encryption suite should be strong (e.g., TLS_AES_256_GCM_SHA384, not weak encryption TLS_RSA_WITH_AES_128_CBC_SHA) |
| Idempotency Verification | Repeatedly call the POST type “create user interface” (send the same parameters) | The first call returns 200 (created successfully), the second and subsequent calls return 400 (indicating “user already exists”). |
2. The Development of the OSI Seven-Layer Network Model (Understanding the “Positioning” of HTTP/HTTPS)
To deeply understand HTTP/HTTPS, it is necessary to know their position in the “network protocol stack,” and the OSI seven-layer model is the “theoretical standard” for network layering. Its development history and layering logic are as follows:
1. Background of the Development of the OSI Seven-Layer Model
- Origin: In the 1970s, computer network vendors (such as IBM, DEC) each developed proprietary protocols, leading to incompatibility between devices from different vendors (e.g., IBM’s SNA protocol and DEC’s DNA protocol were incompatible). To solve the “compatibility issue,” the International Organization for Standardization (ISO) released the “Open Systems Interconnection Reference Model” (OSI/RM) in 1984, which is the OSI seven-layer model.
- Goal: To divide the network communication process into 7 independent layers, each responsible for specific functions, with layers communicating through “interfaces.” Vendors only need to follow the standards of each layer to achieve device interoperability.
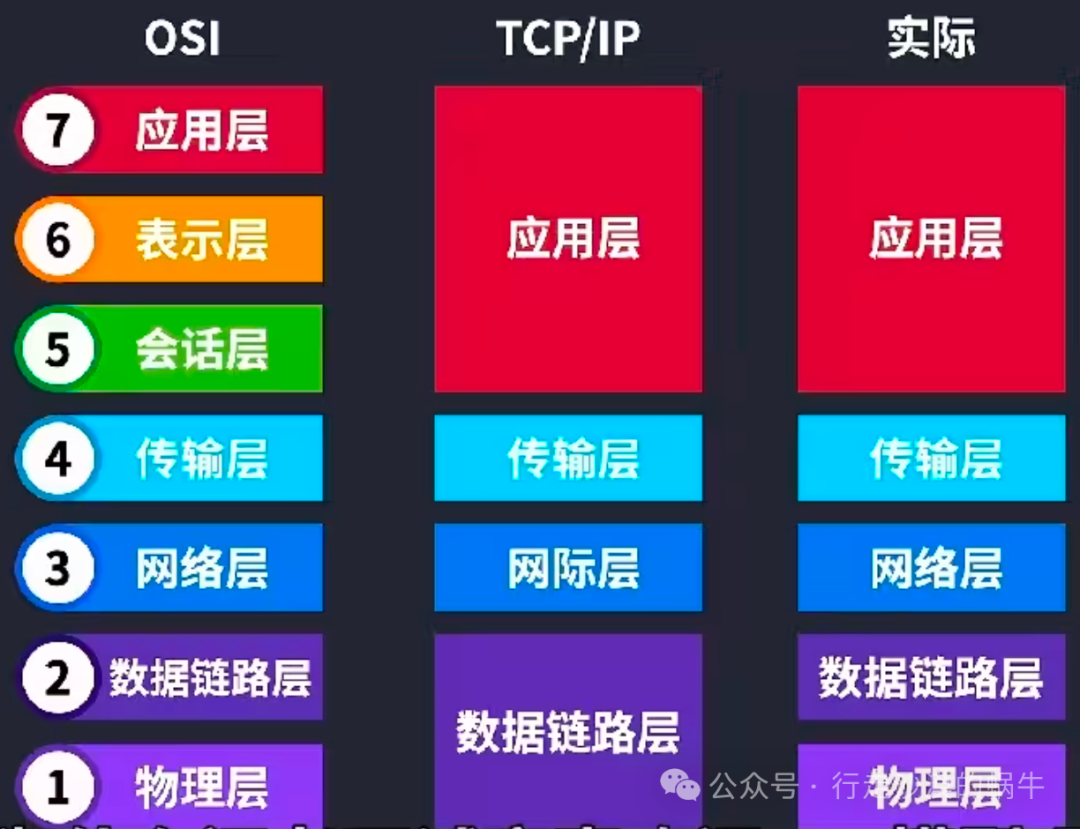
- Current Development: The OSI seven-layer model is rarely fully adhered to in practical applications due to “overly detailed layering and complex implementation”; instead, the “TCP/IP four-layer model” (application layer, transport layer, network layer, network interface layer) is used. However, the “layering concept” of OSI remains central to understanding network protocols (e.g., HTTP at the application layer, TCP at the transport layer).
2. Layering and Functions of the OSI Seven-Layer Model (in Relation to HTTP/HTTPS)
| Layer (from bottom to top) | Layer Name | Core Function | Typical Protocols/Devices | Relation to HTTP/HTTPS |
|---|---|---|---|---|
| Layer 1 | Physical Layer | Transmits bit streams (0/1), handles physical media (network cables, WiFi) | Ethernet, USB, Fiber Optics | The data of HTTP/HTTPS will ultimately be converted into bit streams for transmission at the physical layer. If there is a failure at the physical layer (e.g., cable disconnected), the interface will indicate “network unreachable.” |
| Layer 2 | Data Link Layer | Encapsulates into frames, handles MAC addresses (device physical addresses), error checking | Ethernet Frames, ARP Protocol, Switches | When the client communicates with the server, it needs to obtain the other party’s MAC address through ARP (e.g., “My IP is 192.168.1.100, what is the corresponding MAC?”). A failure at the data link layer (e.g., MAC address conflict) will cause the interface to time out. |
| Layer 3 | Network Layer | Handles IP addresses, routing (determines the path data takes) | IP Protocol, ICMP Protocol, Routers | HTTP/HTTPS requests need to find the server through IP addresses (e.g., <span>api.xxx.com</span> resolves to <span>10.0.0.5</span>), a failure at the network layer (e.g., incorrect IP address, unreachable route) will return “request timed out.” |
| Layer 4 | Transport Layer | Provides end-to-end communication, handles port numbers, ensures reliable data transmission | TCP Protocol (reliable), UDP Protocol (unreliable) | HTTP is based on TCP, and HTTPS is also based on TCP (first establishing a TCP connection, then performing SSL handshake); a failure at the transport layer (e.g., server ports 80/443 not open) will lead to “connection refused” (telnet test <span>telnet api.xxx.com 443</span><code><span> will indicate “Connection refused”).</span> |
| Layer 5 | Session Layer | Establishes, manages, and terminates sessions (e.g., TCP’s three-way handshake/four-way handshake) | SSL/TLS session management, RPC Protocol | HTTPS’s SSL session management (e.g., session reuse to avoid repeated handshakes) belongs to session layer functions; “session timeout” in interface testing (e.g., no operation for 30 minutes after login, Token expires) is related to the session layer. |
| Layer 6 | Presentation Layer | Data format conversion, encryption/decryption, compression/decompression | SSL/TLS Encryption, JSON/XML Parsing, JPEG Compression | HTTPS’s SSL/TLS encryption (encrypting HTTP plaintext into ciphertext) belongs to presentation layer functions; “response data format error” in interface testing (e.g., backend returns XML, frontend expects JSON) is a presentation layer issue. |
| Layer 7 | Application Layer | Provides specific application services (user-visible functions) | HTTP, HTTPS, FTP, DNS, SMTP | HTTP/HTTPS directly belong to the application layer and are the core objects of interface testing (e.g., “login interface,” “order interface” are services at the application layer). |
3. Comparison of the OSI Seven-Layer Model and TCP/IP Four-Layer Model (Practical Application)
Due to the complexity of the OSI seven layers, the “TCP/IP four-layer model” (proposed by ARPA in 1980, earlier than OSI) is used in actual networks, with the correspondence as follows:
| OSI Seven-Layer Model | TCP/IP Four-Layer Model | Core Protocols/Functions |
|---|---|---|
| Application Layer, Presentation Layer, Session Layer | Application Layer | HTTP, HTTPS, FTP, DNS (merging three layers’ functions) |
| Transport Layer | Transport Layer | TCP, UDP |
| Network Layer | Network Layer | IP, ICMP |
| Data Link Layer, Physical Layer | Network Interface Layer (Link Layer) | Ethernet, WiFi, ARP (merging two layers’ functions) |
Focus Points for Interface Testing Engineers:
- When locating interface issues, one can use “layered troubleshooting”: Example: Interface timeout → first check the physical layer (is the cable plugged in?) → data link layer (is there a MAC address conflict?) → network layer (is the IP reachable? Use
<span>ping api.xxx.com</span>) → transport layer (is the port open? Use<span>telnet api.xxx.com 443</span>) → application layer (is the HTTP request correct? Use Postman to replay). - Understand the dependencies of HTTP/HTTPS: HTTP relies on TCP (transport layer), HTTPS relies on TCP + SSL/TLS (transport layer + presentation layer/session layer). If the TCP connection fails to establish (e.g., three-way handshake times out), HTTP requests cannot be sent at all.
3. Recommended Learning Resources for HTTP/HTTPS (Exclusive for Interface Testing Engineers)
- Theoretical Learning:
- Books: “HTTP: The Definitive Guide” (in-depth principles, suitable for advanced learners), “Illustrated HTTP” (rich in illustrations, suitable for beginners).
- Official Documentation: MDN HTTP Documentation (the most authoritative HTTP reference, including practical cases), RFC 2616 (HTTP/1.1 standard document, suitable for in-depth details).
- Packet Capture: Charles (easy to use), Wireshark (low-level protocol analysis, such as TCP handshake).
- Debugging: Postman (interface debugging), curl (command-line debugging, e.g.,
<span>curl -v https://api.xxx.com/login -d '{"username":"test"}'</span>).
- Practice with “Public APIs”: GitHub API (e.g.,
<span>GET https://api.github.com/users/octocat</span>), JSONPlaceholder (simulated REST API). - Set Up Local Services: Write a simple login interface using Python’s Flask framework (
<span>@app.route('/login', methods=['POST'])</span>), then test it using Postman/Charles.
Conclusion
The core logic for interface testing engineers to learn HTTP/HTTPS is: “First understand the theory (structure, methods, status codes) → then practice (packet capture, decryption, debugging) → finally implement testing (design test cases, locate issues)”, with each stage combined with “actual scenarios of interface testing” (such as Token verification, idempotency testing, SSL packet capture) to avoid “learning without application.”
Moreover, the study of the OSI seven-layer model focuses on understanding the “layering concept” and the “positioning of HTTP/HTTPS,” which can help you quickly locate “which layer has an issue” when encountering interface problems (such as timeouts, encryption failures), rather than blindly troubleshooting.