“ Nvidia launched a development board priced at only $99 at this year’s GTC – the Jetson Nano. This article will introduce how to get started with it, including the first boot, installing system packages, configuring the Python development environment, installing Keras and TensorFlow, modifying the default camera, and running classification and object detection tasks. I hope you can avoid some pitfalls after reading this. ”
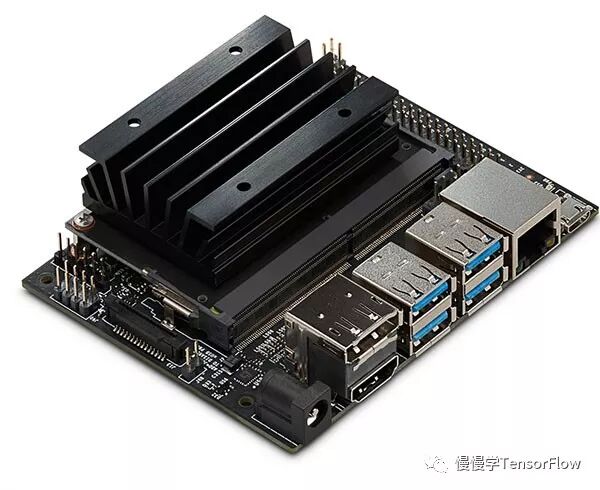
The Jetson Nano is an edge AI development board with 472 GFLOPS of half-precision computing power, equipped with 128 Maxwell architecture CUDA cores. The appearance of the board is shown in the figure below:
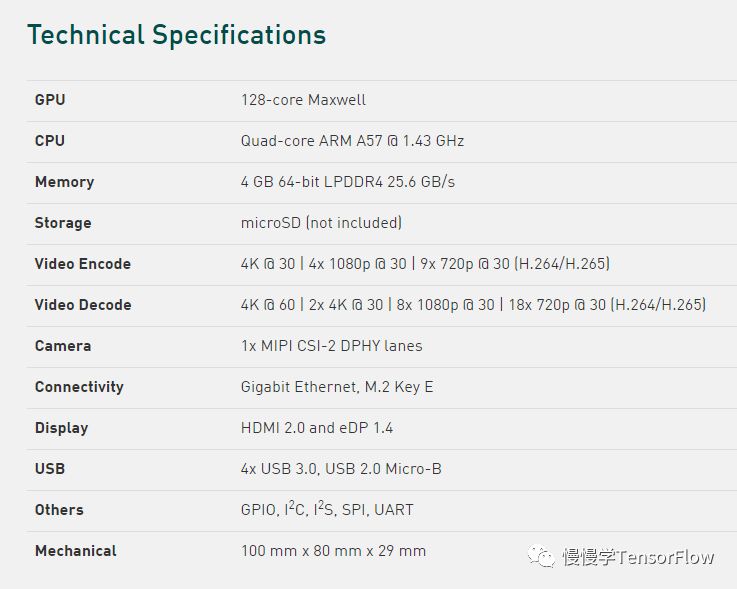
Hardware data sheet:
In terms of resources, it is a stripped-down version of the Jetson TX1, with not many highlights. The main advantage is its low price, making it a decent option among development boards under a thousand yuan.
Recently, a foreign developer, Adrian Rosebrock, got his hands on the Jetson Nano board and tested it immediately, running through the complete process. The following steps are extracted from his notes. Click the “original link” to view his original article. Friends in China who ordered from a certain treasure have yet to receive their shipment, so those who have the board can verify whether the steps in this article are smooth.
01
—
Preparation
Before starting, you need to prepare the following three items:
-
A Micro-SD card with a capacity of at least 16 GB, preferably 32 GB;
-
A 5V 2.5A Micro USB power supply;
-
An Ethernet cable (complaining here, since it claims to be an IoT and edge computing device, why is there no WiFi interface?!);
02
—
Flashing the OS
After obtaining the board, you need to flash the OS before you can install software and run demos. We need to download the Jetson Nano development kit SD card image from Nvidia’s official website. The compressed image package is about 5 GB, and after extraction, it is 12 GB, which is why a Micro-SD card of at least 16 GB is required; otherwise, flashing may fail. Image link:https://developer.nvidia.com/embedded/dlc/jetson-nano-dev-kit-sd-card-image
After downloading and extracting, you can use the dd command on Linux to write the img file to the SD card. The steps for Windows and MacOS are different; please refer to the official link for details:https://developer.nvidia.com/embedded/learn/get-started-jetson-nano-devkit#write
03
—
First Boot
Insert the Micro-SD card into the socket. The socket is located under the heat sink, as shown in the image (complaining here, this place is really hard to find).

After inserting the SD card, connect the power supply, Ethernet cable, and monitor, and power on the board. The specific operation steps are:

After a while, the following screen will appear:
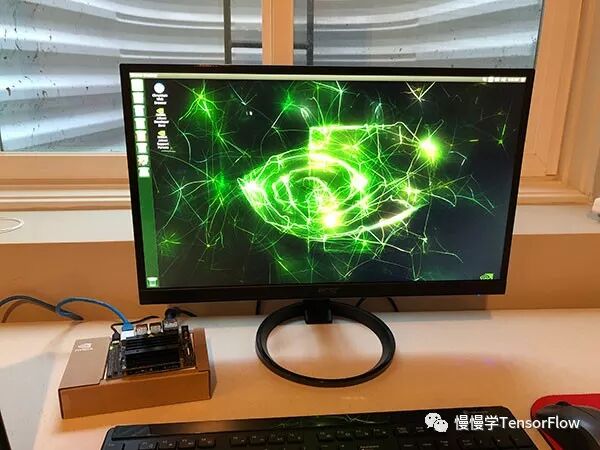
Seeing the desktop indicates a successful boot.
04
—
Installing Software
First, install the basic tools and libraries (ensure a smooth network connection):
|
1 2 3 4 |
$sudo apt–getinstall git cmake $sudo apt–getinstall libatlas–base–dev gfortran $sudo apt–getinstall libhdf5–serial–dev hdf5–tools $sudo apt–getinstall python3–dev |
Configure the Python environment (pip, virtualenv):
|
1 2 3 |
$wget https://bootstrap.pypa.io/get–pip.py $sudo python3 get–pip.py $rmget–pip.py |
Using virtualenv has the benefit of keeping our development environment separate from other system environments.
|
1 |
$ sudo pip install virtualenv virtualenvwrapper |
Edit ~/.bashrc and add the following content at the end:
|
1 2 3 4 |
# virtualenv and virtualenvwrapper export WORKON_HOME=$HOME/.virtualenvs export VIRTUALENVWRAPPER_PYTHON=/usr/bin/python3 source /usr/local/bin/virtualenvwrapper.sh |
Run the following command to make the settings effective:
|
1 |
$source ~/.bashrc |
Now you can run the mkvirtualenv command to create a virtual Python environment. The following command creates a virtual environment named deep_learning with the Python3 interpreter:
|
1 |
$mkvirtualenv deep_learning –ppython3 |
Run the workon command to activate the virtual environment created above:
|
1 |
$ workon deep_learning |
Install Numpy in the virtual environment:
|
1 |
$pip install numpy |
When installing TensorFlow, do not use pip install tensorflow-gpu; Nvidia provides a pre-compiled TensorFlow for Jetson Nano. Run the following command:
|
1 |
$pip install —extra–index–url \ |
Finally, install scipy and Keras, the steps are the same as on x86 platforms:
|
1 2 |
$pip install scipy $pip install keras |
05
—
Running the Demo
We can compile and install the Jetson Inference Engine on Jetson Nano using the following commands:
|
1 2 3 4 5 6 7 8 |
$git clonehttps://github.com/dusty–nv/jetson–inference $cdjetson–inference $git submodule update —init $ mkdir build $ cd build $ cmake .. $ make $ sudo make install |
Note that the cmake stage will download several GB of model files, so ensure that there is enough space on the SD card; 32 GB is a safe bet.
When using the Jetson Nano camera, you have two options:
-
CSI camera module (you can directly use the Raspberry Pi camera module, as the interface is compatible);
-
USB webcam (this article uses this);
The compiled Jetson Inference Engine has several examples located in jetson-inference:
-
detectnet-camera: Object detection example using camera input;
-
detectnet-console: Object detection example using image input;
-
imagenet-camera: Image classification example using camera input;
-
imagenet-console: Image classification example using image input;
-
segnet-camera: Semantic segmentation example using camera input;
-
segnet-console: Semantic segmentation example using image input;
In addition, there are other examples, such as depth map estimation and image super-resolution.
In each example code, the DEFAULT_CAMERA value of -1 indicates using the CSI camera module, changing it to 0 indicates using the USB camera. After modification, recompilation is required:
|
1 2 3 |
$cd../build $make $ sudo make install |
After compilation, you can find the executable programs of the examples in the aarch64/bin directory. Just run them directly.
In practical tests, image classification at an input resolution of 1280×720 achieved a speed of 10 FPS, while object detection reached 5 FPS. This performance is quite acceptable.
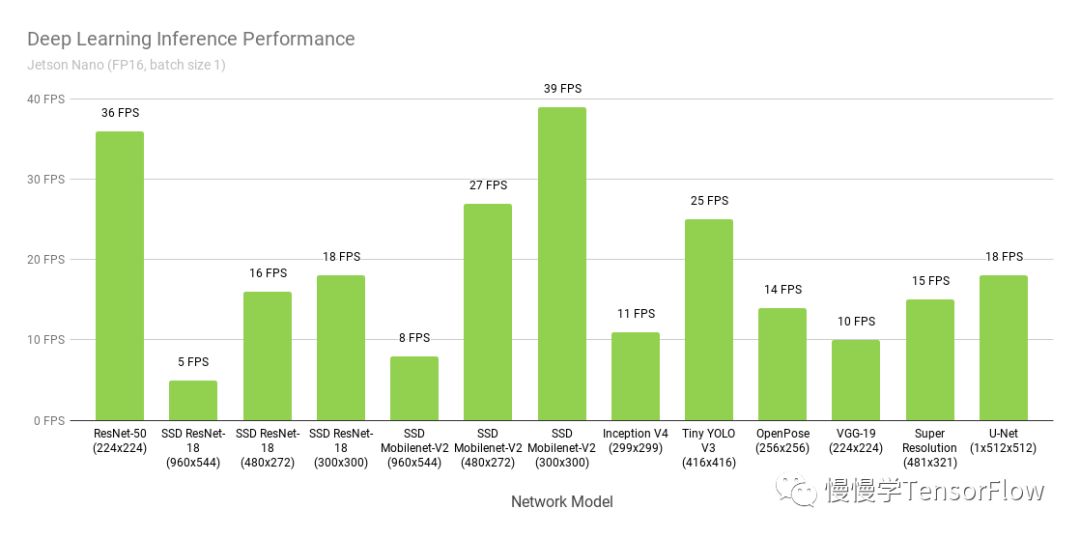
The performance of the Jetson Nano as provided by Nvidia is shown in the figure below:
If you do not have the board yet, you can visit the Nvidia official link for more purchasing information:
https://developer.nvidia.com/embedded/buy/jetson-nano-devkit