Author of this article:

Reprinted from:
https://medium.com/swlh/nvidia-jetson-nano-custom-object-detection-from-scratch-using-tensorflow-and-opencv-113fe4dba134

The purpose of this blog is to guide users in creating a custom object detection model optimized for performance to be used on the NVidia Jetson Nano.

Table of Contents:
-
Required Materials
-
Creating a Custom Dataset
-
Preprocessing
-
Labeling
-
Creating TFRecords
-
CNN
-
Training
-
Model
-
Installing Raspberry Pi Camera on Jetson Nano
-
Conclusion
Required Materials:
-
TensorFlow
-
OpenCV
-
Jupyter Notebook
-
Jetson Nano Developer Kit
-
Raspberry Pi V2 Camera
-
Python
Selection Criteria
We chose Python as the development language because it supports a large number of libraries for data processing and is easy to integrate with TensorFlow. It is also a powerful scripting tool that helps automate tedious tasks. Additionally, all object detection architectures discussed in this blog provide practical Python scripts.
TensorFlow, as a well-known framework for deep learning applications, is a great choice for exploration and learning. It offers excellent documentation and many examples available online.
Based on our experience from previous projects, OpenCV has proven to be a great image processing library. It is very useful in the development described in this blog as it aids in image retrieval and processing on the Jetson Nano using the Raspberry Pi V2 camera.
That said, let’s get started!
Creating a Custom Dataset
The first thing we need to do for custom object detection is to create our own dataset. The neural network to be trained will require several images of the objects to be detected in different locations, under different conditions, and with different backgrounds.
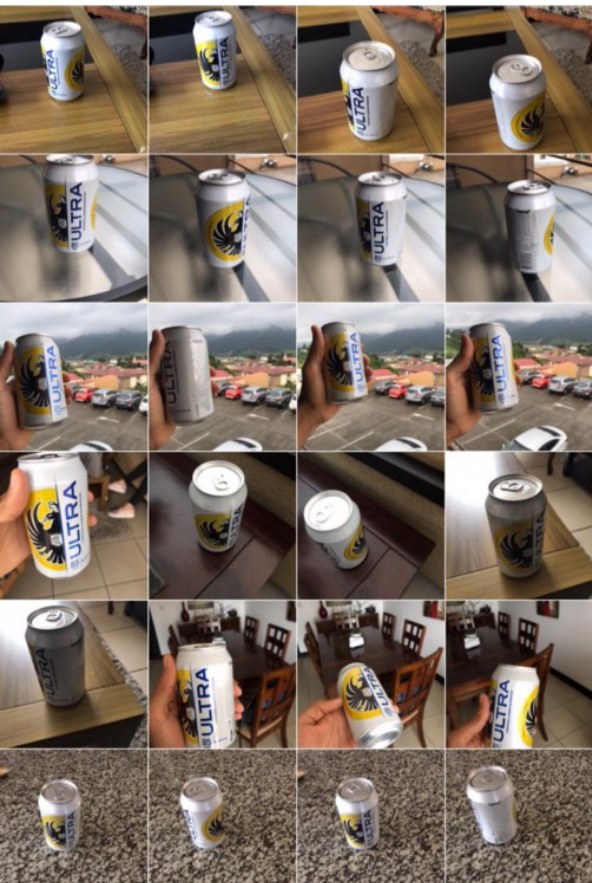
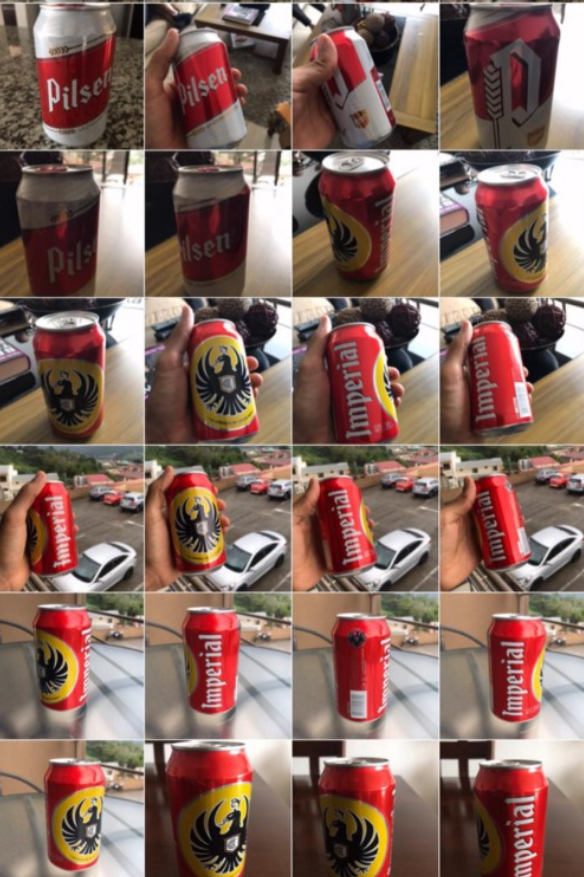
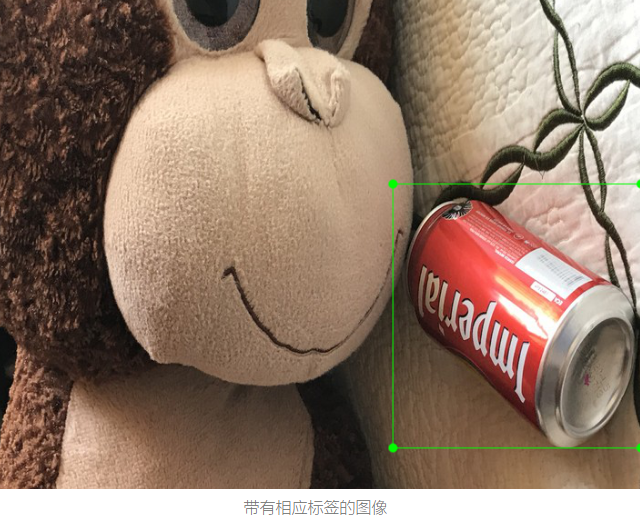
For example, we decided to detect some of the most popular beers in Costa Rica, such as Imperial, Pilsen, and Bohemia. After a quick visit to the supermarket, we purchased six different brands of beer and took 140 photos of each. Here are some examples of our images:
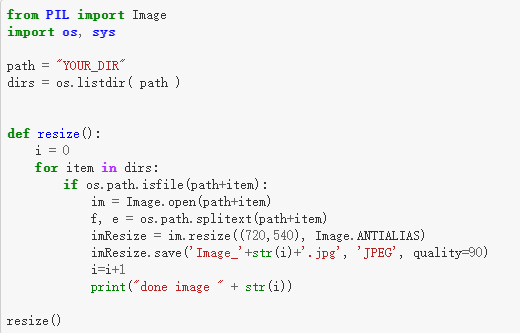
Now that we have an excess of images (840 in this case), we need to prepare them for training our custom model. Currently, their resolution is too high for effective use, so we choose to resize them to a smaller resolution.
Do not do this manually; you can use the code provided below to resize all images in the folder. Feel free to change the height and width specified in the script, but keep in mind: the larger the images, the more computation is required for training.
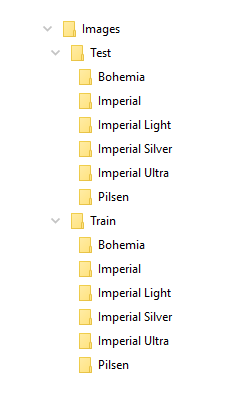
Now, we need to group the images based on their categories. By creating a “train and test” folder containing all categories, we can go further.
Labeling
With the image sizes adjusted accordingly, we now need to label them. In this activity, we display each image one by one and indicate the coordinates of the objects we want to detect along with their corresponding labels.
We used the open-source tool LabelImg to simplify this process.
You can download it from https://tzutalin.github.io/labelImg/.
At the end of this process, you should have each image with its corresponding label, as well as an xml file containing all metadata with the object locations.
Creating TFRecords
After labeling the images for different categories, the next step is to separate them into one group for training and another for testing. In this case, we will separate the images and their corresponding .xml files into different folders. The split will be 80/20, meaning 80% of the images will go into the Train folder, and the remaining 20% will go into the Test folder.
Now we need to create TFRecords! These files will contain all the necessary information to train the neural network, including the images. If you want to learn more about TFRecords, you can search for more details.
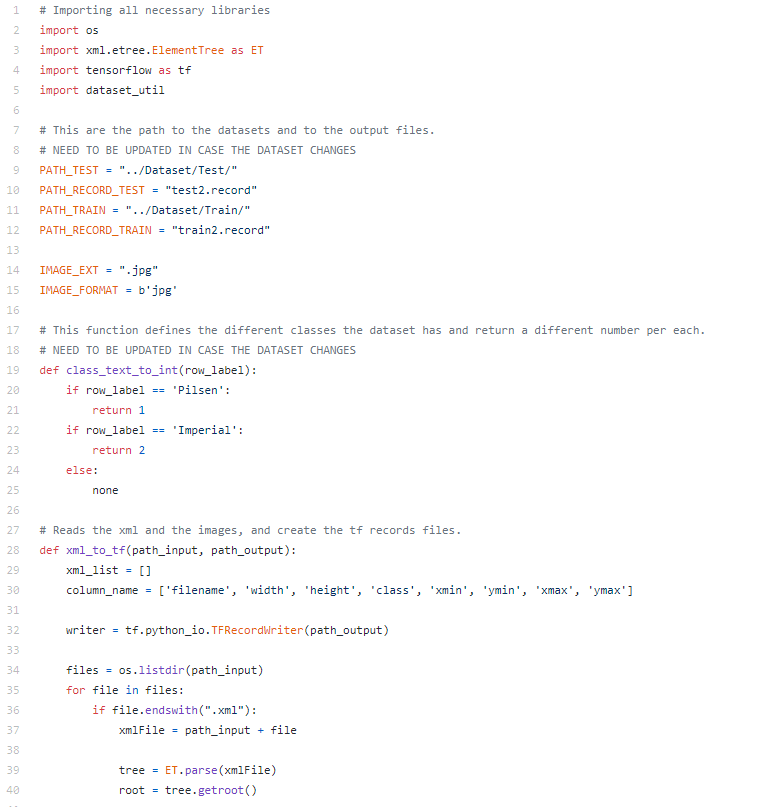
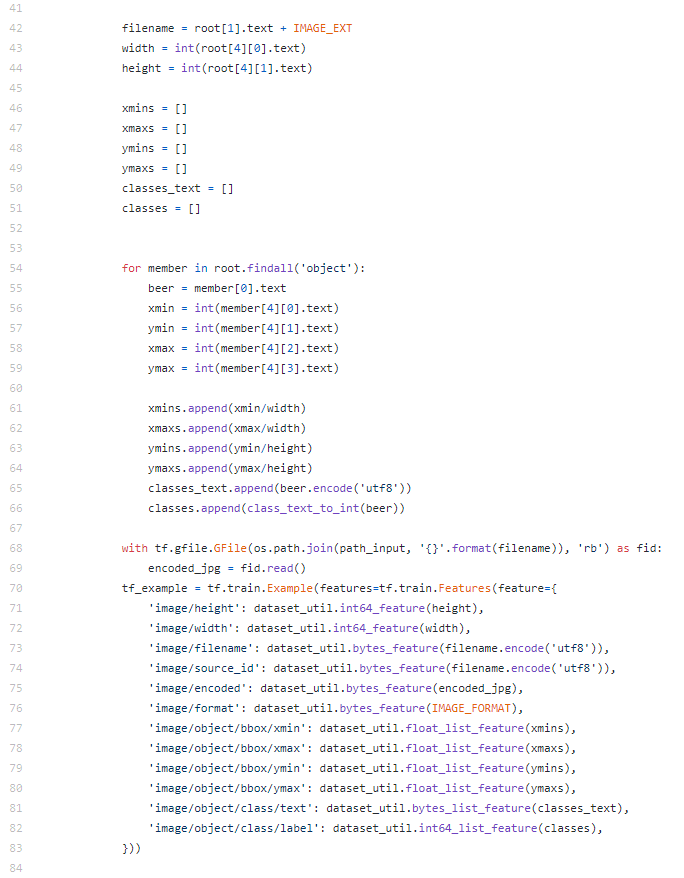
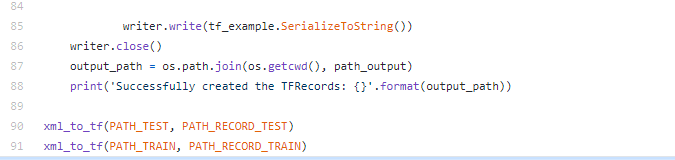
We created a script to generate the TFRecords for us. To use the python script, you only need to make two changes: the variable PATH_* and the function class_text_to_int. The PATH_* variable should point to the dataset and output files (.record) for the training and testing folders. The class_text_to_int() function is meant to convert the classes of the dataset into a number, so you need to sum all the labels created for the images.
CNN
Now, you can create the desired CNN model in any style you want. You can even use some of the model configurations provided by TensorFlow, many of which are suitable for object detection: TensorFlow CNN models.
In our case, we used two different models. First, we tried ssd_inception_v2_coco, and then we tried ssdlite_mobilenet_v2_coco. They exhibited different performance and accuracy. We will discuss the trade-offs later in this blog. First, let’s discuss how to configure everything during the training phase.
We recommend creating a new training folder. In it, you will need to place the TFRecords, model.config (the one you created or downloaded from TensorFlow CNN Models), and the label map.
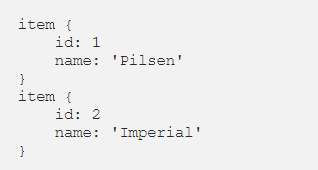
Yes, we haven’t talked about the label map yet. But it’s easy; just create a new file in the following format containing the label names and their numeric IDs. This should map to the IDs specified in the Python script to create the TFRecord.
Now, we need to change some fields on the model.config you selected:
First, change the variable num_classes to match the correct number of classes for the selected dataset.

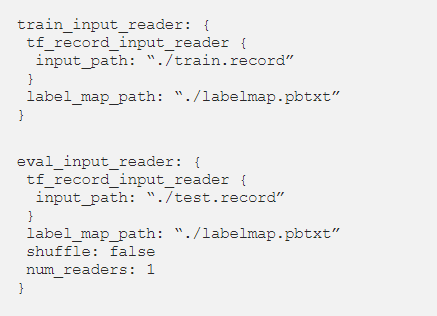
Additionally, find the train_input_reader and eval_input_reader tags and change the input paths. These paths should point to the train.record and test.record files you created. Also, the label_map_path should point to the location of the label map.
These specific changes are mandatory, but we also made other changes to the model to improve performance and customize it for our convenience, as described below.
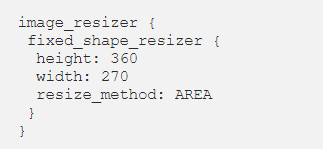
First, we set the image size to a fixed lower resolution (360, 270):
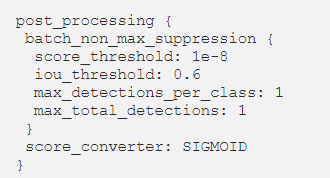
Additionally, we reduced the maximum number of detections per image from 1000 to 1, simplifying the training.
After that, we also changed the fine_tune_checkpoint tag to point to the model of your choice:

Training
Once the configuration file is ready, you can start training the neural network! To do this, you can issue the following command:

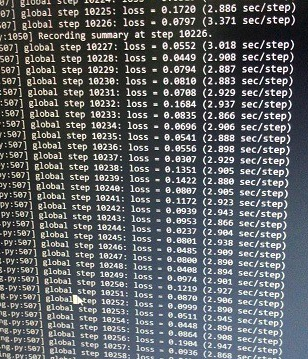
We recommend using TensorBoard to track the training progress.

We trained our model on a basic laptop equipped with an 8th generation Intel i5 and no GPU, taking about 20 hours to reach a reasonable total loss.

Once training is complete, you can create a .pb file that will be used as input in the Jetson Nano to load the model into the Tensor Graph.

Do not drink beer during training. You will need them later.
Model
As mentioned earlier, we tried two different models. The first was SDD Inception V2. This model suggests using multiple operations on each layer instead of just one, and then concatenating the results. Typically, on one layer, we choose to perform fixed-size filters (1×1, 3×3, or 5×5), max pooling layers, or other operations. On the other hand, in the Inception model, we will use all these models on a single layer. With the latter, better accuracy scores can be achieved, and the accuracy scores for detecting all different beer brands ranged from 85% to 95%. Achieving this accuracy does not require an excessive amount of time (relatively) to train the neural network, taking about 12 hours.
The second model used was SSD Lite Mobilenet V2. This model was created to run on mobile devices; it splits all convolutions into different sub-libraries. Ultimately, its functionality is roughly the same as traditional convolutions but faster. For SSD Lite Mobilenet V2, the achieved accuracy ranged from 60% to 85%. To achieve this accuracy, it was necessary to train the neural network for about 20 hours. Additionally, we decided to reduce the number of classes from 2 to 2 to decrease training time and simplify the model.
Which model should you choose? Well, choosing the SDD Inception V2 model is obvious as it shows the best performance. However, keep in mind that if you want to run the model on the Jetson Nano, several factors need to be considered.
Compared to SSD Lite Mobilenet V2, SDD Inception V2 requires more RAM to operate. Based on our experience, the Jetson Nano cannot even run the SDD Inception V2 model as it crashes in most cases when memory runs out. When the application can run, the best performance on the image display is about 0.9 FPS. Meanwhile, the performance of SSD Lite Mobilenet V2 is about 9 FPS. Therefore, we decided to stick with the SSD Lite Mobilenet V2 architecture instead of the SDD Inception V2.
Raspberry Pi V2 Camera with Jetson Nano
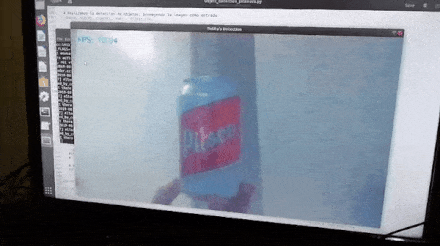
Connecting the Raspberry Pi camera to the Jetson Nano using the Jetson Nano Developer Kit is not a big deal, as the necessary drivers are already installed. Thus, by using the CSI-Camera GitHub repository, we can easily access the camera since NVidia’s Jetson Nano supports MIPI and CSI cameras.
After loading the trained model into the TensorFlow Graph, we retrieved a frame from the camera at a time and input it into the TensorFlow Session assigned to the Graph. The prediction results (if any) are overlaid on the frame to be displayed with bounding boxes around the detected objects.
(The code referenced in this section can be found at https://github.com/memillopeloz/JetsonNano-RPICam)
We ran Python’s profiler cProfile on the above script to better understand the time consumption. To obtain a more robust and representative profile, we modified the object detection code to stop itself after processing a fixed number of frames and pointed the camera at a stationary area while profiling; this way, we could obtain profiling results from several runs that truly reflect the impact of code changes.
With the visual aid provided by Python’s pstats, the preliminary results will be presented next. The results are narrowed down to show the top 15 most time-consuming functions.
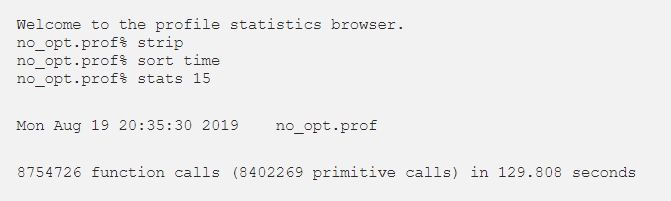
With the results, we can clearly identify that the TensorFlow Session is the main time consumer, so we investigated any possible optimizations that could be applied, likely through parameters. We stumbled upon tf.OptimizerOptions, which may be associated with the configuration of the Session to apply them when constructing the Tensor Graph.
Optimizations were made in the code using tf.GraphOptions, tf.OptimizerOptions, and tf.ConfigProto, as shown in the code snippet below. (For more details on optimization options, see https://github.com/tensorflow/tensorflow/blob/r1.8/tensorflow/core/protobuf/config.proto)

We chose to optimize L1, as it performs common subexpression elimination and constant folding, aiming to reuse precomputed results on certain loop tensor operations. With this in mind, we estimate that using L1 optimization can reduce the overall execution time by at least 15%. The results obtained from analyzing the optimized code are as follows.
This time we chose to display fewer functions:
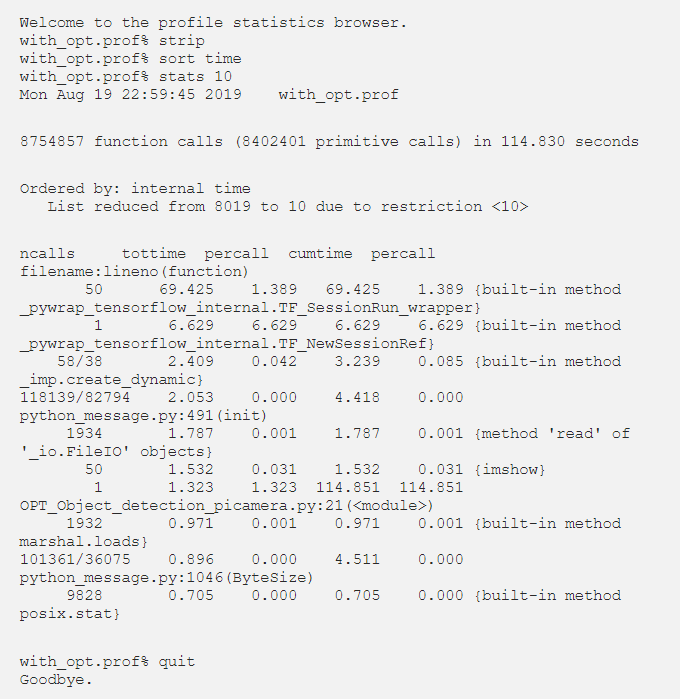
We did manage to reduce the execution time from 129.8 seconds to 114.8 seconds, which overall improved by about 11.55%. It was not as high as initially expected, but it did improve performance. The constant folding optimization function can replace its tensor with constant nodes that can be predetermined, which may be the main reason behind the shown improvement.
Conclusion
Creating our own custom object detection neural network is both fun and challenging. We had to consider the limitations of the hardware (Jetson Nano) that runs the model and modify the model accordingly to maximize performance.
Setting up the right environment is crucial for the smooth execution of the training process and the object detection itself. Most issues encountered are due to incorrect/incomplete setups.
The training phase requires a significant amount of computer resources, especially for highly complex models (like Google’s Inception or MobileNet). Additionally, using dedicated high-end devices can further reduce training time and improve accuracy.
It has been shown that MobileNet is the most efficient architecture for resource-constrained mobile or embedded devices/modules. This is mainly due to memory limitations.
More tutorials:
[Tip Sharing] How to Access Jetson NANO Desktop Remotely from the Internet
[Tip Sharing] Opening Multiple Cameras on Jetson Xavier NX/Jetson NANO Development Kit
[Jetson Nano] Using Nsight to Observe Performance Bottlenecks in TensorFlow Lite Applications